Home>Instruments>Synthesizer>How To Put A Sound Into Es2 Synthesizer In Logic Pro X

Synthesizer
How To Put A Sound Into Es2 Synthesizer In Logic Pro X
Modified: March 5, 2024
Learn how to add a sound to the ES2 synthesizer in Logic Pro X. Enhance your music production skills with this step-by-step guide.
(Many of the links in this article redirect to a specific reviewed product. Your purchase of these products through affiliate links helps to generate commission for AudioLover.com, at no extra cost. Learn more)
Table of Contents
Introduction
Welcome to the exciting world of sound synthesis! In this article, we will explore how to put a sound into the ES2 synthesizer in Logic Pro X. The ES2 synthesizer is a powerful and versatile virtual instrument available in Logic Pro X, offering a wide range of possibilities for creating unique and stunning sounds.
Whether you are a music producer, composer, or simply someone interested in experimenting with sound design, learning how to use the ES2 synthesizer is a valuable skill. By understanding the different components and parameters of the ES2, you can unleash your creativity and bring your musical ideas to life.
In this tutorial, we will guide you through the process of loading a sound into the ES2 synthesizer, modifying it using various oscillators, filters, and effects, and ultimately saving your custom sound for future use. So, let’s dive in and discover the endless sonic possibilities that await us.
Before we begin, it’s important to note that a basic understanding of synthesizers and music production is beneficial. However, even if you are completely new to synthesizers, don’t worry! We will explain each step in a clear and concise manner, ensuring that you grasp the concepts and techniques along the way.
So, grab your headphones and fire up Logic Pro X, because it’s time to embark on a sonic adventure with the ES2 synthesizer!
Step 1: Opening the ES2 Synthesizer in Logic Pro X
The first step in putting a sound into the ES2 synthesizer is to open the instrument in Logic Pro X. Here’s how you can do it:
- Launch Logic Pro X and open the project or create a new one where you want to work with the ES2 synthesizer.
- In the Logic Pro X interface, click on the “Mixer” button to access the mixer window. You can also use the shortcut key ‘X’ to quickly open the mixer.
- In the mixer window, locate the channel strip where you want to add the ES2 synthesizer. Right-click on an empty slot on that channel strip and select “New Software Instrument Track.”
- The ES2 synthesizer will now appear as a new track in your project. Double-click on the ES2 track to open the instrument editor.
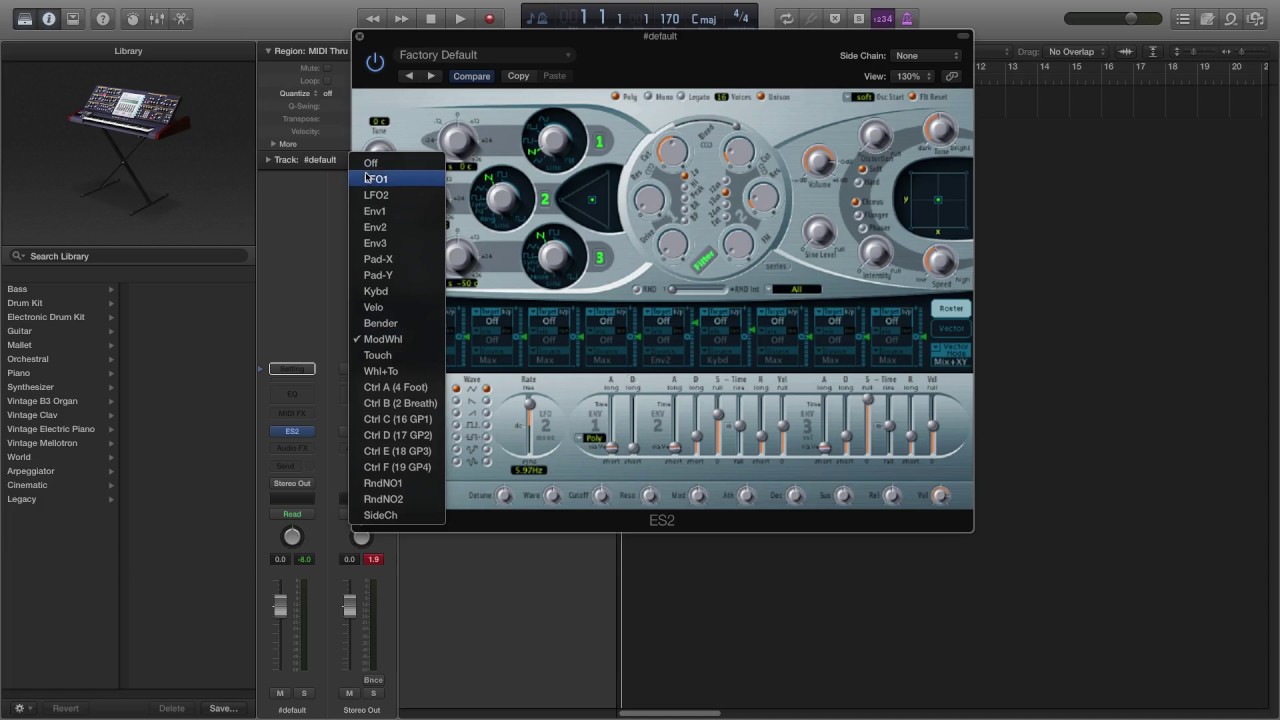
- The ES2 synthesizer interface will now be displayed, showing a series of knobs, buttons, and sliders for controlling various parameters of the sound.
With the ES2 synthesizer now open, you’re ready to dive into the exciting world of sound synthesis and start creating your own unique sounds.
It’s worth mentioning that the ES2 synthesizer offers a wide range of presets that you can choose from. These presets are pre-designed sounds covering different genres and styles. You can explore these presets by clicking on the preset dropdown menu and selecting one that suits your needs. Alternatively, if you want to start from scratch and build your own sound, you can continue to the next step.
Now that you have successfully opened the ES2 synthesizer in Logic Pro X, it’s time to move on to the next step: selecting a sound source.
Step 2: Selecting a Sound Source
Once you have the ES2 synthesizer open in Logic Pro X, the next step is to select a sound source. The sound source is the starting point of your sound and determines the basic waveform that will be used.
To select a sound source in the ES2 synthesizer, follow these steps:
- In the Oscillator section of the ES2 interface, you will see three oscillators labeled Osc 1, Osc 2, and Osc 3. Each oscillator can produce a different waveform or sound source.
- Click on the waveform selector for Osc 1 and choose the sound source you want. The ES2 synthesizer offers a variety of options, including sine, sawtooth, square, triangle, and more.
- Repeat the same process for Osc 2 and Osc 3 if you want to layer multiple sound sources for a richer sound.
Experimenting with different sound sources can lead to a wide variety of sounds. For example, choosing a sine wave will give you a smooth and pure tone, while selecting a square wave will produce a more aggressive and edgy sound. By combining different sound sources, you can create complex and unique sounds that suit your musical vision.
It’s important to note that each oscillator in the ES2 synthesizer has its own set of parameters that can be adjusted. These parameters include pitch, level, fine-tuning, and detuning. By tweaking these settings, you can further shape and manipulate the selected sound sources to create something truly special.
Now that you have selected a sound source in the ES2 synthesizer, it’s time to move on to the next step: modifying the oscillators.
Step 3: Modifying the Oscillators
Once you have selected your sound sources in the ES2 synthesizer, the next step is to modify the oscillators to shape the sound and add more depth and complexity. The ES2 offers a range of parameters that can be adjusted for each oscillator, allowing you to create unique and dynamic sounds.
Here’s how you can modify the oscillators in the ES2 synthesizer:
- Start by selecting the oscillator you want to modify. You can choose between Osc 1, Osc 2, and Osc 3.
- Adjust the pitch of the oscillator using the pitch slider or inputting a specific value. Increasing the pitch will make the sound higher, while decreasing the pitch will make it lower.
- Experiment with the level and balance controls to adjust the volume and relative strength of each oscillator. You can create interesting effects by mixing different levels for each oscillator.
- Use the fine-tuning parameter to make minor adjustments to the pitch, allowing for precise tuning of the sound.
- Explore the detuning function to introduce slight variations in pitch between the oscillators. This can create a thicker, more vibrant sound.
By combining and manipulating the different parameters for each oscillator, you can achieve a wide range of sonic possibilities. Whether you’re looking to create atmospheric pads, punchy basslines, or soaring leads, the options are virtually endless with the ES2 synthesizer.
It’s important to experiment with these parameters and trust your ears. Don’t be afraid to push the boundaries and explore different combinations to discover new and exciting sounds.
Now that you have modified the oscillators in the ES2 synthesizer, it’s time to move on to the next step: adjusting the filters.
Step 4: Adjusting the Filters
Now that you have modified the oscillators and shaped the basic sound in the ES2 synthesizer, the next step is to adjust the filters. Filters play a crucial role in sound synthesis as they allow you to control the frequency content and shape of the sound. By applying different filter settings, you can add warmth, texture, and character to your sound.
Here’s how you can adjust the filters in the ES2 synthesizer:
- In the Filter section of the ES2 interface, you will find two filters labeled Filter 1 and Filter 2. Each filter has its own parameters that can be adjusted.
- Start by selecting the filter you want to work with, either Filter 1 or Filter 2.
- Explore the different filter types available, such as low-pass, high-pass, band-pass, and notch filters. Each filter type will have its own sonic characteristics and affect the sound in different ways.
- Adjust the cutoff frequency parameter to control the point at which the filter begins to attenuate frequencies. Lower cutoff frequencies will result in a darker or more muffled sound, while higher cutoff frequencies will allow more high-frequency content to pass through.
- Experiment with the resonance parameter to emphasize certain frequencies around the cutoff point. Increasing the resonance can create a more pronounced and resonant effect.
- Use the filter envelope section to shape the behavior of the filter over time. By adjusting the attack, decay, sustain, and release settings, you can create dynamic filter sweeps and modulation effects.
The combination of different filter types, cutoff frequencies, and resonance settings can significantly impact the overall sound. Be sure to explore the various possibilities and listen closely to how each adjustment affects the tone and character of the sound.
Now that you have adjusted the filters in the ES2 synthesizer, it’s time to move on to the next step: applying effects.
Step 5: Applying Effects
Once you have modified the oscillators and adjusted the filters in the ES2 synthesizer, the next step is to apply effects to further enhance and shape the sound. Effects can add depth, texture, and spatialization to your sound, taking it to the next level.
Here’s how you can apply effects in the ES2 synthesizer:
- In the Effects section of the ES2 interface, you will find different effects modules that can be activated and adjusted.
- Click on the “Master” button located at the top of the Effects section to enable the master effects. This will activate the overall effects processing for the synthesizer.
- Explore the different effects available, such as reverb, delay, chorus, flanger, and distortion. Each effect module will have its own parameters that can be adjusted to dial in the desired effect.
- Adjust the parameters of each effect to achieve the desired sound. For example, you can control the wet/dry mix, feedback, decay, modulation rate, or distortion intensity.
- Experiment with the order or routing of the effects by dragging them up or down in the Effects section. The position of the effects in the signal chain can greatly impact the overall sound.
When applying effects, it’s important to maintain a balance and not overdo it. Use your ears to carefully listen to how each effect is affecting the sound and make subtle adjustments to achieve the desired result. Sometimes, a gentle touch can bring just the right amount of color and character to your sound.
Remember that every sound is unique, and the choice of effects will depend on the specific sound you’re aiming for. Don’t be afraid to experiment and try unconventional combinations or settings to discover your own signature sound.
Now that you have applied effects to the sound in the ES2 synthesizer, it’s time to move on to the final step: saving the sound.
Step 6: Saving the Sound
After you have crafted and shaped the sound to perfection in the ES2 synthesizer, the final step is to save your creation for future use. Saving the sound allows you to access and recall it in future projects, saving you time and effort in recreating the same sound from scratch.
Here’s how you can save the sound in the ES2 synthesizer:
- In the ES2 interface, locate the preset section which is usually found at the top left corner.
- Click on the preset name or selector to open the preset menu.
- Choose “Save As…” or a similar option to save your custom sound.
- Give your sound a descriptive name to help you remember its characteristics and usage.
- Choose a location on your computer where you want to save the sound.
- Click “Save” to save your custom sound.
By saving your custom sound, you can easily recall it in future projects. Additionally, Logic Pro X provides the option to organize and categorize your sounds using folders or tags, making it easier to locate and browse through your collection of presets.
Remember to create a backup of your saved sounds to prevent any loss or accidental deletion. It’s always a good practice to regularly back up your important files.
Congratulations! You have successfully put a sound into the ES2 synthesizer, modified it, adjusted filters, applied effects, and saved your custom sound for future use. Now, you can explore the vast possibilities of the ES2 synthesizer and create an endless array of captivating sounds for your music productions.
So, go ahead and unleash your creativity with the ES2 synthesizer in Logic Pro X. Happy sound designing!
Conclusion
Congratulations! You’ve now learned how to put a sound into the ES2 synthesizer in Logic Pro X. By following the steps outlined in this article, you have gained the knowledge and skills to create your own unique sounds, shaping and molding them to fit your musical vision.
The ES2 synthesizer is a powerful and versatile tool that offers endless possibilities for sound design. From selecting different sound sources, modifying oscillators, adjusting filters, applying effects, to saving your custom creations, the ES2 allows you to unleash your creativity and craft captivating sounds.
Remember, experimenting and exploring different settings is key to finding your own unique sound. Let your ears be your guide and trust your instincts. Take the time to play around with the various parameters, and don’t be afraid to push the boundaries and try new and unconventional combinations.
Additionally, saving your custom sounds ensures that you can easily access and recall them in future projects, saving you valuable time and effort. Organize your presets and keep backups of your important files to prevent any loss or accidental deletion.
Whether you’re a music producer, composer, or simply someone interested in sound design, mastering the ES2 synthesizer in Logic Pro X opens up a world of creative possibilities. So, dive in, experiment, and have fun as you create captivating, unique sounds to elevate your music productions.
Now that you have the knowledge and tools, go ahead and unleash your creativity with the ES2 synthesizer in Logic Pro X. Happy music-making!

