Home>Production & Technology>Metronome>How To Use Metronome Logic Pro X
Metronome
How To Use Metronome Logic Pro X
Published: January 13, 2024
Learn how to effectively use the Metronome feature in Logic Pro X to enhance your music production and maintain precise timing. Master the art of rhythm with our step-by-step guide.
(Many of the links in this article redirect to a specific reviewed product. Your purchase of these products through affiliate links helps to generate commission for AudioLover.com, at no extra cost. Learn more)
Table of Contents
- Introduction
- What is a Metronome?
- Why Use a Metronome in Logic Pro X?
- Setting Up the Metronome in Logic Pro X
- Adjusting the Metronome Settings
- Using the Metronome for Tempo and Timing
- Syncing External Devices with the Metronome
- Creating Click Tracks with the Metronome
- Advanced Tips and Techniques for Using the Metronome
- Conclusion
Introduction
Welcome to the world of music production! Whether you’re a beginner or a seasoned musician, you probably know the importance of keeping time and maintaining a consistent tempo. That’s where a metronome comes in. A metronome is a valuable tool that helps musicians stay on beat and develop a sense of rhythm.
In this article, we will explore how to use a metronome in Logic Pro X, one of the most popular digital audio workstations (DAWs) in the music industry. Logic Pro X offers a powerful metronome feature that can significantly improve your recording and performance experience.
So, why use a metronome in Logic Pro X? Well, it’s all about precision and timing. When recording or performing music, timing is crucial. A metronome provides a steady click or beep that serves as a reference point for you to stay in sync with the rhythm. It helps you develop a tighter sense of timing and ensures that your music flows smoothly. Whether you’re recording drums, laying down a bassline, or recording vocals, the metronome is your trusty companion in maintaining a consistent tempo.
In the following sections, we will dive into how to set up the metronome in Logic Pro X, adjust its settings, and utilize it for various purposes. Whether you’re a beginner just starting out or an experienced producer looking to refine your timing, this article has got you covered. So, let’s get started and unlock the full power of the metronome in Logic Pro X!
What is a Metronome?
A metronome is a device or software tool used in music to provide a steady beat or click at a specific tempo. It acts as a reference point for musicians to maintain consistent timing and rhythm during practice, recording sessions, or live performances. Traditionally, metronomes were mechanical devices with a pendulum or a wind-up mechanism. However, in today’s digital age, metronomes are commonly found as electronic devices or integrated features in music production software like Logic Pro X.
The primary purpose of a metronome is to help musicians develop a solid sense of rhythm and improve their timing. By setting the metronome to a specific tempo, musicians can play or sing along with the steady beat, ensuring that their performance stays in sync. This is particularly useful for beginners who are learning to play an instrument or for musicians practicing complex passages that require precise timing.
Metronomes are not limited to a specific genre of music. They are used across various musical styles, from classical music to rock, jazz, and everything in between. In addition to keeping time, metronomes can also be used to create complex rhythmic patterns or syncopated beats, adding a layer of creativity to the music-making process.
With the advancements in technology, metronomes have become more versatile and feature-rich. In Logic Pro X, the metronome offers a range of customization options, allowing musicians to tailor the click sound, time signature, accents, and more to suit their specific needs. It provides a flexible tool for musicians to experiment with different rhythms and tempos, enhancing their overall musicality and precision.
Now that we’ve covered the basics of what a metronome is, let’s move on to exploring the benefits and practical applications of using a metronome in Logic Pro X.
Why Use a Metronome in Logic Pro X?
Logic Pro X is a powerful digital audio workstation (DAW) that offers a wide range of features and tools for music production. One of the key tools that Logic Pro X provides is the built-in metronome. So, why should you use a metronome in Logic Pro X? Let’s explore the reasons below:
1. Maintain Consistent Timing: One of the primary benefits of using a metronome in Logic Pro X is to maintain consistent timing in your recordings or performances. The metronome provides a steady click or beep that acts as a reference point for you to stay in sync with the rhythm. It ensures that all elements of your music are well-aligned, resulting in a cohesive and professional-sounding production.
2. Develop a Strong Sense of Rhythm: Working with a metronome helps you develop a strong sense of rhythm, which is essential for any musician. By consistently practicing with a metronome, you train your internal clock to internalize different tempos and time signatures. This skill translates into more precise and dynamic performances, whether you’re a solo artist or playing with a band.
3. Improve Timing and Accuracy: Playing along with a metronome in Logic Pro X helps improve your timing and accuracy. It forces you to pay attention to subdivisions and syncopated rhythms, making your playing more precise and nuanced. Whether you’re recording drums, guitar, piano, or vocals, using a metronome ensures that each note or beat lands exactly where it should.
4. Enhance Recording Workflow: The metronome in Logic Pro X can greatly enhance your recording workflow. It serves as a guide during the recording process, allowing you to easily track multiple instruments or layers with precision. Additionally, it helps you maintain a consistent tempo throughout the recording, which can be especially useful when editing and arranging your music later on.
5. Create Click Tracks and Beats: Logic Pro X’s metronome feature also allows you to create click tracks and beats for your projects. You can customize the metronome sound, time signature, accents, and even add swing or shuffle to give your tracks a unique feel. This flexibility opens up a world of creative possibilities and helps you experiment with different rhythmic patterns and styles.
6. Improve Overall Musicality: Using a metronome in Logic Pro X not only improves your timing and precision but also enhances your overall musicality. It trains your ear to recognize different rhythmic patterns and internalize them, which in turn improves your ability to play with other musicians, improvise, and create more expressive and impactful music.
Now that we understand the benefits of using a metronome in Logic Pro X, let’s proceed to explore how to set up and adjust the metronome settings for optimal usage.
Setting Up the Metronome in Logic Pro X
Setting up the metronome in Logic Pro X is a straightforward process that can be done in a few simple steps. Here’s how to get started:
Step 1: Open Logic Pro X
To access the metronome settings, open Logic Pro X on your computer. Once the application is launched, create a new project or open an existing one.
Step 2: Enable the Metronome
In the top menu, click on “Logic Pro X” and select “Preferences.” In the Preferences window, click on the “Project” tab and then select “Metronome.”
Step 3: Customize the Metronome Settings
Once you’re in the Metronome preferences, you can customize various aspects of the metronome, including:
Tempo: Set the desired tempo for your project by adjusting the BPM (Beats Per Minute). This will determine the speed at which the metronome clicks or beeps.
Time Signature: Specify the time signature of your project. The time signature determines the number of beats in each measure and the duration of each beat. Common time signatures include 4/4, 3/4, and 6/8.
Accent Beats: You can choose to accent certain beats within a measure to create more emphasis. For example, you may want to accent the first beat of each measure in a 4/4 time signature.
Sound: Select the sound you prefer for the metronome click or beep. Logic Pro X offers a range of options, including clicks, beeps, and even custom sounds that you can import.
Swing or Shuffle: If you want to add a swing or shuffle feel to the metronome, you can adjust the swing or shuffle parameter. This adds a rhythmic groove to the metronome click, giving your music a unique feel.
Step 4: Adjust the Metronome Output
In the Metronome preferences window, you can also adjust the metronome output. You can choose to have the metronome click audible only during recording or playback, or both. You can also adjust the volume level of the metronome to ensure it’s audible but not overpowering.
Step 5: Apply the Settings
Once you have customized the metronome settings to your liking, click on “Apply Changes” or “OK” to save the settings and exit the Metronome preferences window.
That’s it! You have successfully set up the metronome in Logic Pro X. Now you can start recording or playing along with the metronome to improve your timing and maintain a consistent tempo.
In the next section, we will explore how to further adjust and utilize the metronome for tempo and timing purposes in Logic Pro X.
Adjusting the Metronome Settings
Logic Pro X provides a range of customizable options for the metronome, allowing you to fine-tune its settings to suit your specific needs and preferences. Here are some key adjustments you can make:
1. Tempo: The tempo setting determines the speed at which the metronome clicks or beeps. You can adjust the tempo by changing the BPM (Beats Per Minute) value. This allows you to match the tempo of your project and maintain a consistent beat throughout.
2. Time Signature: The time signature defines the number of beats in each measure and the duration of each beat. Logic Pro X supports a variety of time signatures, ranging from common signatures like 4/4 and 3/4 to more complex or irregular ones. Select the appropriate time signature for your project to ensure the metronome provides the correct rhythm reference.
3. Accent Beats: You can add accents to specific beats within a measure to create emphasis. For example, in a 4/4 time signature, you can accent the first beat of each measure to highlight the downbeat. This helps musicians stay in sync and maintain a strong sense of rhythm.
4. Sounds: Logic Pro X offers a variety of metronome sounds to choose from. You can select the sound you prefer, such as clicks, beeps, or even custom sounds. The sounds can be adjusted to have different tones or timbres, further allowing you to tailor the metronome to your liking.
5. Swing or Shuffle: If you want to add a swing or shuffle feel to your music, you can adjust the swing or shuffle parameter of the metronome. This introduces slight fluctuations in the timing, creating a more groove-oriented rhythm. Experiment with different swing or shuffle settings to achieve the desired feel.
6. Output Options: Logic Pro X gives you the flexibility to choose when and how the metronome is audible. You can set it to play only during recording, playback, or both. This allows you to focus on the metronome when necessary and silence it for other tasks, such as mixing or editing. You can also adjust the volume level of the metronome to ensure it’s audible but not overpowering.
By adjusting these settings, you can customize the metronome in Logic Pro X to align with your musical style, preferences, and the specific requirements of your project. Whether you need a precise click for classical music or a unique sound for experimental genres, Logic Pro X’s metronome settings provide the flexibility you need to enhance your production.
In the next section, we will explore how to effectively use the metronome for tempo and timing purposes in Logic Pro X, as well as how to sync external devices with the metronome.
Using the Metronome for Tempo and Timing
The metronome in Logic Pro X is an invaluable tool for controlling and maintaining tempo and timing in your music production. Here’s how you can effectively use the metronome to improve your musical performances:
1. Practice with the Metronome: Practicing with a metronome is essential for developing a solid sense of timing. Set the metronome to the desired tempo and play along with the steady click or beep. Start with slower tempos and gradually increase the speed as you become more comfortable. As you practice, focus on staying in sync with the metronome, ensuring that your notes or beats align perfectly with the clicks.
2. Improve Your Timing: The metronome serves as an objective reference point for your timing. It helps you identify any inconsistencies or inaccuracies in your playing. If you find that you’re consistently ahead or behind the beat, adjust your playing accordingly to align with the metronome. Over time, you’ll develop a more precise and consistent sense of timing.
3. Develop Your Rhythmic Accuracy: Playing with a metronome is a great way to hone your rhythmic accuracy. It trains you to execute complex rhythms and syncopated patterns with precision. As you become more proficient, experiment with different subdivisions of the beat, such as eighth notes, triplets, or sixteenth notes. This will further develop your rhythmic dexterity and expand your musical vocabulary.
4. Use the Metronome for Recording: When recording in Logic Pro X, the metronome can be your best friend. It ensures that all elements of your performance are perfectly timed and in sync. Before recording, enable the metronome and set the desired tempo and time signature. This will provide a consistent reference point, allowing you to stay on beat throughout your recording. It’s especially helpful when recording multiple instrumental tracks or layering different parts.
5. Collaborate with Other Musicians: If you’re collaborating with other musicians, the metronome becomes crucial for maintaining synchronization. By sharing the tempo and time signature settings with your collaborators, everyone can play together seamlessly, regardless of location or time. This is particularly useful when working on projects remotely or with musicians in different time zones.
6. Experiment with Tempo and Time Signature Changes: Logic Pro X’s metronome allows you to easily experiment with changes in tempo and time signature. This is particularly useful when composing or arranging music with dynamic shifts or complex rhythmic patterns. By modifying the metronome settings mid-project, you can accurately capture the desired tempo and timing variations, giving your music more depth and expression.
7. Practice Different Musicianship Skills: Along with maintaining tempo and timing, the metronome can be utilized for practicing various musicianship skills. This includes practicing scales, arpeggios, improvisation, and playing in different musical styles. The metronome provides a stable foundation for these exercises, allowing you to focus on technique, dynamics, and creativity.
By utilizing the metronome effectively in Logic Pro X, you can enhance your sense of tempo, timing, and rhythm. The metronome acts as your musical guide, helping you improve your playing, recording, and collaboration experiences.
In the next section, we will explore how to sync external devices with the metronome in Logic Pro X.
Syncing External Devices with the Metronome
In addition to its internal metronome capabilities, Logic Pro X also allows you to sync external devices, such as MIDI instruments or hardware sequencers, with the metronome. This synchronization ensures that all of your equipment and software are perfectly timed together. Here’s how to sync external devices with the metronome in Logic Pro X:
1. Connect your External Device: First, ensure that your external device is properly connected to your computer. This can be done via USB, MIDI cables, or other appropriate connections. Make sure that your device is powered on and recognized by Logic Pro X.
2. Configure MIDI Settings: In Logic Pro X, go to the Preferences menu, then select the MIDI tab. Here, you’ll find a list of all available MIDI devices. Locate your external device in the list and make sure it’s enabled for both input and output. Enable any specific MIDI ports or channels required for the device to communicate with Logic Pro X.
3. Set up External Sync: Once your MIDI settings are configured, go to the Transport menu in Logic Pro X and select “Synchronization” from the dropdown menu. Choose the “External” option to enable external sync.
4. Choose the Sync Mode: In the Synchronization settings, you’ll find various options for sync modes. Choose the mode that best suits your setup and device. The available options include MIDI Clock, MTC (MIDI Time Code), and MMC (MIDI Machine Control). Consult your external device’s documentation to determine which mode is compatible and most appropriate for syncing.
5. Match the Tempo: For successful synchronization, ensure that the tempo settings on your external device match the tempo set in Logic Pro X. If you change the tempo in Logic Pro X, the external device should automatically follow suit. Conversely, if you change the tempo on the external device, Logic Pro X should adjust accordingly. This ensures that all devices and software are synchronized to the same tempo.
6. Start the Sync: With everything properly configured, start the playback in Logic Pro X by pressing the Play button or using the spacebar. The metronome click and your external device should be perfectly aligned, playing in sync with each other. The external device will receive the tempo and timing information from the metronome in Logic Pro X, allowing you to play or record along seamlessly.
7. Test and Troubleshoot: It’s important to thoroughly test the synchronization between Logic Pro X and your external device. Check for any latency or timing issues and make adjustments if necessary. Ensure that both devices maintain accurate timing throughout your recording or performance session.
By syncing your external devices with the metronome in Logic Pro X, you can integrate and control your entire setup with precision and ease. This enables you to create complex musical arrangements, synchronize multiple instruments, and take full advantage of both software and hardware components in your music production workflow.
In the next section, we will explore how to create click tracks with the metronome in Logic Pro X.
Creating Click Tracks with the Metronome
The metronome feature in Logic Pro X offers a powerful tool for creating click tracks, which are essential for recording sessions, live performances, and rehearsing with a band. Click tracks provide a rhythmic reference for musicians, helping them stay in sync and ensuring a cohesive and tight performance. Here’s how to create click tracks using the metronome in Logic Pro X:
1. Enable the Metronome: Before creating click tracks, make sure the metronome is enabled in Logic Pro X. Go to the Preferences menu, select the Project tab, and click on the Metronome section. Ensure that the metronome is enabled for both recording and playback.
2. Set the Tempo and Time Signature: Determine the tempo and time signature for your click track. This will depend on the specific requirements of your project or performance. In Logic Pro X, you can set the tempo by adjusting the BPM (Beats Per Minute) value. Set the time signature to match the desired rhythmic structure, such as 4/4 for common time.
3. Customize the Click Sound: Logic Pro X provides various options for the click sound. You can select different click sounds, such as clicks, beeps, or even import custom sounds. Choose a click sound that suits the style and genre of your music. Ensure that the click is audible without overpowering the music.
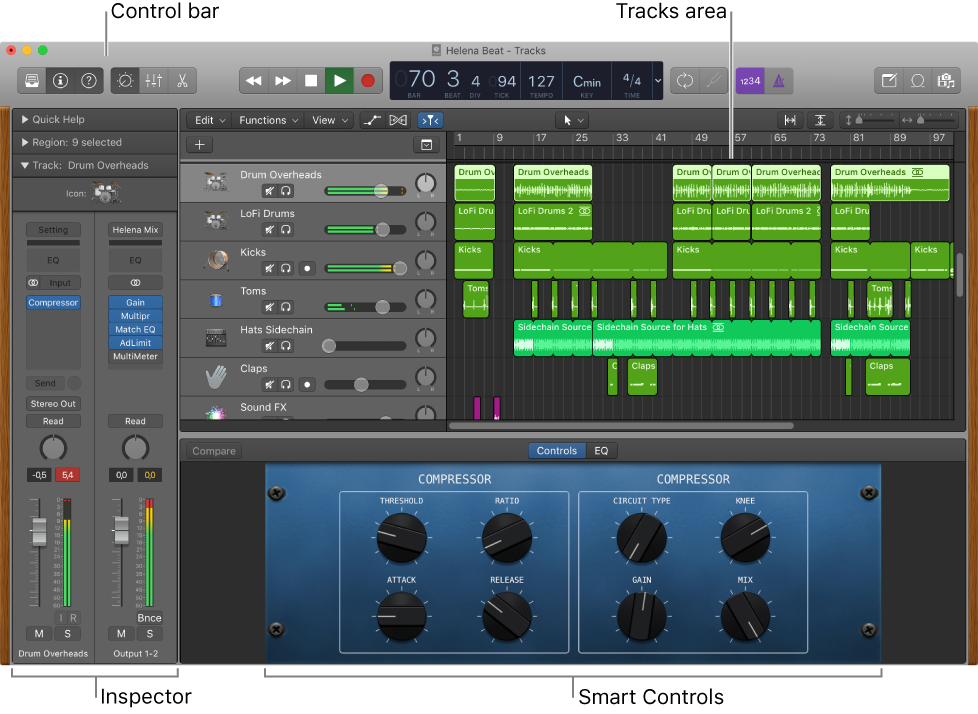
4. Create Click Regions: To create click tracks, you need to place click regions in your project. Click regions act as markers for the click sound to play at specific points in the timeline. To create a click region, go to the Smart Controls panel and locate the Metronome section. Click on the “Create Click Region” button.
5. Position the Click Regions: Once you’ve created a click region, position it on the desired beats or measures in your project. You can drag and drop the click region onto the timeline, aligning it with the desired points where you want the click to play. You can have multiple click regions throughout your project, allowing for flexibility in the timing and structure of the click track.
6. Customize Click Region Properties: Each click region can have customized properties. Select a click region and open the Region inspector. Here, you can adjust the volume level, pan position, and even apply plugins or effects on the click region. This allows you to further tailor the click track to suit your specific needs and preferences.
7. Fine-tune the Click Track: After creating the click regions, play through your project to check the timing and alignment of the click track. Make any necessary adjustments to ensure that the clicks are precisely on the desired beats or measures. You can easily move, resize, or delete the click regions to fine-tune the click track’s timing.
8. Export the Click Track: Once you’re satisfied with your click track, you can export it along with your project. This allows you to share the click track with other musicians or use it during live performances with a click track system. Export the click track as a separate audio file or include it as part of your project mixdown.
Click tracks created with the metronome in Logic Pro X provide a solid foundation for recording sessions, rehearsals, or live performances. They help musicians stay in sync, maintain a consistent tempo, and deliver professional-quality performances. Experiment with different click sounds, tempos, and time signatures to create click tracks that perfectly fit your musical vision.
In the next section, we will explore advanced tips and techniques for using the metronome in Logic Pro X.
Advanced Tips and Techniques for Using the Metronome
While the metronome in Logic Pro X is a powerful tool on its own, there are advanced tips and techniques you can employ to further enhance your music production and performance capabilities. Here are some advanced tips and techniques for using the metronome in Logic Pro X:
1. Experiment with Different Time Signatures: Don’t limit yourself to standard time signatures. Logic Pro X allows you to explore complex and irregular time signatures. Use the metronome to practice and record in unconventional meters like 5/4, 7/8, or even odd meters such as 11/16. This can lead you to create unique and intriguing musical arrangements and help you develop a versatile sense of rhythm.
2. Use Time Signature Changes: Instead of sticking to a single time signature throughout your project, experiment with time signature changes. Logic Pro X makes it easy to modify the time signature at any point in the timeline. Use the metronome to keep track of these changes and ensure a seamless transition between different time signatures.
3. Employ Click Cueing: Click cueing refers to the technique of starting a click track from a specific point within a measure or beat. This is particularly useful when entering the music after a rest or starting at a specific rhythmic point. Utilize Logic Pro X’s click cueing feature to precisely synchronize the click track with your entry point, enhancing the overall cohesion and timing of your performance.
4. Combine Metronome with Count-In: Logic Pro X offers a count-in function that plays a specified number of clicks before recording or playback starts. Combining the metronome’s click sound with the count-in feature can provide a smooth and organized entry into your performance. This allows you and other musicians to prepare and anticipate the starting point, ensuring a seamless and synchronized beginning.
5. Utilize Offbeat Accents: While metronomes traditionally accent the downbeat, you can add offbeat accents to create more complex and rhythmically interesting click tracks. Experiment with accented upbeats or offbeat subdivisions to add a sense of groove and syncopation to your music. This technique can enhance the overall feel and energy of your performances.
6. Create Custom Click Tracks: In addition to using Logic Pro X’s built-in click sounds, you can import custom sounds to create unique click tracks. This allows you to match the click sound to the specific genre, style, or vibe of your project. For example, you can import drum sounds, handclaps, or even musical samples to create dynamic and distinctive click tracks.
7. Combine Multiple Click Tracks: Logic Pro X enables you to layer multiple click tracks. This can be useful when working with complex rhythm patterns or layered arrangements. Each click track can have its own sound, time signature, and tempo. By layering different click tracks, you can create intricate and multi-dimensional metronomic textures that enhance the depth and complexity of your music.
8. Experiment with Groove Templates: Logic Pro X allows you to apply groove templates to your click tracks, injecting a subtle human feel and groove into the metronome clicks. Explore the wide range of groove templates available in Logic Pro X or create your own custom grooves to add a natural and organic touch to your click tracks.
By implementing these advanced tips and techniques, you can elevate your use of the metronome in Logic Pro X and enhance your overall music production experience. These methods allow for more creative exploration of rhythm, timing, and synchronization, ultimately improving the quality and impact of your music.
Finally, let’s conclude our exploration of the metronome in Logic Pro X in the following section.
Conclusion
The metronome in Logic Pro X is more than just a simple click. It is a versatile and essential tool that can greatly enhance your music production and performance experience. By utilizing the metronome effectively, you can improve your timing, maintain consistent tempo, and develop a strong sense of rhythm.
In this article, we explored the fundamentals of the metronome, why it is important to use it in Logic Pro X, and how to set it up. We discussed how to adjust the metronome settings, sync external devices, create click tracks, and even explored advanced tips and techniques for maximizing the power of the metronome.
Using the metronome in Logic Pro X allows you to refine your musical skills, deliver precise and professional recordings, collaborate with other musicians, and experiment with different rhythms and time signatures. It serves as a reliable guide, ensuring that you stay on beat and deliver cohesive performances.
Remember, the metronome is a tool that should be utilized but not relied upon blindly. It is essential to develop your internal sense of timing and musicality alongside practicing with the metronome. The goal is to achieve a balance between precision and expression, using the metronome as a foundation while allowing your musicality to shine through.
So, whether you’re a beginner musician looking to improve your timing or an experienced producer seeking to fine-tune your recordings, don’t underestimate the power of the metronome in Logic Pro X. Embrace it as your trustworthy partner on your musical journey and unlock its full potential to create captivating and compelling music.
Now that you’re armed with knowledge about the metronome in Logic Pro X, it’s time to put it into practice. Take advantage of this powerful tool, experiment with different settings and techniques, and let your musical ideas come to life with precision and expressiveness.
Happy music-making!