Home>Production & Technology>Audiophile>How To Mod Stanton T92 Tonearm With A Different One For Audiophile Playback
Audiophile
How To Mod Stanton T92 Tonearm With A Different One For Audiophile Playback
Modified: January 22, 2024
Upgrade your Stanton T92 turntable with a new tonearm for superior audiophile playback. Learn how to mod your T92 for high-quality sound.
(Many of the links in this article redirect to a specific reviewed product. Your purchase of these products through affiliate links helps to generate commission for AudioLover.com, at no extra cost. Learn more)
Table of Contents
- Introduction
- Understanding the Stanton T92 Tonearm
- Selecting a Compatible Tonearm for Audiophile Playback
- Gathering the Required Tools and Materials
- Modifying the Stanton T92 Turntable
- Removing the Existing Tonearm
- Installing the New Tonearm
- Adjusting the New Tonearm for Optimal Performance
- Testing and Fine-Tuning the Modified Setup
- Conclusion
Introduction
Welcome to the world of audiophile playback, where every nuance of sound matters. As an avid music lover, you understand the importance of having high-quality equipment to truly appreciate the intricacies of your favorite tracks. One crucial component of any turntable setup is the tonearm, which plays a significant role in accurately tracking the record grooves and producing exceptional sound reproduction.
In this article, we will explore the process of modifying the Stanton T92 tonearm with a different one for audiophile playback. The T92 is a popular turntable among music enthusiasts, but some audiophiles prefer to experiment with alternative tonearms to achieve a more precise and detailed sound output.
By replacing the stock tonearm, you have the opportunity to customize your turntable setup and optimize it according to your preferences and desired audio experience. However, it is essential to select a compatible tonearm that meets your specific requirements and is suitable for use with the Stanton T92 turntable.
In the following sections, we will guide you through the process of selecting a compatible tonearm, gathering the necessary tools and materials, and modifying the Stanton T92 turntable. We will also provide step-by-step instructions on removing the existing tonearm, installing the new one, and adjusting it for optimal performance. Finally, we will discuss the importance of thorough testing and fine-tuning to ensure that your modified setup delivers the best possible audiophile playback experience.
Whether you are an experienced audiophile looking to enhance your turntable setup or a passionate music lover eager to delve deeper into the world of high-fidelity sound, this article will equip you with the knowledge and guidance you need to successfully mod your Stanton T92 tonearm for audiophile playback. Get ready to take your listening experience to new heights!
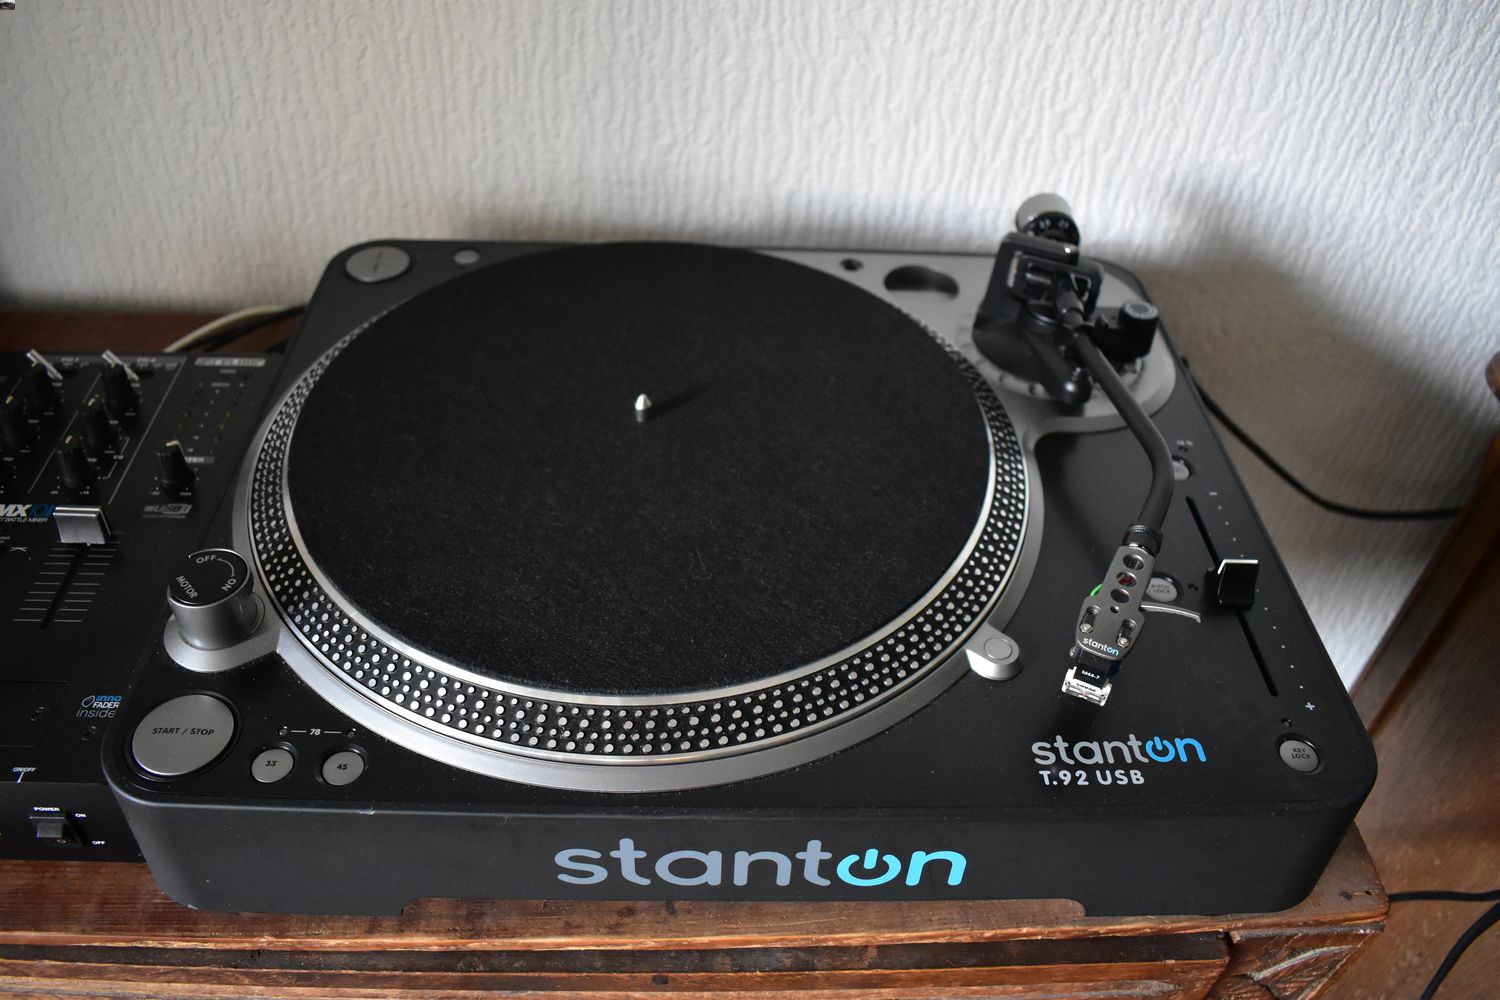
Understanding the Stanton T92 Tonearm
Before delving into the process of modifying the Stanton T92 tonearm, it is essential to have a solid understanding of its design and functionality. The T92 tonearm, manufactured by Stanton, is a popular choice among DJs and turntable enthusiasts due to its reliability and versatility.
The Stanton T92 tonearm features a straight tonearm design, which offers several advantages for audiophile playback. The straight tonearm minimizes tracking errors and distortion by ensuring a consistent horizontal alignment of the stylus with the record grooves. This allows for more accurate tracking, resulting in improved sound quality and fidelity.
Another feature of the Stanton T92 tonearm is its adjustable tracking force. Tracking force refers to the pressure exerted by the stylus on the record surface. It is crucial to find the optimal tracking force for your specific cartridge to avoid premature wear of the stylus or damage to the record grooves. The Stanton T92 provides the flexibility to adjust the tracking force according to your cartridge’s requirements, allowing for precise tracking and optimal playback performance.
Additionally, the Stanton T92 tonearm features a removable headshell, which allows you to easily switch between different cartridges or upgrade to a higher-quality one. This flexibility enables you to tailor your sound reproduction to your preferences and experiment with various cartridge options to achieve the desired audio experience.
It is important to note that while the Stanton T92 tonearm is a reliable and versatile choice, some audiophiles may opt for a different tonearm to further enhance the performance and accuracy of their turntable setup. Different tonearms can offer unique characteristics and sonic qualities that may better suit your specific listening preferences.
Overall, the Stanton T92 tonearm provides a solid foundation for audiophile playback. Its design, adjustability, and compatibility with different cartridges make it a popular choice for both DJs and enthusiasts. However, if you are looking to push the boundaries of sound quality and explore the possibilities of alternative tonearms, it may be worth considering a modification to further elevate your audiophile experience.
Selecting a Compatible Tonearm for Audiophile Playback
When it comes to selecting a compatible tonearm for audiophile playback, there are several factors to consider. The right tonearm can significantly impact the sound quality and overall performance of your turntable setup. Here are some key considerations to keep in mind:
- Compatibility with the Stanton T92: It is essential to choose a tonearm that is compatible with the Stanton T92 turntable. This ensures proper installation and alignment, allowing for optimal performance and sound reproduction.
- Construction and materials: The construction and materials of the tonearm can greatly influence its sonic characteristics. Aluminum, carbon fiber, and other high-quality materials are often used to reduce resonance and vibration, resulting in improved accuracy and fidelity.
- Effective tonearm length: The effective tonearm length refers to the distance from the stylus tip to the pivot point of the tonearm. It plays a crucial role in accurately tracing the record grooves. Different effective lengths can yield different sonic signatures, so consider your preferences and desired sound output when choosing a tonearm.
- Tracking ability: The tonearm’s tracking ability determines its capability to accurately follow the record grooves. Look for a tonearm with minimal tracking distortion and low tracking error to ensure precise reproduction of the audio on your records.
- Adjustability: Consider whether you want a tonearm that offers adjustable features such as tracking force, anti-skate, and VTA (Vertical Tracking Angle). These adjustable parameters allow for fine-tuning and customization of your turntable setup according to your cartridge and listening preferences.
- Budget: Determine your budget for a new tonearm, as prices can vary significantly. It’s important to find a balance between quality and affordability to ensure a satisfactory investment in your audiophile playback system.
Research online reviews and seek advice from fellow audiophiles to gain insights into different tonearm options. Additionally, consult with reputable turntable specialists or dealers who can provide expert guidance and recommendations based on your specific requirements.
Ultimately, the selected tonearm should complement your turntable setup and align with your listening preferences. Take the time to evaluate different options, consider their features, and make an informed decision that will contribute to a heightened audiophile experience.
Gathering the Required Tools and Materials
Before diving into the process of modifying the Stanton T92 tonearm, it’s important to ensure you have all the necessary tools and materials on hand. Here’s a comprehensive list of what you’ll need:
- New tonearm: Select a compatible tonearm that meets your specific requirements and is suitable for use with the Stanton T92 turntable. Make sure to research and choose a high-quality tonearm that will enhance your audiophile playback experience.
- Screwdrivers: Depending on your tonearm and turntable, you may need both flathead and Phillips screwdrivers to remove the existing tonearm and install the new one. It’s important to have the right sizes to prevent damage to the screws.
- Hex key set: Many tonearms require hex keys for precise adjustments. Make sure you have a set of hex keys available in various sizes.
- Soldering iron and solder: If your new tonearm requires soldering for the connection of wires, a soldering iron and solder will be necessary. Make sure you have the appropriate soldering equipment and take any necessary safety precautions when using them.
- Alignment protractor: An alignment protractor is a handy tool used to ensure the proper alignment and geometry of the tonearm and cartridge. It helps to achieve accurate tracking and optimal sound reproduction. Choose one that is compatible with your turntable and tonearm.
- Anti-static mat: When working with delicate turntable components, it’s crucial to create an anti-static environment. An anti-static mat provides a safe and static-free surface to work on and helps prevent damage to sensitive electronic parts.
- Clean cloth and cleaning solution: Before installing the new tonearm, it’s a good idea to clean the turntable’s surface and remove any dust or debris. A clean cloth and a suitable cleaning solution will ensure a pristine environment for the modification process.
- Patience and attention to detail: While not physical tools or materials, these qualities are essential for a successful tonearm modification. Take your time and pay close attention to the instructions and procedures to ensure a precise and accurate installation.
Ensuring you have all these tools and materials ready before starting the modification process will help streamline the process and prevent any delays or complications. Double-check the compatibility of your chosen tonearm with the Stanton T92 and gather any additional tools or materials specific to your setup. With everything prepared, you’ll be ready to proceed with confidence and embark on your audiophile journey.
Modifying the Stanton T92 Turntable
Now that you have gathered all the necessary tools and materials, it’s time to embark on the journey of modifying your Stanton T92 turntable. Here is a step-by-step guide to help you through the process:
- Prepare your workspace: Find a clean, well-lit area to work on your turntable. Place the anti-static mat on your work surface to protect the turntable from any damage or electrostatic discharge.
- Remove the platter: Start by removing the platter from the turntable. Gently lift it straight up, being careful not to damage the drive belt or any other components.
- Disconnect the tonearm cables: Locate the tonearm cable connections on the underside of the turntable. Carefully disconnect them by gently pulling the connectors apart. Take note of how they are connected for easier reinstallation later.
- Remove the existing tonearm: Use the appropriate screwdrivers or hex keys to remove the screws or bolts securing the existing tonearm. Carefully lift the tonearm from its mount, taking care not to damage any delicate wires or connectors.
- Install the new tonearm: Take the new tonearm and align it with the tonearm mount on the turntable. Attach it securely using the provided screws or bolts. Ensure that it sits level and parallel to the turntable surface.
- Connect the tonearm cables: Take the tonearm cables from the new tonearm and connect them to the corresponding connectors on the underside of the turntable. Make sure to match the correct channels (left and right) and secure the connections properly.
- Adjust anti-skate and tracking force: Follow the manufacturer’s instructions for your specific tonearm to adjust the anti-skate and tracking force settings. Use the alignment protractor and tracking force gauge to ensure accurate and precise adjustments.
- Reassemble the platter and test: Place the platter back onto the turntable, ensuring that it is properly aligned with the spindle. Reconnect the drive belt and give it a gentle spin to ensure smooth rotation.
- Test and fine-tune: With the modifications complete, it’s time to test your turntable. Play a record and listen for any inconsistencies or issues. If necessary, make small adjustments to the tracking force or other settings to achieve optimal performance.
It’s important to note that the specific steps and procedures may vary depending on the tonearm you have chosen for your modification. Always refer to the manufacturer’s instructions and guidelines to ensure correct installation and adjustments.
With your Stanton T92 turntable successfully modified, you can now enjoy a new level of audio quality and precision in your audiophile playback. Take the time to fine-tune your setup and explore different records to fully appreciate the enhanced sonic capabilities of your modified turntable. Happy listening!
Removing the Existing Tonearm
Before installing the new tonearm in your Stanton T92 turntable, you’ll need to remove the existing tonearm. Follow these steps to safely and effectively remove the old tonearm:
- Prepare your workspace: Find a clean, well-lit area to work on your turntable. Place the anti-static mat on your work surface to protect the turntable from any damage or electrostatic discharge.
- Secure the turntable: Make sure the turntable is stable and secure before starting. This will prevent any accidental movement or damage during the tonearm removal process.
- Locate the mounting screws: Look for the screws or bolts that secure the existing tonearm to the turntable. These are typically found near the base of the tonearm, close to the pivot point.
- Gather the necessary tools: Depending on the type of screws or bolts used, you may need a suitable screwdriver or hex key to remove them. Ensure you have the appropriate tools on hand before proceeding.
- Unscrew and remove the tonearm: Use the appropriate tool to carefully unscrew and remove the mounting screws or bolts that hold the tonearm in place. Take extra care to not strip the screws or bolts and avoid damaging any part of the turntable.
- Disconnect the tonearm cables: Once the mounting screws or bolts are removed, locate the connections for the tonearm cables. These can typically be found near the base of the tonearm. Gently disconnect the cables, taking note of how they are connected for reinstallation later.
- Remove the tonearm: With the mounting screws or bolts and cables disconnected, gently lift the tonearm from its mount. Take care to avoid bending or damaging any delicate wires or connectors.
- Safely store the old tonearm: If you plan to keep your old tonearm, it’s important to store it in a safe place to prevent any damage. Wrap it in a clean cloth or anti-static sleeve and store it in a secure location.
By following these steps, you can safely remove the existing tonearm from your Stanton T92 turntable. Remember to handle the tonearm and turntable components with care to avoid any accidental damage. With the old tonearm removed, you are now ready to proceed with installing the new tonearm and taking your audiophile playback experience to the next level.
Installing the New Tonearm
With the existing tonearm successfully removed from your Stanton T92 turntable, it’s time to install the new tonearm. The following steps will guide you through the process:
- Prepare your workspace: Ensure you are working in a clean, well-lit area with the anti-static mat in place to protect the turntable from any damage.
- Inspect the new tonearm: Before installation, carefully inspect the new tonearm to ensure it is in optimal condition and free from any defects or damage. Verify that all necessary components, such as mounting screws or bolts, are included.
- Align the new tonearm: Align the new tonearm with the tonearm mount on the turntable. It should fit snugly and parallel to the turntable surface.
- Secure the new tonearm: Using the appropriate screws or bolts provided with the new tonearm, fasten it securely to the tonearm mount. Be careful not to overtighten the screws or bolts, as this can cause damage.
- Connect the tonearm cables: Take the tonearm cables from the new tonearm and connect them to the corresponding connectors on the underside of the turntable. Ensure that the left and right channels are appropriately connected.
- Double-check the connections: Verify that all tonearm cable connections are secure and properly seated. Make sure there are no loose or exposed wires that could interfere with the performance of the new tonearm.
- Adjust the tonearm height and alignment: Follow the manufacturer’s instructions for your specific tonearm to adjust the height and alignment. This will ensure the proper tracking and alignment of the stylus with the record grooves.
- Set the tracking force: Refer to the manufacturer’s guidelines or specifications to determine the recommended tracking force for your new tonearm. Use a tracking force gauge to accurately set the desired tracking force.
- Adjust the anti-skate: Calibrate the anti-skate mechanism according to the manufacturer’s instructions. This will help maintain proper tracking and minimize distortion during playback.
- Perform a final check: Once all adjustments have been made, give the tonearm and turntable a final inspection. Ensure that everything is securely in place and that there are no loose components or obstructions that could impact performance or damage the new tonearm.
By following these steps, you can successfully install the new tonearm onto your Stanton T92 turntable. Take your time during the installation process to ensure precision and accuracy. Once installed, your new tonearm will provide a foundation for exceptional audiophile playback and allow you to fully appreciate the nuances of your favorite recordings.
Adjusting the New Tonearm for Optimal Performance
After installing the new tonearm on your Stanton T92 turntable, it’s important to properly adjust it for optimal performance. Fine-tuning the tonearm will ensure accurate tracking, minimal distortion, and an overall enhanced audiophile experience. Follow these steps to adjust the new tonearm:
- Consult the tonearm manufacturer’s guidelines: Read the manufacturer’s instructions and guidelines specific to your new tonearm. These instructions will provide valuable insights into the proper adjustment procedures and recommended settings.
- Set the tracking force: Determine the optimal tracking force for your cartridge. Consult the cartridge manufacturer’s specifications or guidelines to find the recommended range. Use a tracking force gauge to adjust the tracking force to the desired level, ensuring it falls within the manufacturer’s recommended range.
- Adjust the anti-skate: The anti-skate mechanism counteracts the inward force exerted on the tonearm by the record’s groove. Adjust the anti-skate to match the tracking force you set earlier. This will help maintain proper alignment and minimize distortion during playback.
- Balance the tonearm: Use the tonearm’s counterweight to achieve proper balance. With the tonearm floating freely, adjust the counterweight until the tonearm is parallel to the turntable surface. This ensures that the tracking force is evenly distributed across the stylus.
- Check vertical tracking angle (VTA): The VTA refers to the angle at which the stylus sits in the record groove. Some tonearms allow for adjustment of the VTA. Follow the manufacturer’s instructions to make any necessary VTA adjustments to achieve the optimal listening experience.
- Use an alignment protractor: An alignment protractor is a helpful tool for precisely aligning the cartridge on the tonearm. Follow the protractor’s instructions to ensure proper alignment, minimizing tracking error and distortion.
- Verify azimuth: Azimuth refers to the alignment of the cartridge’s stylus in relation to the record’s surface. Use a cartridge alignment tool or special test records to ensure the proper azimuth adjustment, resulting in accurate tracking and minimal distortion.
- Perform test plays: After making these adjustments, perform test plays with various records to assess the tonearm’s performance. Listen for any signs of distortion, imbalance, or tracking issues. Fine-tune the adjustments as needed to achieve the best possible sound quality.
Remember, each tonearm and cartridge combination may require specific adjustments, so it’s essential to consult the manufacturer’s instructions and guidelines. Taking the time to properly adjust your new tonearm will optimize the playback performance and help you fully appreciate the fidelity and detail of your vinyl collection.
Testing and Fine-Tuning the Modified Setup
Once you have completed the modification of your Stanton T92 turntable with the new tonearm, it’s crucial to conduct thorough testing and fine-tuning to ensure optimal performance. Here are the steps to follow:
- Check for physical stability: Ensure that all components are securely fastened and free from any loose or rattling parts. A stable and solid setup is essential for accurate tracking and minimizing unwanted vibrations.
- Inspect the cartridge alignment: Double-check the alignment of the cartridge using an alignment protractor or alignment tool. This will help ensure that the stylus is properly aligned with the record grooves for accurate tracking and optimal sound quality.
- Perform a test record play: Select a test record with a variety of audio tracks to evaluate the performance of your modified setup. Listen closely for any distortion, channel imbalance, or other issues that may need adjustment.
- Listen for tracking problems: Pay attention to any tracking problems, such as skipping, mistracking, or excessive surface noise. Adjust the tracking force, anti-skate, and other relevant settings as needed to resolve these issues.
- Assess channel balance: Listen for any imbalances between the left and right channels. Adjust the cartridge alignment or tracking force if necessary to achieve balanced playback.
- Evaluate overall sound quality: Listen to a variety of music genres and critically assess the overall sound quality of your modified setup. Pay attention to detail, clarity, dynamics, and overall tonal balance. Fine-tune the tonearm settings as needed to achieve the desired sound signature.
- Perform additional adjustments: If you notice any specific issues during testing, such as distortion in certain frequency ranges or excessive surface noise, consider making further adjustments to the VTA, azimuth, or other relevant settings to address these concerns.
- Take notes: Keep detailed notes of the adjustments you make and their impact on the sound quality. This will help you track your progress and easily revert back to previous settings if needed.
- Repeat the testing phase: After making adjustments, repeat the testing phase to determine the effectiveness of the changes and further refine the setup. This iterative process will help you achieve the best possible sound quality.
Remember, testing and fine-tuning your modified setup is an ongoing process. Don’t hesitate to experiment and make incremental adjustments to achieve your desired sound quality. Take your time, trust your ears, and enjoy the journey of maximizing the potential of your modified Stanton T92 turntable for an exceptional audiophile experience.
Conclusion
Modifying the Stanton T92 tonearm for audiophile playback is an exciting endeavor that allows you to personalize your turntable setup and elevate your listening experience. By understanding the nuances of the Stanton T92 tonearm, selecting a compatible tonearm, gathering the necessary tools and materials, and following the steps for modification, you can achieve exceptional sound reproduction and enjoy your favorite music with enhanced clarity and detail.
Throughout the process, it is crucial to pay close attention to each step, ensuring proper installation, alignment, and adjustment of the new tonearm. Take your time to fine-tune the setup, adjusting tracking force, anti-skate, VTA, and other relevant parameters to achieve optimal performance.
Remember that the modification process is not a one-time event. Ongoing testing and fine-tuning are key to maintaining and improving the performance of your modified setup. Regularly assessing the sound quality, addressing any issues, and making incremental adjustments will allow you to continuously optimize your turntable for the best possible audio reproduction.
Through careful modification and attention to detail, you can transform your Stanton T92 turntable into a powerful audiophile playback system that faithfully reproduces your favorite records with exceptional fidelity and accuracy. Enjoy the journey of exploring the depths of your music collection and experiencing the immersive joy of high-quality sound.
So, go ahead and embark on this exciting journey of modding your Stanton T92 tonearm. Embrace the possibilities, unleash the full potential of your turntable, and indulge in the rich and immersive sound that only a well-crafted and customized audiophile setup can deliver.