Home>Production & Technology>Sound Bar>How To Remove Sound Bar From Dell Monitor
Sound Bar
How To Remove Sound Bar From Dell Monitor
Modified: January 22, 2024
Learn how to easily remove the sound bar from your Dell monitor and enhance your audio experience. Upgrade your setup with this simple tutorial.
(Many of the links in this article redirect to a specific reviewed product. Your purchase of these products through affiliate links helps to generate commission for AudioLover.com, at no extra cost. Learn more)
Table of Contents
- Introduction
- Step 1: Gather the necessary tools
- Step 2: Power off the Dell monitor
- Step 3: Disconnect all cables from the monitor
- Step 4: Locate and remove the sound bar attachment screws
- Step 5: Gently detach the sound bar from the monitor
- Step 6: Secure the removed sound bar safely
- Step 7: Reconnect the cables and power on the monitor
- Conclusion
Introduction
Sound bars have become a popular addition to home entertainment systems, offering enhanced audio quality and immersive sound experiences. If you own a Dell monitor with a detachable sound bar and are looking to remove it for any reason, we’ve got you covered. Whether you want to replace the sound bar, reposition your monitor, or simply prefer the internal speakers, this guide will walk you through the steps to safely remove the sound bar from your Dell monitor.
Before we dive into the steps, it’s important to note that Dell monitors come in various models, each with its own unique design and attachment mechanism for the sound bar. Therefore, the process may differ slightly depending on the specific model you own. However, the general principles discussed in this guide should apply to most Dell monitor sound bar attachments.
Removing the sound bar can be a straightforward process if you follow the proper steps and take necessary precautions. It’s important to handle your Dell monitor and its components with care to avoid any damage. With that in mind, let’s proceed to the step-by-step guide on how to remove the sound bar from your Dell monitor.
Step 1: Gather the necessary tools
Before you begin the process of removing the sound bar from your Dell monitor, make sure you have all the necessary tools at hand. Having the right tools will help you complete the task smoothly and efficiently. Here’s a list of the tools you will need:
- Philips screwdriver or Allen wrench: Depending on the model of your Dell monitor, you may need a Philips screwdriver or an Allen wrench to remove the attachment screws that secure the sound bar.
- Soft cloth or microfiber cloth: It’s always a good idea to have a soft cloth or microfiber cloth on hand to gently clean the monitor or the sound bar if needed.
- Container or bag: Prepare a container or a bag to safely store the attachment screws and any other small components that you remove during the process. This will prevent them from getting lost.
Once you have gathered all the necessary tools, you are ready to proceed to the next step. It’s important to work in a well-lit area and on a clean surface to ensure you have a clear view of the attachment screws and to avoid losing any small parts. Taking these simple precautions will make the process much smoother and efficient.
Step 2: Power off the Dell monitor
Before you begin removing the sound bar from your Dell monitor, it’s crucial to ensure that the monitor is powered off. This step is essential for your safety as well as to prevent any potential damage to the monitor or the sound bar.
To power off your Dell monitor, locate the power button, typically located either on the front or side of the monitor. Press and hold the power button for a few seconds until the monitor completely shuts down. Some monitors may have an on-screen menu that allows you to power off the device. In that case, navigate to the menu and select the option to power off.
Once the monitor is powered off, you can proceed to the next step with peace of mind, knowing that you have taken the necessary precaution to ensure your safety and the safety of the monitor.
It’s important to note that some Dell monitors have both a power button and a separate power switch on the back of the device. In such cases, make sure to turn off both the power switch on the back and the power button on the front or side of the monitor. Double-checking that the monitor is fully powered off will help prevent any accidental damage during the removal process.
Now that your Dell monitor is powered off and safely prepared, you are ready to move on to the next step of removing the sound bar attachment.
Step 3: Disconnect all cables from the monitor
Before you can remove the sound bar from your Dell monitor, it’s important to disconnect all cables connected to the monitor. This step will ensure that you have unobstructed access to the attachment screws and prevent any accidental damage to the cables during the removal process.
Start by locating the cables that are connected to your Dell monitor. Common cables that may be connected include the power cable, HDMI cable, VGA cable, and any other audio or video input cables. Carefully trace each cable to its respective connector on the back of the monitor.
Once you have identified the cables and their connectors, gently remove each cable by firmly grasping the connector and pulling it straight out. Avoid yanking or twisting the cables, as this can cause damage to the connectors or the cables themselves.
If any of the cables are tightly secured or difficult to remove, use gentle wiggling or twisting motions while pulling to loosen them. Take your time and exercise caution to avoid damaging the connectors or the cables.
Once all the cables are disconnected, set them aside in a safe place or neatly coil them for easy reconnection later. Keeping the cables organized will help streamline the removal process and make it easier to reconnect them when you’re ready to use the monitor again.
By disconnecting all cables from your Dell monitor, you are now one step closer to removing the sound bar attachment. With the cables out of the way, you can proceed to the next step with confidence.
Step 4: Locate and remove the sound bar attachment screws
Now that you have disconnected all the cables from your Dell monitor, it’s time to locate and remove the sound bar attachment screws. These screws secure the sound bar to the monitor and need to be removed in order to detach the sound bar.
Start by examining the back of your Dell monitor where the sound bar is attached. Look for any visible screws or fasteners that are holding the sound bar in place. The number and location of these attachment screws may vary depending on the model of your Dell monitor.
Once you locate the attachment screws, you will need the appropriate tool to remove them. In most cases, a Phillips screwdriver or an Allen wrench should be sufficient. Choose the tool that fits securely into the screw head to avoid stripping the screws.
Using the appropriate tool, carefully loosen and remove each sound bar attachment screw. Make sure to keep track of the screws as you remove them, as they will need to be reinstalled if you decide to reattach the sound bar in the future.
It’s important to note that some Dell monitor models may have plastic clips or latches instead of screws to secure the sound bar. In such cases, gently press the clips or latches to release the sound bar from the monitor.
Once you have removed all the attachment screws, the sound bar should be ready to detach from the Dell monitor. However, before proceeding to the next step, make sure to handle the sound bar with care and avoid applying excessive force that could potentially damage the sound bar or the monitor.
With the sound bar attachment screws removed, you are now prepared for the next step of gently detaching the sound bar from your Dell monitor.
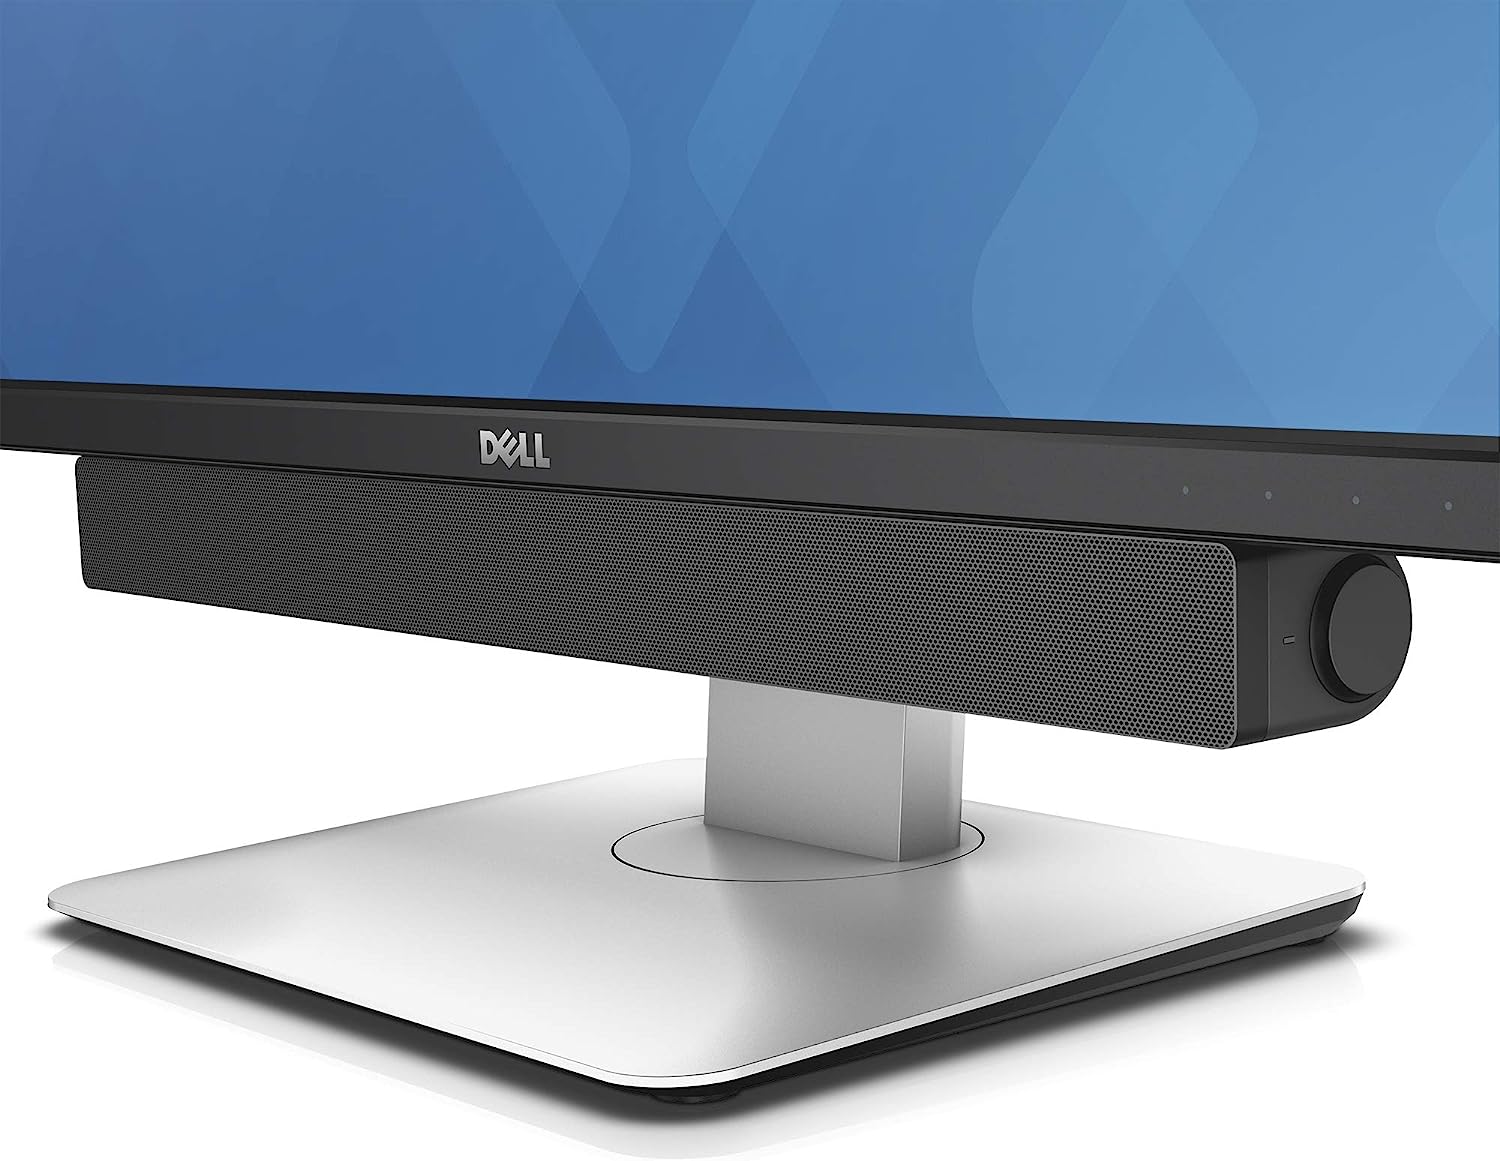
Step 5: Gently detach the sound bar from the monitor
Now that you have removed the attachment screws from your Dell monitor, it’s time to gently detach the sound bar from the monitor itself. This step requires careful handling to prevent any damage to the sound bar or the monitor.
Begin by placing one hand on either side of the sound bar. Apply gentle and even pressure as you start to lift the sound bar away from the monitor. It’s important to avoid pulling or yanking on the sound bar, as this can cause unnecessary strain on the connectors.
If the sound bar feels stuck or resistant, double-check that you have removed all the attachment screws or released any plastic clips or latches securing the sound bar. Sometimes, a slight wiggle or gentle twist may help loosen the sound bar and facilitate its removal.
As you lift the sound bar away from the monitor, be mindful of any connected cables or wires that may still be attached. If you encounter any resistance, gently inspect the underside of the sound bar to ensure there are no hidden connectors or clips still holding it in place.
Once the sound bar is detached, set it aside in a safe and secure location. It’s advisable to place it on a soft surface or use a soft cloth to prevent any scratches or damage while it is not attached to the monitor.
You now have successfully detached the sound bar from your Dell monitor. Take a moment to appreciate your progress and the care you have taken in this process. The next step involves safely storing the sound bar and preparing for reassembly if desired.
Step 6: Secure the removed sound bar safely
After detaching the sound bar from your Dell monitor, it’s important to secure it safely to ensure its protection and prevent any potential damage. Properly storing the removed sound bar will also make it easier if you decide to reattach it in the future. Follow these steps to securely store the sound bar:
- Use a soft cloth or microfiber cloth to gently clean the surface of the sound bar. This will remove any dust or fingerprints and keep it in good condition while it’s not in use.
- Find a safe and secure location to store the sound bar. It’s recommended to place it in a drawer, on a shelf, or in a storage container specifically designed to protect delicate electronic equipment.
- If possible, retain the original packaging or find a suitable box or container that provides cushioning and protection for the sound bar. This will help prevent any accidental damage while in storage.
- Ensure that the storage area is dry and free from any potential hazards, such as liquids, extreme temperatures, or excessive dust. These conditions can potentially harm the sound bar or affect its performance when reattached.
- If you removed any attachment screws or small components, store them in a small container or bag and keep them with the sound bar. This ensures that all the necessary pieces are readily available if you decide to reattach the sound bar.
By securely storing the removed sound bar, you are taking proactive measures to maintain its condition and protect it from any potential damage. Whether you choose to reattach the sound bar or keep it stored for future use, taking care of it when it’s not in use will help prolong its lifespan and ensure optimal performance.
Step 7: Reconnect the cables and power on the monitor
Now that you have safely removed the sound bar from your Dell monitor and stored it securely, it’s time to reconnect the cables and power on the monitor. Follow these steps to complete the process:
- Retrieve the cables that you disconnected earlier from the monitor.
- Gently inspect the cable connectors and the corresponding ports on the back of the monitor to ensure they are free from any debris or damage.
- Align each cable with its respective port and firmly insert it until it clicks into place. Make sure to match the cable types to the correct ports, such as the power cable to the power port and the video cable to the corresponding video input port.
- If you have multiple cables, organize them neatly to avoid any tangling or strain on the connectors.
- Once all the cables are securely connected, locate the power button on the monitor and press it to turn on the device.
- Wait for the monitor to power on and display an image. Be patient, as it may take a few seconds for the monitor to boot up completely.
- Adjust the settings on the monitor, such as brightness or volume, as desired. Test the audio output to ensure that the internal speakers are functioning properly if you removed the sound bar.
By reattaching the cables and powering on the monitor, you have successfully completed the removal process and restored your Dell monitor to its functional state. Take a moment to enjoy the enhanced visuals and immersive audio experience provided by your monitor, whether with or without the sound bar.
If you removed the sound bar with the intention of replacing it or relocating your monitor, remember to keep the stored sound bar in a safe place for future use. Should you decide to reattach it, simply follow the steps in reverse order, starting from Step 7, to properly reconnect and secure the sound bar to your Dell monitor.
Conclusion
Removing the sound bar from your Dell monitor is a fairly straightforward process, provided you follow the steps outlined in this guide. By gathering the necessary tools, powering off the monitor, disconnecting all cables, locating and removing the attachment screws, gently detaching the sound bar, and securely storing it, you can successfully remove the sound bar from your Dell monitor.
Remember to exercise caution and handle all components with care throughout the process to avoid any damage. Taking the time to properly store the sound bar will ensure its protection and make it easier to reattach if desired in the future.
Whether you choose to remove the sound bar temporarily or permanently, your Dell monitor will still provide an outstanding visual experience. If you prefer the internal speakers or plan to replace the sound bar with a different audio setup, this guide has equipped you with the knowledge to make that transition smoothly.
Whenever you decide to reattach the sound bar, simply follow the steps in reverse order, starting with reconnecting the cables and powering on the monitor. With the sound bar properly attached, you can once again enjoy enhanced audio quality and immersive sound experiences while using your Dell monitor.
Remember that the specific steps and attachment mechanisms may differ depending on the model of your Dell monitor. Always refer to the manufacturer’s documentation for the most accurate and detailed instructions.
By following this guide and using proper care, you can confidently remove the sound bar from your Dell monitor and explore alternative audio options or customize your setup to suit your preferences.