Home>Production & Technology>Acoustic>How To Remove The Pins From An Acoustic Guitar
Acoustic
How To Remove The Pins From An Acoustic Guitar
Published: March 11, 2024
Learn how to safely remove the pins from your acoustic guitar with our step-by-step guide. Keep your instrument in top condition with our expert tips.
(Many of the links in this article redirect to a specific reviewed product. Your purchase of these products through affiliate links helps to generate commission for AudioLover.com, at no extra cost. Learn more)
Table of Contents
Introduction
Removing the pins from an acoustic guitar may seem like a daunting task, especially for beginners. However, with the right tools and a clear understanding of the process, it can be a straightforward and rewarding experience. Whether you're changing strings, cleaning your guitar, or making adjustments, knowing how to safely remove the pins is a valuable skill for any guitarist.
The pins, also known as bridge pins, are small, tapered components that hold the strings in place at the bridge of the guitar. They play a crucial role in maintaining the tension and stability of the strings, ultimately influencing the instrument's tone and playability. Understanding how to remove these pins without causing damage to the guitar is essential for proper maintenance and care.
In this guide, we will walk you through the step-by-step process of removing the pins from your acoustic guitar. We'll cover the tools you'll need, the techniques for loosening the strings, and the proper method for safely extracting the pins. Additionally, we'll discuss the importance of using the right tools and offer tips for replacing the strings once the pins have been removed.
By mastering this fundamental aspect of guitar maintenance, you'll gain confidence in handling your instrument and be better equipped to keep it in optimal playing condition. So, let's dive into the process of removing the pins from your acoustic guitar and empower you to take control of your instrument's care and maintenance.
Tools Needed
Before embarking on the task of removing the pins from your acoustic guitar, it's essential to gather the necessary tools to ensure a smooth and efficient process. Having the right tools at your disposal will not only make the task easier but also help prevent any potential damage to your instrument. Here are the essential tools you'll need:
-
String Winder: A string winder is a handy tool designed to facilitate the process of winding and unwinding the tuning pegs. It typically features a crank handle and a peg remover, making it an indispensable tool for changing strings and, in this case, removing bridge pins.
-
Bridge Pin Puller: While it's possible to remove bridge pins using alternative methods, a bridge pin puller is specifically designed for this purpose. It features a notched end that grips the pin securely, allowing for controlled and safe removal without causing damage to the guitar.
-
Soft Cloth: Having a soft cloth on hand is beneficial for protecting the guitar's finish during the pin removal process. It can be used to gently support the guitar body and prevent any accidental scratches or dings.
-
Replacement Strings: While not a tool per se, having a set of replacement strings ready is advisable. Once the pins are removed, you may want to replace the strings, and having a fresh set at the ready will streamline the entire maintenance process.
By ensuring you have these tools readily available, you'll be well-prepared to tackle the task of removing the pins from your acoustic guitar. With the right tools in hand, you can proceed with confidence, knowing that you have everything you need to complete the process effectively and safely.
Step 1: Loosen the Strings
Before attempting to remove the bridge pins from your acoustic guitar, it's crucial to start by loosening the strings. This step is essential as it reduces the tension on the bridge pins, making them easier to remove and minimizing the risk of damage to the guitar.
To begin, place the guitar on a flat surface, ensuring it is stable and secure. Using a string winder, start with the low E string and turn the tuning peg counterclockwise to unwind the string. As the tension decreases, carefully unwind the string from the peg, ensuring it doesn't become tangled or create unnecessary strain on the peg.
Continue this process for each string, working your way from the low E string to the high E string. As you loosen each string, gently guide it out of the bridge saddle, allowing it to rest loosely on the guitar's body. It's important to maintain a steady and controlled approach, ensuring that the strings are gradually and evenly loosened to prevent sudden release of tension, which could potentially damage the guitar or cause injury.
Once all the strings have been adequately loosened and removed from the bridge saddle, you'll notice a significant reduction in tension across the bridge pins. This decrease in tension sets the stage for the subsequent step of removing the bridge pins with greater ease and safety.
By taking the time to properly loosen the strings, you're not only preparing the guitar for the pin removal process but also minimizing the risk of any undue stress on the instrument's components. This thoughtful approach sets the foundation for a smooth and successful pin removal process, ensuring that your acoustic guitar maintenance is carried out with care and precision.
Step 2: Use the Proper Tool
The successful removal of bridge pins from an acoustic guitar hinges on using the appropriate tool for the task. While it may be tempting to improvise with household items, using a dedicated bridge pin puller is the safest and most effective approach.
A bridge pin puller, also known as a bridge pin remover, is specifically designed to extract bridge pins without causing damage to the guitar. Its notched end is engineered to securely grip the pin, providing the necessary leverage and control to ease it out of the bridge. This specialized tool minimizes the risk of slippage or exerting excessive force, which could potentially harm the guitar's bridge or surrounding wood.
When selecting a bridge pin puller, it's essential to ensure that it is compatible with your guitar's bridge pins. Different guitars may have varying pin sizes and shapes, so choosing a puller that aligns with your instrument's specifications is crucial for a seamless removal process.
Using a bridge pin puller not only safeguards the integrity of the guitar but also simplifies the task for the guitarist. Its ergonomic design and purpose-built functionality streamline the pin removal process, making it accessible even for those new to guitar maintenance.
In the absence of a bridge pin puller, alternative methods such as using pliers or improvised tools may pose a greater risk of damage to the guitar. Pliers, for instance, lack the precision and grip of a dedicated bridge pin puller, increasing the likelihood of slippage and potential harm to the guitar's bridge and pins.
By emphasizing the importance of using the proper tool for pin removal, guitarists can approach the maintenance process with confidence and peace of mind. Investing in a quality bridge pin puller not only ensures the safe extraction of bridge pins but also contributes to the overall care and longevity of the acoustic guitar.
In the next section, we will delve into the precise steps for removing the bridge pins, leveraging the chosen tool to execute the process with finesse and precision.
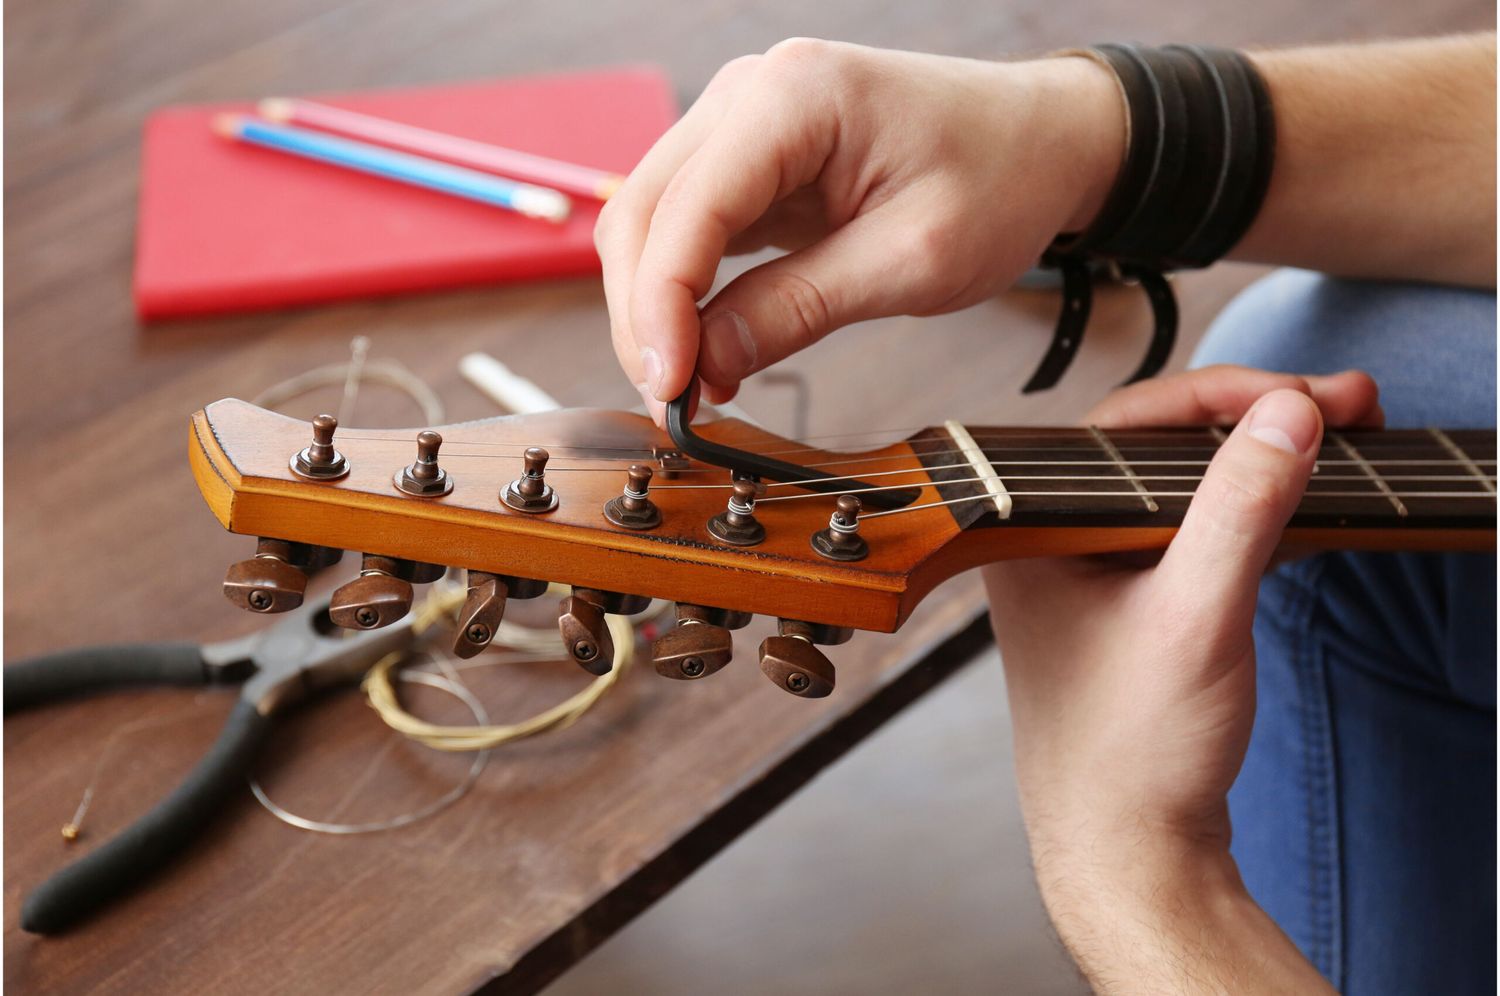
Step 3: Remove the Pins
With the strings adequately loosened and the proper tools at hand, you are now ready to proceed with the pivotal step of removing the bridge pins from your acoustic guitar. This process requires a delicate touch and attention to detail to ensure the safe extraction of the pins without causing any harm to the instrument.
-
Positioning the Guitar: Begin by placing the guitar on a stable surface, ensuring that it is well-supported and won't shift during the pin removal process. This stability is crucial for maintaining control and precision as you work with the bridge pins.
-
Gripping the Pin Puller: Take the bridge pin puller and hold it firmly, ensuring a comfortable and secure grip. The notched end of the puller should align with the head of the bridge pin, allowing for a snug fit that minimizes the risk of slippage during extraction.
-
Aligning the Puller: Carefully position the notched end of the puller around the head of the bridge pin, ensuring that it sits flush and provides optimal contact for extraction. This alignment is essential for maintaining control and preventing any unintended movement that could potentially damage the guitar.
-
Applying Even Pressure: With the bridge pin puller in place, apply steady and even pressure to gradually ease the pin out of the bridge. It's important to exercise patience and avoid applying excessive force, as the goal is to coax the pin out smoothly without causing any strain on the guitar's components.
-
Removing the Pin: As you apply pressure with the puller, you'll feel the bridge pin begin to loosen and rise from its position. Continue to exert gentle pressure, allowing the pin to release from the bridge while maintaining a firm grip with the puller. Once the pin is free, carefully lift it out of the bridge, taking care not to disturb the surrounding area.
-
Repeat the Process: Proceed to remove the remaining bridge pins using the same method, ensuring that each pin is extracted with care and precision. Exercise caution and attentiveness throughout the process, as each pin requires individual attention to prevent any mishaps.
By following these steps with diligence and care, you can successfully remove the bridge pins from your acoustic guitar, setting the stage for further maintenance or string replacement. This meticulous approach ensures that the guitar remains unharmed during the pin removal process, allowing you to carry out maintenance tasks with confidence and precision.
Step 4: Replacing the Strings
After successfully removing the bridge pins and completing any necessary maintenance or adjustments, the next crucial step is to replace the strings on your acoustic guitar. This process not only rejuvenates the instrument's tone and playability but also presents an opportunity to ensure that the new strings are installed correctly for optimal performance.
To begin, gather your replacement strings, ensuring that they are suitable for your acoustic guitar's specific requirements. It's essential to select strings that align with your preferred gauge and material, as this directly influences the instrument's tonal characteristics and feel. With the right strings in hand, you can proceed with confidence, knowing that your guitar will be equipped with the ideal set for your playing style and musical preferences.
Start by threading the end of the first string through the corresponding bridge pin hole, ensuring that it sits securely in the bridge saddle. With the string resting in place, gently press the bridge pin into its slot, allowing the string to be held firmly in position. It's important to ensure that the pin is seated flush with the bridge, providing stability and support for the string.
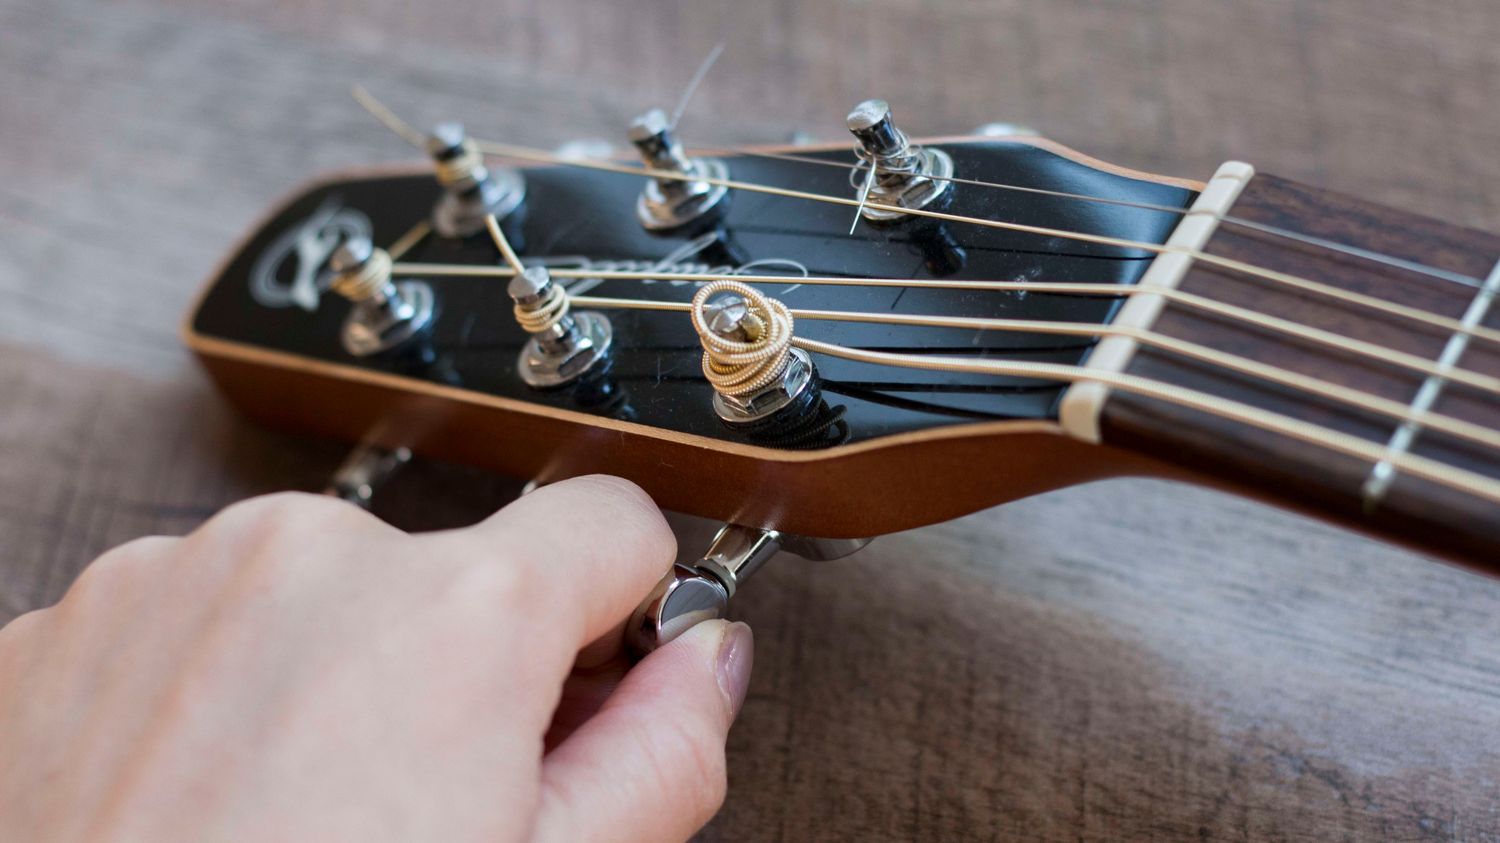
Moving to the headstock, guide the opposite end of the string through the corresponding tuning peg, leaving a sufficient length to wind around the peg. Begin winding the string in the direction that tightens the coil as you turn the tuning peg, ensuring that the string wraps neatly and evenly around the peg. As you wind the string, maintain tension to prevent any slack or uneven winding, which can affect tuning stability and overall playability.
Repeat this process for each string, ensuring that they are threaded through the bridge and headstock correctly and wound neatly around the tuning pegs. Once all the strings are in place, tune them to the desired pitch using a tuner, making any necessary adjustments to achieve proper intonation and tuning stability.
By meticulously replacing the strings with care and precision, you not only restore the acoustic guitar's sonic potential but also contribute to its overall performance and longevity. This final step in the maintenance process ensures that your instrument is ready to deliver exceptional tone and playability, empowering you to explore new musical horizons with confidence and inspiration.
Conclusion
In conclusion, mastering the art of removing the pins from an acoustic guitar is a valuable skill that empowers guitarists to take control of their instrument's maintenance and care. By following the step-by-step process outlined in this guide, guitar enthusiasts can confidently navigate the pin removal process, ensuring that their instruments remain in optimal playing condition.
Understanding the importance of using the right tools, such as a bridge pin puller and a string winder, is fundamental to executing the pin removal process with precision and care. These tools not only facilitate the task but also contribute to the overall safety and well-being of the guitar, safeguarding it from potential damage during maintenance procedures.
Furthermore, the emphasis on loosening the strings before attempting pin removal underscores the thoughtful and meticulous approach required for effective guitar maintenance. By reducing the tension across the bridge, guitarists minimize the risk of strain on the instrument's components, setting the stage for a smooth and successful pin removal process.
The significance of replacing the strings after pin removal cannot be overstated. By selecting the right strings and installing them with attention to detail, guitarists breathe new life into their instruments, revitalizing their tone and playability. This final step completes the maintenance cycle, ensuring that the acoustic guitar is ready to deliver exceptional performance and inspire musicians to explore new musical possibilities.
Ultimately, the process of removing the pins from an acoustic guitar is not merely a maintenance task but a journey of care, respect, and dedication to the instrument. By approaching guitar maintenance with mindfulness and precision, guitarists cultivate a deeper connection with their instruments, fostering a harmonious and enduring partnership that transcends musical boundaries.
In embracing the art of pin removal and guitar maintenance, musicians embark on a path of empowerment, enabling them to unleash the full potential of their instruments and embark on musical endeavors with confidence and creativity. As the strings resonate and the melodies unfold, the bond between guitarist and guitar grows stronger, echoing the timeless harmony of craftsmanship and artistry.