Home>Production & Technology>Sound>How Do I Change Alarm Sound On IPhone
Sound
How Do I Change Alarm Sound On IPhone
Published: December 16, 2023
Learn how to easily change the alarm sound on your iPhone and customize your wake-up experience. Discover new options for sound settings with our simple guide.
(Many of the links in this article redirect to a specific reviewed product. Your purchase of these products through affiliate links helps to generate commission for AudioLover.com, at no extra cost. Learn more)
Table of Contents
Introduction
Changing the alarm sound on your iPhone can be a great way to personalize your wake-up experience or set a unique tone for important reminders. Whether you’re tired of the default alarm sound or simply want a change, knowing how to change the alarm sound on your iPhone is a handy skill to have. Fortunately, Apple provides a simple and straightforward process to customize your alarm sound, allowing you to wake up to your favorite song or a soothing melody.
In this article, we will guide you through the steps to change the alarm sound on your iPhone. We’ll cover everything from accessing the alarm settings to choosing a new sound, previewing and setting the sound, customizing alarm vibrations (optional), and finally saving and testing the changes. So, grab your iPhone and let’s get started!
Note: The steps provided in this article apply to iPhones running iOS 14 or later versions. If you have an older iPhone with a different iOS version, the steps may vary slightly.
Step 1: Accessing the Alarm Settings
To change the alarm sound on your iPhone, you first need to access the alarm settings. Follow these simple steps:
- Open the Clock app on your iPhone. You can easily find it on your home screen or by swiping down and using the search function.
- At the bottom of the screen, tap on the “Alarm” tab. This will bring up the list of your existing alarms.
- If you already have an alarm set, tap on “Edit” in the upper-left corner of the screen. Otherwise, skip to the next step.
- Tap on the existing alarm that you want to change the sound for. This will open the alarm settings for that specific alarm.
Once you have followed these steps, you are ready to choose a new alarm sound and customize your wake-up experience.
Step 2: Choosing a New Alarm Sound
Now that you have accessed the alarm settings on your iPhone, it’s time to choose a new alarm sound. Apple offers a wide selection of pre-installed sounds, as well as the option to use your own custom sound. Follow these steps to select your desired alarm sound:
- Tap on the “Sound” option within the alarm settings.
- A list of pre-installed alarm sounds will appear. Scroll through the options to browse and find the sound you want.
- If you prefer to use your own sound, you can tap on “Pick a Song” at the top of the list. This will allow you to choose a song from your music library.
- Once you have found the alarm sound you want, tap on it to select it. You can preview the sound by tapping on the play button next to it.
Remember, you can always change your alarm sound again in the future, so don’t worry too much about making the perfect choice right now. Experiment with different sounds and find what works best for you.
Step 3: Previewing the Alarm Sound
Before you finalize the alarm sound, it’s a good idea to preview how it will sound when it wakes you up in the morning. The preview function allows you to ensure that the sound is not too loud, too soft, or unpleasant to your ears. Follow these steps to preview the selected alarm sound:
- After selecting the alarm sound in the previous step, tap on the play button next to it.
- Your iPhone will play a sample of the chosen sound, allowing you to listen to it and determine if it suits your preferences.
- If the sound is too loud or too soft, you can adjust the volume by using the volume buttons on the side of your iPhone. This will help you find the perfect balance for your wake-up experience.
Take the time to listen to the alarm sound at different volumes to ensure it’s comfortable and effective for waking you up. It’s important to choose a sound that is pleasant and motivating, rather than jarring or annoying, to start your day on the right foot.
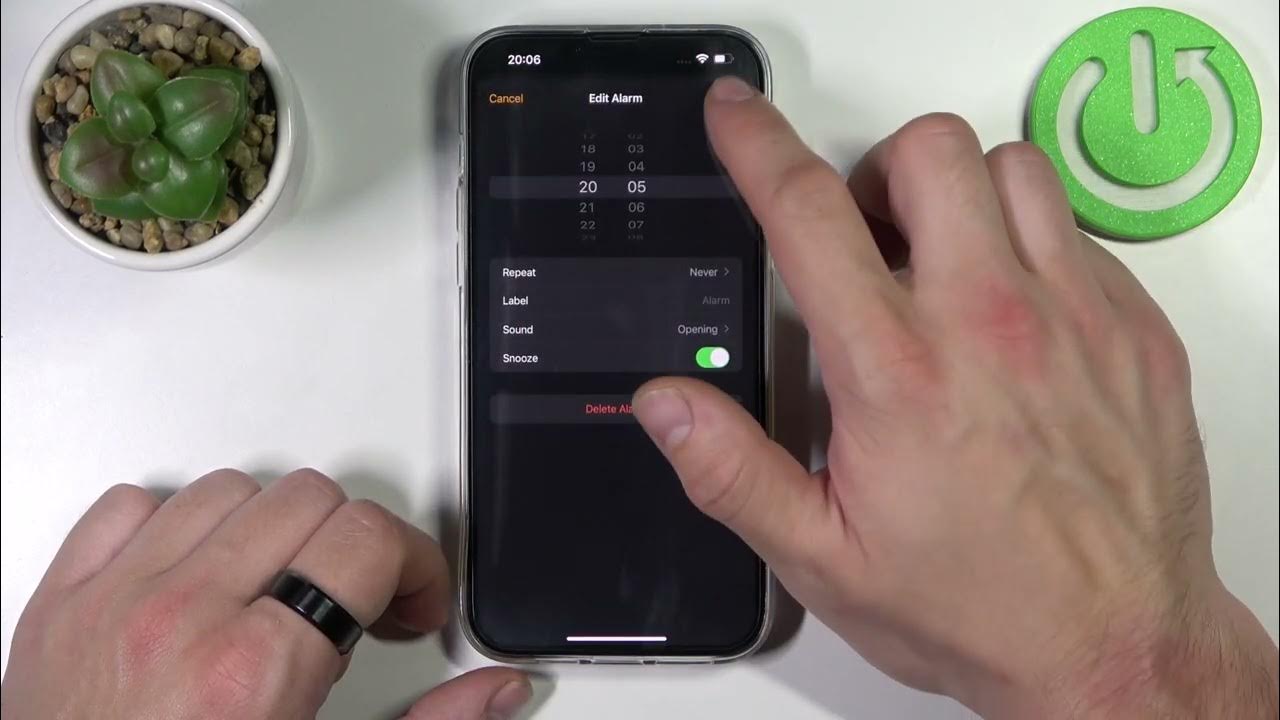
Step 4: Setting the New Alarm Sound
Now that you have chosen and previewed your desired alarm sound, it’s time to set it as the new sound for your alarm. Follow these simple steps to complete the process:
- After you have selected and previewed the alarm sound, tap on the “Back” or “Save” button in the top-left corner of the screen. This will take you back to the main alarm settings.
- Make sure that the toggle switch next to the “Alarm” option is turned on. This ensures that the alarm will be active and will use the newly selected sound.
- If you want to change other settings for the alarm, such as the time, repeat mode, or snooze options, you can do so at this point.
- Once you have confirmed all the settings, tap on the “Save” button in the top-right corner of the screen. This will save your changes and set the new alarm sound.
Congratulations! You have successfully changed the alarm sound on your iPhone. Now, when the alarm goes off, it will play the newly selected sound and wake you up with a fresh and personalized tone.
Remember, if you have multiple alarms set on your iPhone, you can repeat these steps for each alarm to customize the sound individually. This allows you to have different wake-up experiences depending on your schedule or preference.
Step 5: Customizing Alarm Vibrations (Optional)
In addition to changing the sound, you may also want to customize the vibration pattern for your alarm. This can be particularly useful if you prefer to have a silent alarm, or if you want to supplement the sound with a tactile vibration. Follow these steps to customize the alarm vibrations:
- Within the alarm settings, locate the “Vibration” option.
- Tap on the “Vibration” option to open the list of available vibration patterns.
- Select a pre-installed vibration pattern that suits your preference by tapping on it.
- If you want to create your own custom vibration pattern, scroll to the top of the list and tap on “Create New Vibration”. Follow the on-screen instructions to create a unique vibration pattern by tapping and holding on the screen.
Customizing the vibration pattern gives you an additional level of personalization for your alarm. You can choose a gentle vibration pattern or create a more intense one depending on your preference.
Keep in mind that custom vibration patterns can be used not only for alarms but also for other notifications on your iPhone. This feature allows you to differentiate between various alerts based on vibration patterns alone.
If you don’t wish to have any vibrations for your alarm, you can select the “None” option from the vibration list to disable it entirely.
Step 6: Saving and Testing the Changes
After customizing the alarm sound and optionally the vibrations, it’s crucial to save your changes and test the new alarm setting to ensure everything is working as expected. Follow these final steps to complete the process:
- Make sure all your alarm settings, including the sound and vibration (if set), are configured to your liking.
- Tap on the “Save” or “Done” button in the top-right corner of the screen. This will save your changes and bring you back to the main alarms page.
- Once you have saved the changes, it’s time to ensure that the new alarm sound and settings are functioning correctly. To do so, set your alarm to go off at a nearby time and wait for it to trigger.
- When the alarm time arrives, you should hear the new sound play and, if enabled, feel the vibrations associated with it.
- Avoid dismissing the alarm immediately. Instead, let it play for a few seconds to confirm that the chosen sound and vibrations are working as expected.
By testing the alarm, you can verify that everything is functioning correctly and that the chosen sound and vibrations match your preferences. If any adjustments are needed, you can go back to the alarm settings and make the necessary changes before saving them again.
Congratulations! You have successfully customized the alarm sound and vibrations on your iPhone. Now you can start your day with a pleasant and personalized wake-up experience.
Conclusion
Customizing the alarm sound on your iPhone is a simple yet effective way to add a personal touch to your wake-up routine. By following the steps outlined in this article, you can easily change the default alarm sound to something that resonates with your preferences.
From choosing a new alarm sound from the pre-installed options to selecting your favorite song from your music library, the process allows you to infuse your mornings with a fresh and uplifting tone. Additionally, customizing the alarm vibrations provides an extra level of personalization for those who prefer a silent wake-up or wish to combine sound with tactile feedback.
Remember to save your changes and test the new alarm setting to ensure it works as expected. By doing so, you can start your day with confidence, knowing that your customized alarm will wake you up just the way you like it.
So go ahead, tap into your iPhone’s alarm settings, explore the variety of sound options, and discover the perfect tone that will greet you each morning. Embrace the ability to tailor your wake-up experience and make those early hours a little more enjoyable and personal.