Home>Production & Technology>Sound>How To Change IPhone Notification Sound
Sound
How To Change IPhone Notification Sound
Published: October 26, 2023
Learn how to change the notification sound on your iPhone and customize it according to your preferences. Discover step-by-step instructions and tips to personalize your device's sound settings.
(Many of the links in this article redirect to a specific reviewed product. Your purchase of these products through affiliate links helps to generate commission for AudioLover.com, at no extra cost. Learn more)
Table of Contents
Introduction
Notifications on our smartphones play a crucial role in keeping us updated and informed about the important events happening in our digital lives. Whether it’s a text message from a loved one, an email from work, or a social media notification, the sound that accompanies these alerts can shape our overall user experience. However, sometimes the default notification sound on our iPhone might become monotonous or unappealing.
Thankfully, the iOS operating system allows users to customize their iPhone notification sounds with a few simple steps. Whether you want a subtle and soothing sound or a more lively and energetic tone, changing your iPhone’s notification sound is an easy and enjoyable process.
In this article, we’ll guide you through the step-by-step process of changing your iPhone notification sound. Whether you’re using an iPhone 11, iPhone SE, or any other model, the steps remain the same, and you’ll be well on your way to giving your device a personal touch.
So, let’s dive in and explore how you can change your iPhone notification sound to make it truly your own!
Step 1: Open the Settings App
The first step to changing your iPhone notification sound is to open the Settings app on your device. The Settings app is where you can customize various aspects of your iPhone’s functionality and appearance.
To open the Settings app, locate the icon on your home screen that resembles a gear or cogwheel. Tap on this icon to launch the Settings app. If you can’t find it on your home screen, you can swipe down from the top-right corner of your screen to access the Control Center and tap on the Settings icon there. Alternatively, you can use the Spotlight Search feature by swiping down on your home screen and typing “Settings” in the search bar.
Once you’ve successfully opened the Settings app, you’ll be presented with a wide array of options and settings to explore. Don’t worry, changing your notification sound is a breeze and can be accomplished in just a few more steps.
Now that you have the Settings app open on your iPhone, let’s proceed to the next step and navigate to the relevant section where you can customize your notification sound.
Step 2: Select “Sounds & Haptics”
Once you have the Settings app open on your iPhone, it’s time to navigate to the “Sounds & Haptics” section, where you can make changes to your notification sound. This section allows you to customize various sound and vibration settings on your device.
To find the “Sounds & Haptics” section, you’ll need to scroll down the settings menu until you see the option labeled “Sounds & Haptics” or simply “Sounds.” Tap on this option to access the sound settings.
Upon entering the “Sounds & Haptics” menu, you’ll see a variety of sound-related options to explore. This is where you can customize not only your notification sound but also your ringtones, text tones, and other sound effects.
Now that you’ve reached the “Sounds & Haptics” section, you’re one step closer to changing your iPhone notification sound to your desired tone. Let’s move on to the next step, where we’ll choose the notification sound category.
Step 3: Choose the Notification Sound Category
After accessing the “Sounds & Haptics” section in the Settings app, it’s time to choose the category from which you want to select your new notification sound. The categories available may vary depending on your iOS version, but typically, you’ll find options like “Ringtones,” “Text Tone,” and “New Mail.” For changing the notification sound, we’ll focus on the “Text Tone” category.
To proceed, tap on the “Text Tone” option. In this category, you can choose the sound that will play when you receive a notification for text messages. However, bear in mind that this sound will be applied to all incoming text messages unless you customize specific app sounds later in the process. If you want to change the sound for alerts from other apps, you can do so in the individual app settings, which we’ll cover in a later step.
Once you’ve selected the “Text Tone” category, you’ll be presented with a list of pre-installed tones that come with your iPhone. These tones range from familiar classics to more modern and unique options. You can listen to each tone by tapping on it, allowing you to preview how it will sound during notifications.
Ready to give your iPhone a personalized touch? Let’s proceed to the next step, where we’ll choose a new notification sound from the available options.
Step 4: Select a New Notification Sound
Now that you’re in the “Text Tone” category of the “Sounds & Haptics” section, it’s time to choose a new notification sound for your iPhone. This is where you can browse and select from the available options or even add custom notification sounds.
Scroll through the list of pre-installed notification sounds and listen to each one by tapping on it. This will allow you to get a feel for how the sound will play when you receive notifications. From classic chimes to playful melodies, there’s a wide range of options to choose from.
If none of the pre-installed sounds catch your fancy, you can add custom notification sounds to your iPhone. To do this, you’ll need to have the sound file you want to use in a compatible format, such as .m4r for iPhone. You can either create your own custom sound or download one from various websites that offer free or paid notification sound files. Once you have the file, you can add it to your iPhone using iTunes or other methods, and it will appear in the list of available notification sounds.
When selecting a new sound, remember to consider your preferences and the context in which you’ll be receiving notifications. You may want a subtle sound that won’t be too disruptive during important meetings or a more attention-grabbing tone if you don’t want to miss any important alerts.
Once you’ve made your choice, tap on the notification sound you want to use. The checkmark next to the sound indicates that it is selected. Feel free to explore different options until you find the perfect notification sound that fits your style and preferences.
With a new notification sound selected, let’s move on to the next step, where you’ll have the opportunity to preview and confirm the change.
Step 5: Preview and Confirm the Change
Once you’ve selected a new notification sound from the available options or added a custom sound, it’s time to preview and confirm the change. This step allows you to ensure that the chosen sound is to your liking and fits your desired alert style.
After selecting a notification sound in the “Text Tone” category, you’ll notice that the chosen sound is highlighted with a checkmark beside it. This indicates that it is currently set as your notification sound for text messages.
To preview the selected sound, simply tap on it. You will hear a preview of how the sound will play when you receive notifications. This allows you to assess its volume, tone, and overall impact on your user experience.
If you’re satisfied with the preview and want to proceed with the change, you can simply exit the Settings app. The selected notification sound will be saved, and you’ll start experiencing the new sound whenever you receive text message notifications.
On the other hand, if you’re not quite satisfied with the selected sound during the preview, you can always go back to the “Text Tone” category in the “Sounds & Haptics” section and choose a different sound. Repeat the process until you find a notification sound that resonates with you.
Once you’re confident in your choice and have confirmed the change by saving it within the Settings app, you’re ready to enjoy your personalized notification sound on your iPhone. You’ll now be greeted by a unique sound that adds a touch of personality and excitement to your everyday digital interactions.
After you’ve confirmed the change, you also have the opportunity to further customize individual app sounds if desired. In the next step, we’ll explore this optional customization process.
Step 6: Customize Individual App Sounds (Optional)
While changing the overall notification sound in the “Text Tone” category affects all incoming text message notifications, you may want to customize the sounds for specific apps to differentiate between different types of notifications. This optional step allows you to further personalize and enhance your iPhone’s notification experience.
To customize individual app sounds, you’ll need to navigate back to the main Settings app and follow these steps:
- Open the Settings app on your iPhone.
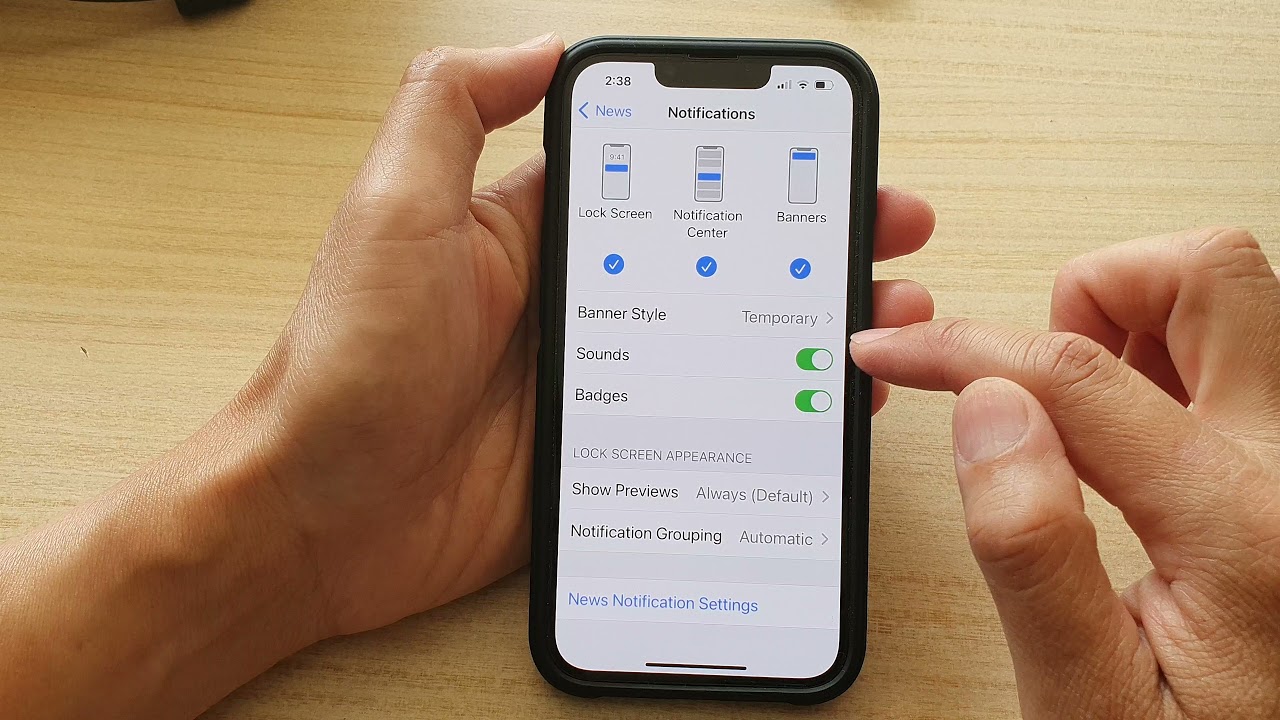
- Scroll down and select the “Notifications” option.
- Here, you’ll see a list of all the apps installed on your device. Tap on the app for which you want to customize the sound.
- In the app’s notification settings, you’ll find various options, including “Sound.” Tap on this option.
- Similar to the “Text Tone” category, you’ll be presented with a list of pre-installed sounds and the option to add custom sounds. Choose the desired sound for this specific app’s notifications.
- Exit the Settings app, and the selected sound will now play when you receive notifications from this particular app.
By customizing sound settings for individual apps, you can have a distinct and recognizable sound for each app’s notifications. For example, you might want a gentle chime for incoming emails, a unique melody for social media updates, or a specific sound for a messaging app.
Remember, this step is optional but can greatly enhance your overall notification experience, making it easier to identify the source of each notification at a glance.
With the option to customize individual app sounds, you have the flexibility to create a truly tailored notification system that suits your preferences and usage patterns.
Now that you have learned how to customize your iPhone’s notification sound and even individual app sounds, you are well-equipped to create a more personalized and engaging user experience on your device. Enjoy exploring different sound options and make your iPhone notifications a reflection of your unique style!
Conclusion
Customizing your iPhone’s notification sound is a simple and effective way to add a personal touch to your device and enhance your overall user experience. With just a few steps, you can change the default notification sound to something that resonates with your style and preferences.
In this article, we have walked you through the process of changing your iPhone notification sound, starting with opening the Settings app, selecting the “Sounds & Haptics” section, choosing the notification sound category, and selecting a new sound from the available options. We have also discussed the option to add custom notification sounds and how to customize individual app sounds for a more personalized notification experience.
By taking the time to personalize your notification sound, you can make your iPhone notifications more enjoyable and easily distinguishable from others. No more generic jingles that blend into the crowd – now you can have a sound that represents your unique style and makes receiving notifications a delight.
Remember to think about the context and purpose of each notification sound. Consider whether you want a subtle sound for discreet alerts or a more attention-grabbing tone for important notifications. This customization empowers you to tailor your notification experience to your lifestyle and needs.
So, go ahead and explore the various sound options available on your iPhone, ranging from the pre-installed tones to the possibility of adding custom sounds. Experiment with different sounds until you find the one that brings a smile to your face every time you receive a notification.
With the ability to customize your iPhone’s notification sound, you can truly make your device an extension of your personality and preferences. Embrace the power of personalized sound and enjoy a more engaging and delightful notification experience on your iPhone.