Home>Events & Info>Acapella>How To Make An Acapella Out Of A Track Logic
Acapella
How To Make An Acapella Out Of A Track Logic
Published: January 3, 2024
Want to learn how to make an acapella out of a track in Logic? Discover step-by-step instructions and unleash your acapella skills today!
(Many of the links in this article redirect to a specific reviewed product. Your purchase of these products through affiliate links helps to generate commission for AudioLover.com, at no extra cost. Learn more)
Table of Contents
Introduction
Welcome to the exciting world of acapella music! Acapella, derived from the Italian phrase “a cappella” meaning “in the style of the chapel,” refers to singing without instrumental accompaniment. It is a genre that showcases the beauty and power of human voices and has gained popularity worldwide.
Creating an acapella version of a track allows you to focus solely on the vocals, isolating them from the original instrumentation and background music. This can be a great tool for remixing, creating cover versions, or even just appreciating the raw talent of vocalists.
In this article, we will explore how to make an acapella out of a track using Logic, a popular digital audio workstation (DAW) favored by musicians, producers, and audio engineers.
Before we dive into the step-by-step process, let’s go over some important considerations. First, keep in mind that not all tracks are suitable for making acapellas. Some songs have vocals that are heavily intertwined with the instrumental elements, making it challenging to isolate them successfully. It’s best to choose tracks where the vocals have a distinct presence and separation from the music.
Secondly, creating acapellas involves manipulating audio files and applying various techniques such as EQ, filtering, and phase cancellation. While this article will guide you through the process, it’s important to have a basic understanding of audio processing and be familiar with the interface and tools of Logic.
With that said, let’s get started on our journey to create an incredible acapella version of a track with Logic!
Step 1: Importing the track into Logic
The first step in the process of creating an acapella using Logic is to import the track you want to work with into the software. Here’s how to do it:
- Launch Logic and create a new project.
- Go to the File menu and select “Import Audio File” or use the shortcut Command + Shift + I.
- Navigate to the location where the track is stored on your computer and select it.
- Click “Open” to import the track into Logic.
Once you have successfully imported the track, it will be displayed in the Logic workspace, ready for further processing.
It’s important to note that Logic supports a wide range of audio file formats, including popular ones like WAV, AIFF, and MP3. However, for best results, it is recommended to work with high-quality lossless audio files such as WAV or AIFF, as they preserve the original audio fidelity.
Before proceeding to the next steps, make sure that you have a backup copy of the original track. This is essential as the process of creating an acapella involves making modifications to the audio, and having a backup ensures that you can always go back to the original if needed.
Now that you have imported the track into Logic, let’s move on to the next step of identifying the main vocal section.
Step 2: Identifying the main vocal section
Once you have imported the track into Logic, the next step in creating an acapella is to identify the main vocal section. This refers to the part of the track where the vocals are most prominent and stand out from the other elements.
Here’s how you can identify the main vocal section:
- Listen to the entire track and pay close attention to the different sections.
- Look for sections where the vocals are clearly the focus and not overshadowed by other instruments or background music.
- Note down the timestamps or sections where you hear the vocals most prominently.
This process requires active listening and may involve multiple iterations to ensure accurate identification. It can be helpful to use headphones or monitors with good frequency response to accurately assess the vocal presence.
Once you have identified the main vocal section, you can proceed to the next step of isolating it in Logic.
Keep in mind that the main vocal section may not necessarily be the entire track. In some cases, you may want to focus on specific verses, choruses, or even individual phrases. The choice depends on your preference and the intended use of the acapella.
Now that you have identified the main vocal section, let’s move on to the next step of isolating it in Logic.
Step 3: Isolating the main vocal section
Now that you have identified the main vocal section in the track, the next step is to isolate it in Logic. This process involves creating a separate track or region specifically for the vocals, allowing you to work on them independently. Here’s how you can do it:
- Using the timestamps or sections you noted in the previous step, locate the starting point of the main vocal section in the track.
- Set the playback position in Logic to the beginning of the main vocal section.
- Use the mouse or keyboard shortcuts to highlight the section of the track that contains the vocals you want to isolate.
- Go to the Edit menu and select “Copy” or use the shortcut Command + C to copy the selected vocal section.
- Create a new audio track in Logic by going to the Track menu and selecting “New Track” or using the shortcut Command + Option + N.
- Go to the Edit menu and select “Paste” or use the shortcut Command + V to paste the copied vocal section into the new track.
By following these steps, you have now successfully isolated the main vocal section in a separate track in Logic. This allows you to focus on the vocals and apply specific processing techniques without affecting the rest of the track.
It’s important to note that when pasting the vocal section into the new track, you might want to adjust the timing and alignment if necessary. Use Logic’s editing tools to ensure that the vocals are in sync with the rest of the track.
Now that you have isolated the main vocal section, we can move on to the next step of applying EQ and filters to enhance the vocals in the acapella.
Step 4: Applying EQ and filters
After isolating the main vocal section in a separate track, the next step in creating an acapella is to apply EQ (equalization) and filters to enhance the vocals. This process allows you to shape the frequency response and remove any unwanted elements that might be present. Here’s how you can do it in Logic:
- Select the vocal track that contains the isolated vocals.
- Open the Channel EQ plugin by clicking on the inserts section of the track or using the shortcut Command + Shift + E.
- Explore the frequency spectrum of the vocals and identify any areas that need adjustment.
- Use the EQ controls to boost or cut specific frequencies. For example, you might want to boost the presence of the vocals in the mid-range frequencies for clarity, or cut the low frequencies to remove rumble or background noise.
- Experiment with different settings and listen to the results in real-time. Trust your ears and make adjustments until you achieve the desired tonal balance.
In addition to EQ, you can also apply filters to further refine the vocals and remove any unwanted elements. Logic offers various types of filters, such as high-pass filters, low-pass filters, and band-pass filters, which can help you isolate specific frequency ranges. Apply these filters selectively to remove background noise, hum, or any other undesirable elements.
Remember to use moderation and make subtle adjustments to maintain the natural character of the vocals. Over-processing can result in an unnatural and artificial sound.
Once you are satisfied with the EQ and filter settings, you can move on to the next step of enhancing the vocal clarity in the acapella.
Step 5: Enhancing the vocal clarity
After applying EQ and filters to shape the frequency response of the vocals in the acapella, the next step is to enhance the vocal clarity. This involves using various techniques and tools in Logic to make the vocals stand out and shine. Here are some steps you can take to achieve this:
- Select the vocal track that contains the isolated vocals.
- Open the Channel Strip settings for the track by clicking on the channel strip or using the shortcut Command + Option + S.
- Apply compression to even out the dynamics of the vocals. Compression helps to control the volume levels and bring out the subtle details in the performance. Adjust the threshold, ratio, attack, and release settings according to the characteristics of the vocals and the desired sound.
- Use a de-esser to reduce sibilance (excessive “s” or “sh” sounds) in the vocals. This is especially useful for acapellas where the vocals can be more exposed without instrumental accompaniment. Tweak the de-esser settings to target the specific frequencies causing sibilance.
- Consider using additional tools such as reverb or delay to add depth and ambience to the vocals. However, use these effects sparingly and with discretion, as the goal is to enhance clarity rather than overwhelm the vocals with excessive effects.
Experiment with different settings and listen to the results in the context of the acapella track. Adjust and fine-tune the processing settings until you achieve a clear and polished vocal sound.
It’s important to approach vocal enhancement with an artistically sensitive mindset. The goal is not to change the natural characteristics of the vocals but to bring out the best qualities and accentuate the performance.
Once you are satisfied with the vocal clarity, it’s time to move on to the next step of removing the background music and instruments from the acapella.
Step 6: Removing background music and instruments
Now that you have enhanced the vocal clarity in the acapella, the next step is to remove the background music and instruments to create a true acapella experience. While completely removing all traces of the original instrumentation is challenging, there are techniques you can use in Logic to minimize their presence. Here’s how you can do it:
- Create a duplicate of the vocal track that contains the isolated vocals.
- Label the duplicate track as “Instrumental Removal” or something similar for clarity.
- Apply a phase inversion plugin to the “Instrumental Removal” track. Logic provides a plugin called “Channel EQ” that can be used for this purpose.
- Adjust the phase inversion settings to invert the phase of the instrumental elements in the track.
- Play both the original vocal track and the “Instrumental Removal” track together.
- Adjust the volume levels and polarity inversion on the “Instrumental Removal” track to find the best balance where the instrumental elements cancel out or minimize.
- Continuously listen and fine-tune the phase inversion settings and volume levels until you achieve the desired reduction of the background music and instruments.
It’s important to note that the success of this technique depends on the original recording quality and how well the vocals are separated from the instrumental elements. In some cases, complete removal may not be possible, but you can still achieve a significant reduction in the background music and instrument presence.
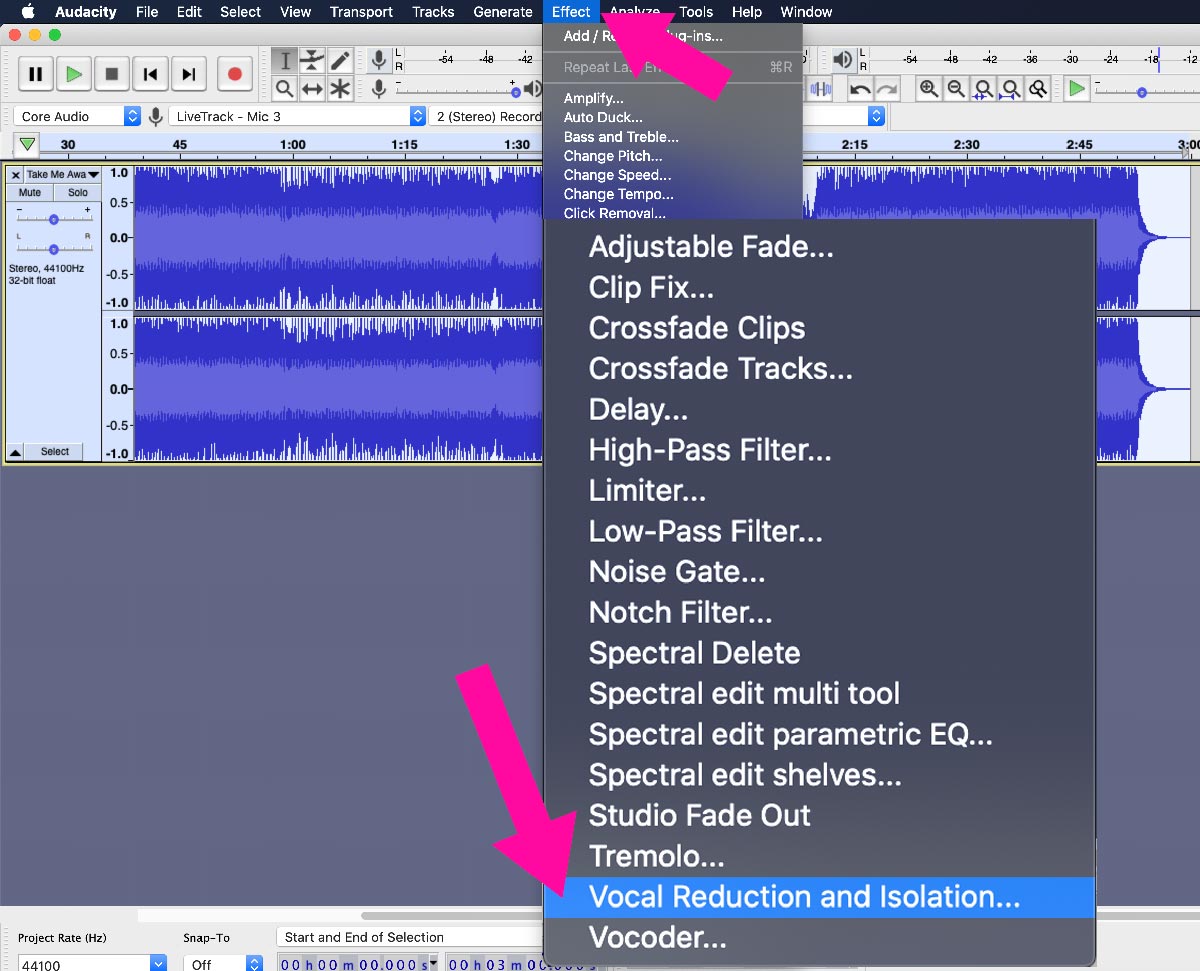
Another approach you can consider is using vocal isolation software or plugins specifically designed for acapella creation. These tools utilize advanced algorithms to isolate the vocals from the original track. However, their effectiveness may vary depending on the complexity of the mix and the quality of the recording.
Once you have achieved a satisfactory reduction in the background music and instrument presence, you can proceed to the final step of fine-tuning the acapella for a seamless listening experience.
Step 7: Fine-tuning the acapella
As you near the completion of creating an acapella in Logic, the final step is to fine-tune the acapella to ensure a seamless and enjoyable listening experience. This involves making adjustments and refinements to the isolated vocals to achieve the desired quality and cohesiveness. Here’s how you can do it:
- Listen to the acapella in its entirety and pay attention to any remaining imperfections or anomalies in the vocals.
- Use Logic’s editing tools to fix any timing issues, pitch inconsistencies, or errant noises that may have been missed during previous processing steps.
- Consider utilizing Logic’s pitch correction tools to correct any subtle tuning issues in the vocals without compromising their natural character. However, use this feature sparingly and ensure that it enhances the performance rather than making it sound robotic or artificial.
- Apply additional processing techniques such as vocal doubling, harmonies, or subtle effects if desired, while ensuring that they complement the vocals and enhance the overall presentation.
- Continuously listen and make adjustments, trusting your ears and artistic intuition, until you are satisfied with the final result.
- Save the acapella as a separate project or export it as an audio file for future use or sharing.
During the fine-tuning process, it’s important to strike a balance between perfection and preserving the authenticity and emotion in the vocal performance. Remember that a certain amount of imperfection can add character and charm to the acapella.
Additionally, it’s a good practice to consult with trusted friends or colleagues with an objective ear. Their feedback can provide valuable insights and help you further refine the acapella.
Once you are satisfied with the final acapella, you can now confidently utilize it for remixing, cover versions, or other creative purposes.
Congratulations! You have successfully created an acapella in Logic. Enjoy the process and have fun exploring the endless possibilities of vocal-only music!
Conclusion
Creating an acapella out of a track using Logic can be a fulfilling and exciting endeavor for musicians, producers, and audio enthusiasts. Through the step-by-step process outlined in this article, you have learned how to import a track into Logic, identify the main vocal section, isolate the vocals, apply EQ and filters, enhance vocal clarity, remove background music and instruments, and fine-tune the acapella.
While the process may require some technical knowledge and experimentation, the results can be rewarding. By isolating the vocals and removing the instrumentation, you can unlock a whole new dimension of the track, allowing the vocals to shine and be appreciated in their purest form.
Throughout the process, it’s important to approach each step with a careful and artistic mindset. Listen attentively, trust your ears, and make adjustments that enhance the natural qualities of the vocals without sacrificing their authenticity.
Remember to be patient and persistent. Creating a high-quality acapella can be a meticulous task that may require multiple iterations and adjustments. Embrace the process and enjoy the journey as you strive to create something unique and captivating.
With your newfound knowledge of creating acapellas in Logic, you can now explore the world of remixing, cover versions, mashups, and other creative endeavors. Let your imagination soar as you unleash the power of the human voice.
So go ahead, start experimenting, and have fun creating your own amazing acapellas using Logic!