Home>Production & Technology>Surround Sound>How To Turn Off Surround Sound Razer Kraken

Surround Sound
How To Turn Off Surround Sound Razer Kraken
Modified: January 22, 2024
Looking to turn off surround sound on your Razer Kraken? Learn how to easily disable surround sound and enhance your gaming experience.
(Many of the links in this article redirect to a specific reviewed product. Your purchase of these products through affiliate links helps to generate commission for AudioLover.com, at no extra cost. Learn more)
Table of Contents
Introduction
Welcome to this guide on how to turn off surround sound on the Razer Kraken headphones. Whether you’re using the Razer Kraken for gaming, music, or other audio activities, understanding how to disable the surround sound feature can improve your overall listening experience. While surround sound can be immersive, some users prefer a more traditional stereo sound output. By following the steps outlined in this article, you’ll be able to easily disable the surround sound feature on your Razer Kraken headphones.
The Razer Kraken is renowned for its superior audio quality and comfortable design, making it a popular choice among gamers and audio enthusiasts alike. However, if you find that the surround sound feature is not to your liking or you simply prefer a different audio output, disabling it is a straightforward process. In this guide, we’ll walk you through the necessary steps to disable surround sound using the Razer Synapse software.
Before we begin, it’s important to note that the Razer Synapse software is compatible with both PC and Mac systems. So regardless of the platform you’re using, you’ll be able to follow along and make the necessary adjustments to your Razer Kraken headset.
Now, let’s dive into the step-by-step process of disabling surround sound on your Razer Kraken headphones.
Step 1: Locating the Audio Control Panel
The first step in turning off surround sound on your Razer Kraken headphones is to locate the audio control panel on your computer. The audio control panel is where you can access and adjust various audio settings, including surround sound options.
To find the audio control panel, follow these steps:
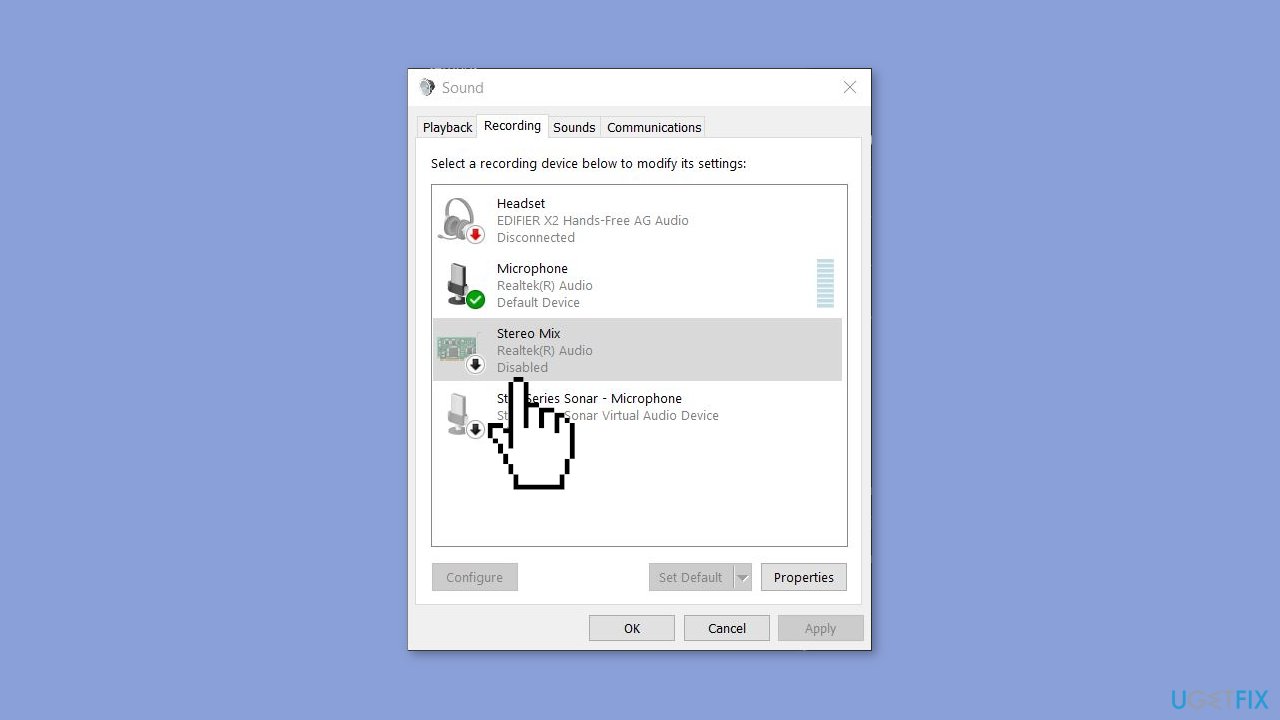
- On a Windows PC: Right-click on the volume icon in the system tray located at the bottom right corner of your screen. From the context menu that appears, select “Open Sound settings” or “Sounds”. This will open the Sound settings window.
- On a Mac: Click on the Apple menu located in the top left corner of your screen. From the drop-down menu, select “System Preferences” and then click on “Sound”. This will open the Sound settings window.
Once you have opened the Sound settings window, you are ready to proceed to the next step.
Note: The exact location and appearance of the audio control panel may vary depending on your operating system version. If you don’t see the options mentioned above, try searching for “audio settings” in the search bar of your operating system.
Step 2: Opening the Razer Synapse Software
Once you have accessed the audio control panel on your computer, the next step is to open the Razer Synapse software. Razer Synapse is a unified configuration software that allows you to customize and adjust various settings for your Razer devices, including the Kraken headphones.
To open the Razer Synapse software, follow these steps:
- Locate the Razer Synapse icon in your system tray or taskbar. It is typically represented by a green tri-snake logo.
- Right-click on the Razer Synapse icon and select “Open” from the context menu. This will launch the Razer Synapse software.
Alternatively, you can also access the Razer Synapse software by searching for it in your computer’s application menu or by double-clicking on the desktop shortcut if you have one.
Once the Razer Synapse software is open, you’re ready to move on to the next step.
Note: If you don’t have the Razer Synapse software installed on your computer, you can download it from the official Razer website. Simply search for “Razer Synapse” in your preferred search engine, navigate to the official Razer website, and download the software suitable for your operating system.
Step 3: Navigating to the Audio Settings
Once you have the Razer Synapse software open, you need to navigate to the audio settings section where you can make adjustments to the surround sound feature on your Razer Kraken headphones.
To access the audio settings, follow these steps:
- Within the Razer Synapse software, look for the “Devices” or “Headset” tab. Click on it to proceed.
- In the “Devices” or “Headset” tab, you should see your Razer Kraken headphones listed. Click on the name of your headset to access the settings specific to your device.
- Once you have selected your Razer Kraken headphones, locate the “Audio” or “Sound” settings option. This is where you can make adjustments to the audio output configuration.
After following these steps, you should now be in the audio settings section of the Razer Synapse software and ready to disable the surround sound feature.
Note: The exact location and terminology of the audio settings may vary depending on the version of the Razer Synapse software you are using. If you’re having trouble locating the audio settings, refer to the Razer Synapse documentation or support for further assistance.
Step 4: Disabling Surround Sound
Now that you have accessed the audio settings section in the Razer Synapse software, you can proceed to disable the surround sound feature on your Razer Kraken headphones. Disabling surround sound will switch your audio output to stereo mode, providing a more traditional sound experience.
To disable surround sound, follow these steps:
- In the audio settings section, look for the “Surround Sound” or “Virtual Surround” option. This is the setting responsible for enabling or disabling the surround sound feature.
- Toggle the switch or checkbox next to the “Surround Sound” option to the off position. This will disable the surround sound feature and switch your audio output to stereo mode.
Once you have disabled the surround sound feature, you can also explore other audio settings within the Razer Synapse software, such as equalizer presets or microphone enhancements, to further customize your audio experience according to your preferences.
Note: Keep in mind that the steps may slightly vary depending on the version of the Razer Synapse software you are using. If you’re having difficulty finding or disabling the surround sound feature, consult the Razer Synapse documentation or seek support from Razer directly.
Step 5: Testing the Changes
After disabling the surround sound feature on your Razer Kraken headphones, it’s important to test the changes you’ve made to ensure that the audio output is now set to stereo mode. Testing the changes will allow you to confirm that the surround sound has been successfully turned off.
Here’s how you can test the changes:
- Play any audio content on your computer, such as a music track or a YouTube video.
- Put on your Razer Kraken headphones and listen to the audio. If the surround sound feature has been disabled successfully, you should notice that the audio is now being produced in stereo, without any virtual surround sound effects.
- Pay attention to the audio quality and spatial positioning of the sound. In stereo mode, the audio should appear more centered and less spatially separated compared to when surround sound was enabled.
If you’re satisfied with the changes and prefer the stereo audio output, then congratulations! You have successfully turned off surround sound on your Razer Kraken headphones.
If, on the other hand, you decide that you prefer the surround sound experience or want to re-enable the surround sound feature, simply go back to the audio settings section in the Razer Synapse software and toggle the “Surround Sound” option back to the on position.
Note: It’s worth experimenting with different audio settings and configurations to find the sound profile that suits your preferences and usage scenarios best. Take your time to explore the various options available in the Razer Synapse software to optimize your audio experience.
Conclusion
In this guide, we have walked you through the process of turning off surround sound on your Razer Kraken headphones. Disabling the surround sound feature allows you to switch to stereo mode and enjoy a more traditional audio output. By following the steps outlined in this article, you can easily navigate the audio control panel, open the Razer Synapse software, access the audio settings, disable surround sound, and test the changes.
The Razer Kraken headphones are known for their exceptional audio quality, and being able to customize the audio settings to your preferences enhances the overall listening experience. Whether you’re a gamer, music lover, or use your headphones for other audio activities, having the flexibility to enable or disable surround sound gives you greater control over your audio output.
Remember, if at any point you decide to re-enable surround sound or further tweak your audio settings, you can easily do so within the Razer Synapse software. Experimenting with different settings can help you find the sound profile that best suits your personal preferences and usage scenarios.
We hope this guide has been helpful in assisting you with turning off surround sound on your Razer Kraken headphones. Enjoy your audio journey with the tailored sound experience that meets your needs!