Home>Devices & Equipment>Turntable>How To Ground A Turntable Without Ground Wire
Turntable
How To Ground A Turntable Without Ground Wire
Published: January 17, 2024
Learn how to ground a turntable without a ground wire and enjoy high-quality audio with our step-by-step guide.
(Many of the links in this article redirect to a specific reviewed product. Your purchase of these products through affiliate links helps to generate commission for AudioLover.com, at no extra cost. Learn more)
Table of Contents
- Introduction
- Why Grounding is Important for Turntables
- Options for Grounding a Turntable without a Ground Wire
- Method 1: Using a Grounding Box or External Grounding System
- Method 2: Connecting the Turntable to a Grounded Audio Device
- Method 3: Using a Grounding Wire or Cable
- Method 4: Grounding Turntable through the Amplifier or Receiver
- Method 5: Using a Grounding Mat or Sheet
- Conclusion
Introduction
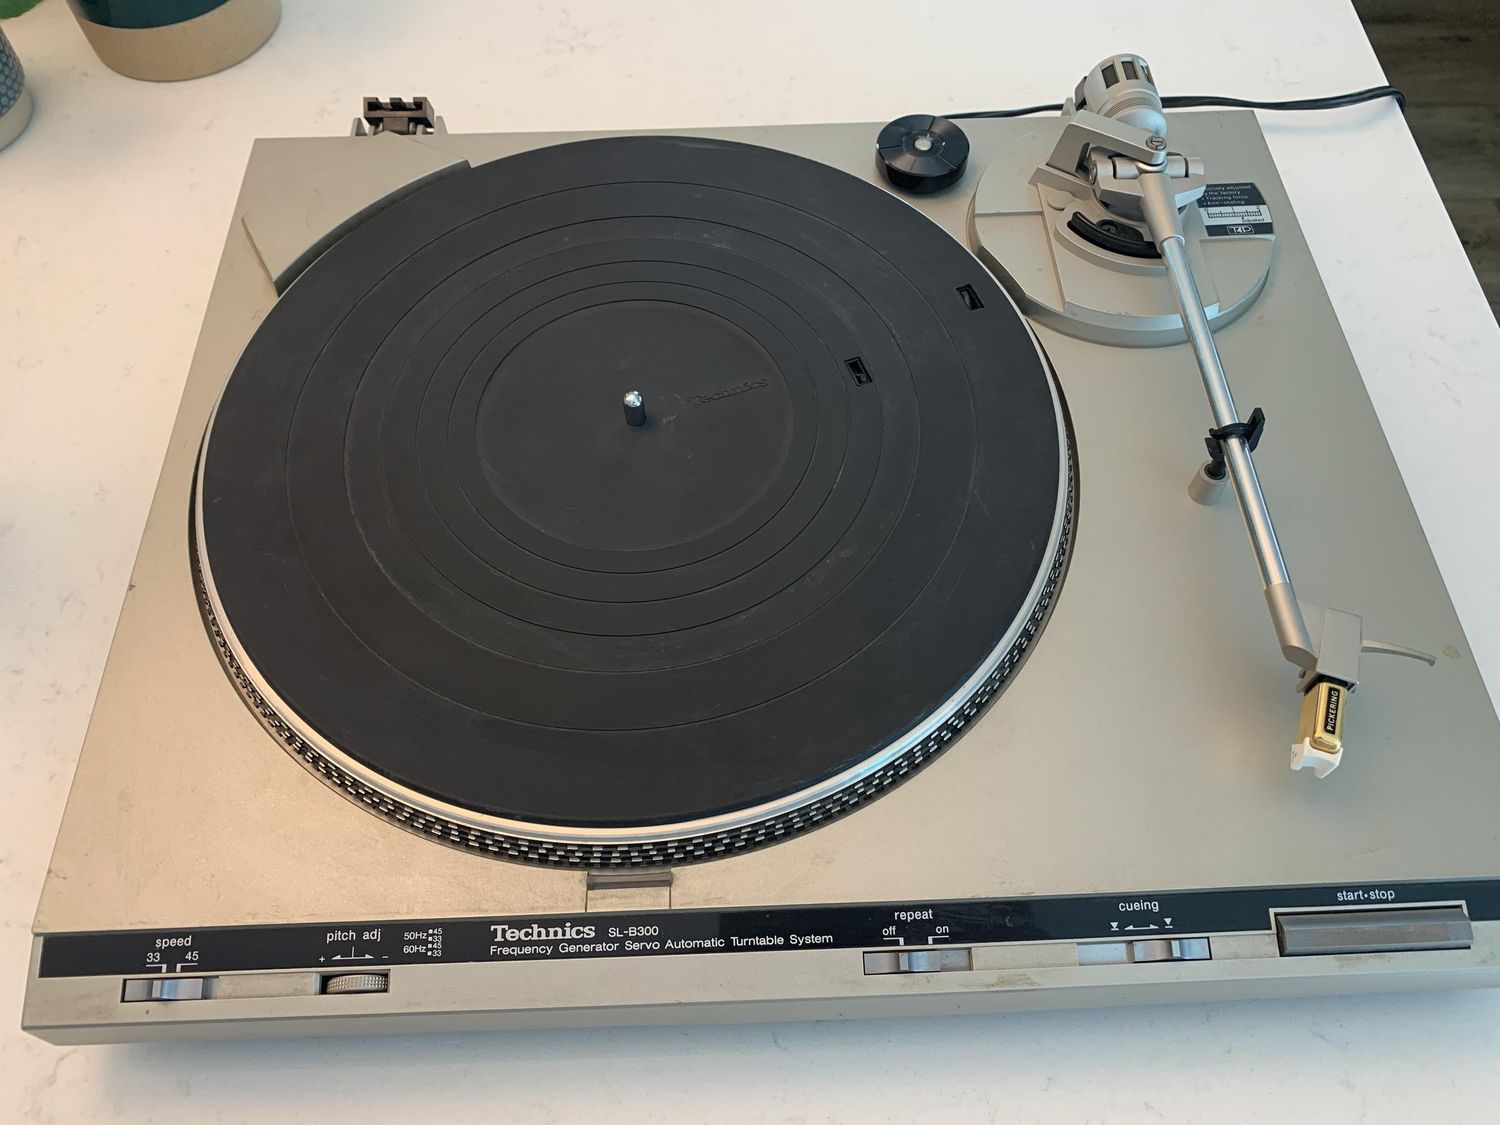
Welcome to the world of turntables! Whether you’re a vinyl enthusiast or a music lover looking to experience the warm, rich sounds of analog audio, using a turntable can be a rewarding experience. However, one of the key aspects of setting up a turntable properly is grounding. Grounding is a crucial step in ensuring optimal audio quality and minimizing unwanted noise and interference.
When it comes to turntables, grounding refers to the process of connecting the turntable’s metal chassis to a ground or earth source. This connection serves to protect the turntable from electrical interference and helps maintain a stable electrical reference point for the audio signal. Grounding helps to prevent the dreaded hum or buzz that can often plague turntables.
While many modern turntables come equipped with a built-in ground wire or grounding terminal, there are still older or entry-level turntables that may not have this feature. In such cases, it becomes necessary to find alternative methods for grounding the turntable. In this article, we will explore various options for grounding a turntable without a ground wire, providing you with the guidance you need to achieve optimal audio performance.
Before we dive into the different grounding methods, it’s important to note that if your turntable has a grounding wire or terminal, it is recommended to use it as this is the most direct and effective way to ground your turntable. However, if your turntable lacks this feature, don’t worry. There are several alternative grounding options available that can help you achieve the desired audio quality.
Why Grounding is Important for Turntables
Grounding is a crucial aspect of setting up a turntable because it helps to eliminate electrical interference and ensure optimal audio performance. When a turntable is not properly grounded, it can result in various issues that negatively impact the sound quality.
One of the main problems that can occur without proper grounding is the presence of a constant hum or buzz in the audio output. This unwanted noise can be caused by electrical interference from external sources such as power cables, electrical equipment, or even the turntable’s own motor. Grounding provides a pathway for these unwanted electrical signals to be safely directed away from the audio signal, minimizing or eliminating the hum or buzz.
Another issue that can arise without proper grounding is the potential for ground loops. Ground loops occur when there are multiple grounding paths that create a difference in electrical potential. This can result in audible noise or distortion in the audio signal. Grounding the turntable properly helps to avoid ground loops by providing a single, consistent ground reference for the audio signal.
In addition to eliminating noise and interference, grounding also helps to protect the turntable and other audio equipment from electrical damage. Electrical spikes or surges can occur in the power supply, and without proper grounding, these surges can find their way into the audio equipment, potentially causing damage to sensitive components.
Overall, grounding is essential for a turntable because it ensures a clean, interference-free audio signal, improves sound quality, and protects the equipment from potential electrical damage. By properly grounding your turntable, you can enjoy a more enjoyable and immersive listening experience, free from unwanted noise and distortion.
Options for Grounding a Turntable without a Ground Wire
If your turntable doesn’t have a built-in ground wire or grounding terminal, there’s no need to worry. There are several alternative methods available to effectively ground your turntable and ensure optimal audio performance. Let’s explore these options:
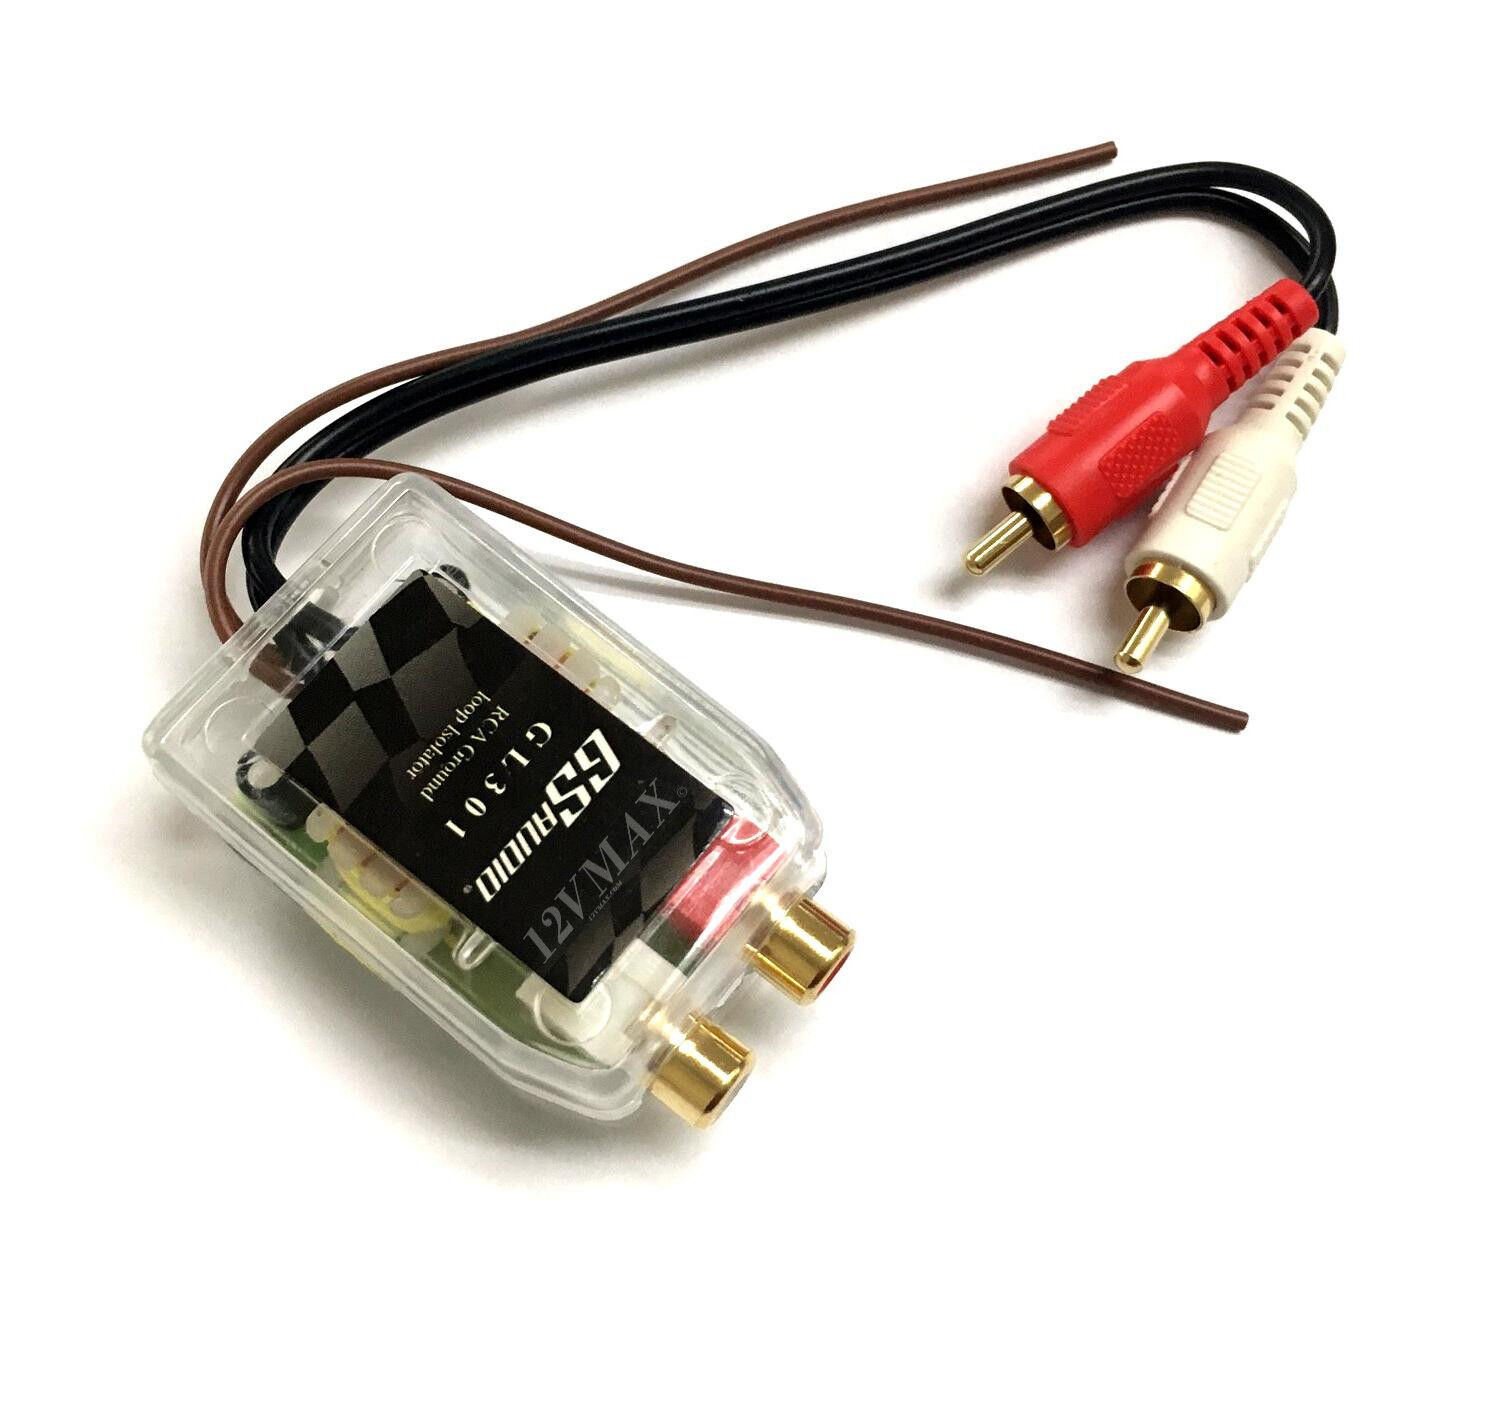
- Using a Grounding Box or External Grounding System: A grounding box or external grounding system can provide a dedicated ground connection for your turntable. These devices are designed to eliminate electrical noise and interference by providing a direct and stable ground reference. They typically come equipped with a grounding wire or terminal that you can connect to your turntable’s chassis.
- Connecting the Turntable to a Grounded Audio Device: If you have other grounded audio equipment, such as an amplifier or receiver, you can connect your turntable to it for grounding. Simply use a shielded RCA cable to connect the turntable’s audio output to the audio device’s input. This will utilize the device’s existing ground connection for effective grounding.
- Using a Grounding Wire or Cable: Another option is to use a separate grounding wire or cable to create a dedicated ground connection for your turntable. You can connect one end of the wire to the turntable’s chassis and the other end to a suitable ground source, such as a screw on a nearby wall outlet or a grounding rod. Ensure that the ground source is properly grounded to provide an effective connection.
- Grounding Turntable through the Amplifier or Receiver: If you are using an amplifier or receiver with a built-in ground wire or grounding terminal, you can connect your turntable to it for grounding. Simply connect the turntable’s ground wire or chassis to the amplifier/receiver’s ground terminal. This will utilize the amplifier/receiver’s grounding system to effectively ground your turntable.
- Using a Grounding Mat or Sheet: A grounding mat or sheet is a conductive material that can be placed under your turntable. It provides a dedicated ground connection by dissipating unwanted electrical signals. Simply place the turntable on top of the grounding mat or sheet, ensuring that it makes good contact with the turntable’s chassis.
These are just some of the options available for grounding a turntable without a built-in ground wire. Each method has its own advantages and considerations, so it’s important to choose the one that works best for your setup. Experimenting with different grounding options can help you find the most effective solution to eliminate unwanted noise and interference, ensuring optimal audio quality from your turntable.
Method 1: Using a Grounding Box or External Grounding System
A grounding box or external grounding system is a dedicated device designed to provide a reliable and effective ground connection for your turntable. These systems work by isolating the turntable’s chassis from external electrical interference and creating a direct path for any unwanted signals to safely dissipate.
To use a grounding box or external grounding system, follow these steps:
- Choose a suitable grounding box or system: Look for a grounding box or system that is compatible with your turntable and meets your specific grounding needs. There are various options available in the market, ranging from simple grounding boxes to more advanced systems with additional features.
- Connect the grounding box or system: Depending on the specific device, you will typically connect the grounding box or system to your turntable using a grounding wire. Attach one end of the grounding wire to the turntable’s chassis and the other end to the grounding terminal on the grounding box or system.
- Ground the grounding box or system: The grounding box or system itself needs to be properly grounded for it to be effective. Ensure that the grounding box or system is connected to a reliable ground source, such as a grounded wall outlet or a designated grounding rod.
- Test for improved audio performance: Once the grounding box or system is properly connected and grounded, test your turntable’s audio performance. Listen for any reduction in unwanted noise or interference. If all goes well, you should experience a cleaner and more enjoyable audio playback.
Using a grounding box or external grounding system is a convenient and effective way to ground a turntable without a built-in ground wire. These devices are specifically designed to address grounding issues and provide a dedicated ground connection for your turntable. By isolating the turntable’s chassis from external interference, they help to minimize unwanted noise and ensure optimal audio performance.
Before purchasing a grounding box or system, it’s important to research different options and choose one that is compatible with your turntable and fits your specific needs. Additionally, always follow the manufacturer’s instructions for proper installation and grounding to maximize the effectiveness of the system.
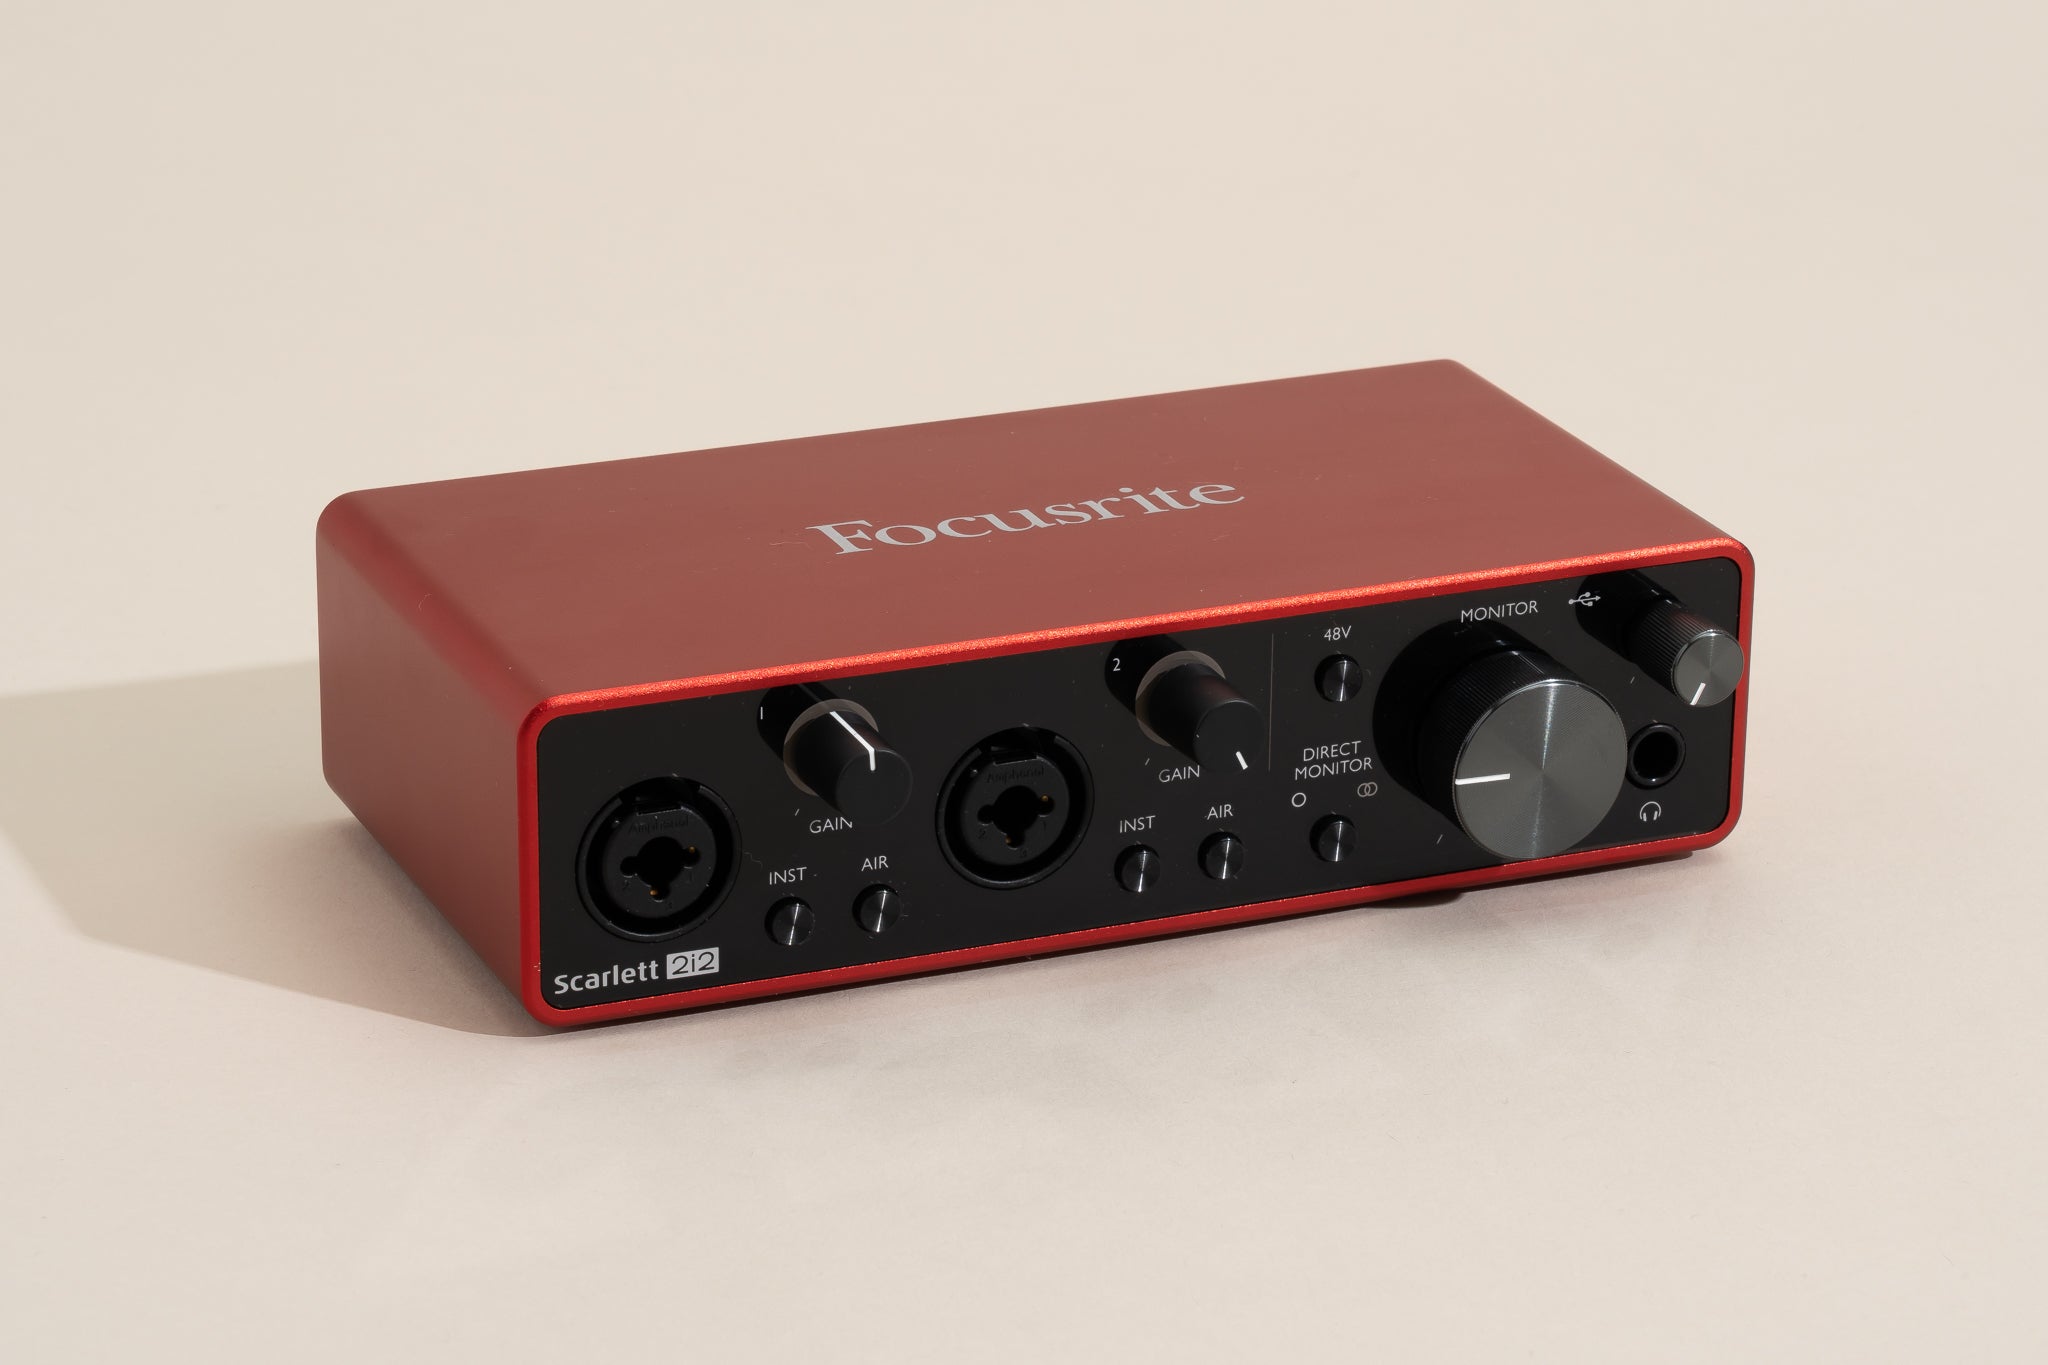
Method 2: Connecting the Turntable to a Grounded Audio Device
If you have a grounded audio device such as an amplifier or receiver, you can utilize its existing ground connection to ground your turntable. This method is straightforward and effective, requiring only a shielded RCA cable.
To connect the turntable to a grounded audio device, follow these steps:
- Identify a grounded audio device: Ensure that the audio device, such as an amplifier or receiver, has a built-in ground wire or grounding terminal. This will serve as the source for the turntable’s ground connection.
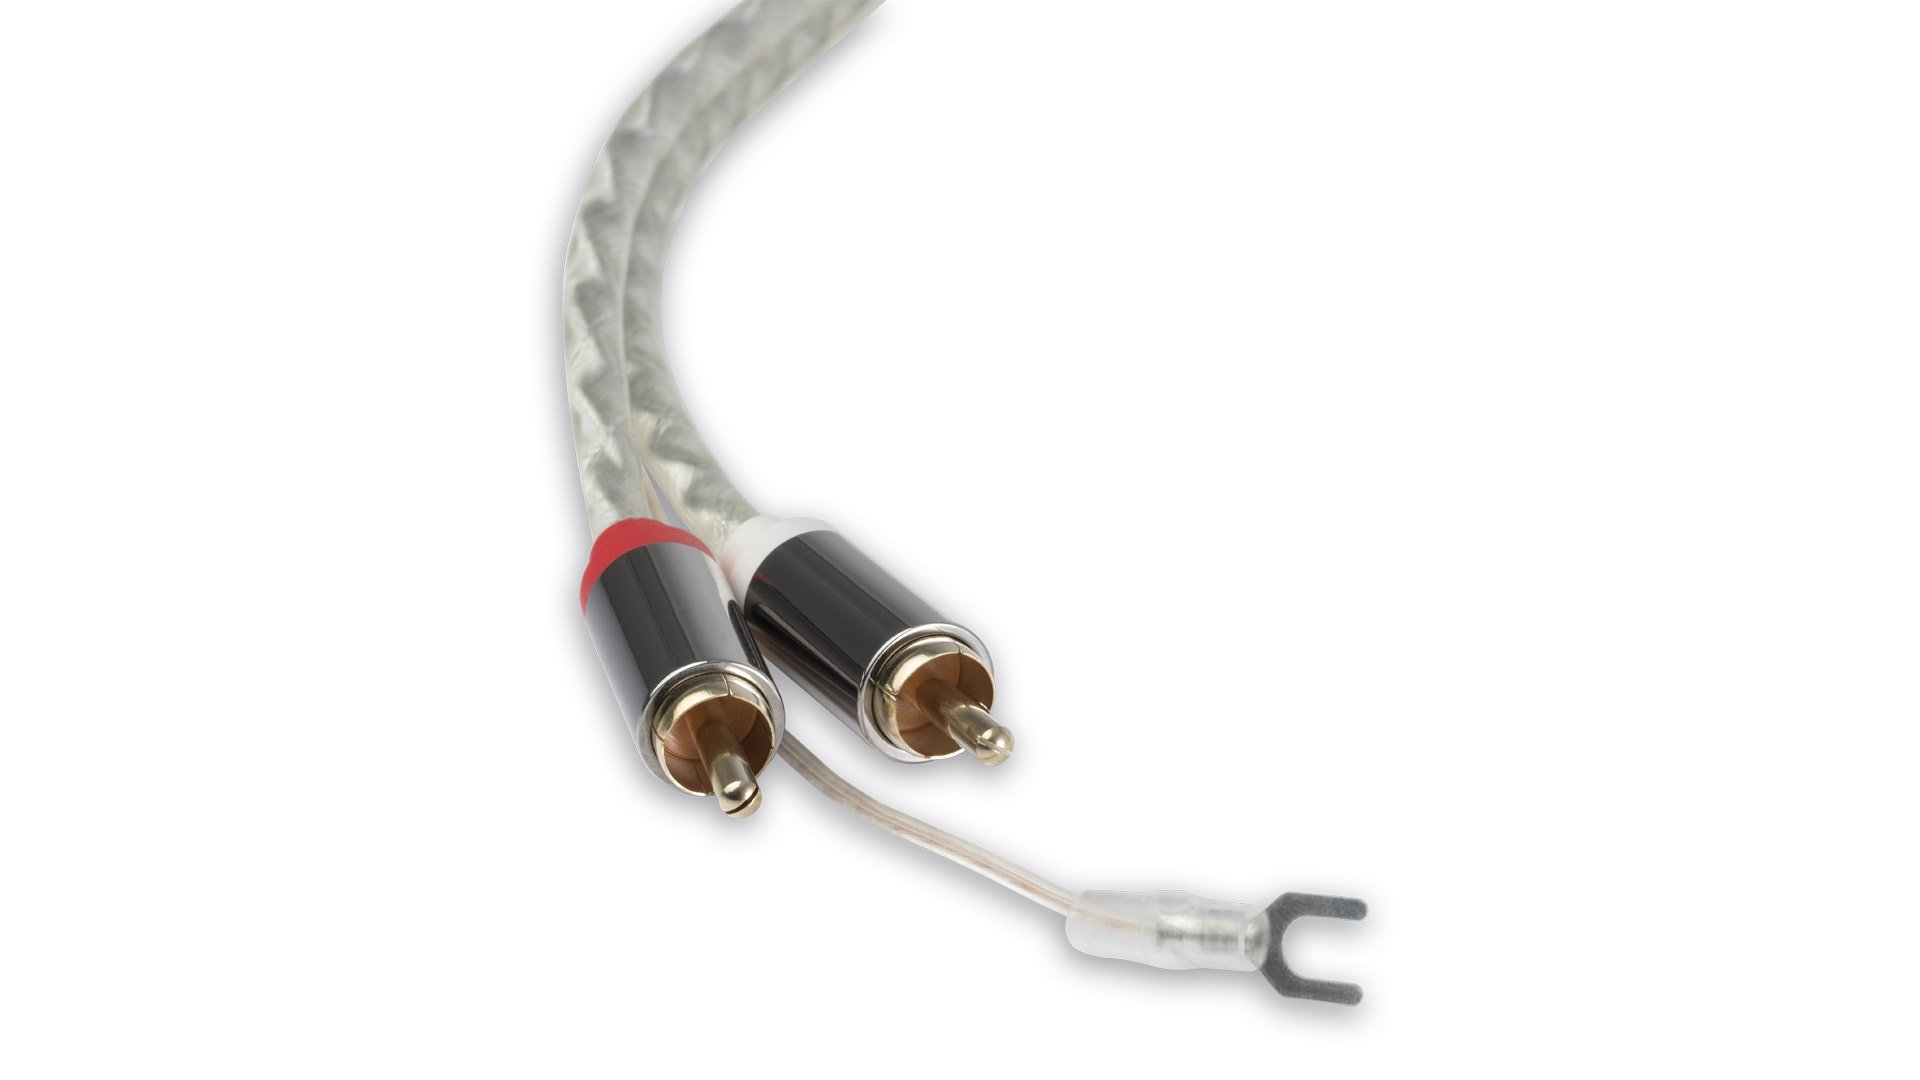
- Prepare the shielded RCA cable: Use a shielded RCA cable to connect the turntable’s audio output to the audio device’s input. The shielding helps reduce interference and maintain audio quality. Connect one end of the RCA cable to the turntable’s audio output, typically labeled as “PHONO OUT,” and the other end to the audio device’s input labeled as “PHONO IN” or “AUX IN.”
- Connect the ground wire: Locate the ground wire or grounding terminal on the audio device. Attach the turntable’s ground wire or chassis to this terminal. This will connect the turntable to the audio device’s existing ground connection.
- Confirm the ground connection: Ensure that the ground wire is securely connected to the audio device’s grounding terminal. You can also test the audio playback to check for any reduction in unwanted noise or interference. If the audio sounds cleaner and there is a noticeable improvement, then the ground connection is successful.
By connecting the turntable to a grounded audio device, you can utilize the audio device’s existing ground connection and effectively ground your turntable. This method provides a reliable grounding solution and helps minimize unwanted noise and interference during audio playback.
It’s important to note that not all audio devices have a dedicated ground wire or grounding terminal. In such cases, this method may not be applicable. Additionally, make sure to use a shielded RCA cable for optimal audio quality and to avoid introducing additional interference.
Overall, connecting the turntable to a grounded audio device is a simple and effective method to ground a turntable without a built-in ground wire. This method allows you to leverage the existing ground connection of the audio device, providing a stable and reliable ground reference for your turntable’s audio signal.
Method 3: Using a Grounding Wire or Cable
If your turntable lacks a built-in ground wire or grounding terminal, one option to ground it is by using a separate grounding wire or cable. This method involves creating a dedicated ground connection by connecting the turntable’s chassis to a suitable ground source.
Here’s how to use a grounding wire or cable to ground your turntable:
- Select a suitable grounding wire: Choose a grounding wire or cable that is long enough to reach from your turntable to a nearby ground source. The wire should be insulated, preferably with a braided shield for added protection against interference.
- Attach the grounding wire to the turntable: Identify a suitable grounding point on the turntable’s chassis. This may be a designated grounding screw or any exposed metal surface. Securely attach one end of the grounding wire to the grounding point on the turntable.
- Connect the other end to a ground source: Identify a reliable ground source in close proximity to the turntable. This can be a screw on a nearby wall outlet, a grounding rod, or any other designated grounding point. Connect the other end of the grounding wire to this ground source, ensuring a secure connection.
- Ensure proper grounding: Double-check that the grounding wire is securely connected at both ends. Also, verify that the ground source is properly grounded. This can be done using a multimeter or consulting a professional if needed. A proper and stable ground connection is crucial for effective grounding.
- Test for improved audio performance: Once the grounding wire is properly installed and connected, test the turntable’s audio performance. Listen for any reduction in unwanted noise, hum, or interference. A successful ground connection will result in a cleaner and more enjoyable audio playback.
Using a grounding wire or cable provides a dedicated ground connection for your turntable, effectively minimizing unwanted noise and interference. However, it’s important to note that the effectiveness of this method may depend on the quality of the grounding wire, the proximity of the ground source, and the overall electrical environment in which the turntable is located.
When choosing a grounding wire, opt for a wire with proper insulation and shielding to minimize the risk of interference. Additionally, make sure the ground source itself is properly grounded to provide a reliable connection.
By following these steps and employing a grounding wire or cable, you can effectively ground your turntable and enjoy optimal audio performance.
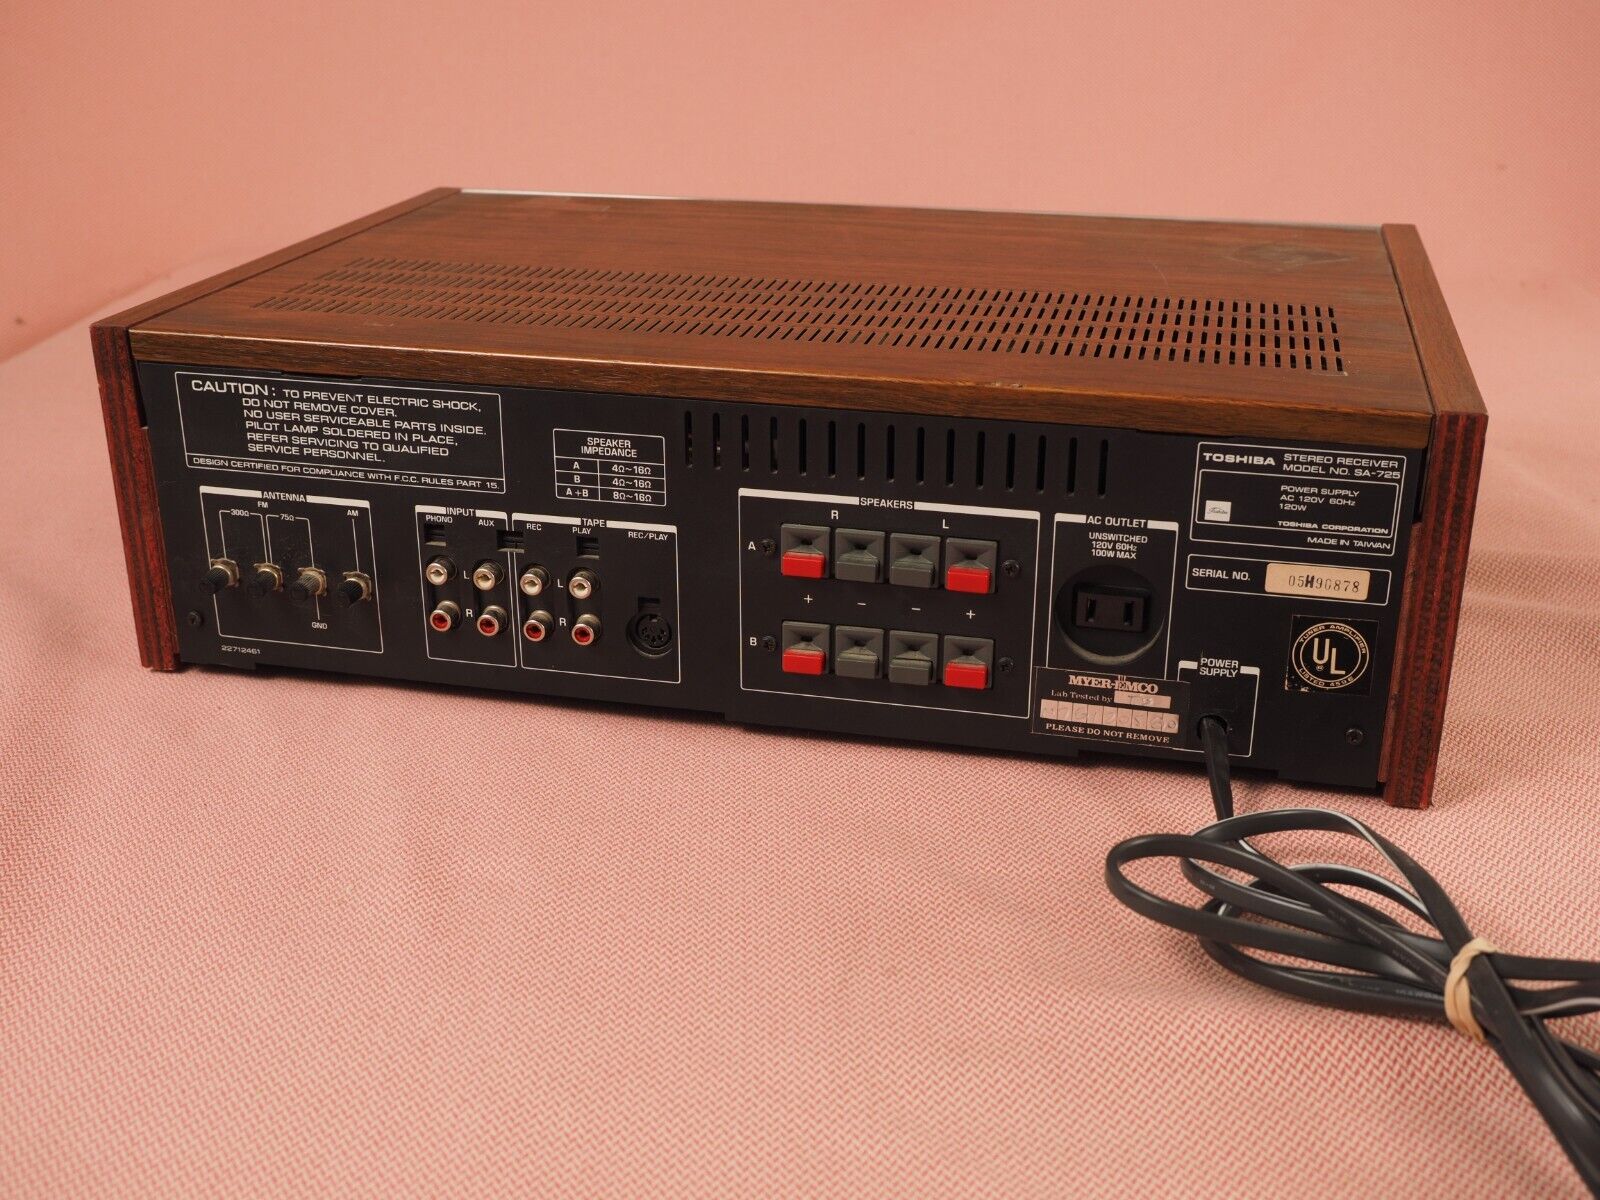
Method 4: Grounding Turntable through the Amplifier or Receiver
If you have an amplifier or receiver with a built-in ground wire or grounding terminal, you can utilize it to ground your turntable. This method allows you to take advantage of the amplifier or receiver’s existing grounding system for effective grounding.
Here’s how to ground your turntable through the amplifier or receiver:
- Identify the ground wire or grounding terminal on the amplifier or receiver: Locate the ground wire or grounding terminal on your amplifier or receiver. It is usually labeled as ‘GROUND’ or ‘GND’ and is designed to provide a dedicated ground connection for audio devices.
- Connect the turntable’s grounding wire or chassis to the amplifier/receiver: If your turntable has a grounding wire, connect it to the amplifier/receiver’s ground terminal. In case your turntable lacks a grounding wire, connect the turntable’s chassis directly to the amplifier/receiver’s ground terminal.
- Ensure a secure connection: Verify that the grounding wire or the turntable’s chassis is securely connected to the amplifier/receiver’s ground terminal. A loose or weak connection may result in poor grounding or introduce noise.
- Confirm the ground connection: Test the audio playback to check for any reduction in noise, hum, or interference. A successful ground connection will result in improved audio quality and a cleaner sound.
By grounding your turntable through the amplifier or receiver, you can take advantage of the existing grounding system, ensuring effective noise reduction and improved audio performance. It is important to note that not all amplifiers or receivers have a dedicated ground wire or grounding terminal. In such cases, this method may not be applicable.
When utilizing this method, it is also crucial to ensure the amplifier or receiver is properly grounded itself. Consult the device’s manual or contact the manufacturer for guidance on proper grounding procedures. Additionally, always follow safety precautions when working with electrical equipment to prevent any accidents or damage.
By utilizing the existing grounding system of the amplifier or receiver, you can effectively ground your turntable and enjoy optimal audio performance without the need for additional grounding hardware or wiring.
Method 5: Using a Grounding Mat or Sheet
If you’re looking for a unique and effective way to ground your turntable, you can consider using a grounding mat or sheet. This method involves placing a conductive material beneath your turntable to create a dedicated ground connection.
Follow these steps to use a grounding mat or sheet:
- Obtain a grounding mat or sheet: Purchase a grounding mat or sheet specifically designed for audio equipment grounding. These products are typically made of conductive materials like carbon or copper and provide a path for unwanted electrical signals to dissipate.
- Position the grounding mat or sheet: Place the grounding mat or sheet on a stable surface where your turntable will sit. Ensure that the mat or sheet completely covers the area beneath the turntable. The mat or sheet should be in direct contact with the turntable’s metal chassis.
- Connect the grounding mat or sheet: Connect the grounding mat or sheet to a suitable ground source. This can be achieved by attaching a grounding wire or cable from the mat or sheet to a grounded wall outlet or grounding rod. Ensure that the ground source is properly grounded before making the connection.
- Verify the ground connection: Confirm that the grounding mat or sheet is securely connected to the ground source. Ensure that the turntable’s metal chassis maintains good contact with the mat or sheet for effective grounding.
- Test for improved audio performance: Once the grounding mat or sheet is properly installed and connected, test your turntable’s audio performance. Listen for any reduction in unwanted noise, hum, or interference. If the audio playback sounds cleaner and more enjoyable, then the grounding mat or sheet has effectively grounded your turntable.
Using a grounding mat or sheet offers a unique and convenient approach to grounding your turntable. These products help to dissipate unwanted electrical signals and minimize interference, resulting in improved audio quality.
When selecting a grounding mat or sheet, make sure to choose one that is suitable for audio equipment and manufactured by a reputable brand. Follow the manufacturer’s instructions for proper installation and grounding to maximize the effectiveness of the mat or sheet.
By using a grounding mat or sheet, you can achieve a dedicated ground connection for your turntable without the need for additional wiring or connections. It’s an innovative method that can provide effective grounding and enhance your overall audio experience.
Conclusion
Grounding is a crucial aspect of setting up a turntable, as it ensures optimal audio performance by minimizing unwanted noise and interference. While many turntables come equipped with a built-in ground wire or grounding terminal, there are still options available for grounding turntables that lack this feature.
In this article, we explored various methods for grounding a turntable without a ground wire. Using a grounding box or external grounding system provides a dedicated ground connection, effectively eliminating electrical interference. Connecting the turntable to a grounded audio device allows you to leverage the device’s existing ground connection. Using a grounding wire or cable creates a dedicated ground connection by connecting the turntable’s chassis to a suitable ground source. Grounding the turntable through the amplifier or receiver utilizes the existing grounding system of the audio device. Using a grounding mat or sheet offers an innovative approach by placing a conductive material beneath the turntable to create a dedicated ground connection.
Each method has its own advantages and considerations, and the choice depends on your specific setup and preferences. Experimenting with different grounding options can help you find the most effective solution for your turntable and audio system.
Remember to always follow the manufacturer’s instructions and ensure a secure and reliable ground connection. Proper grounding will result in cleaner sound, improved audio quality, and an overall better listening experience.
Whether you’re a vinyl enthusiast or just getting started with turntables, understanding how to ground your turntable is essential for optimal audio performance. By implementing the appropriate grounding method, you can minimize unwanted noise and interference, allowing you to truly enjoy the warm and rich sound of vinyl records.