Home>Events & Info>Playback>How To Enable Disk Playback In VLC
Playback
How To Enable Disk Playback In VLC
Modified: January 22, 2024
Learn how to enable disk playback in VLC media player. Follow our step-by-step guide to enjoy seamless playback of your favorite movies and videos.
(Many of the links in this article redirect to a specific reviewed product. Your purchase of these products through affiliate links helps to generate commission for AudioLover.com, at no extra cost. Learn more)
Table of Contents
Introduction
With the convenience of digital media, physical discs may seem like a thing of the past. However, there are still many people who enjoy collecting DVDs, Blu-rays, and other types of optical discs. If you’re one of them, you might already be familiar with VLC Media Player, the popular open-source multimedia player that supports a wide range of formats.
VLC Media Player is not only capable of playing various digital media files, but it can also be used to play DVDs, Blu-rays, and even audio CDs. However, by default, VLC does not enable disc playback. In this guide, we will walk you through the steps to enable disk playback in VLC, so you can enjoy your favorite movies and music without any hassle.
Enabling disc playback in VLC is a simple process that requires just a few clicks. Once you have set it up, you’ll be able to seamlessly play your DVDs, Blu-rays, or CDs directly from the VLC Media Player interface. Whether you want to watch a classic movie, listen to your favorite album, or burn a mix CD, VLC has got you covered.
So, let’s dive into the step-by-step instructions to enable disk playback in VLC Media Player and get ready to experience a whole new level of entertainment.
Step 1: Launch VLC Player
The first step to enabling disk playback in VLC Media Player is to launch the application. If you haven’t already installed VLC, you can download it from the official VLC website and follow the installation instructions for your operating system.
Once VLC is installed, locate the VLC Media Player icon on your desktop or in your list of installed applications and double-click to open it. The VLC Media Player interface will appear on your screen, ready for you to start configuring the settings.
If you already have VLC open, make sure to close any media files or discs currently playing before proceeding to the next steps. This will prevent any conflicts or interruptions during the configuration process.
VLC Media Player is known for its user-friendly interface, with a sleek and intuitive design. The various menu options and settings are easily accessible, making it simple for users of all levels of experience to navigate and customize their playback preferences.
Now that VLC Media Player is open and ready, let’s move on to the next step.
Step 2: Open Preferences
Once you have launched VLC Media Player, the next step is to open the Preferences window. This is where you can access and modify various settings and preferences within VLC.
To open the Preferences window, navigate to the top menu bar of VLC Media Player. On Windows, click on the “Tools” option, and then select “Preferences” from the drop-down menu. On a Mac, click on the “VLC” option in the top-left corner of the screen, and then choose “Preferences” from the list.
Alternatively, you can use the keyboard shortcut “Ctrl+P” on Windows or “Command+, (comma)” on Mac to directly open the Preferences window.
Once you click on the Preferences option or use the keyboard shortcut, a new window will appear on your screen, displaying all the available settings and preferences that you can modify. The Preferences window is divided into different categories, such as “Interface,” “Audio,” “Input/Codecs,” “Video,” and more. Each category contains specific settings related to that particular aspect of the player.
In the next step, we will focus on navigating to the Input/Codecs category, where we can make the necessary changes to enable disk playback in VLC Media Player.
Step 3: Navigate to Input/Codecs
After opening the Preferences window in VLC Media Player, the next step is to navigate to the Input/Codecs category. This is where you can find the settings related to the playback of various types of media files, including discs.
In the Preferences window, you will see a list of categories on the left-hand side. Look for the “Input/Codecs” category and click on it to select it.
Once you have selected the Input/Codecs category, the window will refresh, and you will see a range of options and settings related to input protocols, network caching, demuxers, and more.
Scroll down or use the sidebar on the left to navigate to the “Access Modules” section under the Input/Codecs category. Here, you will find the options related to disc playback.
Now that you have successfully reached the Input/Codecs category and located the relevant section, it’s time to move on to the next step and make the necessary changes to enable disc playback.
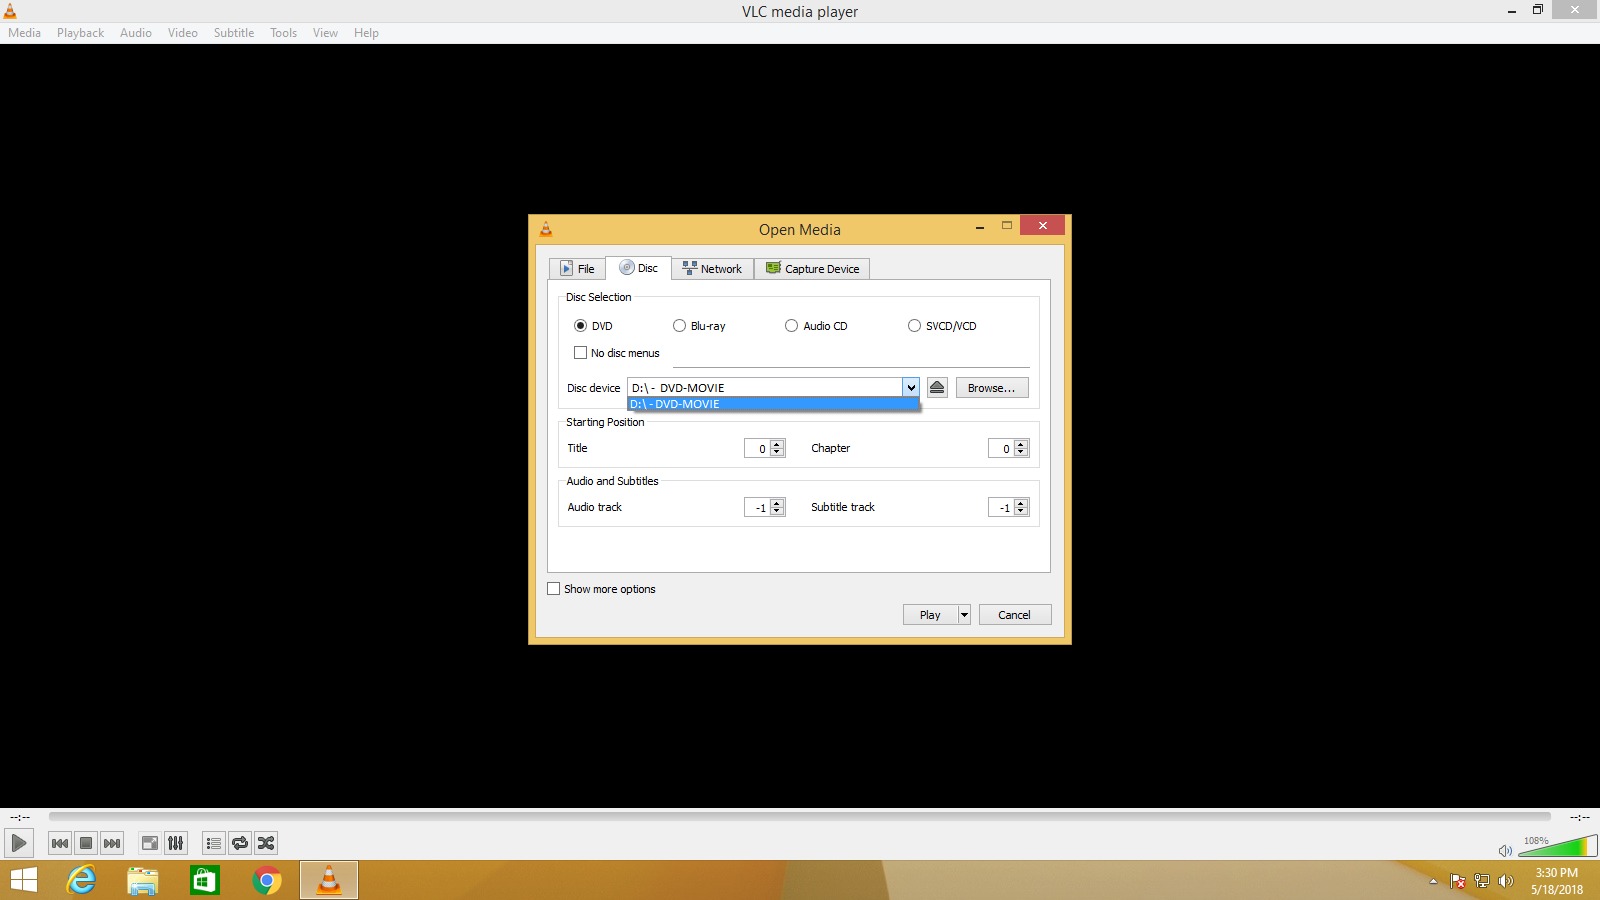
Step 4: Enable Disc Playback
Within the Input/Codecs category in the Preferences window of VLC Media Player, you will find the settings to enable disc playback. To do this, you need to make a few changes in the Access Modules section under Input/Codecs.
Look for the option labeled “Discs” or “DVD” in the Access Modules section. This option may vary slightly depending on the version of VLC Media Player you are using, but it should be easily recognizable.
By default, the “Discs” or “DVD” option may be unchecked or disabled. To enable disc playback, simply check or enable this option by clicking on the checkbox next to it.
Enabling the “Discs” or “DVD” option tells VLC Media Player to recognize and play optical discs inserted into your computer’s DVD or Blu-ray drive.
In addition to enabling the “Discs” or “DVD” option, you may also find other related options to customize the behavior of disc playback. For example, you might find options to select the audio and subtitle tracks, adjust the playback speed, or choose the DVD menu style. Feel free to explore these options and adjust them according to your preferences.
Once you have enabled the disc playback option and made any additional adjustments you desire, you’re ready to proceed to the next step and save your changes.
Step 5: Save Changes
After enabling the disc playback option and making any desired adjustments in VLC Media Player’s Preferences window, it’s important to save your changes. This ensures that the settings you have chosen will be applied the next time you use VLC.
To save your changes, locate the “Save” or “Save Preferences” button within the Preferences window. This button is typically located at the bottom-right corner of the window.
Click on the “Save” button to apply your changes and close the Preferences window. Alternatively, you can use the keyboard shortcut “Ctrl+S” (Windows) or “Command+S” (Mac) to quickly save your preferences.
Once you have saved your changes, VLC Media Player will exit the Preferences window, and you will be back at the main VLC interface, ready to play your discs.
Keep in mind that the changes you have made to enable disc playback will be retained for future use, so you won’t have to repeat this process each time you open VLC.
Now that you have saved your changes, it’s time to move on to the next steps and start enjoying your disc playback experience in VLC Media Player.
Step 6: Insert Disc
With the settings configured to enable disc playback in VLC Media Player and your changes saved, it’s time to insert the disc you want to play. Whether it’s a DVD, Blu-ray, or CD, make sure the disc is clean and free from any scratches or damages that could affect its playability.
Locate your computer’s DVD or Blu-ray drive and gently insert the disc into the tray, ensuring it is properly aligned. Close the tray by pushing it back into the drive until it securely clicks into place.
It may take a few seconds for your computer to recognize the disc and for VLC Media Player to detect it. During this time, it’s normal for the drive to spin and for some activity indicators to appear on your screen.
If VLC Media Player is not automatically launched when you insert the disc, you can manually open it from your desktop or application list as we did in the first step.
Once VLC Media Player detects the disc, it will display the title and other information about the disc on its interface. You are now ready to play the disc and enjoy the content it contains.
Note that VLC may automatically start playing the disc, or you may need to manually initiate playback. If it doesn’t start automatically, proceed to the next step to learn how to play the disc in VLC Media Player.
Step 7: Play the Disc
Now that you have inserted the disc into your computer’s DVD or Blu-ray drive, it’s time to play it in VLC Media Player. VLC provides a seamless playback experience and supports a wide range of disc formats, ensuring compatibility with most DVDs, Blu-rays, and CDs.
To play the disc in VLC, locate the controls at the bottom of the VLC interface. You will see the standard media player controls, such as play, pause, stop, and volume adjustment.
If VLC doesn’t automatically start playing the disc, you can manually initiate playback by clicking on the “Play” button, which is typically represented by a right-facing triangle icon.
Once you click the “Play” button, VLC will begin reading the disc and decoding its content. You will see the video or audio start playing on the VLC interface, and you’ll be able to enjoy the playback of your disc.
VLC Media Player provides various playback options to enhance your experience. You can control the playback speed, adjust the volume, enable subtitles or closed captions, and even navigate through chapters or tracks on the disc.
Feel free to explore and experiment with the different playback features and settings available in VLC Media Player. This will allow you to customize your disc playback experience to your liking.
Now that you have successfully played the disc in VLC, let’s move on to the final step to conclude the process.
Step 8: Enjoy the Playback
Congratulations! You have successfully enabled disc playback in VLC Media Player and played your desired disc. Now it’s time to sit back, relax, and enjoy the playback of your favorite movies, TV shows, music, or any other content stored on the disc.
VLC Media Player provides a seamless and reliable playback experience, ensuring that you can fully immerse yourself in the content without any interruptions or glitches. With its advanced decoding capabilities, VLC can handle various disc formats, including DVDs, Blu-rays, and CDs, giving you the flexibility to enjoy a diverse range of media.
While the disc is playing, you can take advantage of VLC’s intuitive interface and playback controls to enhance your experience. You can pause or resume playback at any time by clicking the appropriate button on the control bar. Adjusting the volume is as simple as dragging the volume slider up or down. If your disc includes subtitles or closed captions, you can enable and customize them to your preference.
Additionally, VLC offers advanced features like audio and video filters, equalizer settings, and playlist creation to further enhance your playback experience. Feel free to explore these features and make adjustments according to your personal preferences.
Remember to take care of your discs by handling them properly, storing them in protective cases, and keeping them away from dust and scratches. By taking these precautions, you can ensure the longevity and optimal playback of your collection.
Now that you know how to enable disc playback in VLC Media Player, you can enjoy your favorite movies, TV shows, and music without the need for a separate media player. VLC’s simplicity, versatility, and support for multiple formats make it a convenient solution for all your disc playback needs.
So, sit back, relax, and enjoy the seamless playback experience provided by VLC Media Player!
Conclusion
Enabling disc playback in VLC Media Player allows you to enjoy your DVD, Blu-ray, and CD collection directly from your computer. By following the simple steps outlined in this guide, you can configure VLC to recognize and play discs seamlessly.
VLC Media Player not only supports a wide range of digital media formats but also provides a user-friendly interface and extensive customization options. With its ability to enable disc playback, VLC eliminates the need for additional media players, making it a convenient and versatile solution for all your multimedia needs.
From launching VLC and accessing the Preferences window to enabling disc playback, saving your changes, and playing the disc, each step in the process is straightforward and easy to follow. VLC’s intuitive interface makes it accessible to users of all experience levels.
Once your discs are playing in VLC Media Player, you can take advantage of the various playback controls and features to enhance your experience. Adjusting volume, enabling subtitles, and exploring advanced settings and filters are just a few examples of the customization options available to you.
Remember to handle your discs with care, ensuring they are clean and free from scratches. By taking proper care, you can preserve the quality of your discs and enjoy optimal playback for years to come.
In conclusion, enabling disc playback in VLC Media Player is a simple yet powerful process that enhances your media consumption experience. Whether you want to watch your favorite movies, listen to music, or explore other forms of disc-based media, VLC provides a seamless and enjoyable playback environment.
So, get ready to rediscover your DVD, Blu-ray, and CD collection with VLC Media Player and enjoy a whole new level of entertainment right from your computer.