Home>Events & Info>Playback>How To Change Playback Speed In Davinci Resolve
Playback
How To Change Playback Speed In Davinci Resolve
Modified: January 22, 2024
Learn how to easily change the playback speed in Davinci Resolve with our step-by-step guide. Speed up or slow down your videos for the perfect effect.
(Many of the links in this article redirect to a specific reviewed product. Your purchase of these products through affiliate links helps to generate commission for AudioLover.com, at no extra cost. Learn more)
Table of Contents
- Introduction
- Understanding Playback Speed in DaVinci Resolve
- Adjusting Playback Speed in the Timeline
- Using Time Stretches to Change Playback Speed
- Creating Variable Speed Effects with Speed Ramps
- Fine-tuning Playback Speed with Keyframes
- Converting Frame Rates for Adjusting Playback Speed
- Tips and Tricks for Changing Playback Speed
- Conclusion
Introduction
Welcome to the world of DaVinci Resolve, a powerful video editing software that offers a wide range of tools and features to enhance your editing experience. One of the key functionalities is the ability to change playback speed, allowing you to control the pace of your videos and create dynamic effects.
Whether you want to speed up a clip for a fast-paced montage or slow down footage to emphasize a particular moment, DaVinci Resolve has all the tools you need. In this article, we will explore the various techniques and methods to change playback speed in DaVinci Resolve, guiding you through the process step by step.
Understanding how playback speed works is crucial before diving into the different techniques. Playback speed refers to the rate at which a video plays back, determining how fast or slow it appears to the viewer. In DaVinci Resolve, you have precise control over the playback speed, allowing you to adjust it to your specific needs.
By changing the playback speed, you can manipulate the tempo, mood, and overall feel of your videos. You can create dramatic slow-motion effects to highlight details, or increase the speed for energetic and action-packed sequences. Whether you’re working on a professional project or a personal video, mastering the art of changing playback speed will add a new dimension to your editing skills.
In the following sections, we will explore the different methods available in DaVinci Resolve to adjust playback speed. From simple adjustments in the timeline to more advanced techniques utilizing time stretches and speed ramps, we will cover all the tools necessary to achieve the desired effect.
So without further ado, let’s dive into the world of changing playback speed in DaVinci Resolve and unlock your creative editing potential.
Understanding Playback Speed in DaVinci Resolve
In DaVinci Resolve, playback speed is measured as a percentage of the original speed. A speed of 100% represents the normal playback speed, while a higher percentage will speed up the video and a lower percentage will slow it down. Understanding how the software handles playback speed is essential for achieving the desired effect in your videos.
When you change the playback speed, DaVinci Resolve adjusts the duration of the clip accordingly. For example, if you double the speed of a clip to 200%, the duration will be cut in half, resulting in a faster playback. Similarly, if you reduce the speed to 50%, the duration will be doubled, resulting in a slower playback.
It’s important to note that changing the playback speed does not affect the underlying media file. DaVinci Resolve applies the speed adjustment dynamically during playback, allowing you to experiment and make changes without altering the original video file.
When you modify the playback speed of a clip, keep in mind that it may affect other elements in your edit. If you have audio attached to the clip, changing the speed will also alter the pitch and duration of the audio. This can create interesting effects or require additional adjustments to ensure the audio remains synchronized with the visuals.
DaVinci Resolve provides several methods for adjusting the playback speed of your clips. These include simple adjustments in the timeline, time stretches, speed ramps, and even the ability to convert frame rates for smoother playback. In the following sections, we will explore each of these techniques in detail, providing you with a comprehensive understanding of how to manipulate playback speed in DaVinci Resolve.
Now that you have a solid understanding of how playback speed works in DaVinci Resolve, we can move on to the practical aspects of changing the speed of your videos. In the next section, we will explore how to make simple speed adjustments in the timeline.
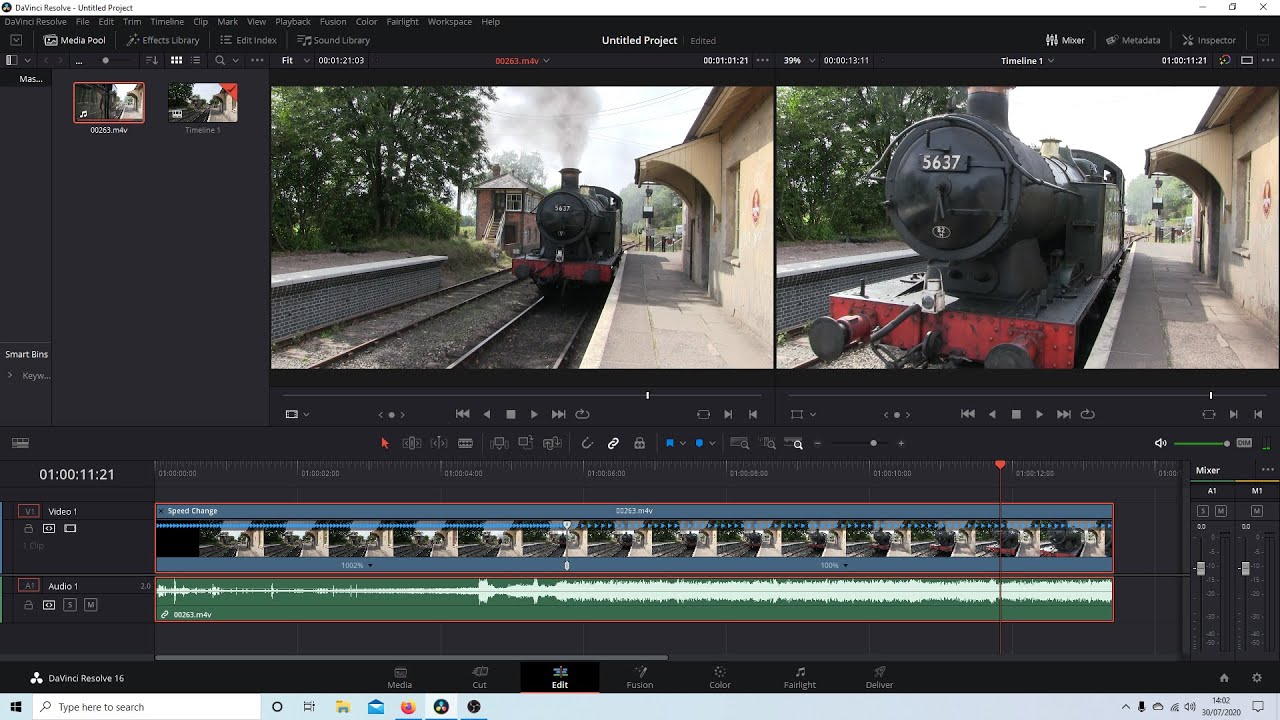
Adjusting Playback Speed in the Timeline
One of the simplest ways to change the playback speed of a clip in DaVinci Resolve is by using the timeline. This method allows you to make quick and straightforward adjustments to the speed of your videos.
To adjust the playback speed in the timeline, follow these steps:
- Select the clip in the timeline that you want to modify.
- In the toolbar at the top of the screen, locate the “Speed” option.
- Click on the dropdown menu next to “Speed” and choose a percentage value to adjust the playback speed. For example, setting it to 200% will double the speed, while setting it to 50% will halve the speed.
As you change the speed, you will notice that the duration of the clip in the timeline adjusts accordingly. If you increase the speed, the clip will become shorter, and if you decrease the speed, the clip will become longer.
Keep in mind that adjusting the playback speed in the timeline affects the entire duration of the clip. If you want to apply speed changes to specific sections of the clip, you will need to utilize more advanced techniques, which we will cover in later sections.
By using the timeline to adjust playback speed, you have quick and convenient control over the overall tempo of your videos. It’s a great starting point for making basic speed adjustments, especially if you’re looking to create time-lapse or slow-motion effects.
Now that you know how to adjust playback speed in the timeline, let’s explore more advanced techniques for changing speed using time stretches and speed ramps.
Using Time Stretches to Change Playback Speed
When you need to adjust the playback speed of a clip while preserving its duration, using time stretches in DaVinci Resolve can be a powerful technique. Time stretches allow you to change the speed of specific sections of a clip while keeping other parts unaffected.
Here’s how you can use time stretches to modify playback speed in DaVinci Resolve:
- Select the clip in the timeline.
- Place the playhead at the beginning of the section where you want to change the speed.
- Right-click on the clip and choose “Enable Retime Controls” from the context menu.
- On the left side of the viewer, you’ll see a white retiming bar that represents the speed of the clip. Click and hold on the edge of the retiming bar at the start of the section and drag to the desired point.
- Repeat the process for the end of the section, adjusting the speed as needed.
- You can add multiple time stretches to different sections of the clip to create varying playback speeds throughout.
The beauty of using time stretches is that they allow you to create smooth transitions between different speeds within the same clip. For instance, you can start with a normal speed, gradually slow down for a dramatic moment, and then speed up again for an energetic sequence.
As you make adjustments with time stretches, the duration of the clip will remain the same, but the playback speed within the specified sections will be altered. This gives you precise control over the pacing of your videos, making it ideal for storytelling purposes.
Using time stretches is an excellent technique for emphasizing specific moments, highlighting details, or creating seamless transitions in your videos. It adds a layer of creativity and versatility to your editing process, allowing you to effectively manipulate the playback speed.
Now that you know how to utilize time stretches to change playback speed, let’s explore how you can utilize speed ramps to create variable speed effects.
Creating Variable Speed Effects with Speed Ramps
If you want to create more dynamic and visually appealing speed effects in your videos, speed ramps in DaVinci Resolve are the way to go. Speed ramps allow you to smoothly transition between different playback speeds, gradually increasing or decreasing the speed over a specific section of a clip.
Here’s how you can create speed ramps in DaVinci Resolve:
- Select the clip in the timeline that you want to modify.
- Place the playhead at the beginning of the section where you want to apply the speed ramp.
- Right-click on the clip and choose “Enable Retime Controls” from the context menu.
- On the left side of the viewer, you’ll see a white retiming bar representing the speed of the clip. Click on the retiming bar at the start of the section to set a keyframe.
- Move the playhead to the end of the section and click on the retiming bar again to set another keyframe.
- With the second keyframe selected, you can adjust the speed by dragging it up or down.
- To create a smooth speed transition, right-click on the second keyframe and choose “Ease In” or “Ease Out” to apply an easing function.
By placing keyframes and adjusting the speed between them, you can create varying playback speeds within the same clip. This technique is particularly useful for dramatic video effects, such as capturing a fast-moving subject and slowing it down for added impact.
Speed ramps give you precise control over the acceleration or deceleration of the playback speed, allowing for smooth and visually appealing transitions. With a combination of time stretches and speed ramps, you can create complex and engaging effects in your videos.
Experiment with different combinations of speed ramps and time stretches to achieve the desired effect. Combine gradual speed changes with specific sections adjusted using time stretches to create compelling storytelling elements in your videos.
Now that you have learned about speed ramps and their ability to create variable speed effects, let’s explore how you can fine-tune playback speed with keyframes.
Fine-tuning Playback Speed with Keyframes
If you want to have precise control over the playback speed of your clips, incorporating keyframes in DaVinci Resolve is essential. Keyframes allow you to set specific values for the speed of a clip at different points in time, enabling you to create intricate and customized speed variations.
Here’s how you can fine-tune playback speed with keyframes in DaVinci Resolve:
- Select the clip in the timeline that you want to modify.
- Right-click on the clip and choose “Enable Retime Controls” from the context menu.
- On the left side of the viewer, you’ll see a white retiming bar representing the speed of the clip.
- Place the playhead at the point in time where you want to set a keyframe.
- Click on the retiming bar to set a keyframe at that specific point.
- Move the playhead to another point in time where you want to change the speed.
- Click on the retiming bar again to set another keyframe.
- With the second keyframe selected, you can adjust the speed by dragging it up or down.
- You can add multiple keyframes to create intricate speed variations throughout the clip.
By setting keyframes and adjusting the speed between them, you can create precise and customized speed variations within your clips. This technique is ideal for achieving specific visual effects and syncing the speed with dramatic moments or musical beats.
Additionally, with keyframes, you can also create smooth transitions between different speed settings. By applying easing functions to the keyframes, you can gradually accelerate or decelerate the playback speed, resulting in visually pleasing and seamless speed changes.
Fine-tuning playback speed using keyframes gives you complete control over the pacing and timing of your videos. It allows you to create unique and engaging effects that captivate your audience and complement your storytelling.
Now that you have mastered the art of fine-tuning playback speed with keyframes, let’s explore how you can convert frame rates for adjusting playback speed.
Converting Frame Rates for Adjusting Playback Speed
In certain instances, you may need to adjust the playback speed of your clips by converting the frame rate. Converting frame rates can provide smoother playback and allow for more accurate adjustments to the speed of your videos in DaVinci Resolve.
Here’s how you can convert frame rates to adjust playback speed in DaVinci Resolve:
- Select the clip in the timeline that you want to modify.
- In the inspector panel on the right-hand side of the screen, locate the “Frame Rate” option.
- Click on the dropdown menu next to “Frame Rate” and choose a different frame rate for your clip.
By converting the frame rate of your clips, you can effectively change the playback speed of the footage. Increasing the frame rate will speed up the playback, while decreasing the frame rate will slow it down.
It’s important to note that converting the frame rate can have an impact on the overall quality and smoothness of your video. Increasing the frame rate beyond the original footage might lead to the creation of new interpolated frames, resulting in a less natural look. Similarly, decreasing the frame rate too much could result in a choppy playback.
While adjusting the frame rate can be useful for achieving specific playback speeds, it’s important to exercise caution and balance the desired effect with the quality of the footage. Always preview the results and make adjustments as necessary to ensure a visually pleasing outcome.
Converting frame rates is particularly helpful when working with footage shot at different speeds or when syncing with audio that has a specific tempo. By precisely matching the frame rate of your clips with the desired speed, you can achieve smooth and seamless playback and create a cohesive visual experience for your audience.
Now that you have learned how to convert frame rates for adjusting playback speed, let’s explore some additional tips and tricks for changing playback speed in DaVinci Resolve.
Tips and Tricks for Changing Playback Speed
Changing playback speed in DaVinci Resolve opens up a world of creative possibilities. To help you make the most out of this feature, here are some tips and tricks to enhance your speed adjustments:
- Experiment and Play: Don’t be afraid to experiment with different speeds and effects. Try out various settings to see how they affect the overall look and feel of your videos. Play around with speed ramps, time stretches, and keyframes to create unique and captivating effects.
- Consider the Story: When adjusting playback speed, always keep the story and content in mind. Use speed changes to enhance the narrative, emphasize key moments, or create an emotional impact. Each speed adjustment should have a purpose and contribute to the overall storytelling.
- Sync with Music: When working with music in your videos, consider syncing the playback speed with the rhythm and tempo of the music. This creates a synchronized and cohesive experience that engages the viewer on multiple levels.
- Use Custom Speed Ramps: In addition to standard speed ramps, experiment with creating custom speed ramps using keyframes. This allows for more precise control over the speed variations and enables you to create unique and personalized effects.
- Blend the Speed Changes: When transitioning between different speed settings, make use of easing functions or crossfades to create smooth and seamless transitions. This helps in maintaining a visually pleasing and cohesive experience for the viewer.
- Preview and Adjust: Always preview your speed adjustments before finalizing them. Take the time to fine-tune and make necessary adjustments to ensure that the playback speed achieves the desired effect. Don’t hesitate to make multiple passes to refine your speed changes.
- Combine Speed with Other Effects: Consider combining the changes in playback speed with other effects like color grading, transitions, or visual effects. This adds an extra layer of creativity and allows for a more immersive and impactful viewing experience.
- Utilize Keyboard Shortcuts: DaVinci Resolve offers a range of handy keyboard shortcuts for manipulating playback speed. Familiarize yourself with these shortcuts to streamline your editing process and expedite speed adjustments.
Remember, changing playback speed is an artistic choice that can greatly enhance the impact of your videos. By utilizing these tips and tricks, you can create visually stunning effects, engage your audience, and bring your vision to life.
Now that we have covered various techniques, tips, and tricks for changing playback speed in DaVinci Resolve, it’s time to wrap up this comprehensive guide.
Conclusion
Changing playback speed in DaVinci Resolve is a powerful tool that allows you to manipulate the tempo, mood, and overall feel of your videos. By adjusting the playback speed, you can create dramatic slow-motion effects, energetic fast-paced sequences, and everything in between.
In this article, we explored the different techniques and methods for changing playback speed in DaVinci Resolve. We learned how to make simple adjustments in the timeline, utilize time stretches to modify speed, create variable speed effects with speed ramps, fine-tune playback speed with keyframes, and even convert frame rates for precise adjustments.
Throughout the process, we discovered various tips and tricks to enhance the effectiveness of our speed adjustments, such as syncing with music, considering the storytelling aspect, blending speed changes, and combining speed with other effects.
DaVinci Resolve offers a wide range of tools and features to help you achieve your desired effect. From the simple timeline adjustments to more advanced techniques involving time stretches and keyframes, the software provides you with the flexibility and control to create videos that truly captivate your audience.
Remember, as you embark on your journey of changing playback speed, always allow yourself to experiment, play, and push the boundaries of your creativity. By exploring different settings and effects, you’ll develop a deeper understanding of the power that comes with manipulating playback speed.
So, embrace the art and science of changing playback speed in DaVinci Resolve. Let your imagination soar, and watch how your videos transform into dynamic and engaging visual experiences.
Now, armed with this newfound knowledge, go forth and create masterpieces that leave a lasting impact through the artful control of playback speed in DaVinci Resolve.