Home>Events & Info>Playback>How To Get Rid Of Clicks And Pops In Pro Tools During Playback
Playback
How To Get Rid Of Clicks And Pops In Pro Tools During Playback
Published: November 23, 2023
Learn how to eliminate clicks and pops in Pro Tools during playback with our step-by-step guide. Achieve smooth and uninterrupted playback in your audio projects.
(Many of the links in this article redirect to a specific reviewed product. Your purchase of these products through affiliate links helps to generate commission for AudioLover.com, at no extra cost. Learn more)
Table of Contents
- Introduction
- Understanding Clicks and Pops in Pro Tools
- Common Causes of Clicks and Pops
- Checking and Adjusting Buffer Size
- Updating Pro Tools and Audio Interface Drivers
- Adjusting Sample Rate and Bit Depth
- Dealing with Plugin Related Issues
- Managing CPU and Disk Usage
- Troubleshooting Audio Hardware
- Optimizing System Settings
- Conclusion
Introduction
Pro Tools is a popular digital audio workstation (DAW) used by many music producers, recording engineers, and sound designers. It offers a wide range of features and tools to create professional-quality audio recordings, mixing, and mastering. However, one frustrating issue that can occur during playback is the presence of clicks and pops in the audio.
Clicks and pops are undesirable artifacts that can disrupt the listening experience, particularly when working on critical projects or trying to achieve pristine sound quality. These glitches can occur for various reasons, including hardware and software issues, improper settings, or even incompatible plugins. Understanding the possible causes and learning how to address them can help you eliminate these pesky clicks and pops in Pro Tools during playback.
This article will guide you through the process of identifying and resolving common causes of clicks and pops in Pro Tools. Whether you’re a seasoned Pro Tools user or just starting out, these tips and techniques will help you optimize your setup and ensure smooth playback without any unwanted interruptions.
Understanding Clicks and Pops in Pro Tools
Before we delve into the solution, it’s important to understand what exactly causes clicks and pops in Pro Tools. Clicks and pops are the audible glitches or artifacts that occur during audio playback. They are usually short, sharp sounds that can disrupt the smoothness of a recording and can be quite annoying.
Clicks are characterized by a sudden spike in audio that creates a popping or clicking sound. They are usually more noticeable and piercing. Pops, on the other hand, are slightly softer and occur when there is a sudden change in the audio signal. These clicks and pops can occur sporadically or be consistent throughout the playback.
The main causes of clicks and pops in Pro Tools can be categorized into hardware-related issues, software-related issues, or a combination of both. Hardware-related issues can include problems with audio interfaces, damaged cables, or incompatible devices. Software-related issues can include buffer size settings, outdated Pro Tools versions, incompatible plugins, or insufficient system resources.
It’s important to note that while clicks and pops can be frustrating, they are not always a sign of a serious problem. Sometimes, they can be a result of highly demanding projects pushing your system to its limits. However, addressing these issues will not only improve the quality of your audio playback but also help optimize your workflow and prevent any potential audio dropouts.
Common Causes of Clicks and Pops
Clicks and pops in Pro Tools can be caused by a variety of factors. Understanding the common causes can help you pinpoint the issue and resolve it effectively. Here are some of the most common causes of clicks and pops in Pro Tools:
- Buffer Size: The buffer size determines the amount of audio data processed at a time. If the buffer size is too low, your system may struggle to keep up with the demands of real-time processing, resulting in clicks and pops. Increasing the buffer size can help alleviate this issue.
- Outdated Drivers: Outdated drivers for your audio interface or other hardware components can cause compatibility issues and lead to clicks and pops. Make sure to regularly update your drivers to ensure smooth performance.
- Sample Rate and Bit Depth: Pro Tools projects often have specific sample rate and bit depth settings. If your audio files do not match the project’s settings, it can result in clicks and pops during playback. Ensure your audio files are properly converted to match the project settings.
- Plugin Compatibility: Some plugins may not be fully compatible with your version of Pro Tools or your operating system, which can cause clicks and pops. Make sure you have the latest versions of your plugins and check for any known compatibility issues.
- High CPU Usage: If your computer’s CPU is under heavy load, it may struggle to process all the audio data in real-time, leading to clicks and pops. Close any unnecessary applications and processes to free up system resources.
- Disk Performance: If your hard drive is fragmented or experiencing performance issues, it can affect the playback of your audio files and cause clicks and pops. Consider optimizing your disk and ensuring it has enough free space.
- Electrical Interference: Problems with power supply or electrical interference can introduce noise into the audio signal, resulting in clicks and pops. Ensure your audio equipment is properly grounded and away from other electrical devices.
- Insufficient RAM: If your computer has limited RAM, it may struggle to handle large projects, leading to clicks and pops. Consider adding more RAM to improve performance.
Identifying and addressing these common causes of clicks and pops can significantly improve the playback quality in Pro Tools. It’s important to troubleshoot each potential cause systematically to find the underlying issue and apply the appropriate solution.
Checking and Adjusting Buffer Size
The buffer size is a crucial setting in Pro Tools that determines the amount of audio data processed at a time. If the buffer size is too small, it can result in clicks and pops during playback, especially when working with resource-intensive projects. Here’s how you can check and adjust the buffer size in Pro Tools:
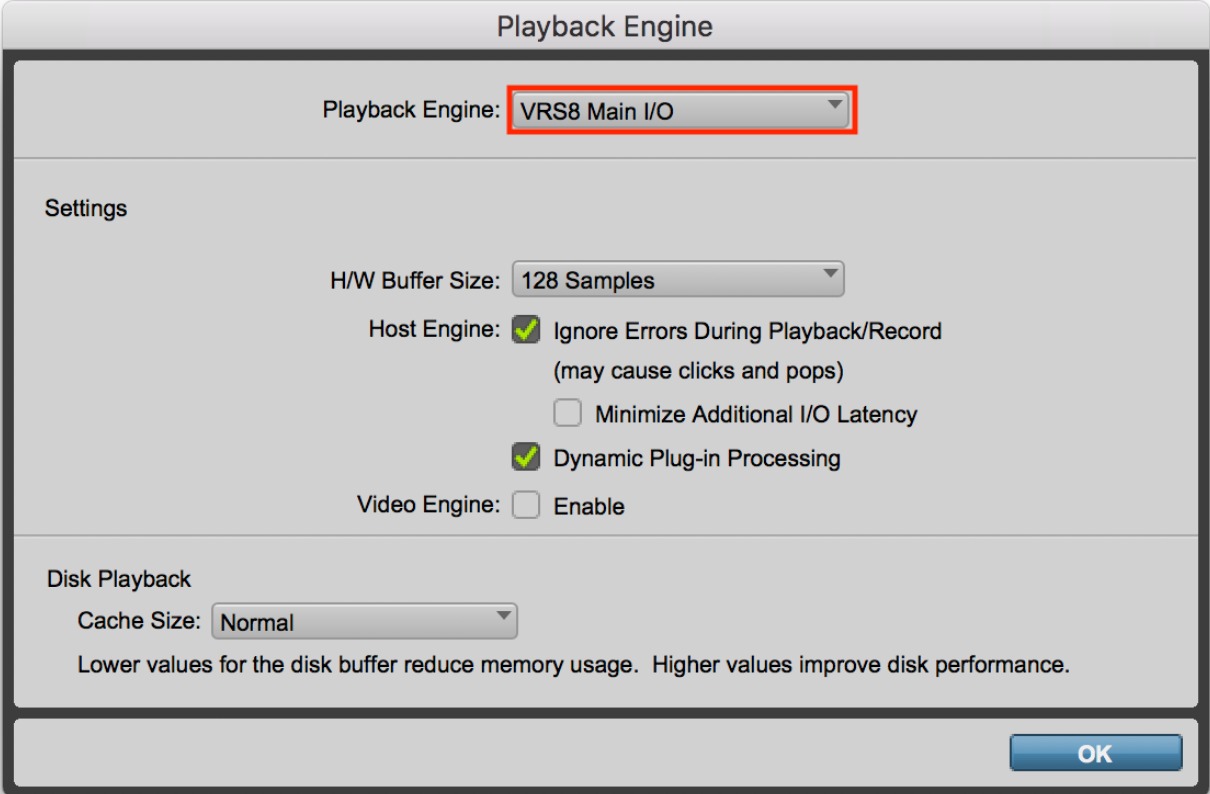
- Open your Pro Tools session and go to the ‘Setup’ menu.
- Select ‘Playback Engine’ from the dropdown menu.
- In the Playback Engine window, locate the ‘H/W Buffer Size’ option.
- Adjust the buffer size to a higher value, such as 512 or 1024 samples. Higher buffer sizes provide more processing time for your system, reducing the chances of clicks and pops.
- Click ‘OK’ to apply the changes.
It’s important to find the right balance with the buffer size. While increasing it can help eliminate clicks and pops, it may also introduce additional latency. Latency refers to the delay between triggering an action and hearing the result. If you notice excessive latency after increasing the buffer size, you may need to experiment with different buffer settings to find the sweet spot.
Keep in mind that the optimal buffer size may vary depending on the complexity of your project and the capabilities of your computer. If you’re working on a project with many audio tracks, plugins, or virtual instruments, you may need to use a larger buffer size to maintain smooth playback.
By checking and adjusting the buffer size in Pro Tools, you can optimize your system’s performance and reduce the likelihood of clicks and pops during playback. Experiment with different buffer sizes and find the best setting that offers a balance between performance and latency for your specific needs.
Updating Pro Tools and Audio Interface Drivers
Keeping your Pro Tools software and audio interface drivers up to date is crucial for optimal performance and compatibility. Outdated software and drivers can often be the cause of clicks and pops during playback. Here’s how you can update Pro Tools and your audio interface drivers:
- Updating Pro Tools:
- Visit the Avid website or open the Avid Application Manager to check for the latest Pro Tools updates.
- If an update is available, download and install it following the provided instructions.
- Before installing an update, ensure that your system meets the minimum requirements for the new version of Pro Tools.
- After installation, restart Pro Tools and open your session to see if the clicks and pops have been resolved.
- Updating Audio Interface Drivers:
- Visit the manufacturer’s website for your audio interface and search for the latest drivers compatible with your operating system.
- Download and install the updated drivers following the manufacturer’s instructions.
- Restart your computer after the driver installation is complete.
By updating Pro Tools to the latest version and ensuring that your audio interface drivers are up to date, you can address any compatibility issues and improve the overall stability of your audio setup. Compatibility problems can often cause clicks and pops during playback, so it’s important to make sure all components are working harmoniously.
Additionally, regularly checking for updates and installing them can provide new features, enhancements, and bug fixes, which can contribute to a smoother experience while working in Pro Tools.
If you continue to experience clicks and pops after updating Pro Tools and your audio interface drivers, it may be worth reaching out to the respective support teams for further assistance. They can provide additional troubleshooting steps or identify any known issues specific to your setup.
Adjusting Sample Rate and Bit Depth
The sample rate and bit depth settings in Pro Tools play a crucial role in determining the quality and accuracy of your audio recordings. Incorrect sample rate and bit depth settings can lead to clicks and pops during playback. Here’s how you can adjust these settings in Pro Tools:
- Sample Rate:
- Open your Pro Tools session and go to the ‘Setup’ menu.
- Select ‘Session’ from the dropdown menu.
- In the Session Setup window, locate the ‘Sample Rate’ option.
- Ensure the sample rate matches the sample rate of your audio files. Common sample rates are 44.1 kHz, 48 kHz, and 96 kHz. Using the wrong sample rate can cause clicks and pops during playback.
- If necessary, adjust the sample rate to match your audio files by selecting the desired option from the dropdown menu.
- Bit Depth:
- In the same Session Setup window, locate the ‘Bit Depth’ option.
- Pro Tools typically uses a bit depth of 24 bits, which offers higher resolution and dynamic range. Ensure that your audio files are also recorded or imported with a matching bit depth.
- Adjust the bit depth if necessary by selecting the desired option from the dropdown menu.
Matching the sample rate and bit depth settings in Pro Tools to your audio files is vital for accurate playback without clicks and pops. If these settings do not align, it can result in audio artifacts due to incompatible data formats.
It’s worth noting that increasing the sample rate and bit depth can improve the overall audio quality, but it may also increase the system’s processing demands. Ensure that your computer and audio interface can handle higher sample rates and bit depths without compromising performance.
By adjusting the sample rate and bit depth settings correctly, you can ensure that Pro Tools accurately processes your audio files without introducing any unwanted clicks and pops during playback. This will contribute to a smoother listening experience and maintain the integrity of your recordings.
Dealing with Plugin Related Issues
Plugins are an essential part of Pro Tools, allowing you to add various effects, virtual instruments, and processing tools to your audio projects. However, incompatible or poorly optimized plugins can sometimes be the cause of clicks and pops during playback. Here’s how you can deal with plugin-related issues in Pro Tools:
- Update Plugins:
Ensure that you have the latest versions of your plugins installed. Developers often release updates to fix compatibility issues and optimize performance. Visit the plugin manufacturer’s website or use their dedicated plugin manager to check for any available updates.
- Remove Faulty Plugins:
If you suspect that a particular plugin is causing clicks and pops, try removing it from your session temporarily. Play your project and see if the issue is resolved. If the clicks and pops disappear, the problematic plugin may need to be updated or replaced.
- Disable or Freeze Resource-Intensive Plugins:
Some plugins require a significant amount of processing power. If you’re working with a plugin-heavy session, consider disabling or freezing resource-intensive plugins that are not currently necessary. This can help reduce the strain on your system and potentially eliminate clicks and pops.
- Plugin Compatibility Mode:
Pro Tools offers a compatibility mode for plugins that may not be fully optimized for certain versions or operating systems. Enable the compatibility mode for problematic plugins to see if it resolves the issue. Keep in mind that this mode may limit certain plugin features or functionalities.
Remember, not all plugins are created equal, and some may perform better than others in Pro Tools. It’s important to choose well-optimized and reputable plugins that are known to work well with your specific setup. Additionally, experiment with different plugin combinations to identify any compatibility issues that might be causing clicks and pops.
By addressing plugin-related issues in Pro Tools, you can ensure a smooth and uninterrupted playback experience. Keep your plugins up to date, remove or disable problematic ones, and optimize their usage in your projects to minimize the occurrence of clicks and pops.
Managing CPU and Disk Usage
The CPU and disk usage play crucial roles in the performance and stability of Pro Tools. Excessive CPU and disk usage can lead to clicks and pops during playback. Here are some strategies to manage CPU and disk usage effectively:
- Free up System Resources: Close any unnecessary applications and processes running in the background to free up CPU and disk resources. These background tasks can consume valuable system resources, impacting the performance of Pro Tools.
- Disable Real-Time Anti-Virus Scanning: Anti-virus software can consume significant system resources as it scans files in real-time. Temporarily disable real-time scanning while working in Pro Tools to alleviate the strain on the CPU and disk.
- Optimize Disk Performance: Ensure your hard drive is optimized by defragmenting it regularly. Fragmented files can slow down data retrieval, affecting the performance of Pro Tools. Additionally, make sure your disk has sufficient free space for smooth operation.
- Use Dedicated Audio Drive: To improve disk performance, consider using a dedicated drive for your audio files. Separate it from the drive where Pro Tools is installed. This helps distribute the workload and reduces the chances of disk-related clicks and pops.
- Trim or Consolidate Regions: In Pro Tools, regions that extend beyond the length of your project can consume unnecessary CPU and disk resources. Trim or consolidate regions to remove any excessive data and optimize system resources.
- Manage Plugin Usage: Plugins, especially resource-intensive ones, can significantly impact CPU usage. Limit the usage of unnecessary plugins and choose lighter alternatives whenever possible. This helps reduce the overall strain on the CPU and minimizes the occurrence of clicks and pops.
- Use Freezing and Bouncing: Freezing tracks or bouncing them to audio can reduce CPU usage by converting virtual instrument tracks or complex processing chains into audio files. This way, Pro Tools can play back the audio without intensive real-time processing.
By effectively managing CPU and disk usage in Pro Tools, you can minimize clicks and pops during playback and optimize the overall performance of the software. Keep an eye on system resource usage and implement these strategies to create a smoother and more stable working environment.
Troubleshooting Audio Hardware
In some cases, clicks and pops in Pro Tools during playback may be caused by issues with your audio hardware. Here are some troubleshooting steps to help you identify and resolve potential audio hardware-related problems:
- Check Cables and Connections: Ensure that all cables and connections between your audio interface, speakers, and other hardware components are secure and in good condition. Loose or faulty connections can introduce noise and cause clicks and pops.
- Test with Different Cables and Ports: Try using different cables and ports to eliminate the possibility of cable or port-related issues. Sometimes, a faulty cable or port can lead to audio artifacts and disrupt the playback.
- Update Audio Interface Drivers: Make sure you are using the latest drivers for your audio interface. Check the manufacturer’s website for any available updates and install them accordingly. Updated drivers can address compatibility issues and improve overall performance.
- Reset Audio Interface Settings: If you are experiencing persistent clicks and pops, try resetting the settings of your audio interface to their default values. Refer to the manufacturer’s documentation or website for instructions on how to perform a reset.
- Test with another Audio Interface: If possible, try using a different audio interface to see if the issue persists. This can help determine if the problem is specific to your current audio interface or if it is related to another component of your setup.
- Check Power Supply: Ensure that your audio interface is receiving a stable power supply. Use a surge protector or a dedicated power outlet to minimize electrical interference that can cause audio artifacts.
- Verify Sample Rate and Clock Settings: Confirm that the sample rate and clock settings on your audio interface match the settings in your Pro Tools session. Mismatched sample rates or clock settings can lead to clicks and pops during playback.
- Consult Manufacturer Support: If you’ve tried the above steps and are still experiencing issues, it may be helpful to reach out to the support team of your audio interface manufacturer. They can provide you with specific troubleshooting steps or offer further assistance.
By troubleshooting your audio hardware, you can identify and resolve any issues that may be causing clicks and pops during playback in Pro Tools. Performing these steps systematically will help you isolate the problem and find an appropriate solution, ensuring a smooth and uninterrupted audio experience.
Optimizing System Settings
To ensure the smoothest playback experience in Pro Tools and minimize the occurrence of clicks and pops, it’s important to optimize your system settings. Here are some key areas to focus on when optimizing your system settings:
- System Requirements: Check the system requirements specified by Avid for the version of Pro Tools you are using. Ensure that your computer meets or exceeds these requirements to avoid performance issues.
- CPU and Memory: Pro Tools is a resource-intensive application, so it’s essential to have a capable processor (CPU) and sufficient memory (RAM) to handle the workload. Consider upgrading your hardware if you find that your system struggles to run Pro Tools smoothly.
- Power Settings: Adjust your computer’s power settings to prevent it from entering sleep mode or powering off while working in Pro Tools. These interruptions can cause audio glitches or even data loss.
- Disable Background Processes: Close unnecessary background processes and applications to free up system resources. This includes antivirus software, system updates, cloud syncing, and any other non-essential tasks that consume CPU or disk usage.
- Optimize Disk Performance: Ensure that your hard drive is healthy, defragmented, and has plenty of free space to avoid any performance issues. Regularly clean up unused files and consider investing in a solid-state drive (SSD) for faster data access.
- Affinity Settings (Windows): Configure your system’s affinity settings to dedicate specific CPU cores to Pro Tools. This can help improve efficiency and prevent other tasks from interfering with Pro Tools’ real-time processing.
- Audio Preferences: Adjust the audio preferences in Pro Tools to optimize the performance for your specific setup. This includes selecting the appropriate audio engine, sample buffer size, and selecting the correct audio interface.
- Disable Wi-Fi or Networking: If you’re not utilizing any online features in Pro Tools, consider disabling Wi-Fi or disconnecting from the network to reduce potential network-related interruptions.
- Regular Updates and Maintenance: Keep your operating system, Pro Tools software, and all plugins up to date. Developers frequently release updates that may include performance improvements, bug fixes, and compatibility enhancements.
By carefully optimizing your system settings, you can maximize the performance and stability of Pro Tools. These optimizations will help reduce the likelihood of clicks and pops during playback and create a more seamless audio production experience.
Conclusion
Dealing with clicks and pops during playback in Pro Tools can be frustrating, but by understanding the common causes and implementing the right solutions, you can achieve smooth and uninterrupted audio playback. Whether it’s adjusting buffer size, updating software and drivers, managing CPU and disk usage, troubleshooting hardware, or optimizing system settings, each step plays a crucial role in ensuring a seamless audio production experience.
Remember, clicks and pops can be caused by a variety of factors, ranging from hardware and software issues to improper settings and incompatible plugins. Taking a systematic approach to identify and address these issues will help eliminate clicks and pops, improve audio quality, and optimize your workflow in Pro Tools.
Regular maintenance, such as updating your software and drivers, defragmenting your hard drive, and keeping your system optimized, is essential to maintaining smooth playback. Additionally, being mindful of the sample rate and bit depth settings, managing CPU and disk usage, and troubleshooting audio hardware can go a long way in preventing clicks and pops from interfering with your creative process.
By implementing the techniques outlined in this article, you’ll be able to quickly diagnose and resolve clicks and pops, allowing you to focus on what’s most important – creating high-quality audio recordings and productions in Pro Tools. Invest time in optimizing your setup, and you’ll be rewarded with a seamlessly functioning system that delivers exceptional sound every time you hit the play button.