Home>Events & Info>Playback>How To Playback On Computer H Dvr H264
Playback
How To Playback On Computer H Dvr H264
Modified: January 22, 2024
Learn how to playback HD DVR H264 recordings on your computer effortlessly with step-by-step instructions. Master the art of playback and never miss a moment.
(Many of the links in this article redirect to a specific reviewed product. Your purchase of these products through affiliate links helps to generate commission for AudioLover.com, at no extra cost. Learn more)
Table of Contents
Introduction
Welcome to the world of HD DVR H264 playback on your computer! If you have a security camera system or a digital video recorder (DVR) that uses H264 compression, you may be wondering how to view and play back your recorded videos on your computer. With the right equipment and software, it’s actually quite simple.
In this article, we will guide you through the process of connecting your H DVR H264 to your computer and installing the necessary software to enable playback. We will also explain how to access the DVR files on your computer and provide some useful tips and tricks for efficient playback.
Before we dive into the steps, it’s important to note that the specific instructions may vary slightly depending on the brand and model of your HD DVR H264. Make sure to consult the user manual or the manufacturer’s website for any specific instructions or troubleshooting steps.
Now, let’s get started and explore how to play back your H DVR H264 recordings on your computer!
Requirements
Before you can begin the process of playing back your H DVR H264 recordings on your computer, there are a few key requirements that you need to fulfill:
- H DVR H264 System: Obviously, you will need a H DVR H264 system with recorded videos that you want to play back. Make sure your DVR is connected to your security cameras and functioning properly.
- Computer: You will need a computer with sufficient processing power and storage capacity to handle the playback of HD video files. A modern computer with at least 4GB of RAM and a multi-core processor is recommended for smooth playback.
- Operating System: The computer should be running a compatible operating system. Most modern Windows and macOS versions are supported, but make sure to check the system requirements of the playback software you plan to use.
- Internet Connection: While not strictly necessary for local playback, an internet connection can be beneficial for software installation, updates, and accessing additional features or online resources.
- H264 Playback Software: You will need to install a software player that is capable of decoding and playing H264 video files. There are numerous options available, both free and paid, so choose one that meets your specific needs.
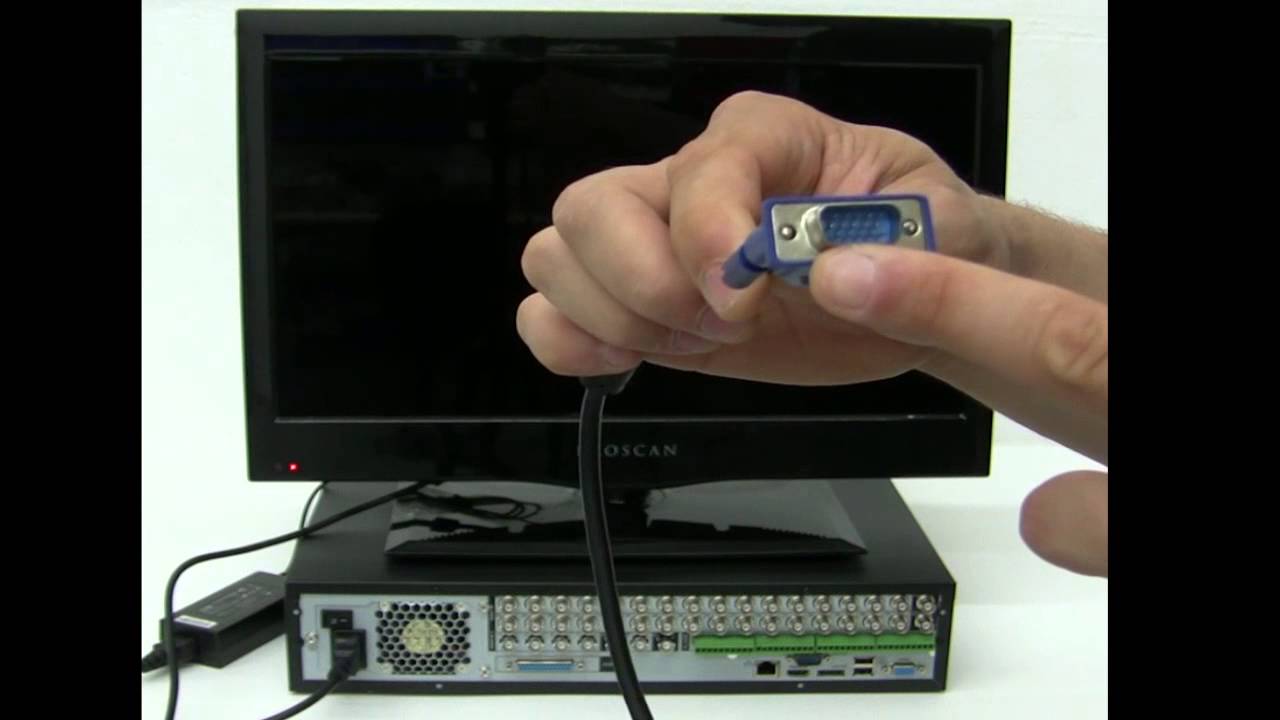
- Connecting Cables: Depending on your DVR and computer setup, you may need the appropriate cables to connect the DVR to the computer. This could be an HDMI cable, VGA cable, or other video/audio connection cables.
With these requirements in place, you are ready to proceed with the steps to connect and playback your H DVR H264 recordings on your computer. Let’s move on to the next section to learn how to connect your DVR to your computer.
Step 1: Connecting the H DVR H264 to the Computer
To begin the playback process, you need to establish a physical connection between your H DVR H264 and your computer. Follow these steps to connect them:
- Identify the Video Output on the DVR: Look for the video output ports on your DVR. The most common options are HDMI and VGA. Check your DVR’s user manual or consult the manufacturer’s website to determine which port is available on your specific model.
- Connect the Video Output Cable: Depending on the video output port on your DVR, connect the appropriate video cable to it. If your DVR has an HDMI port, use an HDMI cable. If it has a VGA port, use a VGA cable. Connect the other end of the cable to the corresponding port on your computer.
- Connect the Audio Output (Optional): If you want to hear the audio from your DVR on your computer, check if your DVR has an audio output port. If it does, connect the audio cable to the audio output port on your DVR and the audio input port on your computer.
- Power on Your DVR: Make sure your DVR is powered on and connected to the power source. Ensure that your computer is also powered on.
- Select the Correct Input on Your Computer: On your computer, select the appropriate input source to receive the video signal from your DVR. This can usually be done by pressing the “Input” or “Source” button on your monitor or through the display settings on your computer.
- Adjust the Display Settings (if necessary): Once the connection is established, you may need to adjust the display settings on your computer to ensure the resolution and aspect ratio match the settings of your DVR.
With the physical connection in place, you have successfully connected your H DVR H264 to your computer. Now, it’s time to move on to the next step and install the required software for playback.
Step 2: Installing the Required Software
Now that you have connected your HD DVR H264 to your computer, the next step is to install the necessary software that will allow you to play back your recordings. Follow these steps to install the required software:
- Research and Choose Playback Software: There are several options available for H264 playback software. Take some time to research and choose the software that best suits your needs and preferences. Some popular choices include VLC Media Player, Windows Media Player, and KMPlayer. Make sure to check for compatibility with your operating system.
- Download the Software: Once you have selected the software, visit the official website or a trusted download source to download the installation file. Ensure that you download the correct version for your operating system.
- Run the Installer: Locate the downloaded installation file and double-click on it to run the installer. Follow the on-screen prompts to proceed with the installation process.
- Accept the License Agreement: During the installation, you may be presented with a license agreement. Read through the agreement and accept it to continue with the installation.
- Select Installation Options: Depending on the software, you may be given options to choose additional features or customize the installation. Make your selections according to your preferences, or simply proceed with the default settings.
- Complete the Installation: Once you have made your selections, click on the “Install” or “Finish” button to complete the installation process. This may take a few moments, so be patient.
- Launch the Software: After the installation is complete, locate the software in your computer’s installed programs or applications list. Double-click on the software icon to launch it.
Congratulations! You have successfully installed the required software for H264 playback on your computer. Now, let’s move on to the next step where we will configure your H DVR H264 for playback.
Step 3: Configuring the H DVR H264 for Playback
Now that you have installed the required software, it’s time to configure your H DVR H264 for playback on your computer. Follow these steps to ensure your DVR is ready for playback:
- Access the DVR’s Network Settings: Using the remote control or the interface on your DVR, navigate to the network settings. You may need to consult your DVR’s user manual for specific instructions on accessing this menu.
- Enable Network Connection: In the network settings, make sure the network connection option is enabled. This will allow your DVR to connect to your computer over the local network.
- Assign an IP Address: Configure your DVR to have a static IP address or assign a DHCP reservation for it on your local network. This will ensure that the IP address of your DVR remains consistent and can be easily accessed from your computer.
- Enable Port Forwarding (Optional): If you want to access your DVR remotely over the internet, you may need to enable port forwarding on your router. Consult your router’s user manual or the manufacturer’s website for instructions on how to set up port forwarding.
- Save the Network Settings: After making any changes to the network settings, make sure to save the configuration to apply the changes.
- Restart the DVR: In order for the changes to take effect, restart your DVR. This will ensure that the network settings are applied properly.
- Verify Network Connectivity: Check if your DVR is connected to the local network by accessing the network settings menu again. Verify that the IP address and network status are displayed correctly.
By following these steps, you have successfully configured your H DVR H264 for playback on your computer. Now, let’s move on to the next step where we will learn how to access the DVR files on your computer.
Step 4: Accessing the DVR Files on the Computer
Now that your H DVR H264 is configured for playback, it’s time to access the DVR files on your computer. Follow these steps to access your DVR files:
- Open the Playback Software: Launch the playback software that you installed in Step 2. You will typically find the software icon on your desktop or in your list of installed programs.
- Locate the File Browser: Within the playback software, look for the option to browse or open files. This is usually indicated by an icon or a menu option with a folder symbol.
- Select the DVR Source: In the file browser, choose the DVR source from which you want to access the files. This could be labeled as “Network,” “Remote,” or the specific IP address of your DVR.
- Enter the Login Information: If prompted, enter the login information for your DVR. This typically includes the username and password associated with your DVR system.
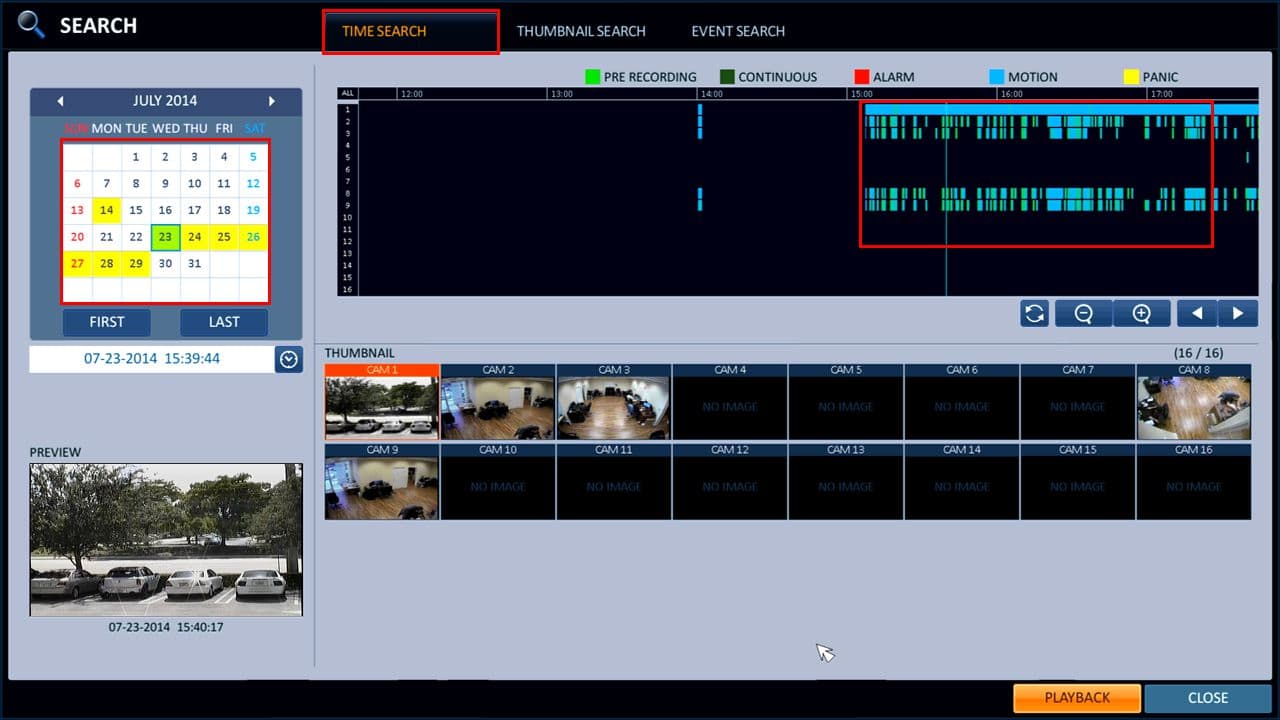
- Navigate to the Recorded Files: Once you have successfully logged in, navigate to the directory or folder where your DVR recordings are stored. This may be located within the DVR’s internal storage or on an external storage device.
- Select the Files for Playback: In the file browser, select the specific files or recordings that you want to play back. You can typically select multiple files by holding down the control key (Windows) or command key (Mac) while clicking on the files.
- Open the Selected Files: After selecting the files, click on the “Open,” “Play,” or similar button to initiate the playback of the selected recordings. The playback software will start decoding and playing the H264 files.
With these steps, you can easily access and play back your DVR files on your computer. Now, let’s move on to the next step where we will explore the various playback options and controls available to you.
Step 5: Playback Options and Controls
Once you have accessed your DVR files and initiated playback on your computer, it’s important to familiarize yourself with the various options and controls available to enhance your viewing experience. Here are some common playback options and controls you should be aware of:
- Play/Pause: The play/pause button allows you to start and pause the playback of your DVR recordings. Clicking this button once will start the playback, and clicking it again will pause the playback at the current point.
- Stop: The stop button will completely stop the playback of your recordings. Clicking this button will bring the playback back to the beginning of the file.
- Seek: The seek bar or slider allows you to manually navigate through the timeline of your recordings. By dragging the slider left or right, you can jump to a specific point in the video.
- Fast Forward/Rewind: The fast forward and rewind buttons allow you to quickly skip forward or backward through the video. The speed at which the video fast forwards or rewinds can typically be adjusted.
- Playback Speed: Many playback software offers the option to adjust the playback speed. You can slow down or speed up the playback to suit your needs.
- Zoom/Pan: Some software allows you to zoom in or pan around the video frame. This can be useful for getting a closer look at certain details or areas in the recording.
- Audio Controls: If your DVR recordings have audio, you can control the volume and mute/unmute the audio using the provided audio controls.
- Subtitle/Captioning: If your recordings have subtitles or captions, you can enable or disable them to enhance your understanding of the content.
- Video Quality: Depending on the software, you may have options to adjust the video quality settings, such as resolution, brightness, contrast, and saturation.
These are some of the common playback options and controls you may encounter when playing back your DVR recordings on your computer. Familiarize yourself with these features to have full control over your viewing experience.
Finally, make sure to save and back up your recordings if necessary. Some software allows you to export or save the playback as a separate file for future reference.
Congratulations! You have successfully learned how to playback your H DVR H264 recordings on your computer. Enjoy exploring your recordings and reliving the captured moments with ease and convenience.
Conclusion
Congratulations on successfully learning how to play back H DVR H264 recordings on your computer! By following the steps outlined in this guide, you have gained the knowledge and skills to connect your DVR to your computer, install the necessary software, configure the DVR for playback, and access and control your DVR files.
With the right equipment and software, you can now easily view and review your recorded video footage on your computer. Whether you are using the playback feature for security purposes or simply to relive special moments, this guide has provided you with the necessary information to seamlessly access and play back your H DVR H264 recordings.
Remember to consult your DVR’s user manual or the manufacturer’s website for any specific instructions or troubleshooting steps that may be unique to your device.
Make sure to explore the different playback options and controls available to further enhance your viewing experience. Adjust the playback speed, utilize the seek bar to navigate through the video timeline, and utilize audio controls or subtitle options as needed. By familiarizing yourself with these features, you can make the most out of your H DVR H264 playback experience.
Finally, remember to save and back up your recordings if necessary. Consider creating separate folders or directories to organize and store your DVR files for easy access in the future. Backing up your recordings will help ensure their safety and provide peace of mind.
Thank you for following this guide. We hope it has been informative and that you are now able to enjoy seamless and convenient H DVR H264 playback on your computer.