Home>Events & Info>Playback>How To Slow Down Playback Speed In Premiere Pro
Playback
How To Slow Down Playback Speed In Premiere Pro
Modified: January 22, 2024
Learn how to slow down the playback speed in Adobe Premiere Pro and gain more control over your video editing. Speed up or slow down your footage with ease using this helpful tutorial.
(Many of the links in this article redirect to a specific reviewed product. Your purchase of these products through affiliate links helps to generate commission for AudioLover.com, at no extra cost. Learn more)
Table of Contents
- Introduction
- Understanding Playback Speed in Premiere Pro
- Adjusting Playback Speed in Premiere Pro
- Method 1: Using the Speed/Duration Option
- Method 2: Using the Rate Stretch Tool
- Method 3: Using Time Remapping
- Method 4: Using the Speed Control Effect
- Method 5: Keyboard Shortcuts for Playback Speed
- Conclusion
Introduction
Welcome to the world of video editing! Premiere Pro is a powerful and versatile software that allows you to create professional-quality videos. One of the key features of Premiere Pro is its ability to adjust playback speed, which can add visual interest and creative effects to your projects. Whether you want to speed up a fast-paced action sequence or slow down a dramatic moment, Premiere Pro gives you the tools to control the timing and tempo of your footage.
In this article, we will explore different methods to slow down playback speed in Premiere Pro. We will guide you through the process step-by-step, providing clear instructions and tips along the way. Whether you are new to video editing or a seasoned pro, this article will help you master the art of manipulating playback speed in Premiere Pro.
Before we dive in, it’s important to understand why adjusting playback speed can be beneficial. Slowing down footage is a common technique used to create dramatic or dreamy effects, emphasize specific moments, or add a sense of suspense. It can also be used to sync audio and video properly or make subtle adjustments to the timing of certain actions. Whatever the reason, being able to control playback speed will give you the creative freedom to bring your vision to life.
Now that you understand the importance of playback speed, let’s explore the various methods you can use to slow down footage in Premiere Pro. Whether you prefer a straightforward approach or a more advanced technique, there is a method that suits your needs. So buckle up and get ready to unleash your creativity!
Understanding Playback Speed in Premiere Pro
Before we dive into the different methods of adjusting playback speed in Premiere Pro, it’s important to have a solid understanding of how it works. Playback speed refers to the rate at which your video footage plays back in the editing software or during export. It can be adjusted to make footage play faster or slower than its original recorded speed.
Playback speed is typically expressed as a percentage or a fractional value. A value of 100% represents the original speed of the shot, meaning it plays back at normal speed. A value less than 100% will make the footage play in slow motion, while a value greater than 100% will make the footage play faster than normal.
It’s important to note that adjusting playback speed does not affect the underlying video file or alter its original duration. Instead, Premiere Pro uses interpolation to create the illusion of slow motion or fast motion by duplicating or skipping frames.
When you slow down playback speed, Premiere Pro will generate additional frames to fill in the gaps and make the motion appear smoother. Conversely, when you speed up playback, Premiere Pro will skip frames to maintain the desired pace. The quality of the slow or fast motion will depend on the method you use and the original footage’s frame rate and resolution.
Another important concept related to playback speed is the timeline and sequence settings. The timeline in Premiere Pro is where you arrange your clips and control their sequence and duration. The sequence settings determine the frame rate and resolution of your project. It’s crucial to ensure that your sequence settings match the frame rate and resolution of your footage to avoid any playback issues.
Now that you have a clear understanding of playback speed and its implications in Premiere Pro, you’re ready to explore the various methods to adjust it. Each method offers different levels of control and flexibility, so you can choose the one that best suits your needs and creative vision. So let’s get into it and learn how to slow down playback speed in Premiere Pro!
Adjusting Playback Speed in Premiere Pro
Now that you understand the basics of playback speed in Premiere Pro, let’s explore the different methods to adjust it. Premiere Pro provides several options to change the playback speed of your footage, each with its own advantages and limitations. Whether you want a simple and quick adjustment or a more precise control over timing, there’s a method for you.
Here are the main methods to adjust the playback speed in Premiere Pro:
- Using the Speed/Duration option
- Using the Rate Stretch tool
- Using Time Remapping
- Using the Speed Control effect
- Using keyboard shortcuts for playback speed
Let’s explore each of these methods in detail.
Method 1: Using the Speed/Duration Option
The Speed/Duration option in Premiere Pro allows you to easily adjust the playback speed of a clip. Here’s how to use it:
- Select the clip in the timeline.
- Right-click on the clip and select “Speed/Duration” from the context menu.
- In the Speed/Duration dialog box, adjust the Speed percentage to your desired value. Lower values will slow down the clip, while higher values will speed it up. You can also enter specific durations or use the timecode to set the speed.
- Click OK to apply the changes.
This method is great for making basic speed adjustments and is especially useful when you want to slow down or speed up an entire clip uniformly.
Method 2: Using the Rate Stretch Tool
The Rate Stretch tool allows you to manually stretch or compress a clip in the timeline to change its playback speed. Follow these steps to use the Rate Stretch tool:
- Select the Rate Stretch tool from the toolbar or press the “R” key.
- Drag the end of the clip to adjust its duration. Stretching it out will slow down the playback, while compressing it will speed it up.
- Release the mouse button to apply the changes.
This method is useful when you need to make precise adjustments to the clip’s duration and speed, as it allows for more flexibility and control.
Method 3: Using Time Remapping
Time Remapping is a powerful feature in Premiere Pro that enables you to create gradual or abrupt speed changes within a clip. Here’s how to use it:
- Select the clip in the timeline.
- Go to the “Effect Controls” panel and locate the Time Remapping option.
- Enable Time Remapping by clicking on the stopwatch icon next to it.
- Add keyframes to the Time Remapping property at the points where you want the speed to change.
- Move the keyframes up or down to adjust the speed between them.
This method gives you precise control over the speed changes within a clip and is ideal for creating dynamic and dramatic effects.
Method 4: Using the Speed Control Effect
The Speed Control effect provides additional options for adjusting the playback speed of a clip. Here’s how to use it:
- Select the clip in the timeline.
- Go to the “Effect Controls” panel and locate the Speed Control effect.
- Adjust the Speed percentage or duration values to change the playback speed.
This method offers more advanced speed control options, such as time stretching and frame blending, which can enhance the quality of your slow motion or fast motion effects.
Method 5: Using Keyboard Shortcuts for Playback Speed
Premiere Pro also provides keyboard shortcuts to quickly change the playback speed of a clip. Here are the common shortcuts:
- To increase playback speed: Press the “[” key.
- To decrease playback speed: Press the “]” key.
- To reset playback speed to normal: Press the “” key.
By using these shortcuts, you can quickly experiment with different playback speeds and find the perfect timing for your footage.
Now that you’re familiar with the different methods of adjusting playback speed in Premiere Pro, you can start experimenting and exploring the creative possibilities they offer. Whether you need a simple speed adjustment or want to create a stunning slow motion effect, Premiere Pro has the tools to help you achieve your vision. So go ahead and take your video editing skills to the next level by mastering the art of adjusting playback speed!
Method 1: Using the Speed/Duration Option
The Speed/Duration option in Premiere Pro is a quick and straightforward method to adjust the playback speed of a clip. It allows you to slow down or speed up the entire clip uniformly. Here’s how to use it:
- Select the clip in the timeline that you want to adjust the playback speed for.
- Right-click on the clip and select “Speed/Duration” from the context menu. Alternatively, you can go to the “Modify” menu at the top and choose “Speed/Duration”.
- In the Speed/Duration dialog box that appears, you’ll see the “Playback Speed” option. By default, it is set to 100%, which represents the original speed of the clip.
- To slow down the clip, enter a lower value (e.g., 50% or 75%). This will make the clip play in slow motion.
- To speed up the clip, enter a higher value (e.g., 150% or 200%). This will make the clip play faster than its original speed.
- You can also enter specific durations or use the timecode to set the speed. For example, entering “00:05:00” will make the clip play for 5 minutes.
- Preview the clip to see the adjusted speed. If you’re satisfied with the result, click OK to apply the changes.
The Speed/Duration option is great for making quick and simple adjustments to the playback speed of a clip. Whether you want to create a slow-motion effect or speed up a time-lapse sequence, this method allows you to achieve the desired effect easily.
It’s important to note that when you adjust the playback speed using the Speed/Duration option, Premiere Pro uses time interpolation to create the desired effect. This means that the software duplicates or skips frames to match the new playback speed without actually altering the original clip or its duration.
Furthermore, keep in mind that changing the playback speed can affect the overall timing and synchronization of your project. Adjustments made to the speed of one clip may require you to make corresponding changes to other clips or audio tracks to maintain consistency.
With the Speed/Duration option, you have a simple and effective tool at your disposal to adjust the playback speed of your clips in Premiere Pro. It’s a great starting point for experimenting with different speeds and exploring the creative possibilities of manipulating time in your videos. So go ahead and dive into the world of adjusting playback speed with the Speed/Duration option!
Method 2: Using the Rate Stretch Tool
If you need more precise control over the playback speed of a clip in Premiere Pro, the Rate Stretch tool is a powerful option to consider. This tool allows you to manually stretch or compress a clip’s duration, thereby changing its playback speed. Here’s how to use the Rate Stretch tool:
- Select the clip in the timeline that you want to adjust the playback speed for.
- From the toolbar, select the Rate Stretch tool or press the “R” key as a shortcut.
- Position the cursor at the edge of the clip where you want to adjust the speed.
- Click and drag the edge of the clip to stretch it out or compress it. Stretching the clip makes it play slower, while compressing it makes it play faster.
- Release the mouse button to apply the changes.
As you drag the edge of the clip with the Rate Stretch tool, you will notice that the duration of the clip changes, reflecting the adjusted playback speed. Premiere Pro dynamically recalculates the frames to match the new duration, applying time interpolation to maintain smooth motion.
The Rate Stretch tool is particularly useful when you need to make precise adjustments to the duration and speed of a clip. It allows you to stretch or compress specific portions of the clip, enabling you to create subtle or dramatic changes in the playback speed.
When using the Rate Stretch tool, keep in mind that altering the duration of a clip may affect the timing and synchronization with other clips or audio tracks in your project. Ensure that you review the overall sequence to ensure consistency and make any necessary adjustments to maintain proper synchronization.
By utilizing the Rate Stretch tool, you have the flexibility to fine-tune the playback speed of your clips in Premiere Pro. Whether you want to create a slow-motion effect for a cinematic sequence or speed up a fast-paced action scene, this method empowers you to have precise control over the timing and tempo of your footage. So go ahead and grab the Rate Stretch tool to experiment with different playback speeds and unleash your creativity!
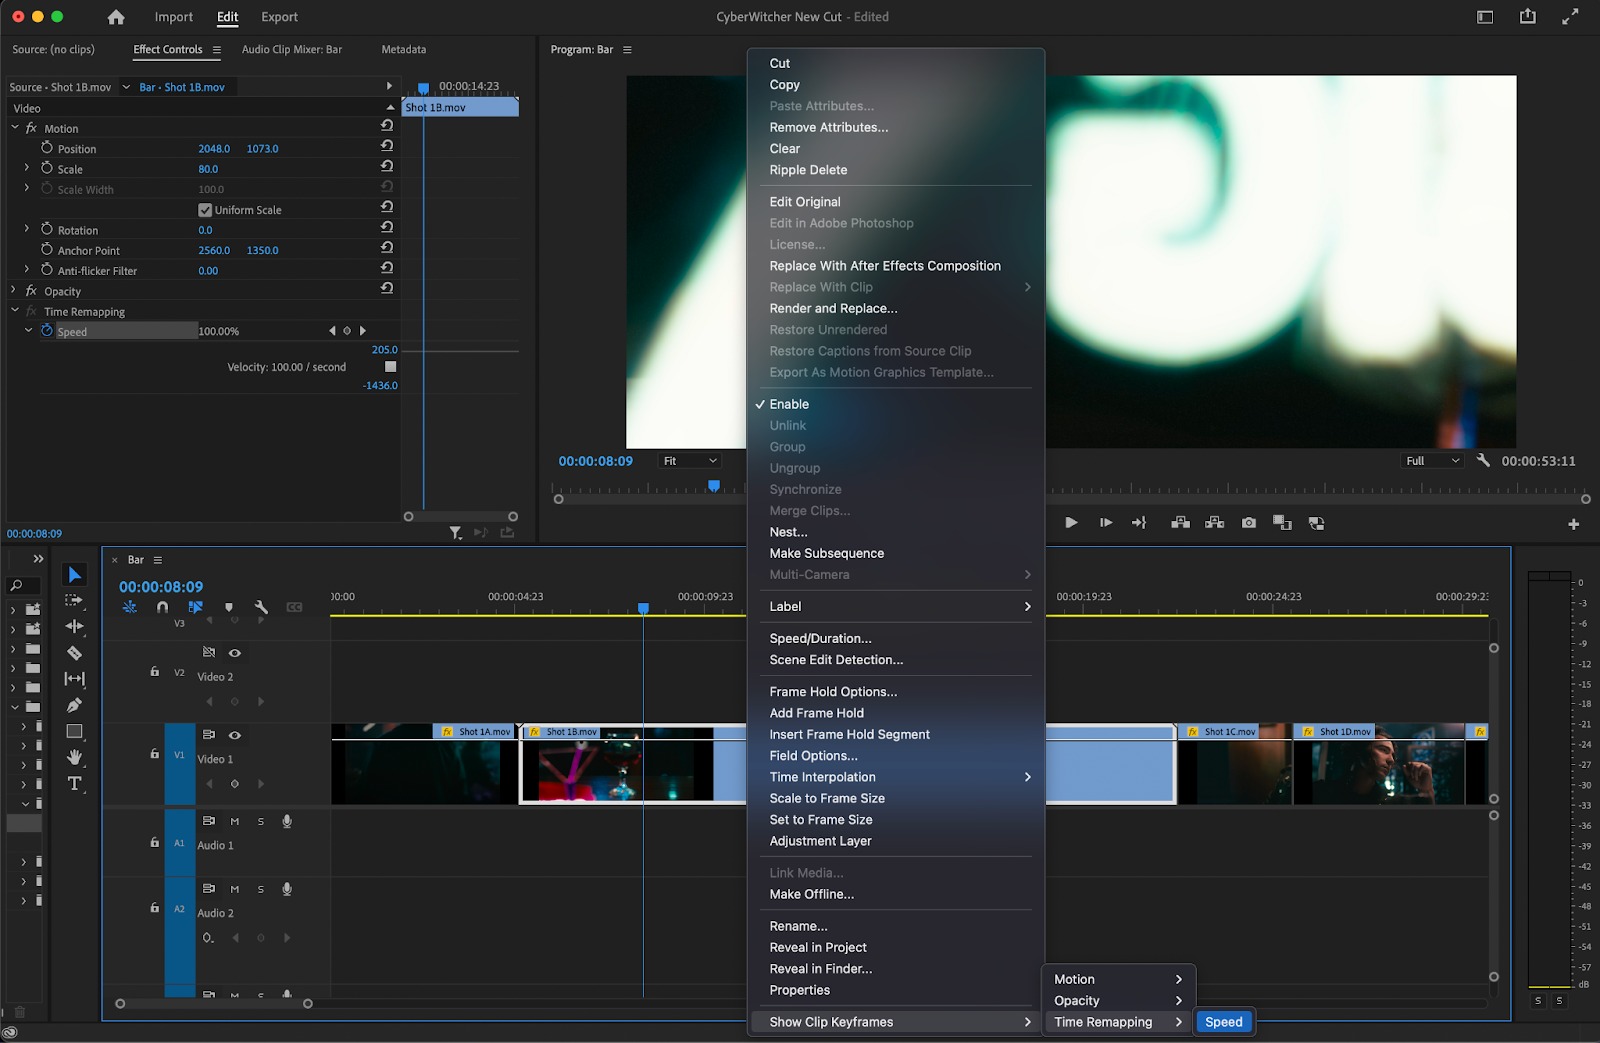
Method 3: Using Time Remapping
For more advanced control over the playback speed of a clip in Premiere Pro, you can turn to the powerful Time Remapping feature. Time Remapping allows you to create gradual or abrupt speed changes within a single clip, opening up endless possibilities for creative editing. Here’s how to use Time Remapping:
- Select the clip in the timeline that you want to adjust the playback speed for.
- In the “Effect Controls” panel, locate the Time Remapping option.
- Enable Time Remapping by clicking on the stopwatch icon next to it. This allows you to set keyframes to control the speed changes.
- To add a keyframe, navigate to the desired point on the clip’s timeline where you want the speed change to occur. Click the diamond-shaped Add/Remove Keyframe button or press Ctrl/Cmd+Shift+K.
- Move to another point on the timeline where you want another speed change and add another keyframe.
- Adjust the position of the keyframes to control the speed changes. Dragging the keyframe up or down alters the speed between them.
- To create a smooth transition between keyframes, you can use easing curves. Click on the keyframe and then select the desired easing curve from the options in the Effect Controls panel.
- Continue adding keyframes and adjusting their positions to shape the speed changes as desired.
With Time Remapping, you have complete control over the timing and speed changes within a specific clip. By adding multiple keyframes and adjusting their positions, you can create smooth or abrupt speed transitions, slow-motion effects, or even create a freeze-frame effect by keeping the speed constant at a particular frame.
It’s important to note that when using Time Remapping, Premiere Pro employs frame blending and interpolation techniques to maintain smooth motion between keyframes. This ensures that the speed changes appear natural and seamless.
Time Remapping gives you the creative freedom to manipulate time and pace within your footage. Whether you want to create a dynamic action scene with varying speeds or evoke an emotional effect with subtle changes, this method allows you to achieve precise control over the playback speed of clips in Premiere Pro.
Remember to review the overall sequence and ensure that the speed changes align with the flow and timing of your project. Adjustments made with Time Remapping may require corresponding changes in other clips or audio tracks for optimal synchronization.
With the versatile Time Remapping feature in Premiere Pro, you have the power to shape time and experiment with different playback speeds. Embrace the creative possibilities it offers and let your imagination run wild as you create captivating visual effects through precise speed adjustments!
Method 4: Using the Speed Control Effect
If you’re looking for more advanced control over the playback speed of a clip in Premiere Pro, the Speed Control effect is a powerful tool to consider. This effect provides additional options and settings to adjust the speed of a clip, allowing you to achieve specific time-related effects. Here’s how to use the Speed Control effect:
- Select the clip in the timeline that you want to adjust the playback speed for.
- In the “Effect Controls” panel, locate the Speed Control effect. You can find it by typing “Speed Control” in the search bar.
- Drag and drop the Speed Control effect onto the clip in the timeline.
- In the “Effect Controls” panel, you’ll see the “Speed” parameter. Adjust this value to change the playback speed of the clip. Decreasing the value slows down the clip, while increasing it speeds it up.
- Experiment with the “Time Stretching” and “Frame Blending” options in the effect controls to enhance the quality of the slow motion or fast motion effect.
- Preview the clip to see the adjusted speed. If you’re satisfied with the result, you can further refine the effect by adjusting additional parameters.
The Speed Control effect provides you with more advanced options for adjusting the playback speed of your clips. You can fine-tune the speed settings and even apply time stretching and frame blending to enhance the quality of your slow-motion or fast-motion effects.
It’s important to note that the Speed Control effect uses time interpolation and frame blending techniques to maintain smooth motion when adjusting the speed of a clip. This helps to ensure that the playback appears natural and seamless to viewers.
When using the Speed Control effect, don’t forget to review the overall sequence to maintain consistency and proper synchronization. Adjustments made to the speed of one clip may require corresponding changes in other clips or audio tracks to ensure smooth transitions and timing.
The Speed Control effect in Premiere Pro gives you the flexibility to explore advanced speed adjustments and creative time-related effects. Whether you want to create stylized slow-motion shots or quick-paced sequences, this method empowers you to manipulate the timing and tempo of your footage in a precise and controlled manner. So go ahead and take advantage of the Speed Control effect to bring your creative vision to life!
Method 5: Keyboard Shortcuts for Playback Speed
Premiere Pro offers a convenient way to adjust the playback speed of your clips using keyboard shortcuts. This method allows you to quickly toggle between different playback speeds without the need to access the menu or apply effects. Here are the common keyboard shortcuts for controlling the playback speed:
- To increase the playback speed, press the “[” key (the left square bracket).
- To decrease the playback speed, press the “]” key (the right square bracket).
- To reset the playback speed to normal, press the “” key (the backslash).
By utilizing these keyboard shortcuts, you can instantly change the playback speed of the currently selected clip in the timeline, allowing for quick experimentation and adjustments.
It’s important to note that these shortcuts work as toggle switches. Pressing the “[” key multiple times will progressively increase the playback speed, and pressing the “]” key multiple times will progressively decrease the speed. When you want to return to the original playback speed, simply press the “” key.
The keyboard shortcuts for playback speed are an efficient way to test different speeds in real-time and quickly find the desired effect for your clip. It is particularly useful when you need to make quick adjustments or fine-tune the timing of specific sections in your footage.
When using keyboard shortcuts for playback speed, keep in mind that they change the speed of the currently selected clip in the timeline. If you want to adjust the speed of multiple clips simultaneously, it’s recommended to use other methods such as the Speed/Duration option or applying effects.
Utilizing the keyboard shortcuts for playback speed in Premiere Pro can significantly streamline your editing workflow. It allows you to effortlessly navigate between different playback speeds, enabling you to make on-the-fly adjustments and find the perfect timing for your clips.
Now that you know the keyboard shortcuts for controlling playback speed, take advantage of this quick and convenient method to experiment with different speeds and create dynamic effects in your video projects. So go ahead and let your fingers do the work as you explore the realm of variable playback speeds!
Conclusion
Adjusting playback speed in Premiere Pro is a powerful technique that allows you to manipulate time, add creative effects, and enhance the storytelling in your videos. Whether you want to slow down a dramatic moment, speed up a fast-action sequence, or create a unique visual effect, Premiere Pro provides a range of methods to achieve your desired results.
In this article, we explored five different methods to adjust playback speed in Premiere Pro:
- Using the Speed/Duration option for simple and uniform speed adjustments.
- Using the Rate Stretch tool for precise control over clip duration and speed changes.
- Using Time Remapping for gradual or abrupt speed transitions within a clip.
- Using the Speed Control effect for advanced speed settings and time-related effects.
- Using keyboard shortcuts for quick and convenient playback speed adjustments.
Each method offers its own level of control and flexibility, allowing you to fine-tune the timing and tempo of your footage based on your creative vision. Whether you’re a beginner or an experienced video editor, these methods provide you with the tools to explore and experiment with different playback speeds to bring your ideas to life.
As you use these methods to adjust playback speed, keep in mind the importance of maintaining consistency and synchronization throughout your project. Changes in speed may require corresponding adjustments in other clips or audio tracks to ensure fluid transitions and a cohesive viewing experience.
Now that you have a deep understanding of adjusting playback speed in Premiere Pro, it’s time to take your video editing skills to the next level. Embrace the versatility and creative possibilities that come with controlling time and pace in your videos. Experiment with different methods, discover your unique style, and create captivating visual effects that will engage your audience.
So go ahead, unleash your creativity, and let the magic of variable playback speed in Premiere Pro take your video projects to new heights!