Home>Events & Info>Playback>Why Won’t My Headphones Show Up In Playback Devices
Playback
Why Won’t My Headphones Show Up In Playback Devices
Modified: January 22, 2024
Having trouble with your headphones not showing up in playback devices? Learn the possible reasons and solutions to fix this playback issue.
(Many of the links in this article redirect to a specific reviewed product. Your purchase of these products through affiliate links helps to generate commission for AudioLover.com, at no extra cost. Learn more)
Table of Contents
Introduction
Headphones are an essential accessory for anyone who enjoys listening to music, watching movies, or playing games on their computer. However, it can be frustrating when your headphones don’t show up in the playback devices on your computer.
There could be several reasons for this issue, ranging from hardware problems to software conflicts. In this article, we will explore various troubleshooting steps to help you resolve this issue and get your headphones working again.
Before we dive into the troubleshooting, it’s important to check the basics. Make sure that your headphones are properly connected to the computer’s audio jack or USB port. It may sound obvious, but sometimes a loose connection can be the cause of the problem. Try unplugging and replugging the headphones to ensure a secure connection.
If the hardware connections are fine and your headphones still don’t show up in the playback devices, it’s time to delve into software-related solutions. One possible cause could be outdated audio drivers. These drivers act as a bridge between your operating system and the audio hardware, so it’s crucial to keep them up to date. We’ll explore how to update your audio drivers in the next section.
In some cases, the headphones may be disabled or hidden in the playback devices settings. We will discuss how to enable hidden devices and ensure that your headphones are visible in the playback devices list. Additionally, restarting the Windows Audio Service can help resolve any issues related to audio playback on your computer.
If the problem persists, running the built-in audio troubleshooting tool can help identify and fix any audio-related problems. This tool can detect and resolve issues with your audio drivers or settings.
Another aspect to consider is compatibility. Sometimes, certain headphones may not be compatible with your computer’s operating system or audio hardware. We’ll provide tips on how to check the compatibility of your headphones with your computer.
Lastly, if none of the previous steps have resolved the issue, it’s worth testing your headphones on another device. This will help determine if the problem lies with the headphones themselves or with your computer.
By following the troubleshooting steps outlined in this article, you can overcome the frustration of headphones not showing up in playback devices and get back to enjoying your favorite audio content on your computer.
Checking Hardware Connections
When your headphones don’t show up in the playback devices on your computer, the first step is to ensure that the hardware connections are properly made. Even a small disconnection or loose cable can prevent your headphones from being recognized by your computer. Here’s what you can do to check the hardware connections:
- Double-check the connections: Start by unplugging your headphones from the audio jack or USB port on your computer. Inspect the end of the headphone cable for any damage or dirt. Then, firmly reinsert the headphones into the appropriate port, ensuring a secure connection.
- Try a different port: If you’re using a USB headphone, try plugging it into a different USB port on your computer. Sometimes, certain USB ports may be faulty or not compatible, causing issues with device recognition. By switching to a different port, you can rule out any problems related to a specific port.
- Test with another device: To verify that the issue is not with your headphones, try connecting them to another device, such as a smartphone or another computer, that you know is in working condition. If the headphones work fine on the other device, it suggests that the problem lies with your computer rather than the headphones.
Once you have checked the hardware connections and tested the headphones on another device, proceed to the next troubleshooting step if the issue still persists.
Updating Audio Drivers
Outdated or incompatible audio drivers can be a common cause for headphones not showing up in playback devices. The audio drivers act as a communication bridge between your operating system and the audio hardware, allowing your headphones to be recognized and used. Here’s how you can update your audio drivers:
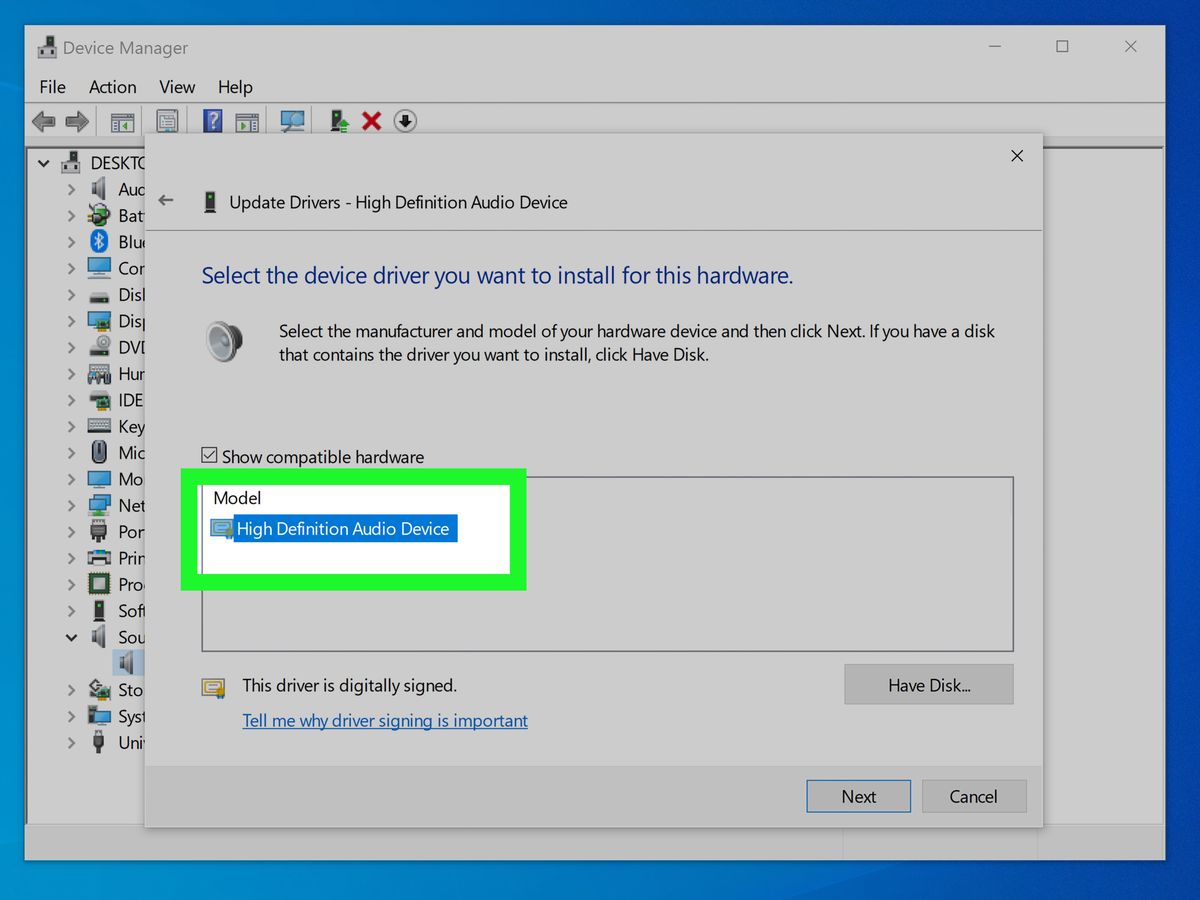
- Identify the audio device: Start by identifying the specific audio device your computer is using. You can do this by going to the Device Manager. In Windows, you can access the Device Manager by right-clicking on the Start button and selecting “Device Manager” from the menu.
- Expand the “Sound, video, and game controllers” category: Once in the Device Manager, locate and expand the “Sound, video, and game controllers” category. This will display all the audio devices installed on your computer.
- Update the audio driver: Right-click on the audio device that corresponds to your headphones and select “Update driver.” You will have the option to update the driver manually or automatically. If you choose to update manually, visit the manufacturer’s website and search for the latest driver for your specific audio device. Download and install the driver following the provided instructions. If you prefer automatic updates, select the option to search for updated drivers automatically and let Windows find and install the appropriate driver.
- Restart your computer: After updating the audio driver, it is recommended to restart your computer. This will ensure that the changes take effect and any conflicts or issues with the old driver are resolved.
If updating the audio driver doesn’t resolve the issue, you may also consider uninstalling the current driver and then reinstalling the latest version. This can help in cases where the driver installation was incomplete or corrupted.
By keeping your audio drivers up to date, you ensure that your computer can properly recognize and utilize your headphones, allowing them to show up in playback devices and enabling you to enjoy your audio content seamlessly.
Enabling Hidden Devices
Sometimes, even though your headphones are connected and the hardware is functioning properly, they may not show up in the playback devices list because they are hidden. This can happen due to certain settings or configurations on your computer. Here’s how you can enable hidden devices:
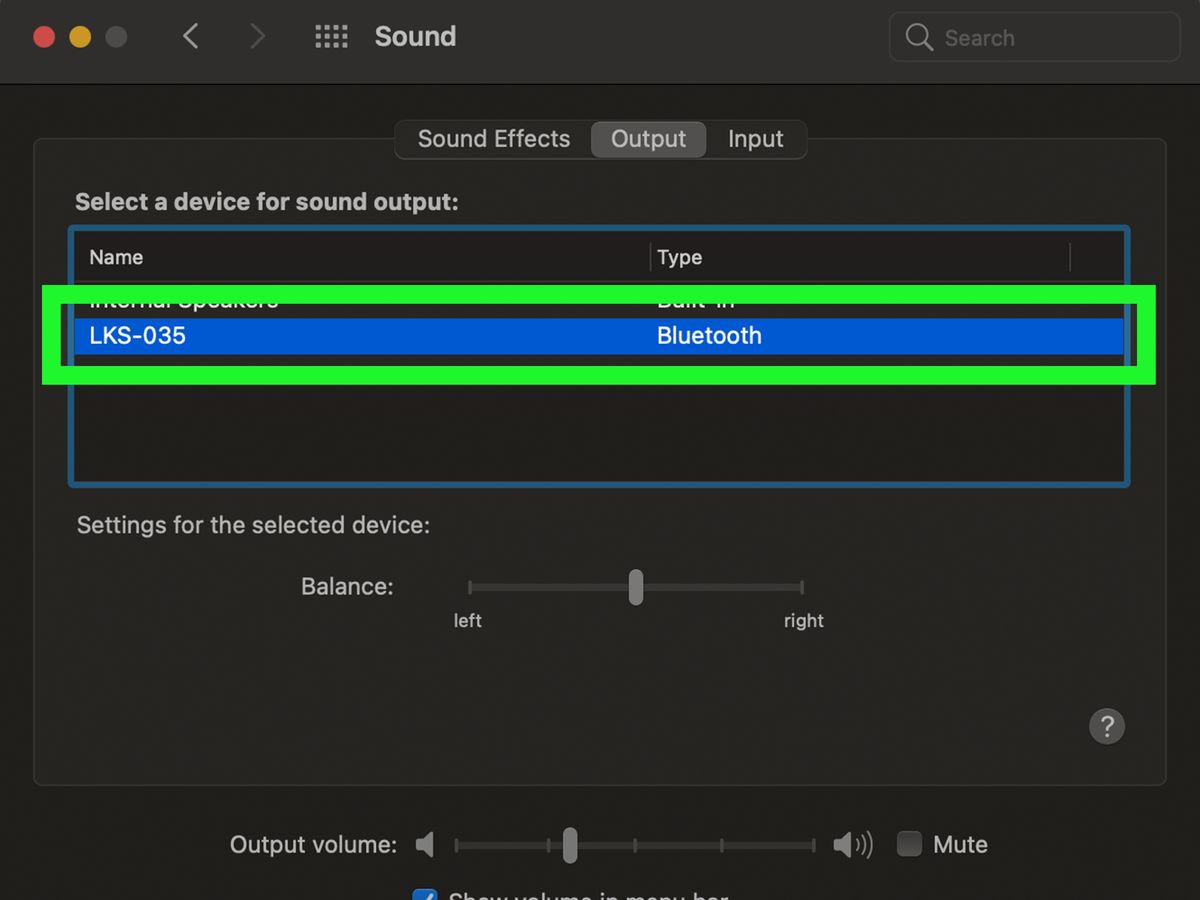
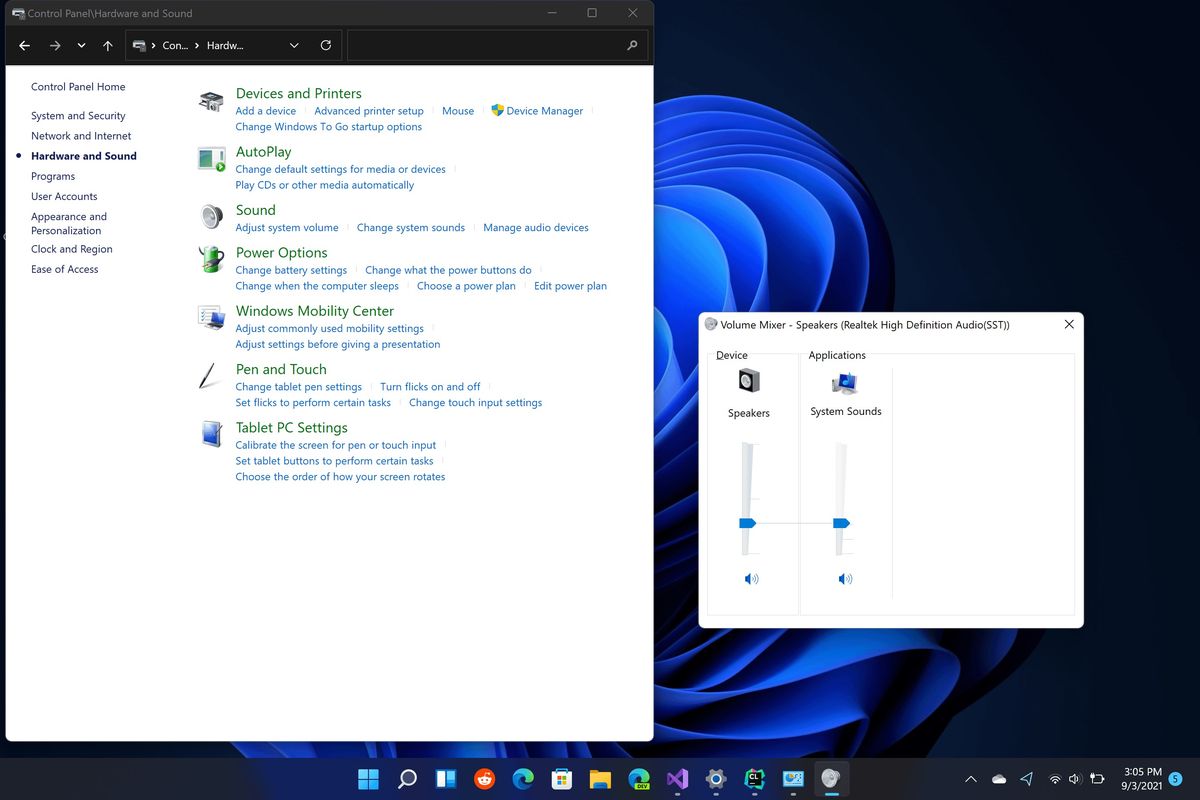
- Open the Sound settings: Go to the Control Panel or search for “Sound” in the Windows search bar to access the Sound settings.
- Switch to the “Playback” tab: In the Sound settings, switch to the “Playback” tab. This tab displays a list of all the audio playback devices connected to your computer.
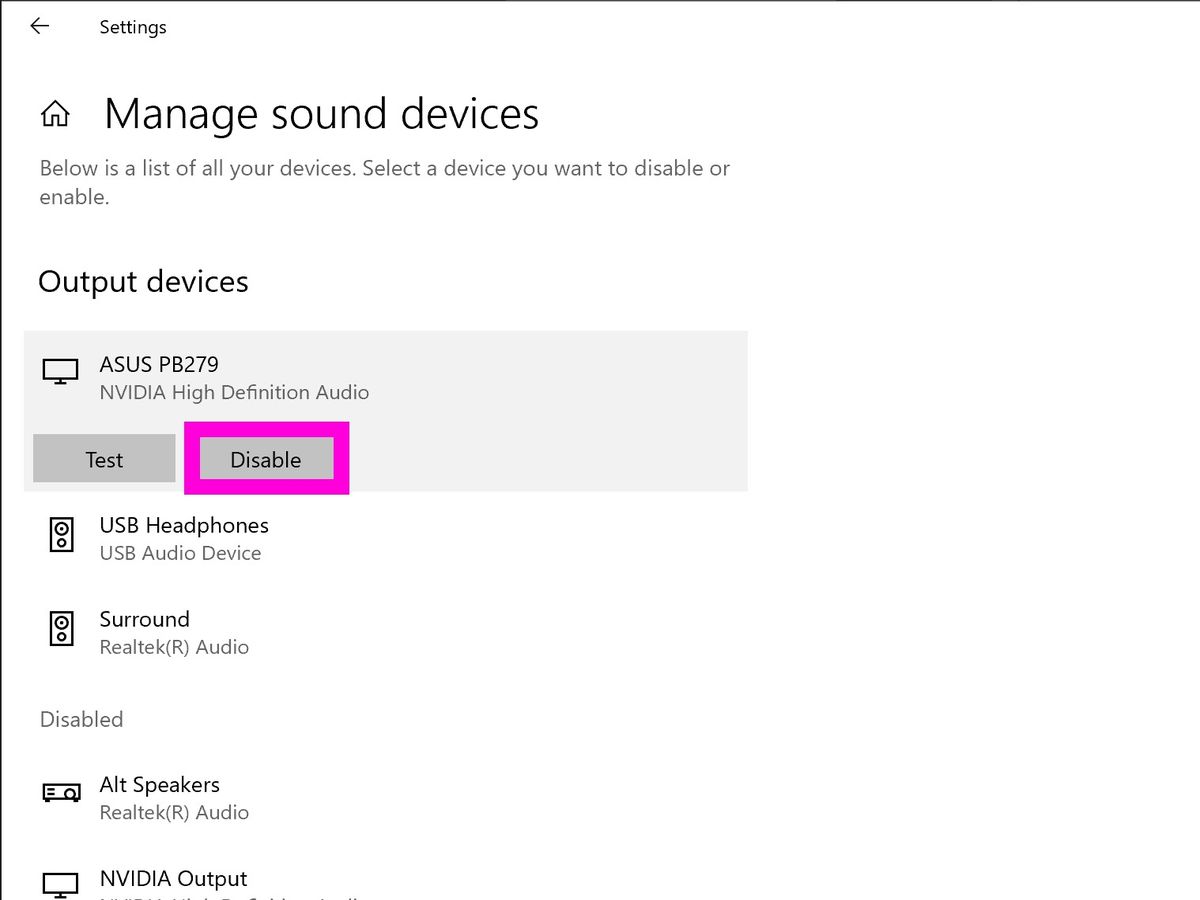
- Show hidden devices: Right-click anywhere in the empty area of the playback devices list and check the option that says “Show Disabled Devices” and “Show Disconnected Devices.” This will make all the hidden devices visible in the list.
- Enable the headphones: Look for your headphones in the list of devices. If you find them, right-click on them and select the “Enable” option. This will enable the headphones and make them available for use.
After enabling the hidden headphones, they should now appear in the playback devices list. Remember to set them as the default playback device if necessary, and test if the audio is working properly.
If your headphones still don’t show up after enabling hidden devices, it’s possible that there may be other underlying issues. Consider proceeding to the next troubleshooting step to further diagnose and resolve the problem.
Restarting Windows Audio Service
If your headphones are not showing up in the playback devices list, restarting the Windows Audio Service can help resolve any issues related to audio playback on your computer. The Windows Audio Service is responsible for managing audio devices and ensuring they function properly. Here’s how you can restart the Windows Audio Service:
- Open the Run dialog box: Press the Windows key + R on your keyboard to open the Run dialog box.
- Type “services.msc” and press Enter: In the Run dialog box, type “services.msc” (without quotes) and press Enter. This will open the Services window.
- Locate the Windows Audio Service: In the Services window, scroll down and locate the “Windows Audio” service from the list of services.
- Restart the service: Right-click on the “Windows Audio” service and select “Restart” from the context menu. This will stop and then restart the service.
Once the Windows Audio Service has been restarted, check if your headphones are now recognized and showing up in the playback devices list. If not, consider performing a system reboot to ensure all changes take effect.
Restarting the Windows Audio Service can resolve various audio-related issues on your computer, including the problem of headphones not appearing in the playback devices list. However, if the issue persists, it may be necessary to explore other troubleshooting steps.
Running Troubleshooter
If your headphones still don’t show up in the playback devices list, running the built-in audio troubleshooter can help identify and fix any audio-related problems on your computer. The troubleshooter is designed to automatically detect and resolve common audio issues. Follow these steps to run the audio troubleshooter:
- Open the Control Panel: Go to the Control Panel on your computer. You can access the Control Panel by searching for it in the Windows search bar or by right-clicking on the Start button and selecting “Control Panel” from the menu.
- Navigate to the Troubleshooting section: In the Control Panel, navigate to the “Troubleshooting” section. Depending on your version of Windows, the location and name may vary, but you can usually find it under the “System and Security” or “System Settings” category.
- Run the audio troubleshooter: Look for the option that says “Troubleshoot audio playback” or something similar. Click on it to run the audio troubleshooter.
- Follow the on-screen instructions: The audio troubleshooter will guide you through the process of detecting and resolving audio problems. Follow the on-screen instructions and provide any necessary information or actions as prompted.
The audio troubleshooter will attempt to diagnose and fix any issues with your audio devices and playback settings. After it completes the process, check if your headphones are now recognized and showing up in the playback devices list.
If the troubleshooter was successful in resolving the issue, you should be able to use your headphones without any problems. However, if the problem persists, there are still other troubleshooting steps you can try.
Checking Compatibility
When your headphones are not showing up in the playback devices, compatibility issues may be the culprit. It’s essential to ensure that your headphones are compatible with your computer’s operating system and audio hardware. Here are some steps to check compatibility:
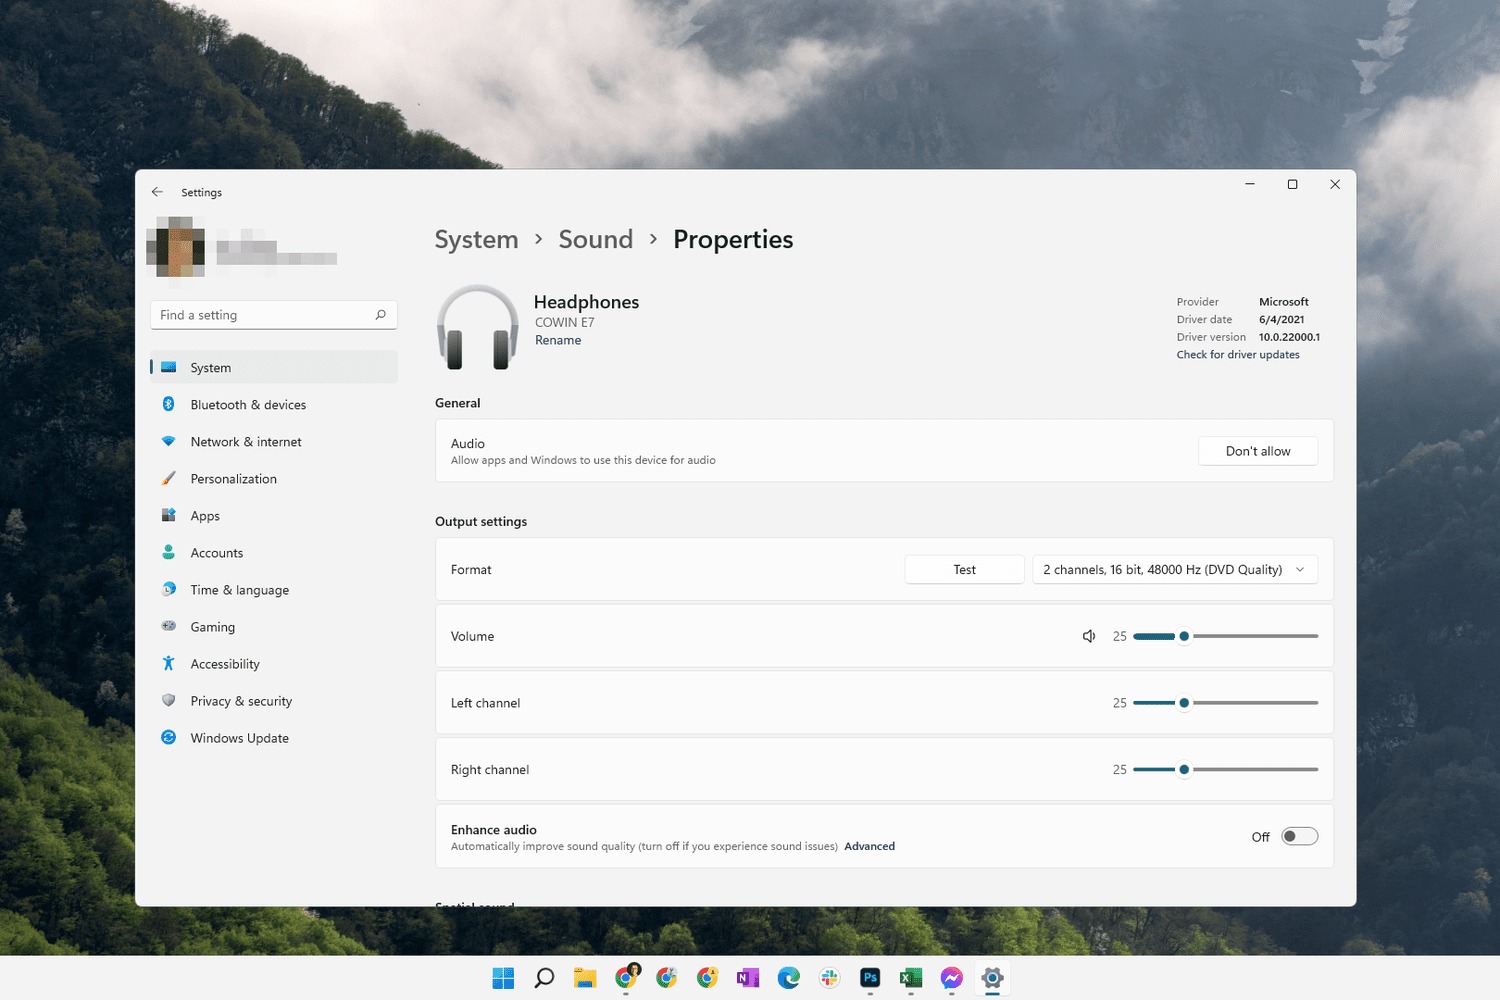
- Review the specifications: Check the specifications of your headphones and compare them with the requirements of your computer. Look for information on supported operating systems and compatibility with audio interfaces (such as USB or audio jacks).
- Visit the manufacturer’s website: Go to the website of the headphone manufacturer and look for compatibility information. Manufacturers often provide compatibility details or downloadable drivers for specific operating systems.
- Check for driver updates: If your headphones require drivers, make sure you have the latest version installed. Visit the manufacturer’s website or the support page to download and install any necessary driver updates. Outdated drivers can lead to compatibility issues and prevent proper recognition of your headphones.
- Try different ports and devices: If your headphones are compatible but still not showing up, try connecting them to different ports on your computer. Additionally, test your headphones on another device, such as a smartphone or another computer, to determine if the issue is specific to your computer or if it persists across multiple devices.
Ensuring compatibility between your headphones and computer is crucial for proper recognition and functionality. If your headphones are not compatible, you may need to consider alternative headphones or explore other options, such as purchasing a compatible audio interface.
If compatibility is not the issue, move on to the next troubleshooting step to further investigate and resolve the problem of your headphones not appearing in the playback devices.
Testing Headphones on Another Device
If your headphones are not showing up in the playback devices on your computer, it’s important to determine whether the problem lies with the headphones themselves or with your computer. Testing your headphones on another device can help you identify the source of the issue. Follow these steps to test your headphones on another device:
- Choose another device: Select a different device to test your headphones on. This can be another computer, a smartphone, a tablet, or any other device with an audio output.
- Connect your headphones: Plug your headphones into the audio jack or USB port of the chosen device. Ensure that the connection is secure.
- Play audio: Play some audio, such as music or a video, on the device using your headphones. Make sure to set the audio output to the headphones if necessary.
- Check for audio output: Verify that the audio is coming through your headphones on the other device. Listen for any distortions or issues with the sound quality.
If your headphones work fine on the other device and the audio plays without any problems, it indicates that the issue lies with your computer rather than the headphones themselves.
In such cases, consider revisiting the previous troubleshooting steps outlined in this article, such as checking hardware connections, updating audio drivers, enabling hidden devices, and restarting the Windows Audio Service. It’s possible that one of these steps may resolve the problem and allow your headphones to show up in the playback devices on your computer.
However, if your headphones still don’t show up on the other device or if there are audio issues when connected to the other device as well, it suggests that the problem lies with the headphones. In this situation, you may need to contact the manufacturer for support, arrange for repairs, or consider purchasing a new pair of headphones.
By testing your headphones on another device, you can narrow down the cause of the issue and determine the most appropriate course of action to resolve the problem.
Conclusion
Experiencing the frustration of your headphones not showing up in the playback devices on your computer can be a common issue. However, there are several troubleshooting steps you can take to resolve this problem and get your headphones working again.
First, start by checking the hardware connections to ensure a secure and reliable connection between your headphones and the computer. Sometimes, a loose or faulty connection can prevent your headphones from being recognized.
If the hardware connections are fine, it’s crucial to update your audio drivers. Outdated or incompatible audio drivers can hinder the proper functioning of your headphones. Visit the manufacturer’s website to download and install the latest audio drivers for your specific device.
Enabling hidden devices in the playback devices settings and restarting the Windows Audio Service can also help in resolving issues related to audio playback on your computer. These steps ensure that all audio devices, including your headphones, are recognized and enabled.
If the problem persists, running the audio troubleshooter can help identify and fix any audio-related problems automatically. This built-in tool can diagnose and resolve common audio issues that may be preventing your headphones from showing up.
In some cases, compatibility between your headphones and your computer’s operating system or audio hardware can be an issue. Make sure to check the specifications and compatibility information provided by the manufacturer to ensure a seamless connection.
Lastly, testing your headphones on another device can help determine if the issue lies with your headphones or with your computer. If the headphones work fine on another device, it indicates that the problem is specific to your computer and further troubleshooting is needed.
By following these troubleshooting steps, you can overcome the frustration of headphones not showing up in playback devices and enjoy your favorite audio content once again. Should the issue persist, consider seeking professional technical assistance to identify and resolve the problem efficiently.