Home>Instruments>Synthesizer>How To Use Yamaha Dx7 Synthesizer
Synthesizer
How To Use Yamaha Dx7 Synthesizer
Modified: February 19, 2024
Learn how to effectively use the Yamaha DX7 synthesizer and create unique sounds with this comprehensive guide. Enhance your synth skills and unleash your creativity with versatile synthesizer techniques.
(Many of the links in this article redirect to a specific reviewed product. Your purchase of these products through affiliate links helps to generate commission for AudioLover.com, at no extra cost. Learn more)
Table of Contents
- Introduction
- Overview of the Yamaha DX7 Synthesizer
- Setting up the Yamaha DX7 Synthesizer
- Navigating the Interface of the Yamaha DX7 Synthesizer
- Understanding the Different Parameters of the Yamaha DX7 Synthesizer
- Creating and Editing Sounds on the Yamaha DX7 Synthesizer
- Using the Built-in Effects of the Yamaha DX7 Synthesizer
- Saving and Loading Sounds on the Yamaha DX7 Synthesizer
- Tips and Tricks for Getting the Most out of the Yamaha DX7 Synthesizer
- Troubleshooting Common Issues with the Yamaha DX7 Synthesizer
- Conclusion
Introduction
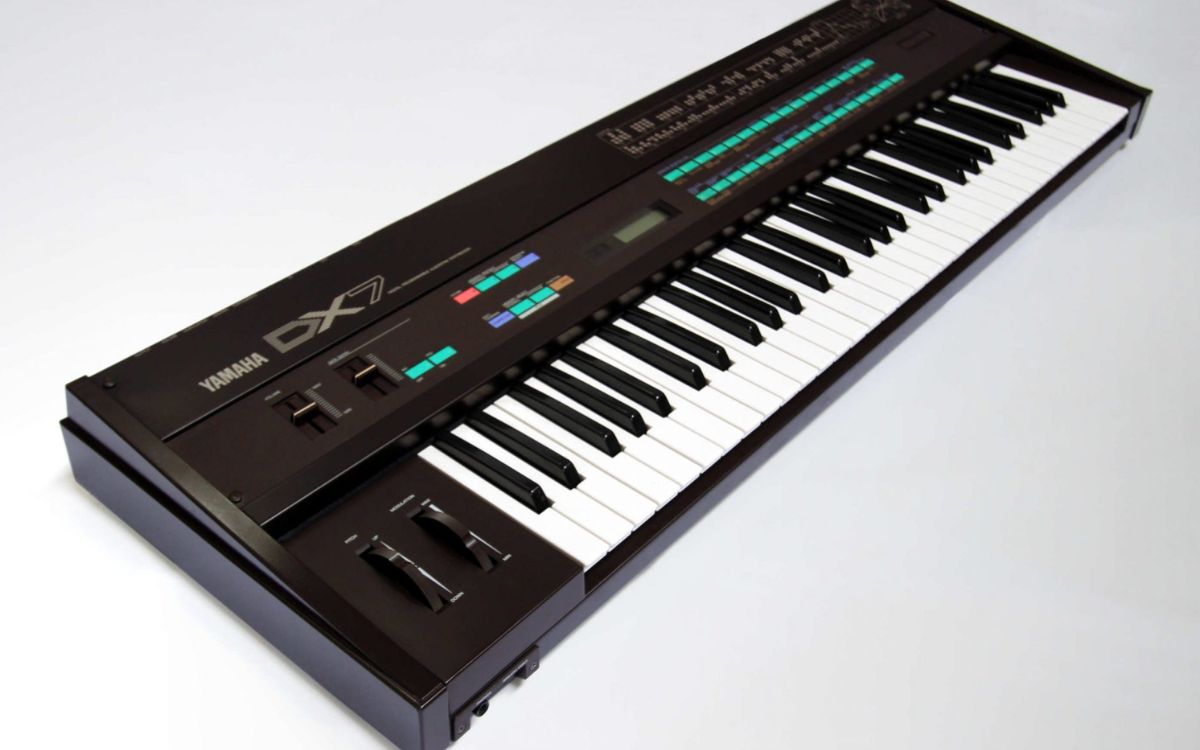
Welcome to the exciting world of the Yamaha DX7 synthesizer! If you are a music enthusiast, musician, or sound designer, you have come to the right place. The Yamaha DX7 is a legendary synthesizer that revolutionized the world of electronic music when it was first introduced in 1983. Its cutting-edge frequency modulation (FM) synthesis capability allowed musicians to create a wide range of unique and dynamic sounds that were previously unheard of.
In this comprehensive guide, we will take you through the ins and outs of the Yamaha DX7 synthesizer, exploring its features, functionalities, and how to make the most out of this iconic instrument. Whether you are a beginner or an experienced user, this article will provide you with the knowledge and techniques to unlock the full potential of the DX7.
From setting up the synthesizer and navigating its interface, to understanding the different parameters and creating your own sounds, we will cover everything you need to know to get started. Additionally, we will delve into using the built-in effects, saving and loading sounds, and provide tips and tricks to enhance your DX7 experience.
So, grab your headphones, fire up your DX7, and let’s dive into the exciting world of the Yamaha DX7 synthesizer!
Overview of the Yamaha DX7 Synthesizer
The Yamaha DX7 synthesizer is a true powerhouse in the world of electronic music. Its unique sound and innovative FM synthesis engine made it one of the most popular and influential synthesizers of all time. The DX7 was the first commercially successful digital synthesizer and became a staple in many professional studios and live performances.
One of the key features that sets the DX7 apart from other synthesizers of its time is its use of frequency modulation synthesis. Instead of traditional subtractive synthesis, the DX7 uses a complex method of modulating one waveform with another to create a vast array of rich and dynamic sounds. This technique allows for a wide range of timbres and textures, from punchy basses to lush pads and intricate leads.
The DX7 offers 16-note polyphony, meaning it can play up to 16 individual notes simultaneously, making it ideal for creating complex multi-layered compositions. It also features a 61-key velocity-sensitive keyboard, allowing for expressive playing and dynamics.
One of the standout features of the DX7 is its extensive library of onboard sounds. With 128 preset patches, including iconic sounds like the “E.Piano 1” and “Bass 1,” the DX7 offers a solid foundation for any musical style. Additionally, the DX7 allows for easy sound editing, giving users the opportunity to tweak and customize the presets to suit their own unique sonic vision.
Connectivity-wise, the DX7 offers both MIDI input and output, allowing for seamless integration with other MIDI-compatible devices and software. This makes it a versatile tool for both studio production and live performances.
In summary, the Yamaha DX7 synthesizer is a legendary piece of music history that continues to be revered and used by musicians, producers, and sound designers. With its iconic FM synthesis engine, extensive sound library, and versatile capabilities, the DX7 is a versatile and powerful instrument that has stood the test of time.
Setting up the Yamaha DX7 Synthesizer
Before diving into the world of the Yamaha DX7 synthesizer, it’s essential to ensure that you have everything set up correctly. Here is a step-by-step guide on how to set up your DX7:
- Power Supply: Begin by plugging in the power cable of your DX7 into a power outlet. Make sure to use the correct voltage for your region to avoid any electrical damage.
- Audio Connection: Connect the audio output of the DX7 to an amplifier or audio interface using the appropriate cables. The DX7 provides both stereo and mono outputs, so choose the option that best suits your setup.
- MIDI Connection: If you’re planning to use MIDI to control the DX7 or to control other MIDI devices from the DX7, connect the MIDI Out of the DX7 to the MIDI In of your MIDI interface or other MIDI devices. Likewise, connect the MIDI In of the DX7 to the MIDI Out of your MIDI interface or other MIDI devices.
- Power On: Once all the connections are properly made, turn on the power switch of the DX7. You should see the LED display light up, indicating that the synthesizer is ready to use.
- Global Settings: It’s important to check the global settings of your DX7 to ensure optimal performance. Press the “Function” button followed by the “Preset” button to access the global settings menu. Use the data entry slider or buttons to navigate through the settings and make any adjustments as needed.
- Sound Selection: Now that your DX7 is set up and ready to go, you can start exploring its vast sound library. Use the buttons or data entry slider to scroll through the presets and select the desired sound. Don’t be afraid to experiment and explore different combinations.
With these simple steps, you can have your Yamaha DX7 synthesizer up and running in no time. Remember to consult the user manual for any specific instructions or troubleshooting information. Once your DX7 is set up, you can start unleashing your creativity and exploring the vast sonic possibilities of this iconic synthesizer.
Navigating the Interface of the Yamaha DX7 Synthesizer
The interface of the Yamaha DX7 synthesizer may seem a bit daunting at first, but once you understand its layout, navigating through the various functions becomes much easier. Let’s take a closer look at the key elements of the DX7’s interface:
- Display: The DX7 features a small LED display that provides important information such as patch names, parameter values, and menu options. The display is used to navigate through different menus and make adjustments.
- Buttons: The DX7 has an array of buttons that allow you to access different functions and menus. These buttons include program selection buttons, category buttons, edit buttons, and function buttons. They provide quick access to various features and settings.
- Data Entry Slider: Located on the right side of the keyboard, the data entry slider is used to navigate through different parameters and make adjustments. Simply slide it up or down to change parameter values.
- Keyboard: The Yamaha DX7 has a 61-key velocity-sensitive keyboard, allowing for expressive playing. The keys are used to trigger sounds and play melodies.
- Output Volume: The output volume knob, usually located on the rear panel of the DX7, controls the overall volume of the synthesizer. Adjust it as needed to achieve the desired output level.
- Modulation and Pitch Bend Wheels: The DX7 features modulation and pitch bend wheels, usually located on the left side of the keyboard. The modulation wheel allows you to add dynamic modulation effects to your sounds, while the pitch bend wheel adds expressive pitch variations.
To navigate through the interface and access different functions, start by pressing the appropriate buttons to select the desired category or menu. Once in a menu, use the data entry slider to scroll through the available options and make adjustments to the parameters. The LED display will provide visual feedback of your selections.
As you become more familiar with the interface, you will discover the wide range of editing possibilities and sound shaping capabilities that the DX7 offers. Take the time to experiment and explore different menus and functions to unlock the full potential of this powerful synthesizer.
With a bit of practice, navigating the interface of the Yamaha DX7 synthesizer will become second nature, allowing you to focus on creating and shaping incredible sounds that will elevate your music to new heights.
Understanding the Different Parameters of the Yamaha DX7 Synthesizer
To fully harness the power of the Yamaha DX7 synthesizer, it’s essential to have a clear understanding of its various parameters. These parameters allow you to shape and mold the sound to your liking. Let’s explore the key parameters of the DX7:
- Operator: The DX7 employs the concept of operators for sound generation. An operator is a basic building block that produces a waveform. The DX7 has 6 operators, each with its own unique set of parameters.
- Algorithm: The algorithm determines how the operators are connected and interact with each other. The DX7 offers 32 different algorithms to create complex and intricate sounds.
- Envelope Generators: The DX7 has 6 envelope generators (EGs), one for each operator. The EGs control how the sound evolves over time. They consist of parameters like attack, decay, sustain, and release, which determine the shape of the sound envelope.
- LFOs: The DX7 features 6 low-frequency oscillators (LFOs), one for each operator. LFOs generate periodic waveforms to modulate various parameters such as frequency, amplitude, and pitch, adding movement and modulation effects to the sound.
- Frequency: Frequency determines the pitch of an operator. The DX7 allows for precise control over the frequency of each operator, allowing you to create melodies, chords, and complex harmonic structures.
- Level: The level parameter controls the amplitude or volume of an operator. Adjusting the level parameter allows you to balance the levels of the different operators and create dynamic and expressive sounds.
- Feedback: Feedback introduces a portion of the operator’s output signal back into its own input. This parameter adds harmonics and can create rich and distorted sounds when used creatively.
- Detune: Detuning introduces slight variations in pitch to create a wider and thicker sound. Adjusting the detune parameter can add depth and richness to your sounds.
These are just a few of the many parameters available on the Yamaha DX7 synthesizer. Each parameter has a significant impact on the overall sound, and mastering their intricacies will allow you to create unique and captivating sounds that suit your musical vision.
Take the time to experiment with these parameters, tweak their settings, and listen to the changes in the sound. Dive into the depths of FM synthesis and explore all the possibilities that the DX7 offers. Don’t be afraid to push the boundaries and discover new and exciting sonic landscapes.
By understanding and harnessing the power of the different parameters, you’ll be able to shape and sculpt sounds that reflect your artistic vision and take your music to new heights.
Creating and Editing Sounds on the Yamaha DX7 Synthesizer
The Yamaha DX7 synthesizer is a powerful instrument that allows you to not only load and play preset sounds but also create and edit your own unique patches. By understanding the sound creation process, you can unleash your creativity and design sounds that are tailored to your musical style. Here’s a step-by-step guide on creating and editing sounds on the DX7:
- Select an Empty Patch: Start by selecting an empty patch where you can create your sound. Press the “Function” button followed by the “Edit” button to access the Edit Mode. Use the data entry slider or buttons to navigate to an empty patch.
- Choose an Algorithm: Select an algorithm that suits your desired sound. The algorithm determines the routing and interaction between the operators. Experiment with different algorithms to explore the sonic possibilities.
- Adjust Operators: Use the operator parameters to shape the fundamental qualities of your sound. Experiment with parameters like frequency, envelope, level, and detune to achieve the desired timbre and character.
- Apply Modulation: Utilize the built-in LFOs and modulation capabilities to add movement and depth to your sound. Modulate parameters such as frequency, amplitude, and level to create evolving and expressive sounds.
- Refine and Layer Operators: Fine-tune the parameters of each operator and listen to how they interact with one another. Layering operators with different settings can create complex and rich textures.
- Save Your Patch: Once you are satisfied with your sound, save it in an available slot. Press the “Function” button followed by the “Store” button, select an empty patch location, and save your sound.
Editing sounds on the Yamaha DX7 synthesizer requires patience and experimentation. Don’t be afraid to try different combinations of parameters and explore the full range of possibilities. Take the time to listen and make adjustments until you achieve the desired sound.
Additionally, it’s worth mentioning that there are resources available online, such as forums and websites, where you can find DX7 patch libraries and editors that allow for more in-depth sound editing and management. These tools can help streamline the sound creation process and provide a wider range of options.
Creating and editing sounds on the Yamaha DX7 synthesizer is an exciting and rewarding experience. With dedication, creativity, and a deep understanding of the instrument’s parameters, you can design unique sounds that will elevate your music to new heights.
Using the Built-in Effects of the Yamaha DX7 Synthesizer
The Yamaha DX7 synthesizer not only offers powerful sound creation capabilities, but it also comes equipped with built-in effects that allow you to further enhance and shape your sounds. These effects can add depth, ambience, and character to your patches, taking them to a whole new level. Let’s explore the built-in effects of the DX7:
- Chorus: The DX7 features a lush chorus effect that adds a sense of spaciousness and richness to your sounds. It creates the illusion of multiple voices playing in unison, resulting in a wider and more vibrant sound.
- Flanger: The flanger effect produces a sweeping and swirling sound by delaying and modulating an audio signal. It can add a sense of movement and create a distinctive swooshing sound, giving your patches a unique character.
- Reverb: Reverb is an essential effect that simulates the natural reverberation of sound in a physical space. It adds depth and ambience, making your sounds feel as if they are in a particular environment. The DX7 offers different reverb types, allowing you to customize the amount and character of the reverberation.
- Delay: The delay effect creates echoes by repeating and slightly delaying the audio signal. It can be used to add space, rhythm, or create unique rhythmic patterns. Adjusting the delay time and feedback parameters allows you to shape the character of the echoes.
To use the built-in effects on the DX7, you can follow these simple steps:
- Select an Algorithm: Start by selecting an algorithm that includes the desired effect. Some algorithms have effects placed in specific positions in the signal flow.
- Adjust the Effect Parameters: Once you’ve selected an algorithm, you can adjust the effect parameters to your liking. Parameters like intensity, depth, speed, and decay control how the effects are applied to your sound.
- Find the Sweet Spot: Experiment with different effect settings to find the right balance and character for your sound. Fine-tuning the effect parameters can make a significant difference in the overall sonic experience.
Using the built-in effects of the Yamaha DX7 synthesizer allows you to transform your sounds and add a professional touch to your compositions. Whether you’re looking to create spatial and atmospheric textures or add movement and character, the DX7’s effects give you the tools to achieve your desired sonic outcome.
Remember, the key to using effects effectively is to apply them tastefully and in moderation. Listen attentively, and let your ears guide you in finding the perfect balance between the dry sound and the effect processing.
So, don’t hesitate to explore the built-in effects of the Yamaha DX7 synthesizer and elevate your sounds to new heights.
Saving and Loading Sounds on the Yamaha DX7 Synthesizer
The ability to save and load sounds on the Yamaha DX7 synthesizer is crucial for organizing your patches and preserving your custom creations. Whether you want to store your favorite sounds for future use or share them with others, understanding the process of saving and loading sounds is essential. Here’s a step-by-step guide on how to save and load sounds on the DX7:
- Saving a Sound:
- Select the desired patch that you want to save or create a new sound from scratch.
- Press the “Function” button followed by the “Store” button.
- Use the data entry slider or buttons to navigate to an empty patch slot where you want to save your sound.
- Press the “Store” button again to confirm the save operation.
- Optionally, you can give your patch a name using the alphanumeric keys on the synthesizer.
- Your sound is now saved in the selected patch slot and ready to be recalled later.
- Loading a Sound:
- Press the “Function” button followed by the “Preset” button to enter the selection mode.
- Use the data entry slider or buttons to choose the patch you want to load.
- Press the key corresponding to the patch number to load the sound.
When saving and loading sounds on the DX7, it’s worth noting that the synthesizer has a finite number of patch locations. It’s essential to manage your patches and make sure you have enough empty slots to store new sounds. If the memory gets full, you may need to delete or overwrite existing patches.
Additionally, the DX7 offers the capability to store patches on cartridges or external storage devices. These options provide extended storage capacity and allow for easy backup and transfer of patches.
By mastering the process of saving and loading sounds on the Yamaha DX7 synthesizer, you can keep your patches organized, protect your creations, and explore a world of sonic possibilities whenever you desire.
Remember to experiment, save variations of your sounds, and explore different combinations. With time, you’ll build a library of unique patches that will elevate your music and inspire your creative journey.
Tips and Tricks for Getting the Most out of the Yamaha DX7 Synthesizer
The Yamaha DX7 synthesizer is a powerful instrument with a plethora of sound-shaping capabilities. To help you maximize your experience with the DX7, we have compiled a list of tips and tricks that will help you get the most out of this iconic synthesizer:
- Experiment with Different Algorithms: The DX7 offers 32 different algorithms that determine how the operators interact with each other. Take the time to explore different algorithms to discover unique and complex sound combinations.
- Layer Sounds: The DX7 allows you to layer multiple sounds to create rich and textured patches. Experiment with layering different presets, or create custom sounds and combine them for a fuller and more expressive sound.
- Use Velocity and Aftertouch: Take advantage of the velocity-sensitive keyboard and aftertouch capabilities of the DX7. Adjusting the operator levels or assigning parameters to respond to velocity or aftertouch adds dynamics and expressiveness to your playing.
- Explore DX7 Patch Libraries: There are numerous patch libraries available online that provide a wealth of additional sounds for your DX7. These patches can inspire new ideas and expand the sonic palette of your synthesizer.
- Tweak and Customize Presets: While the DX7 offers a wide range of presets, don’t be afraid to make adjustments and customize them to suit your taste. Experiment with the operator parameters, envelopes, and modulation to create unique variations of the built-in sounds.
- Modulate Parameters: Use the LFOs and envelope generators to modulate various parameters of the operators. This can create evolving and dynamic sounds that breathe life into your patches. Experiment with different modulation sources and destinations to achieve interesting and complex modulation effects.
- Explore FM Synthesis Concepts: FM synthesis is a unique synthesis method that can be challenging to grasp. Take the time to learn about the concepts and principles behind FM synthesis to unlock the full potential of the DX7. Understanding how the operators interact and modulate each other will open up new sonic possibilities.
- Save and Organize Sounds: Create a system for organizing your sounds to easily recall and manage your patches. Consider creating categories, such as leads, basses, pads, and effects, to keep your sounds organized and accessible.
- Connect with Other Musicians: Join online communities, forums, or social media groups dedicated to the DX7. Connect with other users and share your experiences, patches, and knowledge. Engaging with the DX7 community can provide inspiration, guidance, and opportunities for collaboration.
- Practice and Experiment: Lastly, spend dedicated time practicing and experimenting with the DX7. The more familiar you become with its interface, parameters, and capabilities, the more proficient you’ll become at shaping the sounds you envision.
By utilizing these tips and tricks, you’ll be able to explore the vast sonic possibilities of the Yamaha DX7 synthesizer, expand your creative horizons, and create remarkable music that truly stands out.
Troubleshooting Common Issues with the Yamaha DX7 Synthesizer
While the Yamaha DX7 synthesizer is a reliable instrument, it’s not uncommon to encounter occasional issues or difficulties when using it. Here are some common issues you may come across while using the DX7 and some troubleshooting steps to help you resolve them:
- No Sound: If you’re not hearing any sound from your DX7, first make sure that the volume is not turned down or muted. Check the connections between the DX7 and your speakers or headphones to ensure they are properly connected. Additionally, check if the correct patch is selected and that the levels of the operators are appropriately set.
- Inconsistent Sound or Glitches: If you’re experiencing inconsistent sound or glitches, it may be due to a poor connection. Check the cables and connectors and ensure they are securely plugged in. Also, check for any loose knobs or buttons on the DX7 that may be causing the issue. If the problem persists, try resetting the DX7 to its factory default settings.
- Buttons or Keys Not Responding: If the buttons or keys on your DX7 are not responding or feel unresponsive, try cleaning the contacts using a contact cleaner or isopropyl alcohol. Gently clean the affected areas and test if the buttons or keys have regained their functionality. If the issue persists, it may require professional servicing.
- Display Issues: If the DX7’s display is not working or showing gibberish characters, try turning off the synthesizer and turning it back on. If the problem persists, check the power supply and ensure it is providing the correct voltage. If necessary, consult a professional technician to repair or replace the display.
- Memory Issues: If you’re having trouble saving or loading patches, it may indicate a memory issue. Check if there is enough memory available to store new patches. If the memory is full, consider deleting or overwriting existing patches. If the problem persists, refer to the user manual for instructions on performing a factory reset to restore the memory.
If you encounter any other issues or difficulties that are not addressed here, consulting the Yamaha DX7’s user manual or contacting Yamaha customer support can provide further guidance and assistance. Yamaha has a dedicated support team that can help troubleshoot and resolve any technical issues with your DX7 synthesizer.
Remember, patience and perseverance are key when troubleshooting. With proper care and maintenance, the Yamaha DX7 can provide years of reliable service and inspire you to create incredible music.
Conclusion
The Yamaha DX7 synthesizer is a groundbreaking instrument that has left an indelible mark on the world of electronic music. Its unique frequency modulation (FM) synthesis capabilities and vast sound library have made it a beloved tool for musicians, producers, and sound designers alike.
In this comprehensive guide, we have explored various aspects of the Yamaha DX7 synthesizer, including setting it up, navigating its interface, understanding its parameters, creating and editing sounds, utilizing its built-in effects, and troubleshooting common issues.
By following the tips and tricks provided, you can dive deeper into the world of the DX7 and unlock its full potential. With practice, experiment, and a keen understanding of FM synthesis concepts, you can craft unique sounds that reflect your musical vision.
Remember to save and organize your sounds, explore different algorithms, utilize the effects, and connect with other musicians to expand your knowledge and creativity. Troubleshooting common issues and seeking support from Yamaha’s dedicated customer support team will ensure a smooth and enjoyable experience with your DX7.
So, whether you’re into ambient pads, expressive leads, or punchy basses, the Yamaha DX7 has the power to bring your musical ideas to life. Embrace the intricacies of FM synthesis, explore the sonic landscapes, and let the DX7 inspire you to create music that stands out.
Now that you have a solid understanding of the Yamaha DX7 synthesizer, it’s time to dive in and unleash your creativity. So, grab your keyboard, experiment, and immerse yourself in the sonic possibilities of the iconic Yamaha DX7!