Home>Production & Technology>MP3>How To Make An MP3 A Ringtone
MP3
How To Make An MP3 A Ringtone
Modified: January 22, 2024
Learn how to easily create a custom ringtone from any MP3 file. Follow our step-by-step guide and personalize your smartphone with your favorite tunes.
(Many of the links in this article redirect to a specific reviewed product. Your purchase of these products through affiliate links helps to generate commission for AudioLover.com, at no extra cost. Learn more)
Table of Contents
Introduction
Are you tired of using the same old default ringtones on your phone? Do you want to personalize your device and make it truly unique? Well, look no further! In this article, we will guide you through the process of turning your favorite MP3 audio files into custom ringtones for your phone.
MP3 files have become the most popular audio format for storing and playing music, making them an ideal choice for creating personalized ringtones. With just a few simple steps, you can transform any catchy tune or memorable soundbite into a ringtone that reflects your personality and style.
Whether you have an iPhone or an Android device, the process of creating an MP3 ringtone is quite similar. All you need is a computer, your favorite MP3 file, and some editing software. So, let’s dive in and explore how to make an MP3 a ringtone that is sure to grab everyone’s attention.
But before we jump into the details, let’s talk about the importance of choosing the right MP3 file for your ringtone. The key is to select a clip that is not only enjoyable for you but also has a strong start and a clear ending. This will make your ringtone sound seamless and professional, rather than abruptly cutting off or fading out.
Additionally, keep in mind that not all MP3 files are equal in terms of sound quality. To ensure your ringtone sounds crisp and clear, choose a high-quality MP3 file with a bitrate of at least 192 kbps. This will help prevent any distortion or noise that may diminish the overall listening experience.
Now that we have covered the basics, it’s time to move on to the actual process of editing and converting your MP3 file into a ringtone. So, grab your favorite MP3 file, put on your creative hat, and let’s embark on this exciting journey of personalizing your phone’s ringtone.
Choosing the Right MP3 File
When it comes to choosing the perfect MP3 file for your ringtone, the options are endless. It’s important to select a clip that resonates with you and reflects your personal style. Whether it’s a snippet from your favorite song, a memorable movie quote, or a unique sound effect, the choice is yours.
However, there are a few factors you should consider to ensure the best possible outcome for your ringtone. First and foremost, look for a clip that has a strong and recognizable start and end. This will give your ringtone a polished feel, avoiding any abrupt cuts or fade-outs.
Another crucial aspect is the sound quality of the MP3 file. Choose a file that is encoded at a high bitrate, preferably 192 kbps or higher. This will ensure that your ringtone sounds clear and vibrant, without any distortion or background noise. Remember, a well-encoded MP3 file will make all the difference in the final result.
In addition to the technical aspects, consider the length of the MP3 file. For a ringtone, it’s best to keep it short and sweet, around 30 seconds or less. This will ensure that the ringtone doesn’t become repetitive or lose its impact. Choose a section of the MP3 file that captures the essence of the song or audio clip and makes it instantly recognizable.
Furthermore, consider the genre and style of the MP3 file. Is it a calm and soothing melody or an upbeat and energetic tune? Think about the mood you want to set when your phone rings and choose a clip that aligns with that vibe.
Lastly, remember to respect copyright laws when selecting an MP3 file. Ensure that you have permission to use the audio clip or choose from royalty-free sources to avoid any legal issues.
Now that you have a better understanding of what to look for in an MP3 file, it’s time to move on to the next step: editing the file to create the perfect ringtone. Strap in and get ready to unleash your creativity!
Editing the MP3 File
Once you have chosen the perfect MP3 file for your ringtone, it’s time to dive into the editing process. Don’t worry, you don’t need to be a professional audio editor to accomplish this. There are several user-friendly software options available that make editing a breeze.
One popular choice is Audacity, a free and open-source audio editing software. Audacity allows you to trim, cut, and manipulate your MP3 file with ease. Simply import your MP3 file into Audacity and use the selection tool to choose the desired section for your ringtone.
To ensure a seamless and natural-sounding ringtone, it’s a good idea to fade in and fade out the clip. This can be done using the built-in fade-in and fade-out effects in Audacity. By gradually increasing the volume at the beginning of the ringtone and gradually decreasing it at the end, you can create a smoother transition.
Another helpful feature in Audacity is the ability to remove any unwanted portions of the MP3 file. If you come across any background noise, silence, or imperfections, you can easily delete those sections to maintain a clean and polished ringtone.
Once you are satisfied with the edits, it’s time to save the file. Be sure to save it in a format that is compatible with your phone’s operating system. For Android devices, saving the file as an MP3 should work just fine. However, for iPhones, you may need to convert the file to the M4R format, which we will discuss in the next section.
If you prefer a more user-friendly and intuitive editing experience, there are also various mobile apps available that allow you to edit MP3 files directly on your smartphone. These apps often come with pre-designed templates and effects, making it even easier to create a customized ringtone.
Now that you have successfully edited your MP3 file, let’s move on to the next step: adjusting the length of the ringtone to make it perfect for your phone.
Adjusting the Length of the Ringtone
Now that you have edited your MP3 file and have it saved in the desired format, it’s time to adjust the length of the ringtone. Most phones have a limit on the length of ringtones they can accept, typically around 30 seconds. It’s important to make sure your ringtone falls within this timeframe to ensure compatibility.
To adjust the length of your ringtone, you can use the same audio editing software or app that you used to edit the MP3 file. Open the file and locate the section that you want to keep as your ringtone. Trim the audio by deleting any unwanted portions or by selecting the specific area you want to keep.
Keep in mind that the goal is to maintain the essence of the song or clip while making it concise enough for a ringtone. Be selective in choosing the part that captures the most memorable or catchy section of the audio without losing its impact.
Additionally, consider the pacing and dynamics of the chosen section. A ringtone that starts abruptly or ends suddenly may not have the desired effect. You can use fade-in and fade-out effects, similar to what we discussed in the previous section, to create a smoother transition at the beginning and end of the ringtone.
Once you are satisfied with the length and overall feel of your ringtone, save the file and move on to the next step: converting the MP3 file into a ringtone format that is compatible with your phone.
Before we proceed, it’s important to mention that different methods and software may have varying options for adjusting the length of the ringtone. Some may offer precise control over the start and end time, while others may provide a simple trimming interface. Regardless of the tool you use, the end goal is to ensure that your ringtone is within the accepted duration and delivers the desired impact.
Now that you have tailored your ringtone to the perfect length, let’s move on to the conversion process to ensure compatibility with your phone’s operating system.
Converting the MP3 to a Ringtone Format
Now that you have adjusted the length of your ringtone, it’s time to convert the MP3 file into a format that is compatible with your phone’s operating system. The process may vary slightly depending on whether you have an iPhone or an Android device.
If you have an Android device, you can keep the MP3 format for your ringtone. Simply connect your phone to your computer using a USB cable and transfer the edited MP3 file to your phone’s storage. Once the file is on your phone, you can set it as your ringtone through the sound settings. Most Android devices allow you to choose the file directly from your music library or file manager.
On the other hand, if you have an iPhone, you will need to convert the MP3 file to the M4R format, which is the standard format for iPhone ringtones. There are several methods to accomplish this. One common approach is to use iTunes on your computer.
To convert the MP3 file to the M4R format using iTunes, open iTunes and import the edited MP3 file. Once the file is imported, right-click on it and select “Create AAC Version.” iTunes will create a new version of the file in the M4A format.
Next, locate the M4A file in your iTunes library, right-click on it, and select “Show in Finder” (for Mac) or “Show in File Explorer” (for Windows). This will open the folder containing the file on your computer.
Rename the file extension from .m4a to .m4r. Confirm the file extension change when prompted. Now, you have successfully converted your MP3 file to the M4R format.
To transfer the M4R file to your iPhone, you can use iTunes or other third-party file management apps. Connect your iPhone to your computer, open iTunes, and select your device. From there, go to the “Tones” section and drag the M4R file into the iTunes window. It will be synced to your iPhone and appear in your ringtone settings.
Remember, the steps provided here are just one method for converting the file format. There are alternative methods and software available that you can explore based on your preferences and the tools you have at hand.
Now that you have successfully converted your MP3 file into the appropriate ringtone format, it’s time to transfer the ringtone to your phone and set it as your default ringtone.
Transferring the Ringtone to Your Phone
Once you have edited and converted your MP3 file into the appropriate ringtone format, the next step is to transfer the ringtone to your phone. The method of transferring will depend on the type of phone you have, whether it’s an iPhone or an Android device.
If you have an Android device, transferring the ringtone is a relatively straightforward process. Connect your phone to your computer using a USB cable and enable file transfer mode. Your phone will appear as a removable storage device on your computer.
Next, locate the folder on your phone where ringtones are stored. It may vary depending on the make and model of your device, but typically, you can find it in the “Ringtones” or “Audio” folder. Now, simply copy and paste the converted ringtone file from your computer into the designated folder on your phone.
Once the file is transferred, you can disconnect your phone from the computer. To set the transferred ringtone as your default ringtone, go to your phone’s sound settings and choose the ringtone from the list of available options. You should see the newly transferred ringtone listed, ready to be set as your default ringtone.
If you have an iPhone, transferring the ringtone requires using iTunes or other third-party apps. Connect your iPhone to your computer using a USB cable and open iTunes. Select your device in iTunes and navigate to the “Tones” section.
Drag and drop the converted ringtone file from your computer into the iTunes window. The ringtone will be synced to your iPhone. You can then disconnect your iPhone from the computer.
To set the transferred ringtone as your default ringtone on your iPhone, go to the Settings app, select “Sounds & Haptics,” and then choose “Ringtone.” You will see the transferred ringtone listed under the “Custom” section. Simply select it, and your new ringtone will be set as the default for incoming calls.
Keep in mind that the steps provided here are a general guide, and the exact process may vary depending on the software versions and settings of your specific device. However, these steps should give you a good starting point for transferring the ringtone to your phone.
Now that you have successfully transferred the ringtone to your phone, it’s time to set it as your default ringtone and enjoy the personalized sound whenever someone gives you a call.
Setting the MP3 Ringtone on Your Phone
Now that you have transferred the customized MP3 ringtone to your phone, it’s time to set it as your default ringtone. The steps for setting the ringtone will differ depending on whether you have an Android device or an iPhone.
If you have an Android device, setting the MP3 ringtone is a straightforward process. Go to your phone’s “Settings” and find the “Sound” or “Sound & Notification” section. Within this section, you should find an option to set your default ringtone.
Tap on the “Ringtone” or “Phone Ringtone” option, and a list of available ringtones will appear. Look for the name of the transferred MP3 file in the list and select it. Once selected, the MP3 ringtone will be set as your default ringtone for incoming calls.
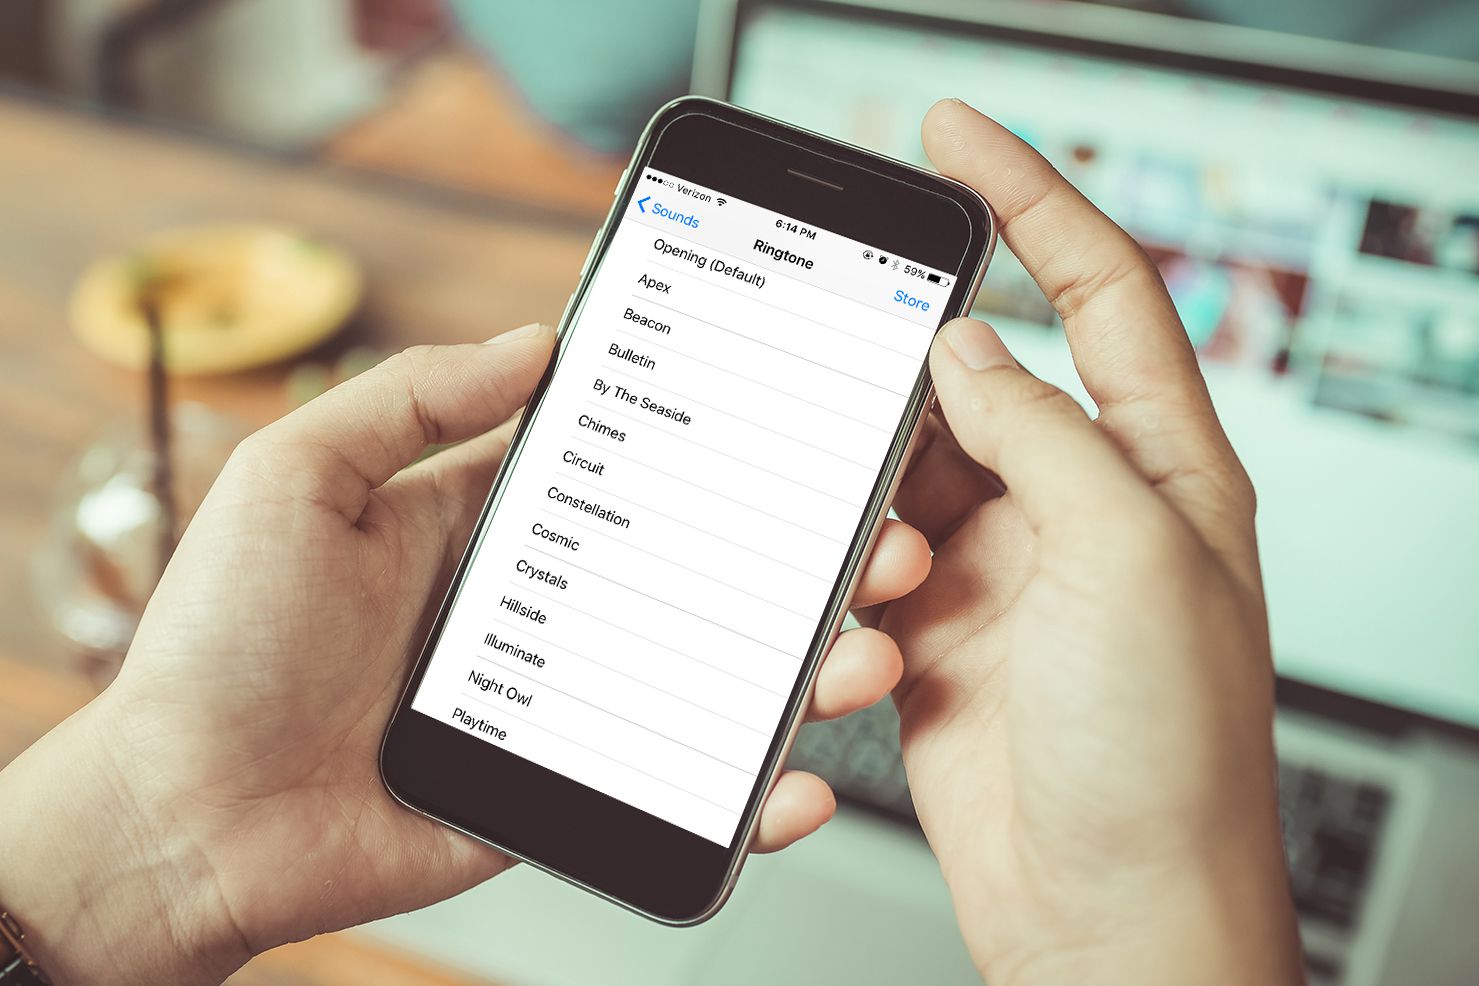
On an iPhone, the process of setting the MP3 ringtone is slightly different. Open the Settings app and navigate to the “Sounds & Haptics” or “Sounds & Haptic Feedback” section. From there, select the “Ringtone” option.
In the “Ringtone” menu, you will find a list of available ringtones. Scroll through the list until you find the name of the transferred MP3 file. Tap on the name of the MP3 ringtone, and it will be set as your default ringtone for incoming calls on your iPhone.
It’s worth noting that some Android devices may also have the option to set specific ringtones for individual contacts. This allows you to assign different MP3 ringtones to different people in your contact list, adding a personal touch to each interaction.
Setting the MP3 ringtone on your phone may vary slightly depending on the make and model of your device and the version of the operating system you are using. However, these general steps should help guide you through the process of setting your customized MP3 ringtone.
Enjoy the satisfaction of hearing your own personalized MP3 ringtone whenever your phone rings, adding a touch of uniqueness to your mobile experience.
Conclusion
Congratulations! You have successfully transformed your favorite MP3 audio file into a custom ringtone for your phone. By following the steps outlined in this article, you have personalized your phone’s ringtone, making it truly unique and reflective of your style.
We started by choosing the right MP3 file, considering factors such as the start and end points, sound quality, and length. Then, we moved on to the editing process, using user-friendly software or apps to trim, fade, and enhance the selected section of the MP3 file. Adjusting the length of the ringtone allowed us to create a concise and impactful audio clip.
Next, we converted the MP3 file to a format compatible with our specific phone’s operating system, whether it be the M4R format for iPhones or simply keeping it as an MP3 for Android devices. We then transferred the ringtone to our phones, either via USB transfer or syncing through iTunes.
Finally, we set the MP3 ringtone as our default ringtone on our phones, enjoying the personalized sound whenever we receive a call. Whether it’s an Android device or an iPhone, the process is straightforward and allows for customization of the ringtone to reflect our individual preferences.
Now, every time your phone rings, you’ll have a unique and personalized ringtone that stands out from the crowd. It’s a small touch that adds a touch of personality to your device and enhances your overall mobile experience.
Remember, it’s important to respect copyright laws and ensure that you have the necessary permissions for using audio clips as ringtones. There are numerous sources of royalty-free music and sound effects available, providing a wide range of options for creating unique and legal ringtones.
So go ahead and have fun experimenting with different MP3 files, expressing your style and personality through your phone’s ringtone. Embrace your creativity and enjoy the satisfaction of having a customized and captivating ringtone that sets you apart.
Now, it’s time to let your phone ring and proudly showcase your personalized MP3 ringtone!