Home>Production & Technology>Sound>How To Change Text Message Notification Sound On Android
Sound
How To Change Text Message Notification Sound On Android
Published: December 16, 2023
Learn how to change the text message notification sound on your Android device with our step-by-step guide. Customize your sound settings for a more personalized experience.
(Many of the links in this article redirect to a specific reviewed product. Your purchase of these products through affiliate links helps to generate commission for AudioLover.com, at no extra cost. Learn more)
Table of Contents
Introduction
Changing the text message notification sound on your Android device can add a personal touch to your device and make it more enjoyable to use. Whether you want a soothing melody, a catchy tune, or a funny sound effect, customizing your text message notification sound can bring a sense of uniqueness to your Android experience.
By default, Android devices come with a set of pre-installed notification sounds. However, you are not limited to these options. You have the freedom to choose from a wide range of sounds, including your favorite songs, sound clips, or even recordings that you create yourself.
In this article, we will guide you through the process of changing the text message notification sound on your Android device. Whether you have a Samsung, Google Pixel, LG, or any other Android phone, the steps are generally similar across devices.
Before we dive into the steps, make sure you have a sound file or sound clip that you want to use as your text message notification sound. You can find a variety of sound files online or even create your own using a sound recording app. Once you have the file ready, let’s begin!
Step 1: Accessing the Android settings
The first step to changing the text message notification sound on your Android device is accessing the settings menu. The exact location of the settings may vary slightly depending on the Android version or device manufacturer, but the general process remains the same.
To access the settings, locate and tap on the “Settings” app on your Android device. It is usually represented by a gear icon and can be found on your home screen or in the app drawer.
Once you tap on the “Settings” app, it will open a new window with a variety of options and settings for your device. This is where you can customize various aspects of your Android experience, including the notification sound.
If you’re having trouble finding the “Settings” app, try swiping down from the top of your screen and tapping on the gear icon in the notification shade. This will also take you directly to the settings menu.
Once you have accessed the settings menu, you are ready to proceed to the next step.
Step 2: Navigating to the Sound settings
After accessing the settings menu on your Android device, the next step is to navigate to the sound settings. This is where you can find various options related to audio settings, including the text message notification sound.
To navigate to the sound settings, look for the “Sound” or “Sound & vibration” option in the settings menu. The exact wording may vary depending on your device’s manufacturer and Android version.
Once you locate the “Sound” option, tap on it to open the sound settings menu. Here, you will find a variety of sound-related options such as ringtones, media volume, and notification sounds.
If you’re unable to find the sound settings option, you can use the search bar at the top of the settings menu. Simply type in “sound” and it should display the relevant options for you to select.
Once you have found and tapped on the sound settings option, you are ready to proceed to the next step and locate the notification sound settings.
Step 3: Locating the Notification sound options
Now that you have navigated to the sound settings menu on your Android device, it’s time to locate the notification sound options. This is where you can choose a new sound for your text message notifications.
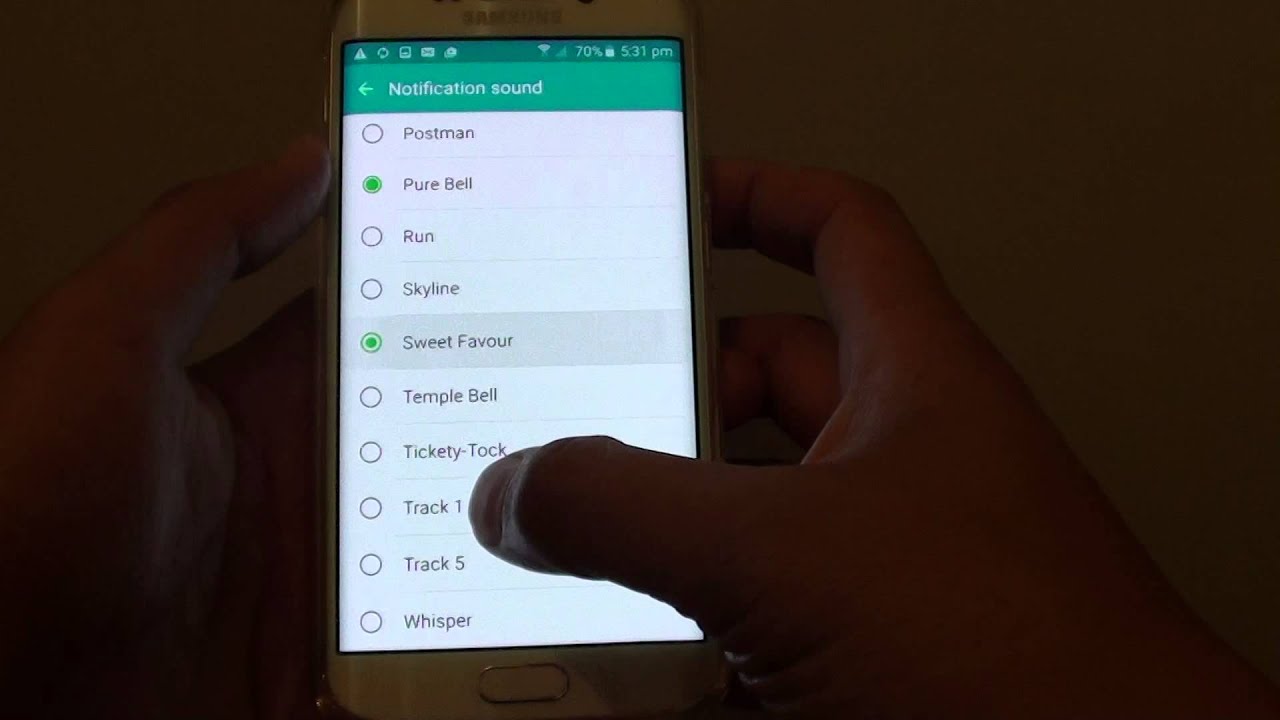
In the sound settings menu, scroll down until you find the “Notifications” or “Notification sound” option. Tap on it to access the notification sound settings.
Upon entering the notification sound settings, you will see a list of available notification sounds. These are the pre-installed sounds that come with your Android device. You can browse through the list to get an idea of the default options.
If you want to use a different sound, you have the option to tap on “Add” or “Choose ringtone” to access additional sound files stored on your device. This will allow you to select a sound file from your music library, downloads folder, or any other location where you have stored the desired notification sound.
Some Android devices may also provide a “Browse” option, which allows you to navigate through your device’s file system to locate the sound file you want to use.
Additionally, certain Android devices offer the option to use custom notifications for specific contacts or apps. This means you can assign a unique notification sound to a specific contact or app, allowing you to differentiate between notifications.
Once you have located the notification sound options and explored the available sounds or added a custom sound, you are ready to proceed to the next step and select a new text message notification sound.
Step 4: Selecting a new text message notification sound
After locating the notification sound options in the previous step, you are now ready to select a new text message notification sound for your Android device. This step allows you to personalize your device and choose a sound that suits your preferences.
To select a new text message notification sound, simply tap on the sound you want to use from the list of available options. If you have added a custom sound, it should also appear in the list, allowing you to select it as your notification sound.
As you tap on each sound, you will hear a preview of how it sounds. This can help you quickly decide whether it matches the desired tone or style you want for your text message notifications.
If you have assigned custom notifications for specific contacts or apps, you can tap on the respective option and choose a unique sound for each contact or app. This can be particularly useful if you want to easily identify important contacts or prioritize certain app notifications.
If you want to revert back to the default or pre-installed notification sound, look for an option like “Default” or “System sound” and tap on it. This will set your notification sound back to the original default sound for text messages.
Once you have selected a new text message notification sound or customized the sound for specific contacts or apps, you are ready to proceed to the final step: testing the new notification sound.
Step 5: Testing the new notification sound
After selecting a new text message notification sound for your Android device, it’s essential to test it to ensure that it meets your expectations. This step allows you to hear how the new sound will sound when you receive a text message.
To test the new notification sound, simply ask a friend or family member to send you a text message. Alternatively, you can use another device to send a test message to yourself.
When the text message arrives, you will hear the new notification sound that you selected. Pay attention to the volume, clarity, and overall quality of the sound. Make sure it is audible and distinguishable among other sounds. If you are not satisfied with the new sound, you can always go back to the previous steps and choose a different one.
It’s important to note that the notification sound you set for text messages may also apply to other types of notifications, such as email notifications or social media alerts. Keep this in mind when selecting a text message notification sound, as it will be the sound you hear for all notifications that use the same sound setting.
If you decide that the new notification sound is not what you expected or you simply want to change it again in the future, you can always revisit the sound settings and select a different sound.
Now that you have tested the new notification sound and verified that it meets your preferences, you have successfully changed the text message notification sound on your Android device.
Conclusion
Customizing the text message notification sound on your Android device can make receiving messages a more enjoyable and personalized experience. By following the simple steps outlined in this article, you can easily change the notification sound to something that reflects your style and preferences.
Starting with accessing the Android settings, you can navigate to the sound settings and locate the notification sound options. From there, you can choose from a variety of pre-installed sounds or even add your own custom sound. Once you have selected a new notification sound, make sure to test it by receiving a text message.
Remember that you have the freedom to change the text message notification sound at any time. So, if you ever feel like trying something different or want to revert back to the default sound, simply follow these steps again.
Personalizing your Android device extends beyond just the appearance and functionality. The ability to customize the sound settings, including the text message notification sound, allows you to make your device truly your own.
Now that you have the knowledge and steps to change the text message notification sound on your Android device, go ahead and give it a try. Have fun exploring different sounds, finding the one that resonates with you, and enhancing your overall Android experience!