Home>Instruments>Guitar>How To Replace A Guitar Nut
Guitar
How To Replace A Guitar Nut
Modified: February 15, 2024
Learn how to replace a guitar nut with our step-by-step guide. Keep your guitar in top shape and improve its playability.
(Many of the links in this article redirect to a specific reviewed product. Your purchase of these products through affiliate links helps to generate commission for AudioLover.com, at no extra cost. Learn more)
Table of Contents
Introduction
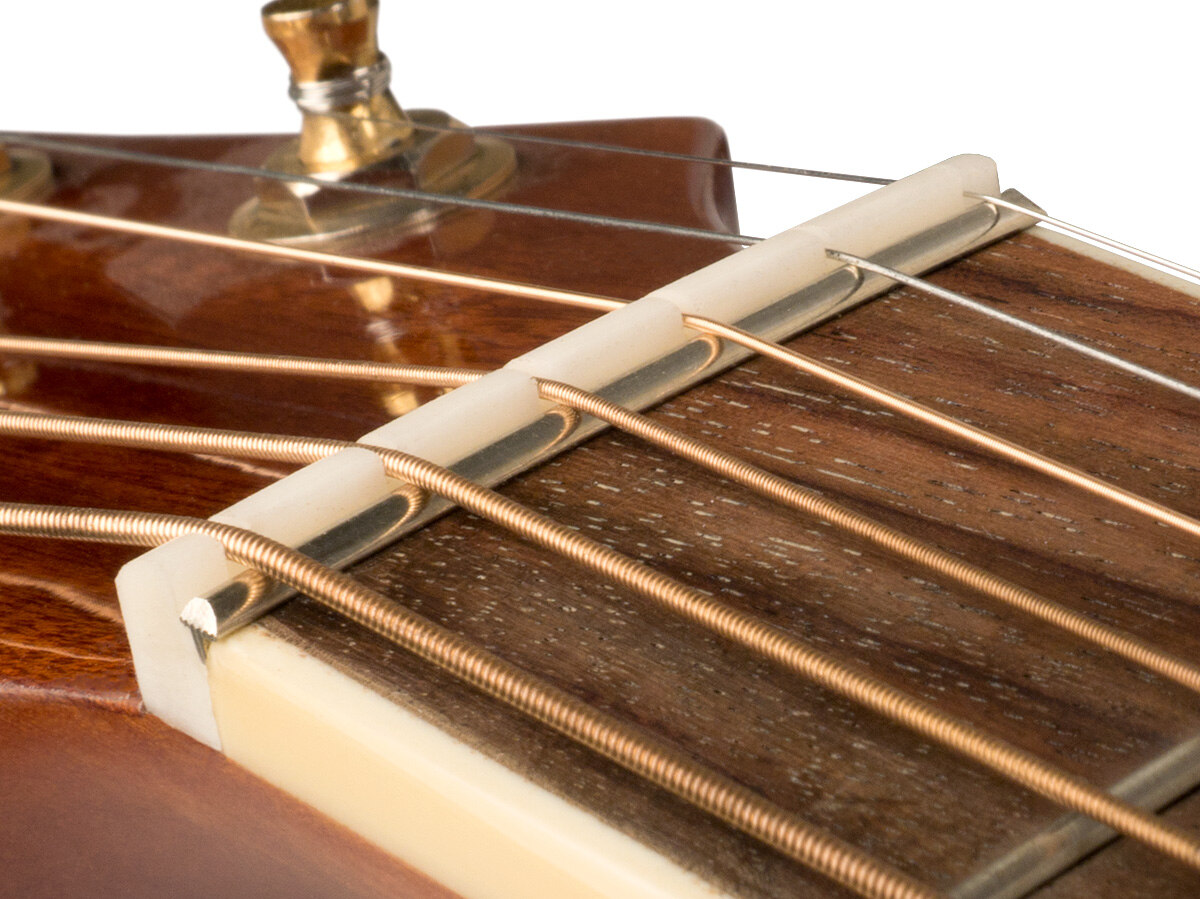
So, you've noticed some buzzing or intonation issues with your guitar, and after some investigation, you've determined that the culprit is the nut. Don't worry; this is a common issue that many guitarists encounter. The nut, located at the top of the fretboard, plays a crucial role in maintaining proper string spacing, height, and alignment. Over time, it can wear down, leading to tuning instability and poor playability. Fortunately, replacing a guitar nut is a manageable task that can be accomplished with the right tools and a bit of patience.
In this guide, we'll walk through the process of replacing a guitar nut, providing step-by-step instructions and valuable tips to ensure a successful outcome. Whether you're a seasoned guitarist or a budding enthusiast, mastering this skill will empower you to keep your instrument in top playing condition and tailor its performance to your preferences.
Before we dive into the nitty-gritty of nut replacement, it's essential to understand the significance of this component. The nut not only supports the strings at the headstock end but also determines the spacing and alignment, ultimately influencing the guitar's playability and tuning stability. By maintaining a properly fitted and well-adjusted nut, you can optimize your instrument's performance and elevate your playing experience.
Now, let's gather the necessary tools and materials to embark on this rewarding endeavor. Remember, patience and attention to detail are key virtues when working on your beloved guitar. With the right approach, you'll soon have a new nut in place, restoring your instrument's functionality and playability.
Tools and Materials Needed
Before you begin the process of replacing your guitar nut, it’s crucial to have the right tools and materials at your disposal. Here’s a comprehensive list of what you’ll need:
- New Nut: Ensure that you have a replacement nut that is compatible with your guitar’s make and model. Nuts come in various materials such as bone, synthetic bone, brass, and graphite, each offering unique tonal characteristics and durability.
- Small Hammer: A lightweight hammer will be necessary for gently tapping the old nut out of its slot.
- Needle Files: These precision files are essential for adjusting the new nut to achieve the correct string spacing and depth.
- Masking Tape: Use this to protect the fretboard and headstock from accidental scratches or dings during the nut replacement process.
- Ruler or Calipers: Accurately measuring the dimensions of the existing nut and the new nut is vital for a proper fit.
- Sandpaper or Fret Leveling File: This will help in fine-tuning the nut’s height and ensuring a smooth, level surface.
- Small Screwdriver: You may need this to remove any screws or retainers holding the existing nut in place.
- String Action Gauge: This tool will aid in setting the correct string height over the first fret once the new nut is installed.
- Wood or Plastic Shim: Sometimes, a shim is needed to achieve the perfect neck angle and string action after installing the new nut.
By gathering these tools and materials, you’ll be well-prepared to tackle the nut replacement process with confidence and precision. Remember, attention to detail and patience are essential as you work through each step. Now that you have everything you need, it’s time to remove the old nut and prepare for the installation of the new one.
Removing the Old Nut
Before you can install a new nut, you must first remove the old one. This process requires care and precision to avoid damaging the guitar’s headstock or fretboard. Follow these steps to safely remove the old nut:
- Loosen the Strings: Begin by loosening the tension on all the strings. This will make it easier to access the nut and prevent any damage to the headstock or fretboard during the removal process.
- Support the Neck: To prevent any undue stress on the neck, support the guitar’s neck by placing a soft cloth or towel under it while you work.
- Protect the Surrounding Area: Cover the headstock and fretboard around the nut with masking tape to shield them from accidental scratches or dings caused by slipping tools.
- Remove the Old Nut: Depending on the type of guitar, the nut may be held in place by glue, screws, or simply friction. Carefully examine how the nut is secured and proceed accordingly. If it’s glued in place, use a small hammer and a block of wood to gently tap it out. For nuts held by screws, carefully remove them using an appropriately sized screwdriver. If the nut is held by friction, carefully lift it out using a small, flat tool to avoid any damage to the surrounding areas.
- Clean the Nut Slot: Once the old nut is removed, take a moment to clean out any debris or remnants of glue from the nut slot. A small, soft brush can be helpful for this task.
With the old nut successfully removed and the slot cleaned, you’re now ready to prepare the new nut for installation. Take your time and proceed with caution to ensure that the guitar’s headstock and fretboard remain unscathed throughout this process.
Preparing the New Nut
Now that the old nut has been removed, it’s time to prepare the new nut for installation. Proper preparation is essential to ensure that the new nut fits correctly and facilitates optimal string action and intonation. Follow these steps to prepare the new nut:
- Measure and Compare: Begin by measuring the dimensions of the new nut and comparing them to the slot in the guitar’s neck. Ensure that the new nut matches the width and depth of the slot, and make any necessary adjustments if the fit is not precise.
- File the Bottom: If the new nut is slightly taller than the slot, carefully file the bottom of the nut using fine-grit sandpaper or a fret leveling file. This will ensure that the nut sits flush in the slot without affecting the string height.
- Shape the Sides: Use a set of needle files to shape the sides of the nut, ensuring that it aligns perfectly with the fretboard and headstock. Take care to maintain a consistent and straight profile for a professional-looking fit.
- Check String Spacing: Verify that the string slots in the new nut align with the guitar’s fretboard and maintain the correct spacing for each string. Make any necessary adjustments to ensure uniform string spacing across the nut.
- Test Fit: Before applying any adhesive, perform a test fit of the new nut in the slot. Ensure that it sits snugly and uniformly without any gaps or tilting. This step allows you to address any fitting issues before final installation.
By meticulously preparing the new nut, you’ll ensure a seamless and secure fit that promotes stable tuning and optimal string performance. Once the new nut is perfectly shaped and fitted, you’re ready to proceed with the installation process, bringing your guitar one step closer to renewed playability and tone.
Installing the New Nut
With the new nut expertly prepared, it’s time to proceed with the installation process. This step is crucial in ensuring that the nut is securely and accurately positioned, setting the stage for improved playability and tuning stability. Follow these steps to install the new nut:
- Apply Adhesive (If Necessary): If your guitar’s nut slot requires adhesive to secure the new nut, apply a small amount of wood glue or specialized nut adhesive to the bottom of the nut. Be cautious not to overapply, as excess adhesive can seep out and create a messy finish.
- Seat the Nut: Gently place the new nut into the slot, ensuring that it sits flush and level with the fretboard. Use light pressure to press it into place, allowing the adhesive to create a secure bond.
- Check Alignment: Verify that the new nut is perfectly aligned with the fretboard and headstock. Any misalignment at this stage can lead to tuning and intonation issues, so take the time to ensure its precise positioning.
- Secure the Nut (If Necessary): If your guitar’s nut is designed to be secured with screws or retainers, carefully fasten them in place using the appropriate tools. Take care not to overtighten the screws, as this can cause damage to the nut or the surrounding wood.
- Allow for Setting Time: If adhesive was used, allow sufficient time for it to set and create a strong bond. Follow the manufacturer’s recommendations for drying or setting time to ensure a secure and durable installation.
By following these steps, you’ll successfully install the new nut, setting the stage for improved string performance and overall playability. With the nut securely in place, your guitar is one step closer to regaining its optimal tone and tuning stability. Before moving on, take a moment to appreciate the progress you’ve made and get ready for the final adjustments that will bring your guitar’s setup to perfection.
Final Adjustments and Testing
As you near the completion of the nut replacement process, it’s essential to perform final adjustments and testing to ensure that your guitar’s playability and tuning stability are optimized. Follow these steps to fine-tune the new nut and assess its performance:
- Check String Height: Using a string action gauge, verify that the strings sit at the correct height over the first fret. Make any necessary adjustments to achieve uniform string height, ensuring comfortable playability and minimized fret buzz.
- Verify String Spacing: Double-check that the string slots in the new nut maintain consistent spacing and alignment with the guitar’s fretboard. This step is crucial in ensuring accurate string intonation and playability across the fretboard.
- Test Tuning Stability: Tune the guitar to pitch and assess the tuning stability across all strings. Pay attention to any binding or sticking at the nut, as this can cause tuning issues. If necessary, lightly lubricate the nut slots with a specialized nut lubricant to facilitate smooth string movement.
- Playability Assessment: Test the guitar’s playability by fretting notes and chords across the fretboard. Ensure that the strings ring out clearly and sustain appropriately, indicating proper nut action and string contact.
- Intonation Check: Play a few chords and check the guitar’s intonation to ensure that the nut replacement has not adversely affected the instrument’s overall tuning accuracy. Make any required adjustments at the bridge or saddle to fine-tune the intonation.
By meticulously performing these final adjustments and tests, you’ll ensure that the new nut facilitates optimal playability, tuning stability, and string performance. Take your time to address any issues that may arise, as achieving a perfectly set up nut is crucial to your guitar’s overall functionality and tone. With the final adjustments complete, it’s time to revel in the rejuvenated performance of your instrument and celebrate the successful replacement of the guitar nut.
Conclusion
Congratulations! You’ve successfully navigated the process of replacing a guitar nut, a task that empowers you to maintain and optimize your instrument’s playability and tone. By following the steps outlined in this guide and exercising patience and precision, you’ve revitalized your guitar’s performance and set the stage for an enhanced playing experience. As you reflect on this accomplishment, consider the following key takeaways:
- Importance of Nut Maintenance: The nut is a critical component of your guitar’s setup, influencing string spacing, height, and alignment. By understanding its significance and learning to replace it, you’ve taken a proactive step in caring for your instrument.
- Empowerment Through Skill Building: Mastering the art of nut replacement equips you with valuable skills that contribute to your growth as a guitarist. The ability to perform maintenance and setup tasks enhances your connection with your instrument and fosters a deeper understanding of its mechanics.
- Customization and Personalization: Replacing the nut opens doors to customization, allowing you to explore different nut materials and dimensions to tailor your guitar’s performance to your preferences. This level of customization can significantly impact your playing style and tonal expression.
- Appreciation for Instrument Care: Engaging in the process of nut replacement fosters a deeper appreciation for the care and maintenance of musical instruments. By investing time and effort into preserving your guitar’s functionality, you cultivate a sense of stewardship and respect for your beloved instrument.
As you continue your musical journey, remember that the knowledge and skills gained from replacing a guitar nut extend beyond this specific task. They contribute to a holistic understanding of your instrument and empower you to nurture its potential for years to come. Whether you’re a seasoned guitarist or a novice enthusiast, the ability to maintain and optimize your guitar’s components is a valuable asset that enhances your musical experience.
With the new nut securely in place and your guitar’s setup fine-tuned, take a moment to savor the accomplishment and the renewed potential of your instrument. Your dedication to caring for your guitar sets the stage for countless hours of joyful playing and musical exploration. Embrace the satisfaction of a job well done and let the revitalized performance of your instrument inspire your musical creativity.
Now, armed with the knowledge and expertise gained from this process, you’re ready to embark on your next musical endeavor, equipped with the confidence and skills to maintain and optimize your instrument’s playability and tone. Whether it’s a subtle setup adjustment or a more involved maintenance task, your journey as a guitarist is enriched by the ability to care for and elevate the performance of your cherished instrument.