Home>Instruments>Guitar>How To Set Up A Guitar Pedal Board
Guitar
How To Set Up A Guitar Pedal Board
Published: February 14, 2024
Learn how to set up a guitar pedal board for optimal sound and performance. Our step-by-step guide covers everything you need to know about organizing and connecting guitar pedals.
(Many of the links in this article redirect to a specific reviewed product. Your purchase of these products through affiliate links helps to generate commission for AudioLover.com, at no extra cost. Learn more)
Table of Contents
Introduction
So, you've finally decided to take your guitar playing to the next level by incorporating some awesome effects into your sound. Building a pedal board can be an exciting and rewarding experience for any guitarist. Whether you're aiming for a subtle touch of reverb or a full-blown wall of sound with distortion and delay, a well-organized pedal board can be the key to unlocking your sonic potential.
In this comprehensive guide, we'll walk you through the process of setting up your very own guitar pedal board. From selecting the right board and arranging your pedals to connecting and powering them effectively, we've got you covered. By the end of this journey, you'll be ready to unleash a world of creative possibilities through your customized pedal board setup.
But before we dive into the nitty-gritty details, let's take a moment to appreciate the art of crafting a pedal board. It's not just about assembling a bunch of stompboxes and connecting cables; it's about curating a collection of sonic tools that resonate with your musical style and inspire your creativity. Each pedal on your board is a gateway to a distinct palette of sounds, and the way you arrange and combine them can significantly impact your playing experience.
Whether you're a seasoned gigging musician or a bedroom enthusiast, the process of setting up a pedal board is an opportunity to explore new tones, experiment with different effects chains, and ultimately, sculpt a signature sound that is uniquely yours. So, grab your favorite guitar, roll up your sleeves, and let's embark on this pedal board journey together. It's time to unleash the potential of your guitar rig and elevate your musical expression to new heights.
Selecting the Right Pedal Board
Before you start assembling your pedal board, it’s essential to choose the right platform to house your collection of effects pedals. The market offers a wide array of pedal board options, ranging from compact and minimalist boards to larger, more expansive setups. The choice you make should align with the number of pedals you intend to use, your preferred playing environment, and your mobility needs.
When selecting a pedal board, consider the following factors:
- Size and Portability: If you’re a gigging musician who frequently performs at different venues, a lightweight and portable pedal board may be ideal. Compact boards are also suitable for players with a minimal pedal setup, while larger boards accommodate extensive effects chains.
- Material and Durability: The construction of the pedal board is crucial for long-term reliability. Aluminum and rugged plastic boards are popular choices, offering a balance of sturdiness and weight efficiency.
- Cable Management: Some pedal boards feature built-in cable routing options or included accessories for organizing cables, contributing to a tidy and professional-looking setup.
- Power Supply Compatibility: Ensure that the pedal board can accommodate your preferred power supply unit, whether it’s a dedicated pedalboard power brick or individual power adapters.
- Future Expansion: Anticipate your potential need for additional pedals in the future. Choosing a slightly larger board than your current requirements can prevent the hassle of upgrading to a new board as your pedal collection grows.
When browsing pedal board options, take the time to envision your ideal setup and how it will complement your playing style. Some guitarists prefer a streamlined board with carefully selected essential pedals, while others thrive on the versatility of a spacious board that accommodates a diverse range of effects. Ultimately, your pedal board should reflect your musical identity and provide a practical foundation for unleashing your creativity.
Remember, the pedal board is more than just a platform for your pedals; it’s a personalized space where your sonic journey unfolds. Once you’ve chosen the perfect board, you’re one step closer to assembling a captivating array of effects that will define your signature sound.
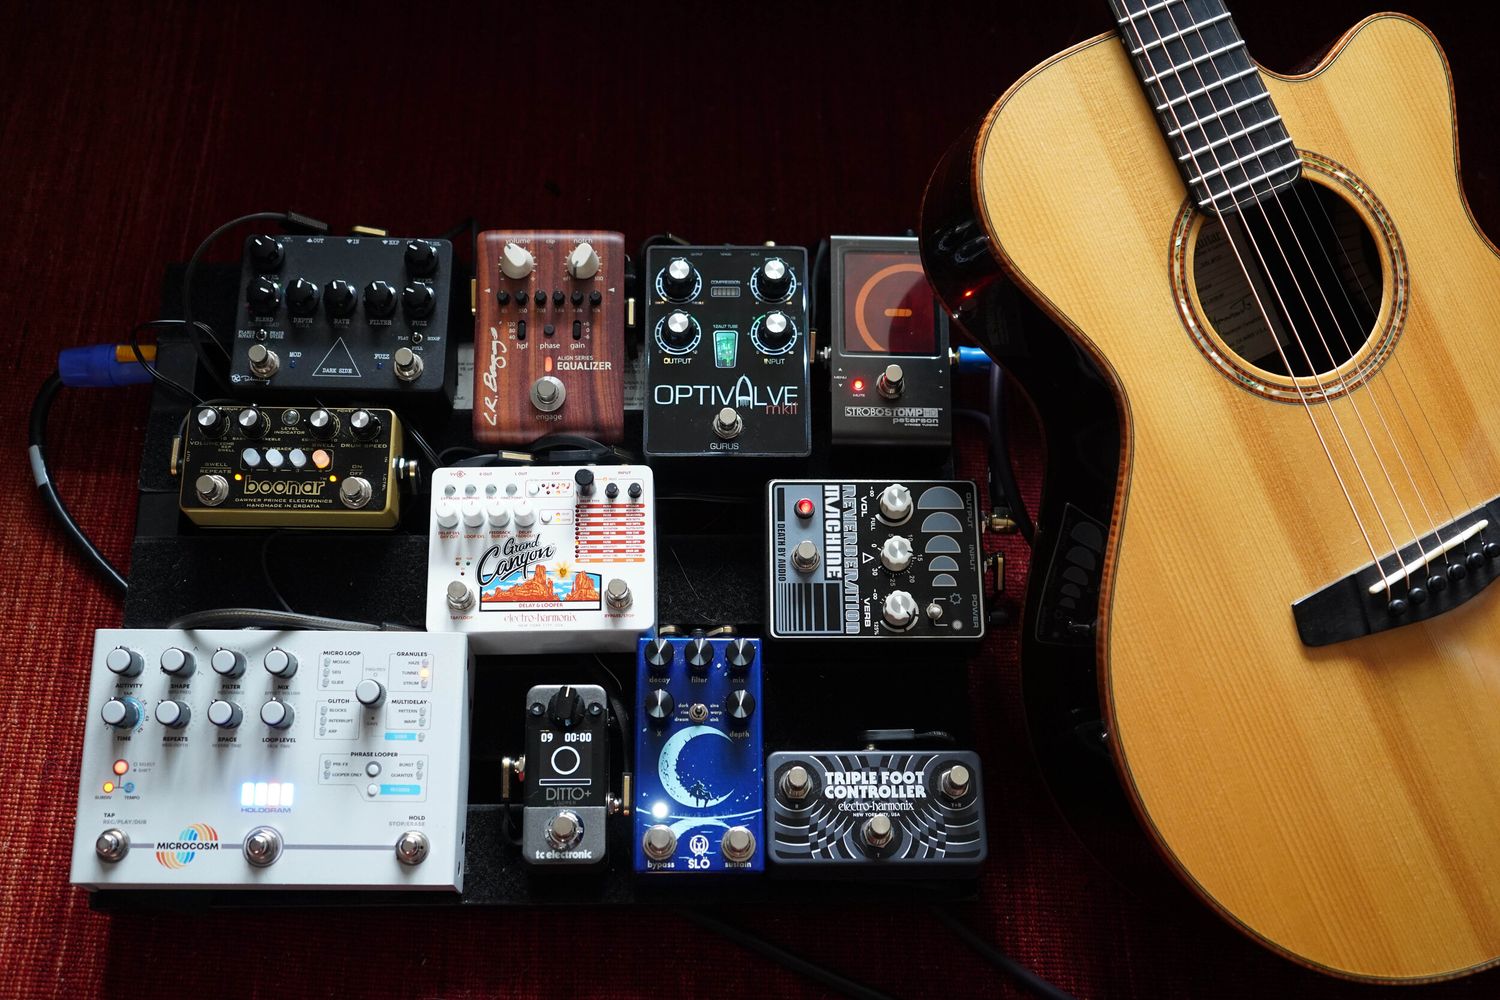
Arranging Your Pedals
Now that you have the perfect pedal board, it’s time to arrange your effects pedals in a manner that optimizes functionality, ergonomics, and sonic coherence. The way you organize your pedals can significantly impact your playing experience and the overall sound of your rig. Here are some essential tips for arranging your pedals:
- Signal Flow: Consider the signal path from your guitar to the amplifier. In most cases, the signal flows from the guitar into the first pedal, then through the rest of the chain before reaching the amplifier. Organizing your pedals in this sequential order ensures that each effect receives the appropriate input and contributes to a harmonious overall sound.
- Effect Order: While there are no strict rules, a common effects chain order starts with dynamics-based effects (such as compressors and wah pedals), followed by gain-based effects (overdrive, distortion), modulation effects (chorus, phaser), time-based effects (delay, reverb), and finally, the tuner as the last pedal in the chain.
- Space Consideration: Leave ample space between pedals to prevent accidental activation and to accommodate larger pedals or expression pedals. This spacing also facilitates easy access for toggling switches and adjusting knobs during performances.
- Strategic Placement: Position frequently used pedals within easy reach, especially those requiring real-time adjustments during performances. Placing less frequently adjusted pedals towards the edges of the board can streamline your access to essential effects.
- Cable Management: Neatly route and secure your cables to minimize tangling and potential signal interference. Utilize cable ties, adhesive-backed cable mounts, or pedal board-specific cable management accessories to maintain a tidy and organized setup.
As you arrange your pedals, take the opportunity to experiment with different combinations and placements to discover unique sonic textures and tonal possibilities. Don’t hesitate to rearrange your pedals if a different order enhances your sound or workflow. Ultimately, the goal is to create a pedal board layout that empowers your musical expression and inspires your creativity.
By thoughtfully arranging your pedals, you can streamline your playing experience, unleash a diverse range of tones, and ensure that your pedal board becomes an intuitive extension of your musical identity. With your pedals strategically positioned and interconnected, you’re ready to delve into the next phase of setting up your ultimate guitar pedal board.
Connecting Your Pedals
With your pedals neatly arranged on the board, the next crucial step is to establish secure and efficient connections between them. Proper pedal interconnection ensures seamless signal transfer, minimizes signal degradation, and contributes to the overall integrity of your guitar tone. Here’s a guide to effectively connecting your pedals:
- Patch Cables: Utilize high-quality patch cables to link your pedals. Shorter cables are ideal for connecting pedals in close proximity, while longer cables may be necessary to bridge larger gaps between pedals. Opt for low-capacitance cables to maintain signal clarity and minimize high-frequency loss.
- Directional Flow: Ensure that the cables follow a logical and unobstructed path between pedals, avoiding sharp bends or kinks that could compromise signal integrity. Neatly routing the cables along the edges or designated channels of the pedal board can contribute to a tidy and professional-looking setup.
- Effect Order: Adhere to the predetermined signal flow and effect order as established during the pedal arrangement phase. Consistently maintaining the effects chain sequence through proper cable connections ensures that each pedal receives the appropriate signal and contributes to the desired sonic outcome.
- Power Cable Management: If your pedals are powered by individual adapters, strategically route the power cables to minimize clutter and potential interference with the audio signal cables. Separating power and audio cables can help reduce noise and unwanted hum in your signal chain.
- Testing Connections: After establishing the physical connections, conduct a brief test to ensure that all pedals are functioning as expected. Verify that each effect is engaging and disengaging seamlessly, and listen for any unexpected noise or signal anomalies that may indicate a faulty connection.
By meticulously connecting your pedals with attention to detail, you can create a robust and reliable signal chain that preserves the fidelity of your guitar’s output and the sonic characteristics of each effect in your arsenal. Remember, the quality of your connections can significantly influence the overall performance and tonal integrity of your pedal board setup.
With your pedals seamlessly interconnected, you’re now poised to address the essential power requirements that will sustain your effects and drive your sonic exploration to new heights.
Powering Your Pedals
Ensuring reliable and consistent power for your array of effects pedals is a critical aspect of setting up a functional and stable pedal board. While individual pedal power requirements may vary, a unified and efficient power supply system can streamline your setup and mitigate potential issues related to noise, ground loops, and power-related malfunctions. Here’s how to effectively power your pedals:
- Power Supply Unit: Invest in a high-quality, isolated power supply unit designed specifically for effects pedals. Isolated outputs prevent ground loops and minimize electrical interference, contributing to a quieter and more reliable performance.
- Power Capacity: Ensure that the power supply unit can deliver adequate current and voltage for all your pedals. Consider the total power consumption of your effects and select a power supply with ample capacity to accommodate present and future additions to your pedal board.
- Daisy-Chaining vs. Isolated Outputs: Evaluate the power requirements of each pedal and determine whether daisy-chaining multiple pedals from a single output or utilizing individual isolated outputs is the most suitable approach. High-current digital pedals often benefit from dedicated isolated outputs to prevent noise and performance issues.
- Power Cable Management: Neatly route power cables alongside the audio signal cables, minimizing the potential for interference and maintaining a tidy and organized pedal board setup. Cable ties, adhesive-backed mounts, or dedicated cable management accessories can aid in maintaining a clean and efficient layout.
- Testing and Troubleshooting: After connecting the power supply to your pedals, conduct a thorough test to ensure that each pedal receives power and functions as expected. Address any issues related to power distribution, polarity, or abnormal pedal behavior promptly to prevent performance disruptions.
By prioritizing effective power distribution and management, you can optimize the reliability and performance of your pedal board while safeguarding against potential technical setbacks during rehearsals and performances. A robust and well-organized power supply system forms the backbone of your pedal board setup, providing the energy necessary to bring your sonic visions to life.
With your pedals powered and poised for action, it’s time to fine-tune and optimize your setup for the ultimate sonic experience.
Testing and Tweaking Your Setup
With your pedal board fully assembled, interconnected, and powered, it’s essential to conduct comprehensive testing and fine-tuning to ensure optimal performance and sonic satisfaction. Testing your setup allows you to identify and address any potential issues, refine your effects chain, and tailor your pedal board to your specific playing preferences. Here’s how to methodically test and tweak your pedal board setup:
- Sound Check: Connect your guitar to the pedal board and route the output to your amplifier or audio interface. Play through each effect individually to verify that they are functioning correctly and producing the intended sonic results. Listen for any unexpected noise, signal degradation, or irregular behavior that may require troubleshooting.
- Effects Chain Evaluation: Experiment with different combinations of effects and assess how they interact with one another. Fine-tune the order of your pedals to achieve the most musically pleasing and coherent results. Pay attention to how each effect complements the others and contributes to your overall sound.
- Tonal Refinement: Adjust the settings and parameters of individual pedals to achieve the desired tonal characteristics. Explore various knob positions, switch settings, and pedal interactions to sculpt your ideal guitar tones. Take note of any adjustments that enhance your playing experience and align with your musical vision.
- Performance Simulation: Mimic real-world playing scenarios by engaging multiple effects simultaneously and testing their impact on your tone and playing dynamics. Evaluate how your pedal board responds to different playing styles, intensity levels, and musical genres to ensure versatility and adaptability.
- Feedback and Iteration: Solicit feedback from fellow musicians, audio engineers, or trusted listeners to gain insight into the overall impact of your pedal board setup. Consider their observations and recommendations as you refine and iterate on your effects chain and tonal adjustments.
By systematically testing and tweaking your setup, you can fine-tune the sonic capabilities of your pedal board, identify opportunities for improvement, and tailor your effects chain to suit your artistic aspirations. This iterative process empowers you to harness the full potential of your pedal board and unlock a diverse range of expressive possibilities.
Once you’re satisfied with the performance and sonic character of your pedal board, you’re ready to unleash your creatively crafted tones and embark on an inspiring musical journey with your personalized arsenal of effects.