Home>Production & Technology>Sound Bar>How To Set Up A Sound Bar

Sound Bar
How To Set Up A Sound Bar
Modified: January 22, 2024
Learn how to set up a sound bar in a few easy steps. Enhance your audio experience with our comprehensive guide on sound bar installation and configuration.
(Many of the links in this article redirect to a specific reviewed product. Your purchase of these products through affiliate links helps to generate commission for AudioLover.com, at no extra cost. Learn more)
Table of Contents
- Introduction
- Step 1: Unboxing and inspecting the sound bar
- Step 2: Finding a suitable location for the sound bar
- Step 3: Connecting the sound bar to the TV
- Step 4: Configuring the sound bar settings
- Step 5: Connecting additional audio devices
- Step 6: Testing the sound bar
- Step 7: Troubleshooting common issues
- Conclusion
Introduction
Welcome to our comprehensive guide on how to set up a sound bar! Sound bars have become increasingly popular in recent years, as they provide a convenient and affordable way to enhance the audio quality of your TV or home entertainment system. Whether you’re a movie lover, avid gamer, or simply enjoy listening to music, a sound bar can dramatically improve your audio experience.
In this step-by-step tutorial, we will walk you through the process of setting up a sound bar from start to finish. From unboxing and inspecting the sound bar to connecting it to your TV and configuring the settings, we will cover everything you need to know to get the most out of your new audio device. So let’s dive in!
Setting up a sound bar may seem intimidating at first, especially if you’re not particularly tech-savvy. But fear not! We have simplified the process into easy-to-follow steps that anyone can understand, regardless of their level of expertise. By the end of this guide, you’ll be able to enjoy enhanced sound quality and immerse yourself in a whole new audio experience.
Before we begin, it’s important to note that while our instructions are generally applicable to most sound bars, there may be slight variations depending on the specific model you have. Therefore, we recommend consulting the user manual that came with your sound bar for any specific instructions or troubleshooting tips.
Now that we’ve covered the basics, let’s get started with step one: unboxing and inspecting the sound bar.
Step 1: Unboxing and inspecting the sound bar
Now that you have your new sound bar in hand, it’s time to unbox and inspect it. This step is important to ensure that all the necessary components are included and in good condition. Let’s get started!
1. Find a clear and spacious area where you can unbox your sound bar. Make sure to have a soft surface, such as a carpet or tablecloth, to prevent any scratches or damage to the sound bar or your furniture.
2. Carefully open the box and remove all the components. Typically, you will find the sound bar itself, a remote control, a power adapter, audio cables, and any additional accessories that may have been included.
3. Take a moment to inspect each component for any signs of damage or defects. Look for any visible dents, scratches, or loose parts. If you notice any issues, it is best to contact the manufacturer or retailer immediately to resolve the problem.
4. Read through the user manual that came with the sound bar. Familiarize yourself with the different parts and their functions. This will make the setup process much smoother in the following steps.
5. As you unbox the sound bar, take note of the different input and output ports available. These ports will be essential for connecting your sound bar to your TV and other audio devices later on. Check for HDMI, optical, USB, and auxiliary ports, among others.
6. Don’t forget to check if batteries are included for the remote control. If not, make a note to purchase them separately.
7. Keep all the components and accessories organized in a safe place. It’s a good idea to keep the original packaging in case you need to transport or store the sound bar in the future.
Now that you have successfully unboxed and inspected your sound bar, you can move on to the next step: finding a suitable location for the sound bar.
Step 2: Finding a suitable location for the sound bar
Now that you have unboxed and inspected your sound bar, it’s time to find the perfect spot to set it up. The location you choose can significantly impact the audio quality and overall experience. Here are some tips to help you find a suitable location:
1. Assess the layout of your room: Take a look at the layout of your room and consider the acoustics. Ideally, you want to place the sound bar in a central location where the audio can evenly distribute throughout the room. Avoid placing it in a corner, as this can cause audio distortion and muffled sound.
2. Consider the size and design of your sound bar: Sound bars come in different sizes and designs. Some are compact and can be wall-mounted, while others are larger and meant to sit on a stand or cabinet. Depending on the layout and aesthetics of your space, choose a location that complements the dimensions and style of your sound bar.
3. Position the sound bar below or above your TV: The most common placement for a sound bar is either below or above the TV. If you have a wall-mounted TV, placing the sound bar below the TV is a popular choice. If your TV is on a stand, you can place the sound bar on the stand or mount it on the wall above the TV. Make sure the sound bar doesn’t obstruct the TV screen and is aligned with the center of the TV for optimal audio output.
4. Consider the audio projection: Sound bars are designed to project audio in a specific direction. Some models have speakers that are angled to bounce sound off the walls, creating a surround sound effect. Place your sound bar in a position that allows the sound to bounce off the walls and reach your listening area effectively.
5. Take into account the connectivity options: Depending on your sound bar’s connectivity options, you might need to consider the location in relation to your TV and other audio devices. Ensure that you have easy access to the necessary ports on both the sound bar and the TV for seamless connection.
Remember, it’s important to experiment with different locations and positions to find the optimal spot for your sound bar. Once you have found the perfect location, you can move on to the next step: connecting the sound bar to your TV.
Step 3: Connecting the sound bar to the TV
Now that you have found the ideal location for your sound bar, it’s time to connect it to your TV. The connection process may vary depending on the model of your sound bar and TV, but we will cover the general steps here.
1. Identify the available audio output ports on your TV. The most common options are HDMI, optical, and auxiliary (3.5mm) ports. Check the user manual of your TV to locate these ports if you’re unsure.
2. Locate the corresponding input ports on your sound bar. These may be labeled as HDMI ARC (Audio Return Channel), optical, or AUX. If your sound bar has multiple input options, choose the one that matches the audio output port on your TV that you plan to use.
3. Connect one end of the audio cable (HDMI, optical, or auxiliary) to the audio output port on your TV, and the other end to the corresponding input port on your sound bar.
4. If you’re using an HDMI connection, make sure to enable the HDMI ARC function on both your TV and sound bar. This allows for two-way audio transmission between the devices.
5. Once the physical connection is made, turn on your TV and sound bar. Use your TV remote to navigate to the audio settings and ensure that the audio output is set to the connected sound bar. This may involve selecting the correct HDMI input or optical output, depending on your setup.
6. Test the audio output by playing content on your TV. You should now be able to hear the sound coming from your sound bar and experience enhanced audio quality.
7. If your sound bar has a wireless subwoofer or satellite speakers, follow the specific instructions provided by the manufacturer to connect and pair them with the sound bar. This may involve a wireless connection or using additional audio cables.
Remember, if you encounter any issues during the connection process, refer to the user manuals of your TV and sound bar for troubleshooting tips and specific instructions. Once you have successfully connected the sound bar to your TV, you can move on to the next step: configuring the sound bar settings.
Step 4: Configuring the sound bar settings
Now that your sound bar is connected to your TV, it’s time to configure the settings to optimize your audio experience. The settings available may vary depending on the model of your sound bar, but we will cover some common adjustments here.
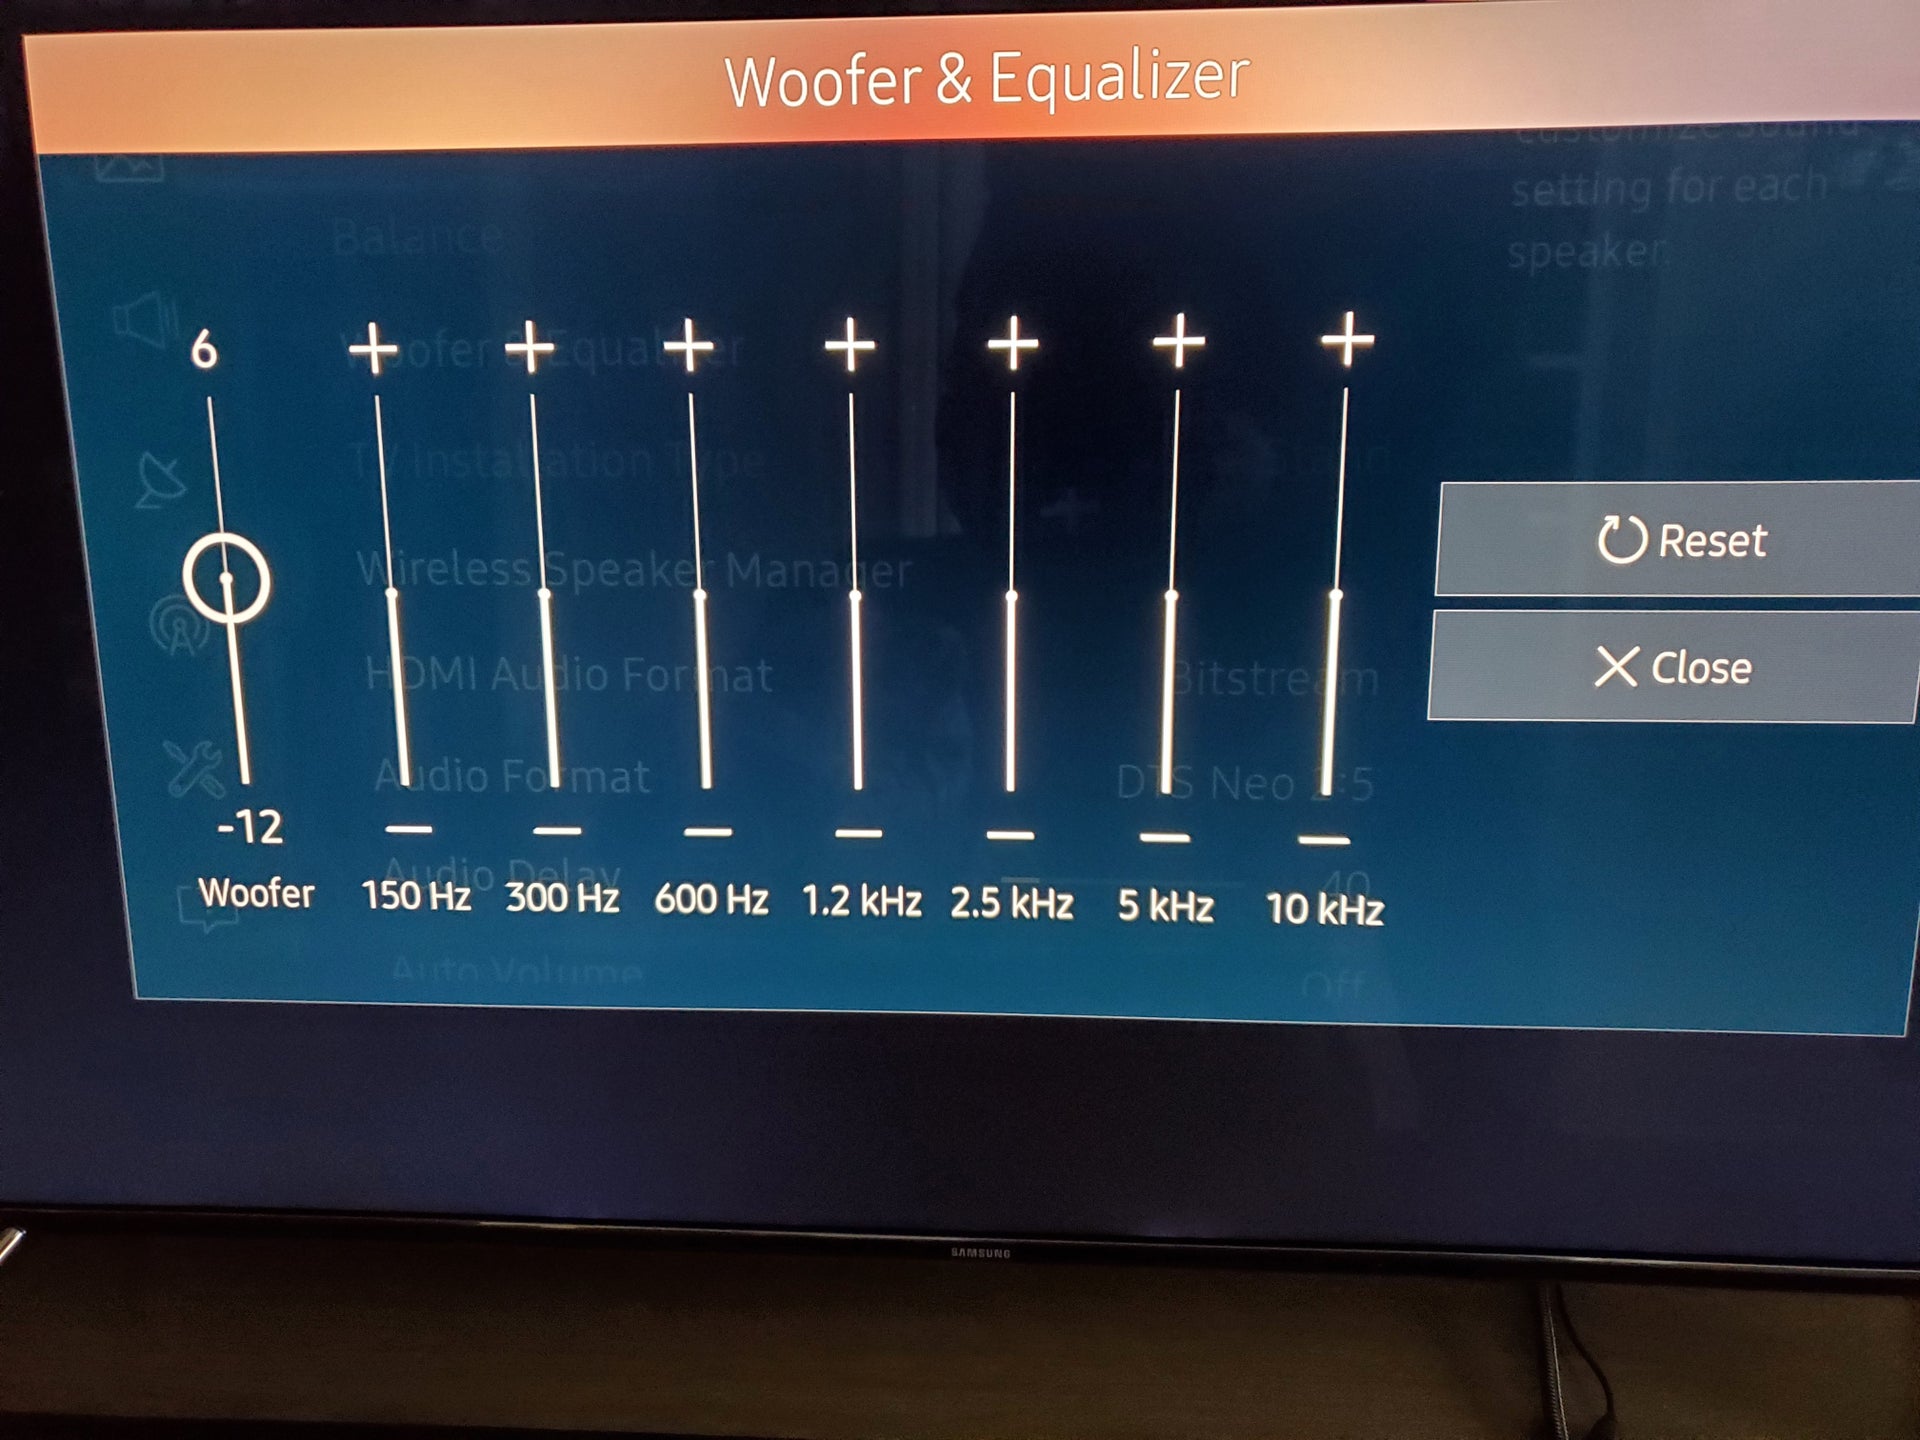
1. Use the sound bar remote control to access the settings menu. Look for options such as sound modes, equalizer settings, and audio enhancements. These settings allow you to customize the sound output according to your preferences.
2. Experiment with different sound modes to find the one that best suits the content you’re watching. Common sound modes include movie mode, music mode, and dialogue mode. Each mode emphasizes different audio elements to enhance the overall experience.
3. Adjust the equalizer settings to fine-tune the audio output. This allows you to boost or reduce specific frequencies like bass, treble, or mid-range. Play around with the settings to achieve the desired sound signature.
4. If your sound bar has additional audio enhancements like virtual surround sound or 3D audio, enable them to create a more immersive audio experience. These features can simulate a wider soundstage and add depth to the audio.
5. Some sound bars have smart features, such as built-in voice assistants or compatibility with voice control platforms like Alexa or Google Assistant. Set up these features according to the manufacturer’s instructions to enhance your sound bar’s functionality.
6. If your sound bar supports Bluetooth or Wi-Fi connectivity, you can connect your smartphone or other audio devices wirelessly. This allows you to stream music or play audio directly through the sound bar, expanding its versatility beyond TV audio.
7. Don’t forget to adjust the volume levels of your sound bar to a comfortable level. Some sound bars offer independent volume control for subwoofers and satellite speakers if you have them connected.
Remember, the specific settings and adjustments will vary depending on your sound bar model. It’s always a good idea to refer to the user manual for detailed instructions and any additional features specific to your sound bar.
Once you have configured the sound bar settings, it’s time to move on to the next step: connecting additional audio devices.
Step 5: Connecting additional audio devices
In addition to connecting your sound bar to your TV, you may have other audio devices that you want to connect for an enhanced audio experience. Whether it’s a gaming console, Blu-ray player, or music streaming device, here’s how you can connect them to your sound bar:
1. Identify the available input ports on your sound bar. Most sound bars have multiple input options, such as HDMI, optical, and auxiliary ports.
2. Determine the output options of your audio devices. Check if they have compatible audio output ports that match the inputs on your sound bar. The most common ones are HDMI, optical, or auxiliary ports.
3. Connect an audio cable (HDMI, optical, or auxiliary) from the audio output port of your audio device to the corresponding input port on your sound bar.
4. If you have multiple devices to connect, consider using an HDMI switcher or audio switcher device to expand the number of available input ports on your sound bar. This allows you to connect multiple devices and switch between them conveniently.
5. Turn on both your sound bar and the connected audio device. Ensure that the sound bar is set to the correct input/source corresponding to the connected device.
6. Test the audio output by playing content on the connected device. You should now be able to hear the sound coming through your sound bar, providing a seamless and immersive audio experience.
Remember to refer to the user manuals of your audio devices and sound bar for any specific instructions or troubleshooting tips regarding the connection process. Each device may have its own settings that need to be adjusted accordingly.
Once you have successfully connected additional audio devices to your sound bar, you can move on to the next step: testing the sound bar.
Step 6: Testing the sound bar
After setting up and connecting your sound bar, it’s important to test its performance to ensure everything is working properly. Here are some steps to follow when testing your sound bar:
1. Play varied content: Test your sound bar with different types of audio content, such as movies, music, and TV shows. This will allow you to evaluate its performance across different sound frequencies and adjust settings if necessary.
2. Listen for audio clarity: Pay attention to how clear the dialogue and audio effects sound. If the dialogue is difficult to hear or the audio feels muffled, you may need to adjust the sound bar settings or positioning.
3. Test surround sound capabilities: If your sound bar has virtual surround sound or other audio technologies, play content that is optimized for surround sound. Listen for a more immersive audio experience and check if the sound is properly distributed throughout the room.
4. Adjust volume and balance: Experiment with different volume levels to find the right balance. Make sure that the sound is loud enough without being distorted or too overpowering. If you have satellite speakers or a subwoofer connected, adjust their volume levels to achieve a balanced soundstage.
5. Test connectivity options: If you have connected additional audio devices to your sound bar, test their functionality. Ensure that the sound bar can seamlessly switch between different devices and that the audio quality remains consistent.
6. Evaluate audio synchronization: Check if the audio is in sync with the video. If there is a noticeable delay, adjust the audio delay settings on your sound bar or TV to eliminate the lag.
7. Pay attention to any issues or abnormalities: If you encounter any audio dropouts, distortion, or other abnormalities, refer to the troubleshooting section in the user manual or contact the manufacturer for assistance.
By thoroughly testing your sound bar, you can ensure that it is producing the desired audio quality and fulfilling your expectations. Don’t hesitate to make adjustments and fine-tune the settings to optimize your audio experience.
Once you are satisfied with the performance of your sound bar, you can move on to the final step: troubleshooting common issues.
Step 7: Troubleshooting common issues
While setting up and using your sound bar, you may encounter common issues that can affect the audio performance. Knowing how to troubleshoot these problems can help you quickly resolve them. Here are some common issues and possible solutions:
1. No sound or low volume: If you’re not hearing any sound or the volume is too low, check the audio connections to ensure they are securely plugged into the correct ports on both the sound bar and the TV. Also, check the volume level on both the TV and the sound bar and make sure it is set appropriately.
2. Audio delay or sync issues: If you notice a delay between the audio and video, adjust the audio delay settings on your sound bar or TV to synchronize them. Refer to the user manual for specific instructions on how to adjust the audio delay.
3. Audio distortion or buzzing sound: Distorted or buzzing sound can be caused by a faulty audio cable or an incompatible audio format. Try using a different audio cable or adjusting the audio format settings on your TV or sound bar until the distortion is eliminated.
4. Remote control issues: If you’re experiencing difficulties with the sound bar remote control, check the battery level and replace them if necessary. If the remote control is not responsive, ensure that there are no obstructions between the remote and the sound bar. You may also need to reset or re-pair the remote according to the manufacturer’s instructions.
5. Subwoofer connectivity problems: If you have a wireless subwoofer and it’s not connecting to the sound bar, ensure that both the subwoofer and sound bar are powered on and within range of each other. Follow the specific pairing instructions provided by the manufacturer to establish a connection.
6. Sound bar not turning on or losing power: If your sound bar is not turning on or losing power unexpectedly, ensure that the power cable is securely plugged into an electrical outlet. Check the power supply and verify that it meets the requirements specified by the manufacturer. If the issue persists, contact customer support for further assistance.
7. Bluetooth or Wi-Fi connectivity issues: If you’re having trouble connecting your devices via Bluetooth or Wi-Fi, ensure that both the sound bar and the device you’re trying to connect are in pairing mode. Also, check if there are any software updates available for your sound bar that could improve connectivity.
If you have tried the suggested troubleshooting steps and are still experiencing issues, it’s recommended to consult the user manual or contact the manufacturer’s customer support for further assistance. They will be able to provide you with more specific troubleshooting steps based on your sound bar model.
Congratulations! By following this comprehensive guide, you have successfully set up your sound bar, connected it to your TV, configured the settings, and troubleshooted common issues. Now, sit back, relax, and enjoy an enhanced audio experience with your new sound bar!
Should you encounter any questions or need further assistance, feel free to refer back to this guide or seek support from professionals in the field.
Conclusion
Setting up a sound bar doesn’t have to be a daunting task. With the step-by-step guide provided in this article, you can easily unbox, connect, configure, and troubleshoot your sound bar to achieve an immersive audio experience.
We started by unboxing and inspecting the sound bar, ensuring all components were in good condition. Then, we moved on to finding a suitable location for the sound bar, considering room layout and acoustics. The next steps involved connecting the sound bar to the TV, configuring the sound bar settings, and connecting additional audio devices for a more versatile setup.
Once everything was connected, we emphasized the importance of testing the sound bar, playing different types of content, and adjusting settings to achieve optimal audio performance. And for the instances when things don’t go as planned, we provided troubleshooting tips for common issues that may arise during the setup process.
By following this guide, you can now enjoy enhanced sound quality and an immersive audio experience when watching movies, playing games, or listening to music. The sound bar serves as a convenient and affordable solution to elevate your entertainment system, creating a more immersive and satisfying audio experience.
Remember, while this guide provides a general overview of the setup process, it’s important to consult the user manual specific to your sound bar model for any additional instructions or troubleshooting tips.
Now, sit back, relax, and immerse yourself in the rich and enhanced audio that your sound bar provides. Enjoy a truly cinematic experience from the comfort of your own home!