Home>Production & Technology>Stereo>How To Install Chevy Colorado Custom Stereo
Stereo
How To Install Chevy Colorado Custom Stereo
Modified: January 22, 2024
Learn how to install a custom stereo in your Chevy Colorado and enhance your audio experience. Upgrade your car's sound system with ease.
(Many of the links in this article redirect to a specific reviewed product. Your purchase of these products through affiliate links helps to generate commission for AudioLover.com, at no extra cost. Learn more)
Table of Contents
- Introduction
- Step 1: Gather Necessary Tools and Materials
- Step 2: Disconnect the Battery
- Step 3: Remove the Dashboard Trim
- Step 4: Remove the Factory Stereo Unit
- Step 5: Prepare the Wiring Harness
- Step 6: Connect the Wiring Harness and Antenna Adapter
- Step 7: Mount the Custom Stereo Unit
- Step 8: Test the Stereo and Make Adjustments
- Step 9: Reinstall the Dashboard Trim
- Step 10: Reconnect the Battery
- Conclusion
Introduction
Welcome to the world of customized car audio! If you’re a proud owner of a Chevy Colorado and you’re looking to upgrade your stereo system, you’ve come to the right place. Installing a custom stereo in your truck can dramatically enhance your audio experience and give you access to a wide range of features and functionalities.
This step-by-step guide will walk you through the process of installing a custom stereo in your Chevy Colorado. Whether you’re a DIY enthusiast or a car audio beginner, this article will provide you with all the information you need to successfully complete the installation.
Upgrading your stereo system has several benefits. Not only will you enjoy improved sound quality, but you’ll also have access to additional features like Bluetooth connectivity, USB ports, touchscreen displays, and compatibility with various audio formats.
Before we dive into the installation process, it’s important to gather the necessary tools and materials. This ensures that you have everything you need on hand and makes the process smoother and more efficient.
Step 1: Gather Necessary Tools and Materials
Before you begin the installation process, it’s essential to gather all the tools and materials you’ll need. Here’s a comprehensive list of what you’ll require:
- Custom stereo unit: Choose a stereo that is compatible with your Chevy Colorado and meets your audio preferences.
- Mounting kit: This kit will help secure the new stereo in your truck’s dashboard.
- Wiring harness: The wiring harness serves as a connector between the new stereo unit and the vehicle’s electrical system.
- Antenna adapter: An antenna adapter is necessary to ensure proper functioning of the radio.
- Trim removal tools: These tools are essential for safely removing the dashboard trim without causing any damage.
- Socket wrench set: You’ll need a socket wrench set to remove any bolts or screws holding the factory stereo in place.
- Wire strippers: Wire strippers are necessary for removing insulation from the wiring harness.
- Electrical tape: Electrical tape is used to secure and insulate the connections.
- Zip ties: Zip ties help organize and secure the wiring behind the stereo unit.
- Trim panel tool: A trim panel tool will assist you in removing the dashboard trim without scratching or damaging it.
It’s important to have all the necessary tools and materials before you start the installation process. This way, you can avoid interruptions and complete the task efficiently.
Step 2: Disconnect the Battery
Before you begin working on your Chevy Colorado’s stereo system, it’s important to disconnect the battery to prevent any electrical mishaps. Here’s how to do it:
- Park your truck in a safe and well-ventilated area away from any flammable materials.
- Open the hood of your truck and locate the battery.
- Use a wrench to loosen the nut on the negative terminal (-) of the battery.
- Once the nut is loosened, carefully lift the negative terminal clamp off the battery post. Make sure the clamp is away from the post to prevent accidental contact.
- Repeat the same process for the positive terminal (+) of the battery.
- After both terminals are disconnected, secure the clamps away from the battery posts to avoid any accidental reconnection.
By disconnecting the battery, you eliminate the risk of electrical shock or damage to your truck’s electrical system while working on the stereo installation. It’s essential not to skip this step to ensure your safety.
Step 3: Remove the Dashboard Trim
Now that you’ve disconnected the battery, it’s time to remove the dashboard trim to gain access to the stereo unit. Follow these steps:
- Start by identifying the clips and screws that secure the dashboard trim. Depending on your Chevy Colorado model, there may be screws hidden behind covers or located in various places.
- Use a trim panel tool or a flathead screwdriver wrapped in a cloth to avoid scratches, and gently pry around the edges of the dashboard trim to release the clips.
- Continue working your way around the trim until all the clips are released, and then carefully remove the trim piece.
- Store the trim piece in a safe place to prevent damage.
It’s important to be gentle when removing the dashboard trim to avoid any breakage or damage. Take your time and exercise patience throughout this process to ensure a successful installation.
Step 4: Remove the Factory Stereo Unit
With the dashboard trim removed, it’s time to remove the factory stereo unit from your Chevy Colorado. Follow these steps:
- Locate the screws or bolts that hold the stereo unit in place. These may be visible or hidden behind the dash panel.
- Using a socket wrench or a screwdriver, remove the screws or bolts securing the stereo unit.
- Gently pull the stereo unit out of the dashboard, being mindful of any connected wires or cables.
- Disconnect the wiring harness and antenna cable from the back of the factory stereo unit.
It’s important to handle the factory stereo unit with care to avoid any damage. Be cautious while disconnecting the wiring harness and antenna cable to prevent any accidental pulling or bending of the wires.
Once the factory stereo unit is removed, set it aside in a safe place. You’ll need it in case you want to revert to the original system or if you plan to sell or trade your vehicle in the future.
Step 5: Prepare the Wiring Harness
With the factory stereo unit removed, it’s time to prepare the wiring harness for the installation of the new custom stereo. Follow these steps:
- Start by identifying the wiring harness that matches your Chevy Colorado’s make and model. This harness will serve as the connection between the vehicle’s electrical system and the new stereo unit.
- Match the wire colors on the wiring harness with the corresponding wire colors on the new stereo unit. This ensures proper connectivity and functionality.
- Strip a small portion of insulation from each wire end using wire strippers. This will expose the bare wire for a secure connection.
- Twist the exposed wires on the wiring harness with the wires on the stereo unit and cover each connection with electrical tape. This provides extra protection and prevents any short circuits.
It’s crucial to double-check the wiring connections to ensure accuracy and prevent any potential problems. Refer to the wiring diagrams provided with the new stereo unit or consult an installation guide if needed.
Preparing the wiring harness is an essential step in the installation process as it establishes the proper connections between the vehicle’s electrical system and the new stereo unit. Taking the time to accurately match and secure the wires will ensure a successful installation and optimal performance of your custom stereo.
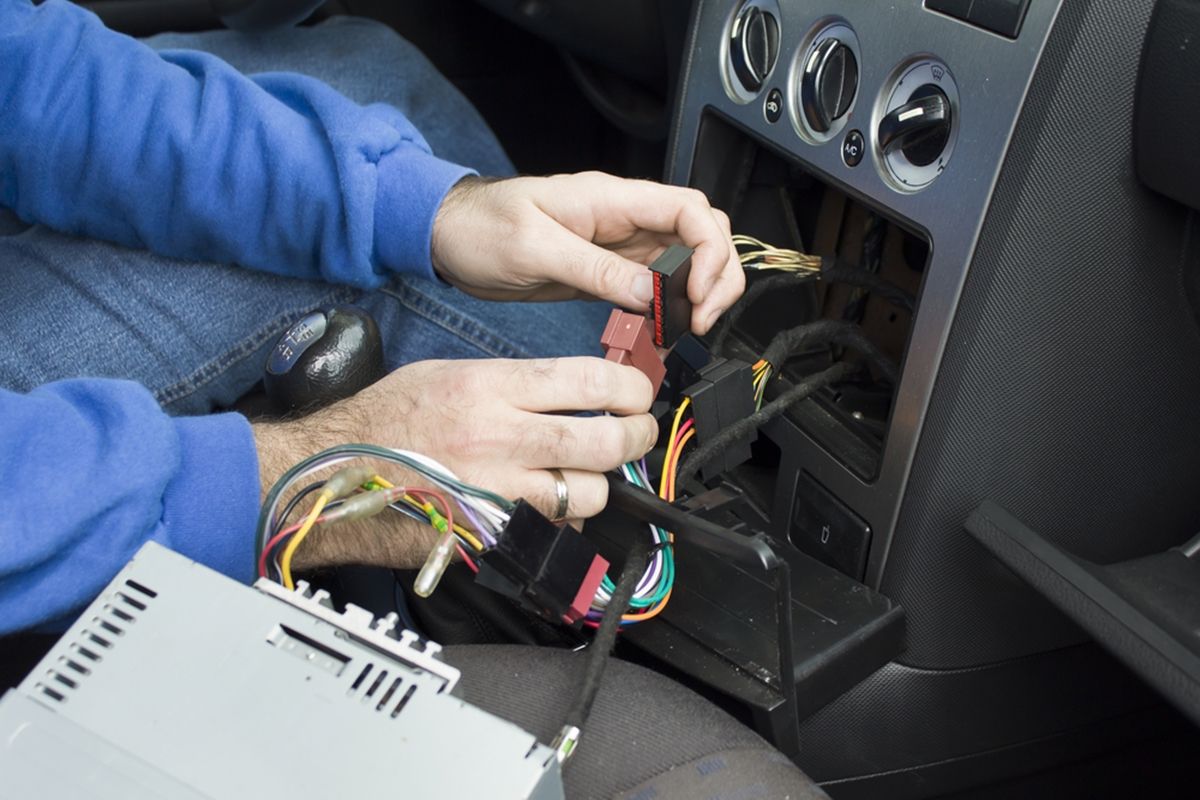
Step 6: Connect the Wiring Harness and Antenna Adapter
Now that the wiring harness has been prepared, it’s time to connect it to the new stereo unit along with the antenna adapter. Follow these steps:
- Locate the wiring harness on the back of the new stereo unit and the corresponding wiring harness connector from your Chevy Colorado.
- Connect the wiring harnesses together by matching the wire colors on both ends. Ensure that the connections are secure and tightly fastened.
- Connect the antenna adapter to the antenna cable coming from your vehicle. This adapter allows the new stereo unit to receive radio signals.
- Secure all the connections by using electrical tape or heat-shrink tubing to insulate the connections and prevent any potential electrical shorts.
It’s crucial to check the connections to ensure they are properly aligned and secure. Loose or faulty connections can result in audio malfunctions or loss of functionality.
Connecting the wiring harness and antenna adapter is a critical step in the installation process. It establishes the necessary electrical connections between the vehicle and the new stereo unit, allowing for seamless integration and functionality.
Step 7: Mount the Custom Stereo Unit
With the wiring harness and antenna adapter connected, it’s time to mount the custom stereo unit in your Chevy Colorado’s dashboard. Follow these steps:
- Take the mounting kit that came with your new stereo unit and position it in the empty stereo slot.
- Align the screw holes on the mounting kit with the corresponding holes in the dashboard.
- Insert the screws provided with the mounting kit through the holes and tighten them using a screwdriver or socket wrench.
- Gently slide the custom stereo unit into the mounting kit until it is securely in place.
- Ensure that the stereo unit is level and flush with the dashboard.
It’s important to follow the manufacturer’s instructions and guidelines when mounting the custom stereo unit. Each stereo unit may have specific mounting requirements, so refer to the user manual if needed.
Once the custom stereo unit is securely mounted in the dashboard, give it a gentle tug to ensure it is firmly in place. A properly mounted stereo unit will provide stability and prevent any vibrations or movement during vehicle operation.
Step 8: Test the Stereo and Make Adjustments
After successfully mounting the custom stereo unit in your Chevy Colorado, it’s time to test it and make any necessary adjustments. Follow these steps:
- Reconnect the negative and positive battery terminals. Use a wrench to tighten the nuts securely.
- Turn on your truck’s ignition to power up the stereo unit.
- Test the basic functionality of the stereo, including audio playback, radio reception, and any additional features or settings.
- Ensure that the sound is clear and adjust the volume accordingly.
- If the stereo unit has any display or touchscreen, test its responsiveness and make sure all buttons and controls are fully functional.
- If any adjustments are needed, consult the user manual of the custom stereo unit to learn how to access and modify settings.
It’s important to thoroughly test the stereo unit to ensure that all features and functions are working properly. Take note of any issues or abnormalities and address them accordingly.
During the testing phase, pay attention to the sound quality and make any necessary adjustments to the equalizer settings or audio balance to suit your preferences.
If you encounter any difficulties or technical issues, consult the user manual or reach out to the manufacturer or a professional car audio technician for assistance.
Step 9: Reinstall the Dashboard Trim
With the custom stereo unit tested and adjusted, it’s time to reinstall the dashboard trim in your Chevy Colorado. Follow these steps:
- Retrieve the dashboard trim piece that was removed earlier in the installation process.
- Carefully align the trim piece with the openings in the dashboard.
- Gently press and secure the trim piece to snap it back into place. Make sure all the clips are properly aligned.
- Go around the trim piece and ensure that it is securely attached without any loose edges.
It’s important to be gentle when reinstalling the dashboard trim to avoid any breakage or damage. Take your time to align the trim piece properly and ensure that all clips are securely fastened.
Once the dashboard trim is back in place, check its fit and appearance to ensure that it is aligned correctly and looks seamless.
Reinstalling the dashboard trim not only gives your Chevy Colorado a finished and polished look, but it also protects the internal components and provides a cohesive aesthetic.
Step 10: Reconnect the Battery
After successfully reinstalling the dashboard trim, it’s time to reconnect the battery in your Chevy Colorado. Follow these steps:
- Double-check that all connections, including the wiring harness and antenna adapter, are securely in place.
- Take the negative battery terminal clamp and position it over the negative battery post.
- Tighten the nut on the negative terminal clamp using a wrench. Ensure that it is snugly secured, but do not overtighten.
- Repeat the same process for the positive battery terminal clamp, ensuring a tight connection.
Reconnecting the battery allows the electrical system in your Chevy Colorado to receive power again, enabling the proper functionality of the stereo unit and other vehicle components.
Before moving on, turn on your truck’s ignition and test the stereo unit one final time to confirm that it is still functioning correctly after reconnecting the battery.
If everything is working as expected, congratulations! You have successfully installed and connected a custom stereo in your Chevy Colorado.
It’s important to note that some stereo units may require additional setup or programming. Refer to the user manual or consult the manufacturer’s instructions if you encounter any specific requirements.
Conclusion
Congratulations on successfully installing a custom stereo in your Chevy Colorado! By following the step-by-step guide in this article, you have upgraded your audio system and unlocked a world of enhanced sound quality and advanced features.
The installation process may have required some time and patience, but the end result is well worth it. Your new custom stereo unit will provide you with improved audio capabilities, including options like Bluetooth connectivity for hands-free calling and music streaming, USB ports for charging and playing media, and advanced equalizer settings to personalize your listening experience.
Remember, when working with car audio installations, it’s important to gather the necessary tools and materials, disconnect the battery, remove the dashboard trim, uninstall the factory stereo unit, prepare the wiring harness, connect the wiring harness and antenna adapter, mount the custom stereo unit, test the stereo and make adjustments, reinstall the dashboard trim, and finally, reconnect the battery.
Always consult the user manuals provided by the manufacturer of your custom stereo unit and any additional installation instructions specific to your Chevy Colorado model. If you encounter any difficulties or prefer professional assistance, don’t hesitate to seek help from a car audio specialist.
With your newly installed custom stereo, you can now enjoy a heightened audio experience every time you hit the road in your Chevy Colorado. Whether you’re embarking on a road trip or commuting to work, your favorite music, podcasts, and audio content will accompany you on your journey, creating a more enjoyable and immersive ride.