Home>Production & Technology>Treble>How To Install A Treble Bleed Kit
Treble
How To Install A Treble Bleed Kit
Modified: February 15, 2024
Learn how to install a treble bleed kit and improve your guitar's tone. Prevent loss of high-frequency details with this simple DIY guide.
(Many of the links in this article redirect to a specific reviewed product. Your purchase of these products through affiliate links helps to generate commission for AudioLover.com, at no extra cost. Learn more)
Table of Contents
Introduction
When it comes to achieving the perfect tone on your electric guitar, one crucial factor is often overlooked: the treble response. The treble frequencies play a vital role in adding clarity and definition to your sound. However, as you roll back the volume knob on your guitar, you may notice a loss of treble and a muddiness creeping into your tone. This is due to a phenomenon known as “treble bleed.”
In simple terms, treble bleed refers to the loss of high-frequency signals as you decrease the volume on your guitar. The result is a duller sound that lacks sparkle and definition. This is where a treble bleed kit comes into play: a simple and effective solution to retain the treble frequencies even at lower volume settings.
A treble bleed kit consists of a few electronic components that are installed on your guitar’s volume potentiometer. Its primary purpose is to preserve the high-end frequencies, ensuring a consistent and clear tone regardless of how much you decrease the volume.
In this article, we’ll dive into the details of treble bleed kits, their importance, and guide you through the step-by-step process of installing one on your guitar. Whether you’re a seasoned guitarist or a DIY enthusiast looking to enhance your instrument’s performance, this article will provide you with the knowledge and skills needed to install a treble bleed circuit and regain control over your guitar’s treble response.
What is a Treble Bleed Kit?
A treble bleed kit is a collection of electronic components that can be installed on your guitar’s volume potentiometer. Its purpose is to prevent the loss of high frequencies or treble when you roll back the volume knob. By adding a treble bleed circuit, you can retain the clarity and brightness of your sound even at lower volume settings.
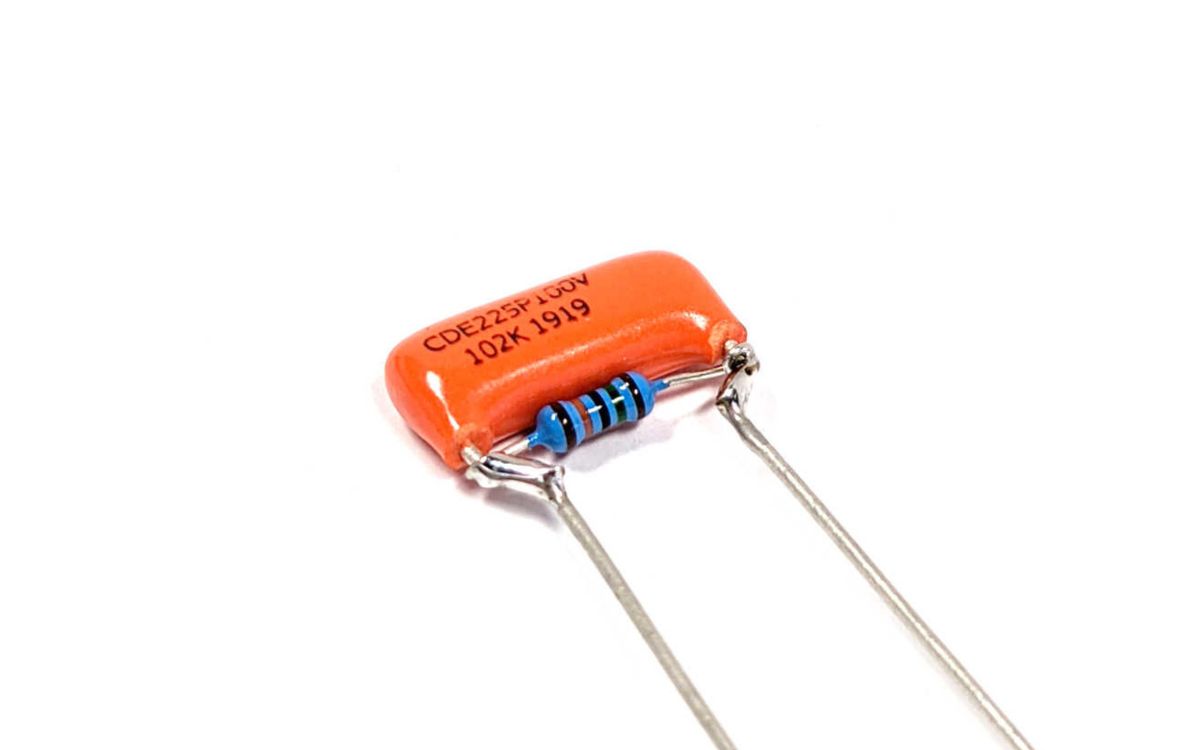
The treble bleed kit typically includes a resistor and a capacitor. These components work together to allow high frequencies to pass through the circuit while reducing the impact of the volume control on the treble response. Essentially, the treble bleed circuit creates a parallel path for treble frequencies, ensuring they remain present and audible when the volume is reduced.
The resistor in the treble bleed kit is responsible for limiting the amount of treble that bypasses the volume control. It helps maintain a balance between the high and low frequencies in your guitar’s signal, preventing the treble frequencies from overpowering the rest of the tonal range.
On the other hand, the capacitor in the treble bleed kit helps to filter out any unwanted frequencies from the treble bleed circuit. It ensures that only the desired treble frequencies are passed through, while attenuating any potential noise or interference that may be present in the signal.
It’s important to note that treble bleed kits are not a one-size-fits-all solution. Different kits may have varying resistor and capacitor values, allowing you to customize the treble bleed circuit to suit your specific preferences. Finding the right combination of values can help you achieve the desired balance between volume control and treble response, allowing you to retain the full tonal range of your guitar even at lower volumes.
Overall, a treble bleed kit is a valuable addition to any electric guitar. It provides a simple and effective way to retain clarity, definition, and brightness in your tone, regardless of how much you roll back the volume knob. Now that you understand the basics of what a treble bleed kit is, let’s explore why installing one is beneficial for your guitar’s overall performance.
Why Should You Install a Treble Bleed Kit?
Installing a treble bleed kit on your guitar offers several significant advantages that enhance your playing experience and allow for better tonal control. Here are some key reasons why you should consider installing a treble bleed kit:
1. Maintains Clarity: One of the main benefits of a treble bleed kit is that it ensures the treble frequencies remain intact, even when you roll back the volume knob. This means that you won’t lose the clarity, brightness, and definition that high-end frequencies provide to your tone. Whether playing clean or with overdrive, a treble bleed circuit helps maintain the essential characteristics of your sound.
2. Retains Tonal Balance: When you decrease the volume on your guitar without a treble bleed circuit, you may notice a loss of not just treble, but also other frequencies. This can result in a muffled or muddy tone, as the overall tonal balance is disrupted. With a treble bleed kit, you can preserve the entire frequency range and maintain the proper balance between highs, mids, and lows, ensuring a consistent tonal quality regardless of volume level.
3. Smooth Volume Roll-off: Without a treble bleed circuit, rolling back the volume knob on your guitar can feel abrupt and uneven. The treble bleed kit smoothens out this transition, making volume adjustments more gradual and responsive. This allows for more precise control over your guitar’s dynamics and helps you achieve the desired tone, whether you’re playing softly or cranking up the volume.
4. Versatile Playing Experience: By installing a treble bleed kit, you expand the range of tones and dynamics available to you. With the ability to maintain treble frequencies at lower volumes, you can explore new playing techniques and styles without sacrificing clarity or losing the desired brightness in your sound. Whether you’re playing rhythm or lead, a treble bleed circuit gives you greater flexibility and versatility in shaping your tone.
5. Cost-Effective Solution: Compared to other guitar modifications or upgrades, installing a treble bleed kit is relatively affordable. It’s a cost-effective way to improve your guitar’s performance and enhance the overall sound quality. With a simple installation process and minimal investment, you can unlock the full potential of your instrument and optimize your playing experience.
With these advantages in mind, it’s clear why installing a treble bleed kit is a worthwhile endeavor for any guitarist who values control, clarity, and versatility in their tone. Now that you understand the benefits of a treble bleed kit, let’s move on to the tools and materials you’ll need to get started with the installation process.
Tools and Materials Needed
Before you embark on installing a treble bleed kit on your guitar, it’s essential to gather the necessary tools and materials. Having the right equipment on hand will ensure a smooth and efficient installation process. Here is a list of the tools and materials you’ll need:
Tools:
- Screwdriver Set: A set of screwdrivers, both flathead and Phillips, will be essential for removing the pickguard or control plate on your guitar.
- Soldering Iron: A soldering iron is necessary for soldering the treble bleed components onto the potentiometer of your guitar.
- Solder: High-quality solder is required to create a secure and reliable connection between the treble bleed components and the potentiometer.
- Wire Cutters: Wire cutters will come in handy for trimming excess wire and ensuring clean, precise connections.
- Wire Strippers: Wire strippers are used to remove the insulation from the wires, making them ready for soldering.
- Electrical Tape: Electrical tape is useful for insulating and protecting soldered connections from electrical interference and potential short circuits.
Materials:
- Treble Bleed Kit: Purchase a treble bleed kit that includes a resistor and a capacitor. The values of these components may vary, so choose a kit that suits your tonal preferences.
- Potentiometer: Depending on the condition of your current potentiometer, you may choose to replace it with a new one. It’s a good opportunity to upgrade to a higher-quality potentiometer if desired.
- Wire: You’ll need wire to connect the components of the treble bleed kit to the potentiometer. Use insulated wire with an appropriate gauge for a secure and reliable connection.
- Heat Shrink Tubing (optional): Heat shrink tubing is useful for providing an additional layer of insulation and protection to soldered connections.
With these tools and materials at your disposal, you’ll be well-prepared to install a treble bleed kit on your guitar. Before starting the installation process, make sure you have a clear workspace, good lighting, and a basic understanding of soldering techniques. Now that you’re ready to proceed, let’s move on to the step-by-step guide for installing a treble bleed kit on your guitar.
Step 1: Gathering the Necessary Parts
Before diving into the installation process, it’s crucial to gather all the necessary parts for installing a treble bleed kit on your guitar. Here’s a step-by-step guide on how to gather the required parts:
- Identify the Potentiometer: First, determine the type and value of the volume potentiometer in your guitar. This information is usually printed or stamped on the potentiometer housing. Common potentiometer values include 250k and 500k. Knowing the potentiometer value will help you choose a treble bleed kit with the appropriate resistor and capacitor values.
- Purchase the Treble Bleed Kit: Look for a treble bleed kit that matches the potentiometer value in your guitar. The kit should include the necessary components, such as a resistor and a capacitor, that are compatible with your potentiometer. Consult with a knowledgeable guitar technician or do some research to ensure the components in the kit are suitable for your specific guitar’s electronics.
- Consider Upgrading the Potentiometer (optional): While not necessary, you might want to take this opportunity to upgrade your potentiometer. Higher-quality potentiometers can potentially enhance your guitar’s overall performance and longevity. Look for potentiometers from reputable brands known for their durability and smooth taper.
- Check for Additional Required Components: Depending on the treble bleed kit and your guitar’s setup, you may need additional components such as wire, heat shrink tubing, and electrical tape for the installation. Make sure to acquire these materials in advance to avoid any delays during the installation process.
- Verify the Compatibility: Double-check that the treble bleed kit and any additional components you’ve gathered are compatible with your guitar’s electronics and the potentiometer. Ensure that the resistor and capacitor values in the treble bleed kit are suitable for your desired treble response and tonal preferences.
By following these steps, you’ll ensure that you have all the necessary parts and components for installing a treble bleed kit on your guitar. Taking the time to gather the proper materials beforehand will make the installation process smoother and more efficient. Now that you’re equipped with the necessary parts, let’s proceed to the next step: preparing the guitar for installation.
Step 2: Preparing the Guitar
Before you can begin installing a treble bleed kit on your guitar, it’s important to properly prepare the instrument. This step involves removing any necessary components and ensuring a clean and organized work area. Follow these steps to prepare your guitar for the treble bleed kit installation:
- Gather the Necessary Tools: Before starting the preparation process, make sure you have all the required tools and materials within reach. This includes screwdrivers, wire cutters, wire strippers, soldering iron, solder, and any other tools you might need for the installation.
- Create a Workspace: Find a well-lit, comfortable, and spacious area to work on your guitar. Lay down a soft cloth or blanket to protect the guitar’s finish from scratches or dings during the process.
- Loosen the Strings: Begin by loosening the strings of your guitar. This will make it easier to access the components and perform the necessary work without the tension of tightened strings getting in the way.
- Remove the Pickguard or Control Plate: Depending on the guitar model, you’ll need to remove the pickguard or control plate to access the internal electronics. Use the appropriate screwdriver to carefully remove the screws securing the pickguard or control plate. Keep track of the screws to ensure you can put everything back together correctly later.
- Document Wiring Connections: Take photos or make diagrams of the existing wiring connections before disconnecting anything. This will act as a reference for reassembling the guitar correctly later on. Pay attention to the connections of the volume potentiometer and any other relevant components.
- Unsolder Existing Wires: Using a soldering iron, desolder and disconnect any wires connected to the volume potentiometer. Be careful not to apply excessive heat or force that could damage the potentiometer or other components.
- Label and Organize Wires: As you remove the wires, label them or take notes to remember which connections they belong to. This organization will be helpful during the reassembly process.
- Clean the Guitar Cavity: Take this opportunity to use a soft brush or cloth to remove any dust, debris, or excess solder from the guitar cavity. A clean cavity ensures better contact and easier installation of the treble bleed components.
By following these steps, you’ll have your guitar ready for the treble bleed kit installation. Taking the time to prepare the guitar properly ensures a smooth installation process and reduces the risk of any damage or complications. Now that the guitar is prepared, we can move on to the next step: installing the treble bleed kit.
Step 3: Installing the Treble Bleed Kit
With the guitar prepared, it’s time to move on to installing the treble bleed kit. This step-by-step guide will walk you through the process of adding the treble bleed circuit to your guitar:
- Identify the Potentiometer Connections: Locate the volume potentiometer and identify its connections. The potentiometer will have three terminals: input, output, and ground. The input is where the signal comes in, the output is where the signal goes out, and the ground provides a reference point for the signal.
- Connect the Resistor and Capacitor: Take the resistor from the treble bleed kit and connect one leg to the output terminal of the potentiometer. Solder the connection securely. Next, take the capacitor and connect one leg to the input terminal of the potentiometer. Again, ensure a solid solder joint.
- Attach Wires: Cut two lengths of wire, one slightly longer than the distance between the resistor and capacitor, and the other long enough to reach the input terminal of the potentiometer. Strip both ends of the wires and solder one end of each wire to the other leg of the resistor and capacitor connections previously made.
- Connect the Wires: Solder the free end of the wire connected to the resistor to the input terminal of the potentiometer. Solder the free end of the wire connected to the capacitor to the ground terminal of the potentiometer.
- Insulate the Connections: If desired, slide heat shrink tubing over the soldered connections and use a heat source to shrink it down, providing insulation and added protection. Alternatively, you can wrap the connections with electrical tape to insulate them.
These steps outline the basic process of installing a treble bleed kit on your guitar. It’s essential to ensure that all connections are secure, with clean solder joints and proper insulation. Double-check your work to ensure there are no loose wires or exposed connections that could cause issues later on.
Once the treble bleed kit is installed and the connections are secure, you can proceed to the next step: testing the treble bleed circuit to ensure it’s functioning correctly.
Step 4: Testing the Treble Bleed Circuit
After installing the treble bleed kit, it’s crucial to test the circuit to ensure it’s functioning correctly and achieving the desired results. This step will help you verify that the treble frequencies are preserved when adjusting the volume knob. Follow these steps to test the treble bleed circuit:
- Reconnect the Volume Potentiometer: Begin by reconnecting the volume potentiometer and any other components that were previously disconnected during the preparation stage. Use the labeling or diagrams you created to ensure the wires are connected to the correct terminals.
- Tune the Guitar: Tune your guitar to your desired pitch to ensure accurate and consistent sound during the testing process.
- Set Amp and Guitar Controls: Adjust your amplifier’s settings to a neutral position, setting both the EQ and gain controls to unity (12 o’clock position). Keep the guitar’s tone controls at their middle positions as well.
- Play and Observe: Start playing your guitar and gradually roll back the volume knob while paying attention to the treble response. With a properly installed treble bleed kit, you should notice that the high-frequency content remains clear and present even at lower volume settings. The treble frequencies should be consistently audible, and there shouldn’t be any significant loss in clarity or brightness.
- Experiment with Different Settings: As you test the treble bleed circuit, feel free to experiment with different volume settings and adjust the guitar’s tone controls. Take note of any changes in the tone and make sure the treble frequencies are still well-defined and balanced throughout the volume range.
- Make Adjustments if Needed: If you find that the treble response is not to your liking or that there are any issues with the circuit, you may need to make adjustments. This can include changing the resistor or capacitor values, double-checking the solder connections, or seeking the assistance of a professional guitar technician for further troubleshooting.
By testing the treble bleed circuit, you can ensure that it’s functioning as intended and providing the desired results. If everything is working correctly, you can move on to the final step: reassembling the guitar.
Step 5: Reassembling the Guitar
After successfully installing and testing the treble bleed circuit, it’s time to reassemble your guitar. This final step will guide you through putting everything back together and restoring your instrument to its fully functional state. Follow these steps to reassemble your guitar:
- Secure Components: Start by carefully placing the pickguard or control plate back onto the guitar body. Use the screws you previously removed to secure it in place. Ensure that all components are properly aligned and seated before tightening the screws.
- Reattach the Strings: Begin reattaching the guitar strings and tuning them to the appropriate pitch. It’s crucial to ensure that the strings are properly secured and properly wound around the machine heads to avoid any tuning stability issues.
- Double-Check Wiring Connections: Before finalizing the reassembly, double-check all wiring connections to ensure they are securely connected and properly insulated. Verify that each wire is connected to the correct terminals and that there are no loose or exposed connections that could cause issues.
- Test Playability and Sound: Once the guitar is fully reassembled, take some time to test its playability and sound. Play different chords, scales, and techniques to ensure that everything feels and sounds as expected. Pay close attention to the treble response and listen for any abnormalities or inconsistencies in the tone.
- Make Final Adjustments: If you encounter any issues during the testing phase, make the necessary adjustments. This can include adjusting the action, intonation, or pickup height, or addressing any issues with the treble bleed circuit. Seek professional help if needed to ensure optimal performance.
By carefully reassembling your guitar, you’ll ensure that all components are secure and properly connected. Taking the time to verify the playability and sound quality reinforces the success of the treble bleed kit installation and allows you to fully enjoy the improved tonal control and clarity provided by the circuit.
Congratulations! You have successfully installed a treble bleed kit on your guitar and completed the reassembly process. Take some time to appreciate the improved functionality and tone of your instrument, and unleash your creativity with its enhanced sound. Remember, installing a treble bleed kit is a valuable modification that can greatly enhance your playing experience and give you greater control over your guitar’s tone.
If you’re unsure or uncomfortable with any steps mentioned in this guide, it’s always best to consult a professional guitar technician for assistance. They have the knowledge and experience to ensure a proper installation and can address any specific concerns or requirements for your particular guitar model.
Enjoy your newly upgraded guitar and have fun exploring the wider range of tonal possibilities it now offers!
Conclusion
Installing a treble bleed kit on your electric guitar is a worthwhile endeavor that can greatly enhance your playing experience and improve the overall tone of your instrument. By preserving the treble frequencies even at lower volume settings, a treble bleed circuit ensures that your sound remains clear, defined, and well-balanced.
Throughout this guide, we’ve explored the importance of treble bleed kits and provided a step-by-step process for installing one on your guitar. From gathering the necessary parts and preparing the guitar to installing the treble bleed circuit and testing its functionality, each step has contributed to upgrading your guitar’s performance.
By maintaining clarity, preserving tonal balance, and providing a smooth volume roll-off, a treble bleed kit offers versatility and control over your guitar’s tone. It allows you to explore a wider range of playing techniques and styles without losing treble response or sacrificing the desired brightness in your sound.
As you’ve learned, installing a treble bleed kit requires some basic knowledge of guitar electronics and soldering techniques. If you’re unsure or uncomfortable with any step, it’s always best to seek assistance from a professional guitar technician who can guide you through the process and ensure a proper installation.
By confidently following the steps outlined in this guide, you’ll be able to install a treble bleed kit on your guitar and enjoy the benefits of a more versatile and well-balanced tone. Remember to test and make any necessary adjustments, and always prioritize the safety and integrity of your instrument throughout the installation process.
Now that you have the knowledge and skills to install a treble bleed kit, go ahead and unleash your creativity with your newly upgraded guitar. Explore the full potential of your instrument and enjoy the improved control, clarity, and responsiveness that the treble bleed circuit brings to your playing.