Home>Devices & Equipment>Car Audio>How To Set Up Car Audio System
Car Audio
How To Set Up Car Audio System
Modified: February 18, 2024
Learn how to set up your car audio system with our step-by-step guide. Enhance your driving experience with quality sound and enjoy your favorite music on the go with our expert tips.
(Many of the links in this article redirect to a specific reviewed product. Your purchase of these products through affiliate links helps to generate commission for AudioLover.com, at no extra cost. Learn more)
Table of Contents
- Introduction
- Step 1: Choosing the Right Car Audio Components
- Step 2: Preparing the Car for Installation
- Step 3: Installing the Head Unit
- Step 4: Installing the Speakers
- Step 5: Installing the Amplifier
- Step 6: Wiring the Car Audio System
- Step 7: Testing and Adjusting the Audio System
- Step 8: Securing and Finishing the Installation
- Conclusion
Introduction
Welcome to the world of car audio! Whether you’re a music enthusiast or someone who enjoys a crisp, immersive sound experience while driving, creating the perfect car audio system can greatly enhance your driving pleasure. A well-designed car audio system can transform those mundane commutes into exhilarating journeys full of your favorite tunes.
Setting up a car audio system may seem daunting at first, especially if you don’t have much experience with car electronics. But fear not! With the right guidance and a bit of patience, you’ll be able to create a high-quality car audio system that will make every drive a memorable one.
In this comprehensive guide, we’ll walk you through the step-by-step process of setting up a car audio system. From choosing the right components to installing and fine-tuning the system, we’ll cover everything you need to know to create an exceptional sound experience in your vehicle.
Before we dive into the technical aspects, let’s go over some important factors to consider when setting up a car audio system. The three key components of a car audio system are the head unit, speakers, and amplifier. The head unit is the control center of your audio system, allowing you to select sources, adjust settings, and play your favorite music. The speakers are responsible for reproducing sound accurately and evenly throughout the car. And the amplifier boosts the signal from the head unit to provide enough power to the speakers.
Other considerations include the size of your vehicle, budget, and personal preferences. Different cars may require different installation methods and component sizes. Your budget will determine the quality and performance of the components you can afford. And your personal preferences, such as musical genres and audio quality expectations, will help shape the sound signature of your system.
Now that you have a basic understanding of what’s involved, let’s jump into the exciting world of car audio and explore how to create your own audio haven on wheels!
Step 1: Choosing the Right Car Audio Components
The first step in setting up a car audio system is selecting the right components. Choosing high-quality components that suit your needs and preferences will significantly impact the overall sound performance of your system. Here are the key components to consider:
- Head Unit: Also known as the car stereo or receiver, the head unit is the heart of your audio system. It provides the interface for controlling the audio sources, settings, and outputs. When choosing a head unit, look for features like Bluetooth connectivity, USB ports, CD/DVD playback capability, and compatibility with your smartphone.
- Speakers: Speakers play a crucial role in reproducing sound accurately and delivering an immersive listening experience. Consider the size and configuration of your car’s speaker slots before selecting the speakers. Coaxial speakers are a popular choice as they combine the woofer and tweeter in a single unit, while component speakers provide more flexibility with separate woofers and tweeters for better sound staging.
- Amplifier: An amplifier boosts the audio signal from the head unit, providing more power to the speakers. It enhances the overall volume and clarity of the sound. When choosing an amplifier, pay attention to its power rating, number of channels, and compatibility with your speakers. Additionally, consider whether you prefer a standalone amplifier or an all-in-one head unit with a built-in amplifier.
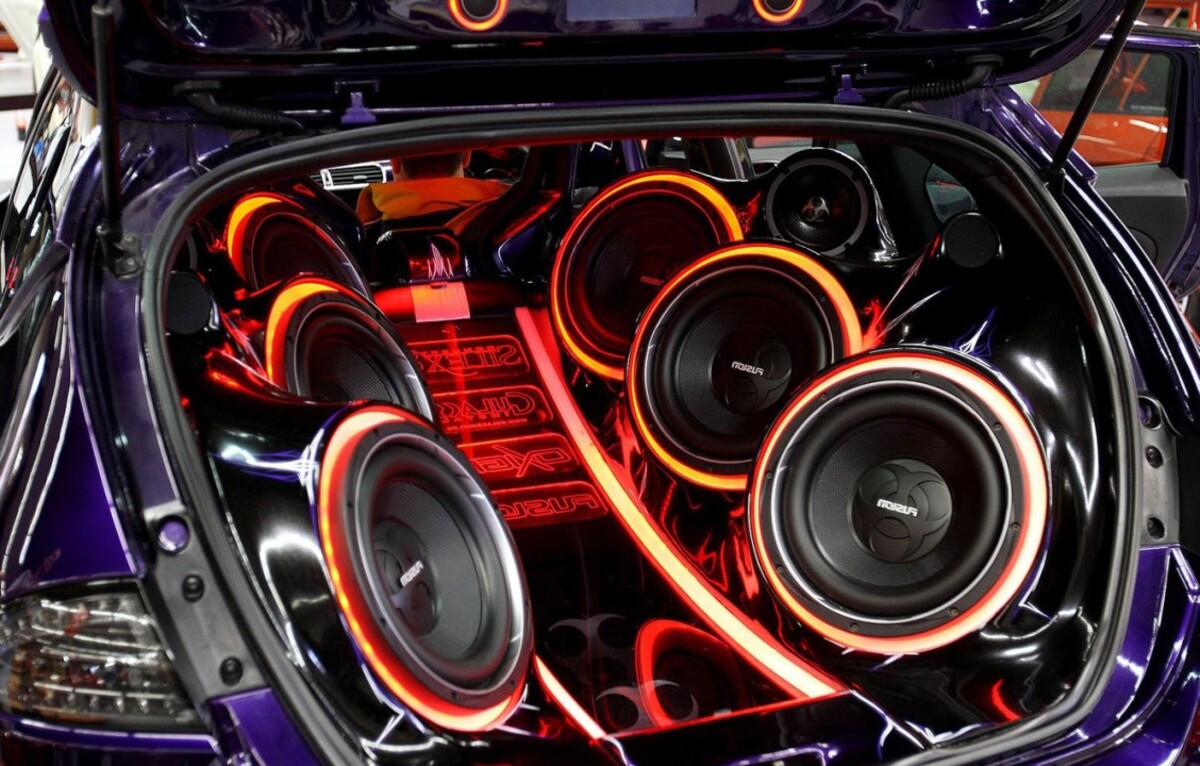
- Subwoofers: If you enjoy deep bass and want to add more impact to your music, consider adding a subwoofer to your car audio system. Subwoofers specialize in reproducing low-frequency sounds and can greatly enhance the overall audio experience. Pay attention to factors such as subwoofer size, power handling, and enclosure type when selecting a subwoofer.
- Sound Deadening Materials: To minimize road noise and vibrations that can negatively impact audio quality, consider using sound deadening materials. These materials, such as foam insulation or mass-loaded vinyl, can be applied to the car doors, floor, and trunk to create a quieter and more controlled listening environment.
When selecting car audio components, it’s essential to consider your budget, as prices can vary significantly. Determine your priorities and allocate your budget accordingly. It’s also a good idea to listen to different audio setups to understand the sound signature they offer and ensure they align with your preferences.
Now that you have a better understanding of the key components involved, you can begin researching and comparing different brands and models. Read reviews, check specifications, and consult with car audio experts to make informed decisions.
Step 2: Preparing the Car for Installation
Before you can begin installing your car audio components, it’s important to prepare your car to ensure a smooth and successful installation process. Taking the time to prepare your vehicle will help minimize any potential issues and ensure that your new audio system is installed securely and functions optimally. Here are some steps to follow:
- Gather the necessary tools: Before getting started, make sure you have all the necessary tools within reach. Common tools for car audio installation include screwdrivers, wire cutters, electrical tape, a wire stripper, panel removal tools, and zip ties. It’s also a good idea to have a voltmeter or a test light for checking the car’s electrical connections.
- Disconnect the battery: To ensure your safety and prevent any accidental electrical shorts, disconnect the negative battery terminal. This will eliminate the risk of causing damage to your vehicle’s electrical system during installation.
- Plan the layout: Determine the ideal locations for mounting the head unit, speakers, and amplifier. Consider factors such as accessibility, visibility, and compatibility with your car’s interior. Take measurements and mark the areas where you’ll be installing the components.
- Remove existing components (if applicable): If you’re replacing an existing audio system, such as a factory-installed unit, remove it carefully. Refer to the car’s user manual or seek guidance from online resources for specific instructions on removing the old components. Take note of any wiring connections that need to be disconnected.
- Prepare wiring harnesses: Wiring harnesses are essential for connecting the head unit to the car’s electrical system. Purchase the appropriate harnesses for your specific car make and model, as well as for the chosen head unit. Follow the manufacturer’s instructions to connect the wiring harnesses correctly.
- Identify and route wiring paths: Plan the paths for routing the speaker wires, power cables, and signal cables. Avoid running them near any heat sources or moving parts to prevent potential damage. Additionally, ensure that the wires are routed in a way that won’t interfere with the car’s airbags and other safety features.
- Prepare mounting locations: Based on the layout you planned earlier, prepare the mounting locations for the head unit, speakers, and amplifier. Use appropriate mounting brackets, adapters, and screws to securely attach the components to the car’s interior or body.
By taking the time to properly prepare your car, you can set a solid foundation for a smooth and successful installation. This will help avoid any unnecessary delays or complications during the installation process. Additionally, following these steps will help ensure that your new car audio system is installed securely and functions optimally.
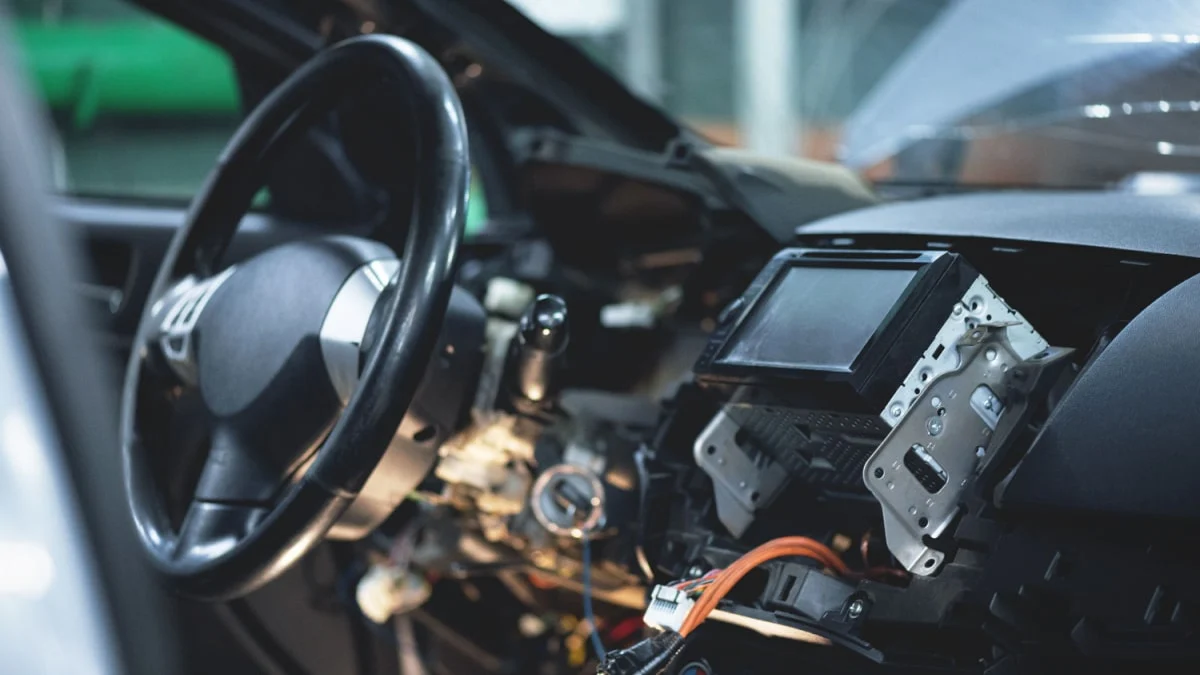
Step 3: Installing the Head Unit
The head unit is the central control for your car audio system, allowing you to select sources, adjust audio settings, and enjoy your favorite music. Installing the head unit is a crucial step in setting up your car audio system. Follow these steps to properly install the head unit:
- Remove the existing head unit (if applicable): If you’re replacing a factory-installed head unit or an older aftermarket unit, carefully remove it. Refer to the car’s user manual or online resources for specific instructions on removing the old head unit.
- Connect the wiring harness: Connect the wiring harness from the car’s electrical system to the wiring harness on the new head unit. Match the color-coded wires and secure the connections using crimp connectors or soldering and heat shrink tubing.
- Mount the head unit: Depending on the make and model of your car, you may need mounting brackets or a dash kit to install the head unit properly. Attach the brackets or dash kit to the head unit according to the manufacturer’s instructions. Then, secure the head unit in the designated mounting location. Double-check that it is securely fastened to prevent any rattling or vibrations.
- Connect the antenna: Plug in the antenna cable into the designated port on the back of the head unit. This will allow your car’s radio to receive AM and FM signals.
- Test the head unit: Before finishing the installation, reconnect the car’s battery and power on the head unit. Test all the functions, including radio reception, CD/DVD playback, Bluetooth connectivity, and any other features specific to your head unit. Make sure everything is working as intended.
- Secure any loose wiring: Once you’ve confirmed that the head unit is functioning correctly, secure any loose wiring using zip ties or electrical tape. This will prevent wires from interfering with other components or causing any safety hazards.
- Reassemble the car’s interior: If you had to remove any panels or trim pieces during the installation, reassemble them securely. Ensure that all clips and screws are properly tightened, and there are no loose or rattling parts.
Remember to consult the user manual of your specific head unit and follow the manufacturer’s instructions for a seamless installation. If you’re not confident in your DIY skills, it’s always a good idea to seek professional assistance for a precise and professional head unit installation.
With the head unit installed, you’re one step closer to enjoying your new and improved car audio system. Now, let’s move on to the next step: installing the speakers.
Step 4: Installing the Speakers
The speakers play a vital role in delivering high-quality audio and immersing you in your favorite music while driving. Properly installing the speakers will ensure optimal sound performance and an enjoyable listening experience. Follow these steps to install the speakers in your car:
- Choose the speaker locations: Determine the optimal locations for installing the speakers in your car. Consider factors such as sound staging, visibility, and compatibility with your car’s interior. Most cars have pre-designated speaker locations, such as the doors, dashboard, or rear deck. Make sure to match the speaker sizes to fit these locations.
- Prepare the speaker mounts: If your car’s speakers require mounting brackets or adapters to fit the factory locations, install them before attaching the speakers. These mounts ensure a secure fit and prevent any vibrations or rattling. Follow the manufacturer’s instructions for proper installation.
- Route and connect the speaker wires: Plan the path for routing the speaker wires from the head unit or amplifier to each speaker location. Avoid running the wires near any moving parts or sources of heat. Connect the speaker wires to the appropriate terminals on each speaker, ensuring proper polarity (+ and -).
- Mount the speakers: Attach the speakers to their designated locations, whether it’s the car doors, dashboard, or rear deck. Use screws or other mounting hardware provided with the speakers or the mounting brackets. Ensure that the speakers are securely fastened to prevent any vibrations or movement while driving.
- Test the speakers: Once the speakers are installed, reconnect the car’s battery and power on the audio system. Test each speaker to ensure that sound is coming through clearly and evenly. Adjust the audio settings, such as balance and fade, to achieve the desired sound staging.
- Secure any loose wiring: After confirming that the speakers are functioning properly, secure any loose wiring using zip ties or electrical tape. This will prevent wires from interfering with other components or causing any safety hazards.
- Reassemble the car’s interior: If you had to remove any panels or trim pieces during the installation, reassemble them securely. Check for any loose or rattling parts and tighten all screws and clips.
Remember to consult the user manual of your specific speakers and follow the manufacturer’s instructions for a proper installation. If you’re unsure about any aspect of speaker installation or want to achieve the best sound quality, it’s advisable to seek assistance from a professional car audio installer.
With the speakers properly installed, you’re one step closer to experiencing an immersive and high-fidelity sound in your car. Next, we’ll move on to installing the amplifier, which will further enhance the audio performance of your car audio system.
Step 5: Installing the Amplifier
An amplifier is a crucial component in a car audio system as it enhances the power and clarity of the audio signal. Installing an amplifier will provide the necessary boost to your speakers, resulting in a more robust and immersive sound experience. Follow these steps to install the amplifier in your car:
- Choose the amplifier location: Determine the ideal location for installing the amplifier in your car. Common locations include the trunk, under a seat, or in the glove compartment. Make sure the chosen location allows for proper ventilation and is secure from any potential damage or interference.
- Prepare the wiring: Measure and cut the appropriate lengths of power wire, ground wire, and RCA cables for connecting the amplifier to the head unit. Ensure that the wires are long enough to reach the intended locations without stretching or bending excessively.
- Connect the power wire: Run the power wire from the car’s battery to the amplifier location. Use an appropriately sized fuse near the battery terminal to protect the electrical system. Connect the power wire to the amplifier’s power input terminal, ensuring a secure and tight connection.
- Connect the ground wire: Find a suitable grounding point near the amplifier location, ensuring it has clean metal-to-metal contact. Use a wire brush or sandpaper to remove any paint or rust from the grounding point. Connect the ground wire from the amplifier to the grounding point, securing it tightly.
- Connect the RCA cables: Run the RCA cables from the head unit location to the amplifier. Connect the RCA cables to the corresponding input terminals on the amplifier, ensuring a secure connection. This will allow the audio signal to be transmitted from the head unit to the amplifier for amplification.
- Connect the speaker wires: Run the speaker wires from the amplifier to each speaker location. Connect the speaker wires to the amplifier’s output terminals, making sure to match the positive and negative terminals. Connect the other end of the speaker wires to the appropriate terminals on each speaker, ensuring proper polarity.
- Secure the amplifier: Securely mount the amplifier in the chosen location using appropriate mounting brackets or screws. Make sure the amplifier is secure and does not move or vibrate while driving.
- Test the audio system: Once the amplifier is installed, reconnect the car’s battery and power on the audio system. Test the audio system to ensure that the amplifier is working correctly and providing the desired power and clarity to the speakers.
It’s crucial to consult the user manual of your amplifier and follow the manufacturer’s instructions for a proper installation. Additionally, consider seeking professional assistance if you’re unsure about any aspect of amplifier installation or want to achieve the best sound quality for your car audio system.
With the amplifier properly installed, your car audio system is well-equipped to deliver powerful and high-fidelity sound. Next, we’ll move on to the wiring process, which will ensure proper connections and functionality throughout the system.
Step 6: Wiring the Car Audio System
Wiring is a crucial step in setting up a car audio system as it ensures proper connections and functionality between the various components. Proper wiring will allow the audio signal to flow smoothly from the head unit to the speakers and amplifier. Follow these steps to wire your car audio system:
- Prepare the necessary wiring: Ensure you have the appropriate gauge of wiring for your specific system. High-quality speaker wires, power wires, ground wires, and RCA cables are essential for optimal performance.
- Route the wiring: Plan the path for routing the wires to connect the head unit, amplifier, and speakers. Keep them away from any moving parts, heat sources, and sharp edges to avoid potential damage. It’s also important to separate power wires from signal wires to prevent any interference or noise.
- Connect the head unit wiring: Connect the wiring harness from the head unit to the appropriate wiring connections in the car. Match the color-coded wires and secure the connections using crimp connectors or soldering and heat shrink tubing.
- Connect the amplifier wiring: Connect the power wire from the amplifier to the positive terminal of the car battery, using an appropriate fuse near the battery terminal for protection. Connect the ground wire from the amplifier to a solid grounding point on the car body.
- Connect the speaker wiring: Run the speaker wires from the amplifier to each speaker location. Connect the positive and negative wires to their corresponding terminals on the amplifier and speakers, ensuring proper polarity (+ and -).
- Connect the RCA cables: Connect the RCA cables from the head unit to the input terminals on the amplifier. This will transmit the audio signal from the head unit to the amplifier for amplification.
- Secure and organize the wiring: Secure any loose wiring using zip ties or electrical tape. This will prevent wires from interfering with other components, causing rattling, or posing safety hazards. Neatly organize and bundle the wires to ensure a clean and professional installation.
- Test the audio system: Once all the wiring is complete, reconnect the car’s battery and power on the audio system. Test each component of the system, including the head unit, amplifier, and speakers, to ensure that the audio signal is flowing correctly and that the sound is clear and balanced.
Proper wiring is essential for a reliable and high-performance car audio system. Take your time to carefully route, connect, and secure the wiring to ensure optimal functionality and longevity. If you’re unsure about any aspect of the wiring process, consult the user manuals of your components or seek professional assistance.
With the wiring complete, you’re almost ready to enjoy your enhanced car audio system. Let’s move on to the final step: testing and adjusting the audio system to achieve the best sound quality.
Step 7: Testing and Adjusting the Audio System
Testing and adjusting the audio system is a crucial step in setting up your car audio system. This step ensures that all the components are functioning properly and allows you to fine-tune the system to achieve the best possible sound quality. Follow these steps to test and adjust your car audio system:
- Power on the system: Reconnect the car’s battery and power on the audio system. Ensure that all components, including the head unit, amplifier, and speakers, are receiving power and functioning correctly.
- Balance and fade adjustment: Use the balance and fade controls on your head unit to adjust the audio output between different speakers in your car. Find the optimal balance to ensure that the sound is evenly distributed and centered in the car.
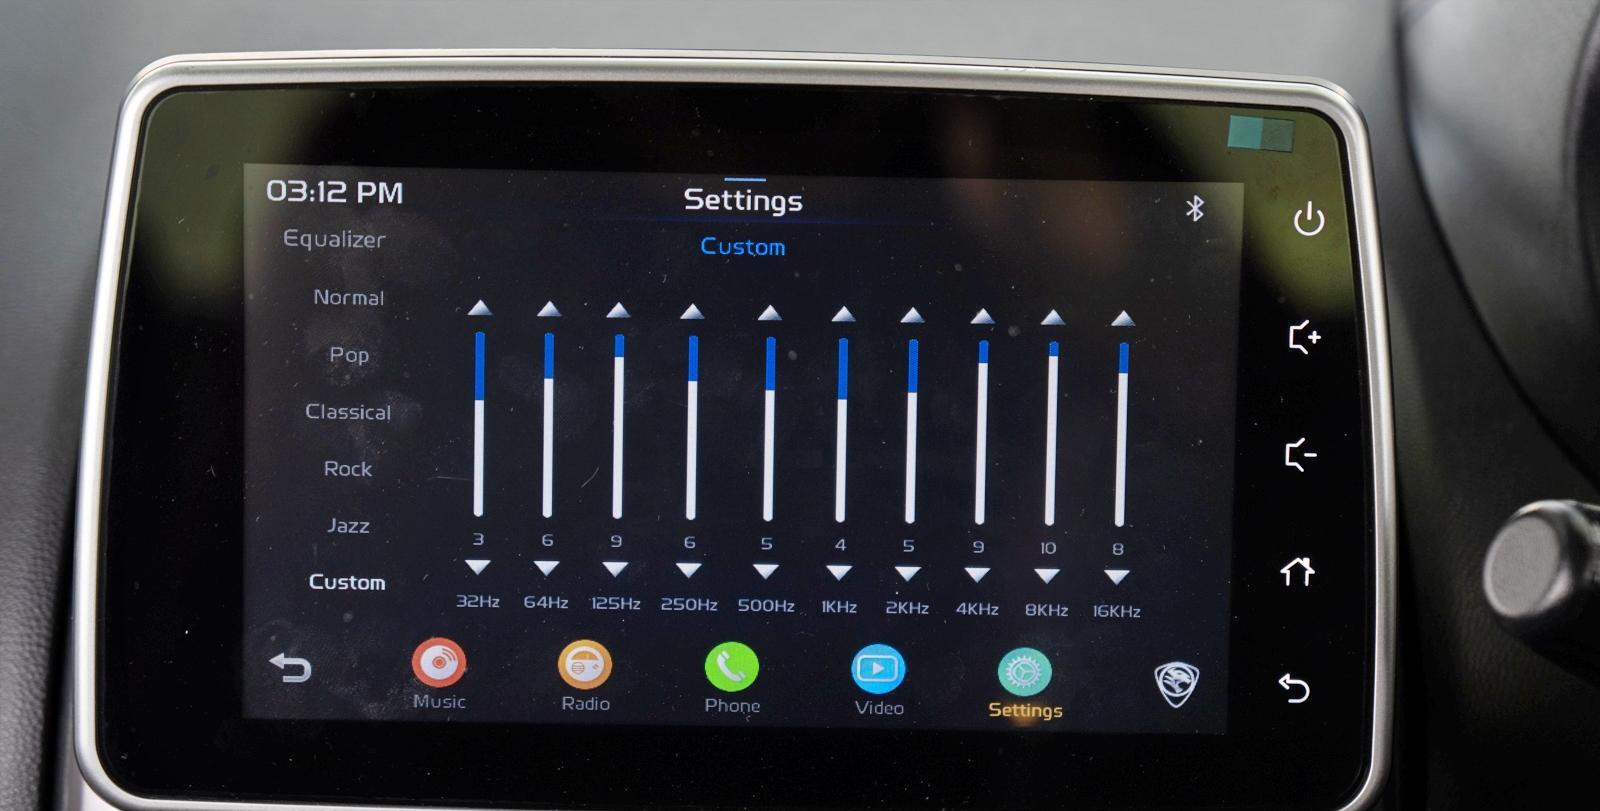
- Equalizer settings: Take advantage of the equalizer settings on your head unit to adjust the audio frequency response according to your preferences. Experiment with different settings to fine-tune the bass, midrange, and treble levels and create a sound signature that suits your listening preferences and the acoustics of your car.
- Subwoofer adjustment: If you have a subwoofer in your system, adjust its level, crossover frequency, and phase settings to achieve a well-integrated and balanced low-frequency response. Experiment with these settings to find the perfect amount of bass that complements the rest of the audio spectrum.
- Sound imaging and staging: Pay attention to the sound imaging and staging of your audio system. Adjust the speaker positions and angles, if possible, to create a realistic and immersive soundstage in your car. This will ensure that instruments and vocals are positioned correctly and provide a sense of depth and space in the audio playback.
- Testing audio sources: Test your audio system with different audio sources, such as CDs, streaming services, or high-quality audio files. Listen to various genres of music to evaluate the clarity, detail, and dynamics of your audio system across different music styles.
- Fine-tuning and retesting: As you make adjustments to your audio system, listen carefully and retest with different tracks to ensure that the changes result in improved sound quality. Take your time to find the perfect settings that deliver the most satisfying audio experience for you.
It’s important to note that testing and adjusting a car audio system is often subjective, as everyone’s preferences and listening environments are different. Trust your ears and make adjustments that enhance your personal listening experience. It may take some trial and error to achieve the desired results, so be patient and enjoy the journey of optimizing your car audio system.
Once you’re satisfied with the sound quality, you can move on to the final step: securing and finishing the installation of your car audio system.
Step 8: Securing and Finishing the Installation
After successfully installing and testing your car audio system, it’s essential to secure and finish the installation to ensure long-term reliability and performance. Properly securing the components and tidying up the installation will not only improve the overall aesthetics but also prevent any potential issues down the line. Follow these steps to secure and finish the installation of your car audio system:
- Secure loose components: Double-check all the components of your car audio system, including the head unit, speakers, amplifier, and subwoofer (if applicable). Ensure that they are securely fastened and properly mounted in their designated locations. Tighten any screws or mounting brackets that may have loosened during the installation process.
- Check wiring connections: Inspect all the wiring connections in your car audio system, including the connections at the head unit, amplifier, and speakers. Ensure that all connections are tight and secure, with no loose or exposed wires. If necessary, apply electrical tape or use wire ties to hold the wires neatly together, preventing them from rubbing against any sharp edges or interfering with other components.
- Verify proper fuse rating: Double-check the fuse size and rating on the power wire near the battery connection. Ensure that the fuse rating matches the requirements of your amplifier and is adequate to protect your car’s electrical system. Fuses are crucial in preventing damage from excessive current flow and should be installed correctly for safety.
- Apply sound dampening materials: For improved audio quality and reduced road noise, consider applying sound dampening materials to the car doors, floor, and trunk. These materials, such as foam insulation or mass-loaded vinyl, help create a quieter and more controlled listening environment by minimizing vibrations and external noise interference.
- Clean up the installation: Take the time to clean up any debris or dust that may have accumulated during the installation process. This will not only improve the aesthetics but also help prevent any potential damage or interference with the functioning of the components. Use a soft cloth or a car-specific cleaning product to clean any surfaces that may have come in contact with your hands during the installation.
- Reassemble the car’s interior: Once you’re satisfied with the installation and everything is secured, reassemble any panels or trim pieces that were removed. Ensure that all clips and screws are properly tightened, and the interior looks neat and well-organized.
- Final testing and adjustments: After completing the installation and finishing touches, perform a final test of your car audio system. Play various tracks and evaluate the sound quality to ensure that everything is functioning correctly and that you’re happy with the final result. Make any necessary final adjustments to the settings, if needed.
By securing and finishing the installation, you’re ensuring that your car audio system performs optimally and reliably. Now, sit back, enjoy the fruits of your labor, and revel in the immersive and high-quality sound experience that your new car audio system provides.
Congratulations! You have successfully set up your car audio system. Remember to regularly maintain and clean your system to prolong its lifespan and continue enjoying exceptional sound quality during your journeys. Happy driving and happy listening!
Conclusion
Congratulations on completing the installation of your car audio system! By following the step-by-step guide provided, you have successfully transformed your vehicle into a personal sound haven. Your dedication and attention to detail in choosing, installing, and fine-tuning the components have resulted in an immersive and high-quality audio experience while on the road.
Throughout the process, you have learned the importance of choosing the right car audio components, preparing the vehicle for installation, and properly installing the head unit, speakers, and amplifier. Wiring the system, testing, and adjusting the audio settings have also played crucial roles in ensuring optimal performance and sound quality.
Remember that setting up a car audio system is a personal journey, and each system is unique to the individual’s preferences and the acoustics of the car itself. Take the time to experiment with different settings, audio sources, and genres of music to find the sound signature that brings you the most enjoyment.
Regular maintenance and care of your car audio system are important to ensure its longevity and continued performance. Keep an eye out for any loose connections, vibrations, or signs of wear, and address them promptly to avoid any audio issues in the future.
As technology continues to advance, you may also consider upgrading your system or adding new features in the future. Stay informed about the latest developments in car audio technology and explore options that align with your evolving needs and preferences.
Now, it’s time to hit the road, crank up the volume, and enjoy your favorite tunes in crystal-clear sound. Whether you’re embarking on a long road trip or simply commuting to and from work, your newly installed car audio system will undoubtedly enhance your driving experience and make every journey a memorable one.
Safe travels and enjoy the music!