Home>Devices & Equipment>Yamaha>How To Connect Yamaha Receiver To LG TV
Yamaha
How To Connect Yamaha Receiver To LG TV
Modified: January 22, 2024
Learn how to connect your Yamaha receiver to your LG TV easily and start enjoying high-quality audio and video experience. Follow our step-by-step guide now!
(Many of the links in this article redirect to a specific reviewed product. Your purchase of these products through affiliate links helps to generate commission for AudioLover.com, at no extra cost. Learn more)
Table of Contents
- Introduction
- Step 1: Check the available ports on the Yamaha receiver and LG TV
- Step 2: Connect the HDMI cable from the Yamaha receiver to the LG TV
- Step 3: Turn on the Yamaha receiver and LG TV
- Step 4: Set the input source on the LG TV
- Step 5: Configure the audio settings on the Yamaha receiver
- Step 6: Test the connection
- Conclusion
Introduction
Connecting your Yamaha receiver to an LG TV is essential if you want to enjoy immersive audio while watching your favorite movies, TV shows, or playing video games. The combination of a Yamaha receiver’s powerful sound capabilities and an LG TV’s stunning visuals can create a truly cinematic experience right in your living room.
However, for many people, the process of connecting the two devices may seem intimidating. With various ports and settings to consider, it’s easy to get confused. But fear not! In this article, we’ll guide you through the step-by-step process of connecting your Yamaha receiver to your LG TV, ensuring that you don’t miss out on the incredible audio it offers.
Whether you have a brand new Yamaha receiver and LG TV or you’re working with older models, this guide will help you navigate the connection process easily. We’ll cover everything from checking available ports to configuring audio settings, ensuring that you have a seamless connection and optimal audio quality.
So, if you’re ready to enhance your audiovisual experience and take advantage of the power of your Yamaha receiver and LG TV, let’s dive in and get started!
Step 1: Check the available ports on the Yamaha receiver and LG TV
Before we connect the Yamaha receiver to the LG TV, it’s important to identify the available ports on both devices. This will ensure that we choose the right type of connection and use the appropriate cables for a seamless connection.
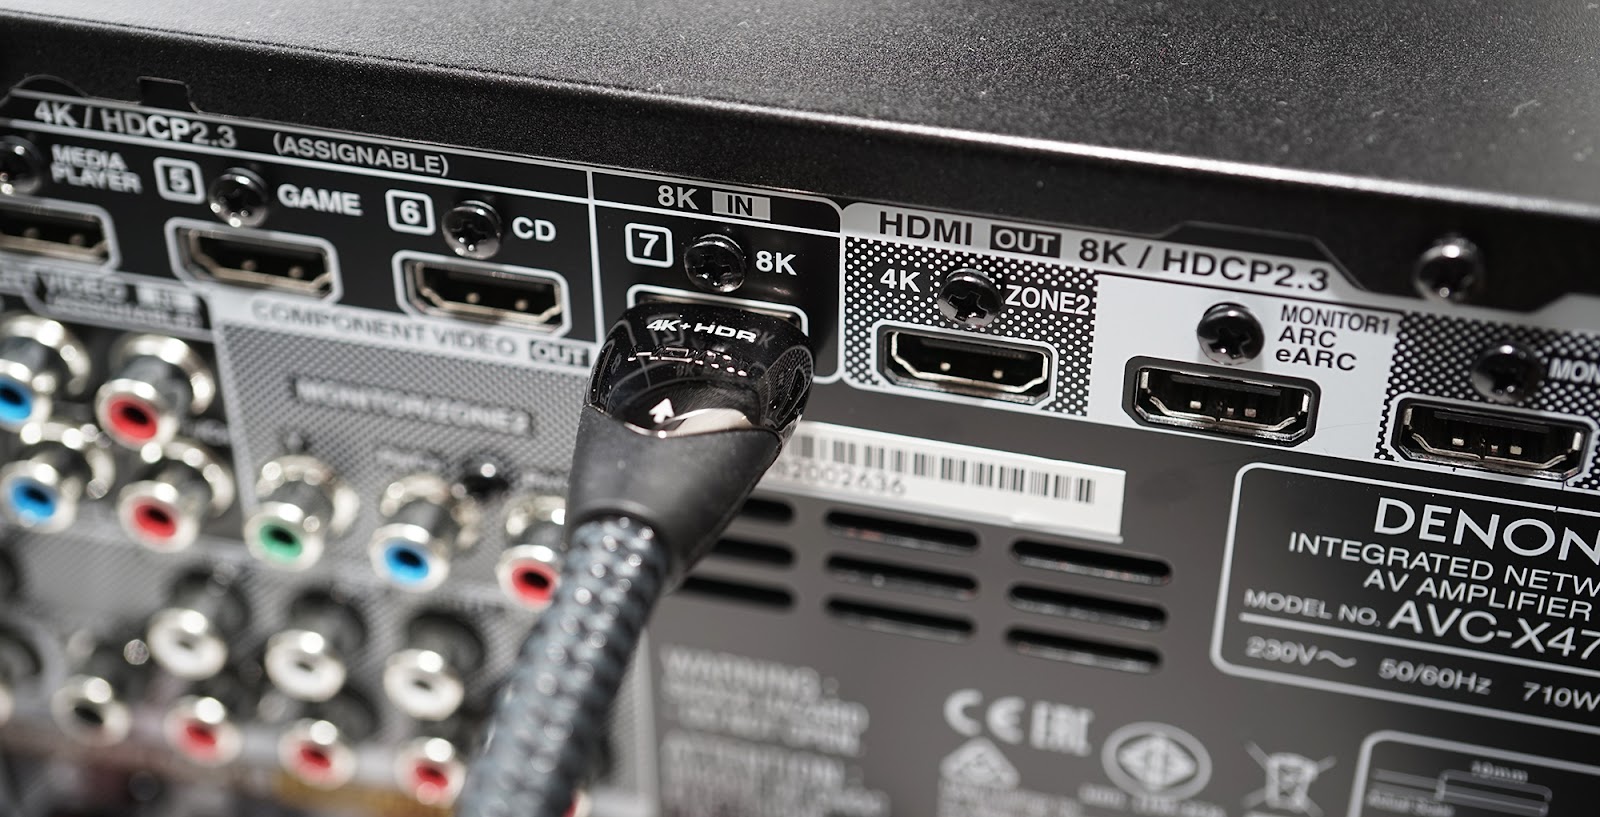
Start by examining the back panel of your Yamaha receiver. Look for HDMI ports, as this is the most common and convenient way to connect audio and video devices. Newer receivers usually have multiple HDMI ports to accommodate various devices.
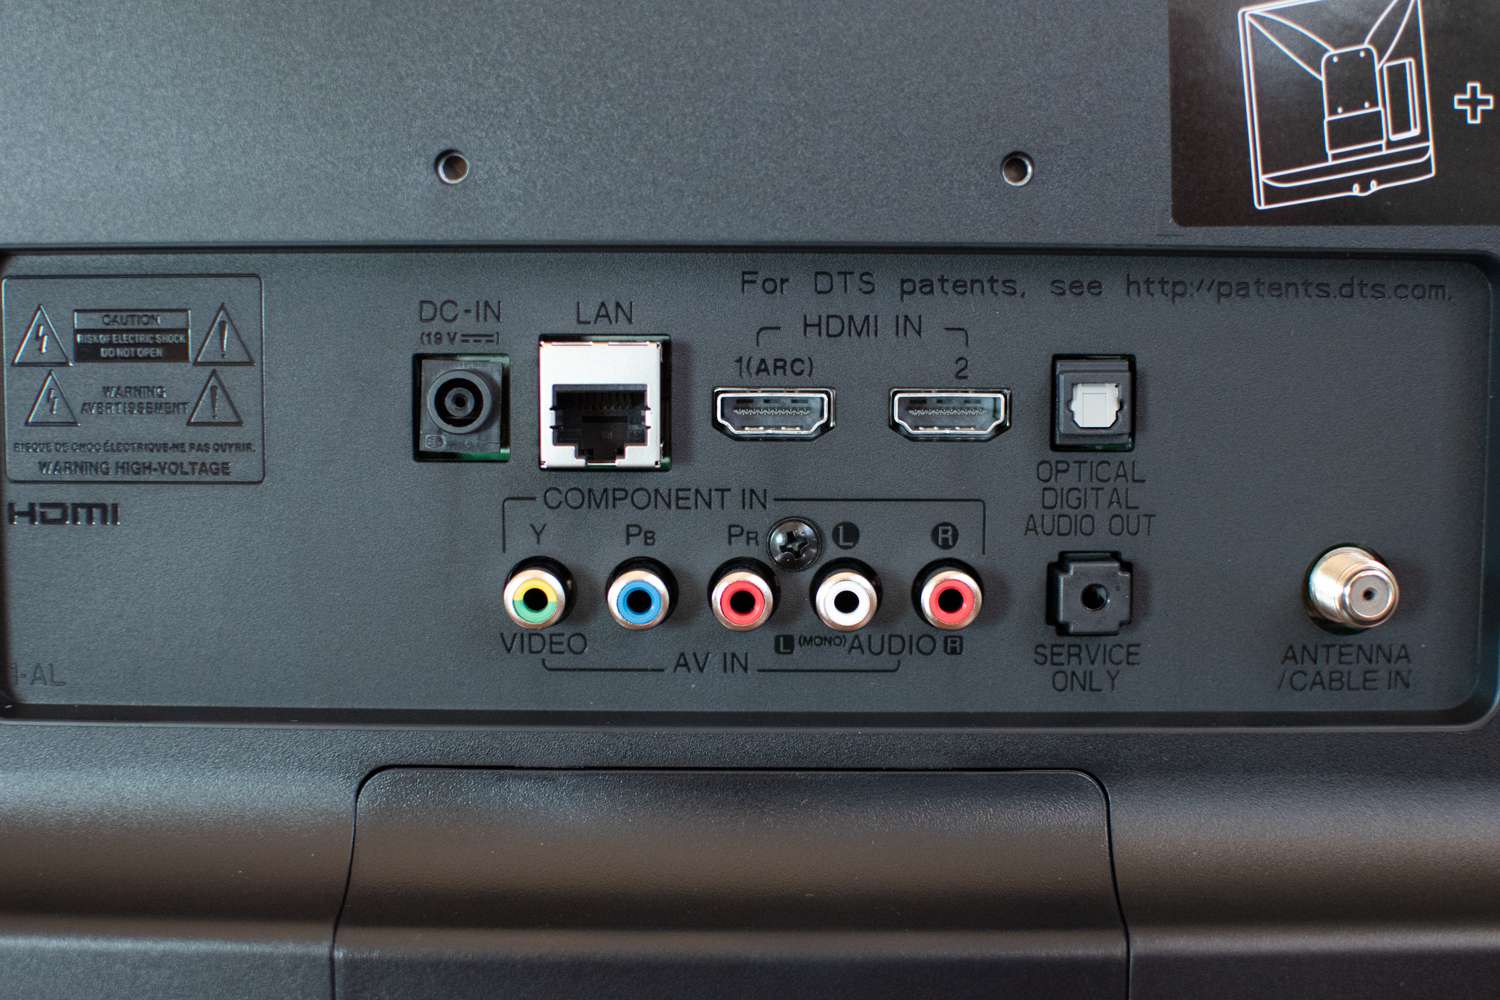
Next, turn your attention to the back of your LG TV. Look for HDMI input ports, typically labeled as HDMI-IN. The number of HDMI ports may vary depending on the model, so make sure to locate them before proceeding.
When checking the available ports on both devices, it’s essential to assess the version of HDMI they support. HDMI versions 1.4 and higher are recommended for optimal audio and video quality. Additionally, if your Yamaha receiver supports HDMI ARC (Audio Return Channel), you’ll have the ability to transmit audio from the TV back to the receiver through the same HDMI cable.
Once you’ve identified the HDMI ports on the Yamaha receiver and LG TV, you’re ready to move on to the next step. Remember to take note of the specific ports you’ll be using, as this information will be crucial during the connection process.
By checking the available ports on both the Yamaha receiver and LG TV, you ensure that you have a clear understanding of the connectivity options at your disposal. This knowledge will help you make the right choices when connecting the devices, ensuring a smooth and hassle-free setup process.
Step 2: Connect the HDMI cable from the Yamaha receiver to the LG TV
Now that you have identified the appropriate HDMI ports on your Yamaha receiver and LG TV, it’s time to connect them using an HDMI cable. HDMI cables are typically included with your devices, but if not, you can easily purchase one from an electronics store.
Start by connecting one end of the HDMI cable to the HDMI output port on the Yamaha receiver. Ensure that the cable is inserted securely but gently to avoid any damage. If you have multiple HDMI output ports on your receiver, choose the one that corresponds to your desired setup configuration.
Next, take the other end of the HDMI cable and connect it to one of the HDMI input ports on the LG TV. Again, make sure the cable is inserted firmly but not excessively tight. Remember to note which HDMI input port you used, as you’ll need this information later.
If your Yamaha receiver supports HDMI ARC, you’ll need to connect the HDMI cable to both the HDMI output (labeled ARC) on the receiver and the HDMI input (labeled ARC) on the LG TV. This allows for two-way audio transmission between the devices through a single cable.
Once the HDMI cable is securely connected on both ends, you have completed the physical connection between the Yamaha receiver and LG TV. Now, it’s time to power on the devices and proceed to the next step.
Connecting the HDMI cable ensures a high-quality digital audio and video link between your Yamaha receiver and LG TV. This single cable connection simplifies setup and eliminates the need for multiple audio and video cables, providing convenience and reducing clutter.
Step 3: Turn on the Yamaha receiver and LG TV
Now that you have successfully connected the HDMI cable between your Yamaha receiver and LG TV, it’s time to power on both devices. This step is crucial as it allows the devices to communicate with each other and establish a connection.
Start by locating the power buttons on both the Yamaha receiver and the LG TV. These buttons are typically located on the front or top panel of the devices. Press the power button on the Yamaha receiver first, and wait for it to fully power on. You may see indicator lights or a display screen come to life, indicating that the receiver is operational.
Next, press the power button on the LG TV to turn it on. You should see the LG logo appear on the screen, followed by the TV’s main menu or the input selection screen.
During this process, it’s essential to ensure that the LG TV is set to the correct HDMI input source. Using the LG TV remote, navigate to the input/source selection menu. Look for the corresponding HDMI input port that you connected the Yamaha receiver to in the previous step.
Once you have selected the correct HDMI input, you should see the video from the Yamaha receiver displayed on the LG TV screen. At this point, the devices are successfully communicating with each other, and you are ready to proceed to the next step.
By turning on the Yamaha receiver and LG TV, you establish the necessary power connection for both devices. This step allows the audio and video signals to flow between the two devices, setting the stage for a remarkable home entertainment experience.
Step 4: Set the input source on the LG TV
With the Yamaha receiver and LG TV powered on, it’s time to set the input source on your LG TV to ensure that it recognizes the connected Yamaha receiver as the audio and video source.
Using your LG TV remote, locate and press the “Input” or “Source” button. This button is typically labeled with one of those terms and is located near the navigation or menu buttons.
A menu will appear on the TV screen, displaying a list of available input sources. Look for the HDMI input that corresponds to the port you connected the Yamaha receiver to in the previous steps. It may be labeled as “HDMI 1,” “HDMI 2,” or something similar.
Using the arrow keys on your remote, navigate to the HDMI input that matches the connection. Once you’ve highlighted the correct input, press the “Enter” or “OK” button on the remote to select it.
The LG TV will now switch to the selected HDMI input, and you should see and hear the audio and video coming from the Yamaha receiver on your TV screen and speakers.
It’s important to note that some LG TVs may have a simplified menu option called “Home Dashboard” or “Home Screen.” In this case, you can navigate to the input selection using the on-screen icons or tiles instead of the traditional menu.
Setting the correct input source on the LG TV ensures that the video and audio signals from the Yamaha receiver are correctly routed to your TV, providing you with a seamless and synchronized audiovisual experience.
Step 5: Configure the audio settings on the Yamaha receiver
Now that the Yamaha receiver is connected to the LG TV and the input source is selected, it’s time to configure the audio settings on your Yamaha receiver to optimize the sound output.
On the Yamaha receiver remote or front panel, locate the “Menu” or “Settings” button. Press it to access the receiver’s settings menu.
Once in the settings menu, navigate to the “Audio” or “Sound” section. Here, you will find various options to adjust and customize the audio output according to your preferences.
Start by selecting the audio output mode. Depending on your setup and preferences, you can choose between Stereo, Surround Sound, Dolby Atmos, or any other available audio modes.
Next, adjust the volume and balance levels. These settings allow you to fine-tune the sound distribution between the speakers connected to your Yamaha receiver.
If your Yamaha receiver supports audio enhancement features such as Equalizer, Dynamic Range Control, or Room Acoustic Calibration, take the time to explore these options and adjust them as needed for optimal sound quality in your specific environment.
Additionally, if you have a subwoofer connected, you can adjust the subwoofer level and crossover settings to ensure a balanced and deep bass response.
Once you are satisfied with the audio settings on your Yamaha receiver, exit the settings menu and proceed to the next step.
By configuring the audio settings on your Yamaha receiver, you can tailor the sound output to your personal preferences and optimize it for your specific audio setup. This step ensures that you’ll experience the full potential of your Yamaha receiver’s audio capabilities when paired with your LG TV.
Step 6: Test the connection
After completing the previous steps, it’s important to test the connection between your Yamaha receiver and LG TV to ensure that everything is working correctly. Testing the connection verifies that both audio and video signals are being transmitted properly and that you can enjoy your desired media with optimal quality.
Start by selecting a media source, such as a Blu-ray player, gaming console, or streaming device, that is connected to your Yamaha receiver. Make sure the media source is turned on and ready to play.
On your LG TV remote, navigate to the input/source selection menu. Choose the HDMI input that is connected to your Yamaha receiver if it’s not already selected.
With the media source playing, you should see the corresponding video displayed on your LG TV screen. Listen carefully to the sound output from your connected speakers. Ensure that the audio is clear, balanced, and synchronized with the video.
If you encounter any issues, such as no sound or distorted audio, start by checking the connections between the Yamaha receiver and the speakers, as well as the HDMI cable connections. Make sure everything is securely and correctly connected.
If the issue persists, refer to the user manuals for both the Yamaha receiver and LG TV for troubleshooting tips or contact customer support for assistance.
Once you have confirmed that the audio and video signals are transmitting correctly and the sound quality meets your expectations, congratulations! You have successfully connected your Yamaha receiver to your LG TV and are ready to enjoy a superb audiovisual experience.
Testing the connection ensures that all components are working together harmoniously, providing you with an immersive and captivating viewing experience.
Conclusion
Connecting your Yamaha receiver to an LG TV allows you to elevate your home entertainment experience by combining stunning visuals with powerful audio. In this article, we have provided a step-by-step guide to help you effortlessly connect your Yamaha receiver to your LG TV.
We started by checking the available ports on both devices, ensuring that you choose the right type of connection and use the appropriate cables. Then, we guided you through connecting the HDMI cable from the Yamaha receiver to the LG TV, establishing a high-quality audio and video link.
Next, we instructed you to turn on the Yamaha receiver and LG TV, ensuring that the devices communicate with each other and establish a connection. Afterward, we guided you to set the input source on the LG TV, allowing it to recognize the Yamaha receiver as the audio and video source.
Once the basic setup was complete, we proceeded to configure the audio settings on the Yamaha receiver, fine-tuning the sound output to your liking and optimizing the audio performance of your setup.
Lastly, we emphasized the importance of testing the connection to ensure that both audio and video signals are transmitted properly and that you can enjoy your media with optimal quality. By following these steps, you can confidently experience immersive audio and stunning visuals while watching movies, TV shows, or playing games on your Yamaha receiver and LG TV.
If you encounter any difficulties during the setup or if you have any further questions, refer to the user manuals of your devices or reach out to customer support for assistance.
Now that you are equipped with the know-how to connect your Yamaha receiver to your LG TV, it’s time to sit back, relax, and enjoy a truly cinematic experience right in the comfort of your own home!