Home>Devices & Equipment>Subwoofer>How To Disable Computer Subwoofer

Subwoofer
How To Disable Computer Subwoofer
Modified: February 18, 2024
Learn how to disable your computer subwoofer easily with this step-by-step guide. Enhance your audio experience by controlling the output of your subwoofer.
(Many of the links in this article redirect to a specific reviewed product. Your purchase of these products through affiliate links helps to generate commission for AudioLover.com, at no extra cost. Learn more)
Table of Contents
Introduction
Subwoofers are a crucial component of any audio system, delivering deep bass and enhancing the overall audio experience. However, there may be instances where you need to disable your computer’s subwoofer. Whether you’re troubleshooting sound issues or simply don’t want the extra bass, knowing how to disable the subwoofer can come in handy.
In this article, we will explore several methods to disable your computer’s subwoofer. These methods are applicable for both Windows and Mac operating systems, giving you the flexibility to disable the subwoofer on various devices.
It’s important to note that disabling the subwoofer will result in the loss of low-frequency sound reproduction. So, before proceeding, make sure you understand the potential impact and only disable the subwoofer if it serves your specific needs.
Now, let’s dive into the different methods you can use to disable your computer’s subwoofer.
Method 1: Adjusting Sound Settings
The first method to disable your computer’s subwoofer involves adjusting the sound settings. This method is straightforward and can be done on both Windows and Mac systems.
Here’s how you can disable the subwoofer through sound settings:
- On Windows, right-click on the speaker icon in the system tray and select “Playback devices.” On Mac, click on the Apple menu, go to “System Preferences,” and select “Sound.”
- In the Playback tab (Windows) or Output tab (Mac), locate your default audio device. It is usually labeled as “Speakers” or “Headphones.”
- Double-click on the default audio device to open its properties.
- In the properties window, navigate to the “Enhancements” or “Audio” tab.
- Look for an option related to bass or subwoofer and uncheck it to disable the subwoofer. The wording of the specific option may vary depending on your audio drivers or operating system version.
- Click “Apply” or “OK” to save the changes.
Once you have followed these steps and disabled the subwoofer option in the sound settings, the bass output should be significantly reduced, effectively disabling the subwoofer.
It’s important to mention that the specific steps and options may vary slightly depending on your operating system version, audio drivers, and hardware configuration. If you’re having trouble finding the appropriate settings, consult the documentation or support resources for your specific device.
Method 2: Disconnecting the Subwoofer
If you want to completely disable the subwoofer and remove it from your audio setup, you can physically disconnect it from your computer. This method is useful if you don’t want any bass output at all.
Follow these steps to disconnect the subwoofer:
- Locate the subwoofer unit connected to your computer. It is typically a separate speaker unit with a dedicated power cable.
- Disconnect the power cable from the subwoofer, effectively turning it off.
- If the subwoofer is connected to your computer via a cable, unplug the cable from both the subwoofer and the audio output on your computer.
- Once disconnected, the subwoofer will no longer receive power or audio signals, effectively disabling it as part of your audio system.
It’s worth mentioning that some audio systems may have built-in amplifiers or controllers that allow you to power off or disable the subwoofer through software or hardware controls. Refer to the user manual or documentation of your specific audio system to explore any additional options for disabling the subwoofer.
Remember that by physically disconnecting the subwoofer, you will lose all low-frequency sound reproduction. So, make sure this is the desired outcome before proceeding.
Method 3: Using Device Manager
To disable your computer’s subwoofer, you can utilize the Device Manager, a built-in Windows utility that allows you to manage hardware devices and their drivers. This method is specific to Windows operating systems.
Here’s how you can disable the subwoofer using the Device Manager:
- Open the Start menu, type “Device Manager,” and select it from the search results to launch the utility.
- In the Device Manager window, expand the “Sound, video, and game controllers” category.
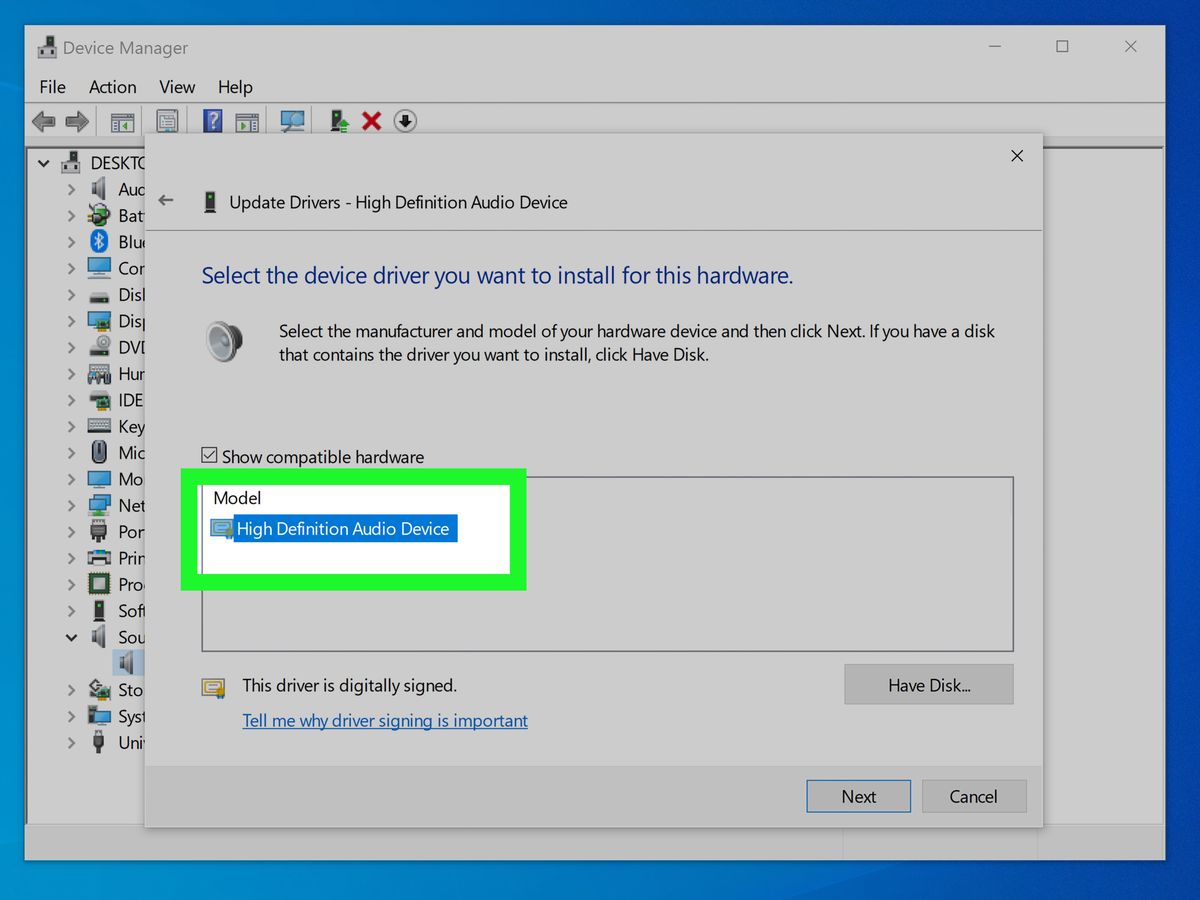
- Look for a subwoofer device listed under this category. It may be labeled as “Subwoofer,” “Bass,” or something similar. Right-click on it and select “Disable device.”
- A prompt may appear to confirm the action. Click “Yes” to proceed with disabling the subwoofer.
- The subwoofer device will now be disabled, and the bass output will be significantly reduced.
It’s important to note that the appearance and labeling of the subwoofer device may vary depending on your audio hardware and drivers.
If you ever want to re-enable the subwoofer, simply repeat the steps above, right-click on the disabled subwoofer device, and select “Enable device.”
Keep in mind that changes made using the Device Manager are specific to the device and may not affect all software applications. Some media players or audio software may have their own settings for controlling the subwoofer, so you may need to adjust those settings separately to ensure the subwoofer remains disabled.
Method 4: Disabling the Subwoofer Driver
Another method to disable your computer’s subwoofer involves disabling the specific driver associated with the subwoofer. This method is applicable to both Windows and Mac operating systems.
Follow these steps to disable the subwoofer driver:
- On Windows, open the Device Manager by searching for it in the Start menu. On Mac, go to “System Preferences” and select “Sound.”
- In the Device Manager (Windows) or Sound settings (Mac), locate the subwoofer driver. It may be listed under the “Sound, video, and game controllers” category or labeled specifically as the subwoofer driver.
- Right-click on the subwoofer driver and select “Disable” or “Uninstall.” If prompted, confirm the action.
- Restart your computer to apply the changes.
Disabling the subwoofer driver will prevent it from functioning and delivering bass output. However, keep in mind that this method may have implications for other audio functions as well, as it affects the overall audio driver.
If you ever decide to re-enable the subwoofer driver, you can follow the same steps and select “Enable” or reinstall the driver if it was uninstalled.
Note that disabling the subwoofer driver may have more significant consequences on the audio playback than simply adjusting the sound settings or disconnecting the subwoofer physically. Exercise caution and make sure this method aligns with your specific audio requirements.
Conclusion
Disabling your computer’s subwoofer can be useful for troubleshooting sound issues, adjusting audio preferences, or simply when you don’t want the extra bass in your audio playback. Throughout this article, we have explored four methods to disable the subwoofer on your computer.
Firstly, adjusting the sound settings through the control panel or system preferences allows you to disable the subwoofer by unchecking specific bass-related options. This method is straightforward and applicable to both Windows and Mac systems.
Secondly, physically disconnecting the subwoofer removes it from the audio setup altogether, effectively disabling it. This method is useful if you want to completely eliminate bass output.
Thirdly, using the Device Manager in Windows allows you to disable the subwoofer device driver, resulting in reduced bass output. This method is specific to Windows operating systems.
Lastly, disabling the subwoofer driver through the system settings or Device Manager can be done on both Windows and Mac systems. However, this method may have broader implications for the overall audio functionality of your computer.
Before disabling the subwoofer, consider the specific audio requirements and the potential impact on your audio experience. If necessary, consult the documentation or support resources for your specific device or operating system.
By being aware of these different methods to disable the subwoofer on your computer, you now have the flexibility to adjust your audio setup according to your preferences and needs.
Remember to proceed with caution and choose the method that best suits your situation. Whether troubleshooting or personal preference, the ability to disable the subwoofer provides greater control over your audio experience.