Home>Production & Technology>Audio Interface>How To Connect Audio Interface To Computer

Audio Interface
How To Connect Audio Interface To Computer
Modified: February 17, 2024
Learn how to connect an audio interface to your computer and enhance your audio recording and production. Step-by-step guide for seamless integration.
(Many of the links in this article redirect to a specific reviewed product. Your purchase of these products through affiliate links helps to generate commission for AudioLover.com, at no extra cost. Learn more)
Table of Contents
Introduction
Welcome to the fascinating world of audio interfaces! If you’re a musician, podcaster, or sound enthusiast, you’ve likely heard of these incredible devices. An audio interface is a vital tool that allows you to connect your instruments, microphones, or other audio sources to your computer, enabling you to record, produce, and manipulate high-quality audio.
Whether you’re a beginner looking to set up your first home recording studio or a seasoned professional searching for an upgrade, understanding how to connect an audio interface to your computer is essential. This comprehensive guide will walk you through the process step by step.
With an audio interface, you can unlock a whole new world of possibilities. Whether you’re recording vocals, capturing instrumental performances, or producing electronic music, an audio interface ensures pristine sound quality, low latency, and increased flexibility in your digital audio workspace.
In this article, we’ll delve into the different types of audio interfaces available, explore the steps to connect an audio interface to your computer, and provide troubleshooting tips to help you overcome common issues. So, let’s dive in and unravel the mysteries of audio interfaces!
Understanding Audio Interfaces
Before we jump into the technicalities of connecting an audio interface to your computer, let’s take a moment to understand what exactly an audio interface is and why it is an essential piece of equipment for audio professionals and enthusiasts.
An audio interface is an external hardware device that acts as a bridge between your audio sources (such as microphones, instruments, or synthesizers) and your computer. Its primary function is to convert analog audio signals into digital data that can be processed and manipulated by your computer’s audio software.
One of the key features of an audio interface is its ability to provide high-quality audio conversion. Most built-in computer sound cards aren’t designed with professional audio production in mind, resulting in lower audio fidelity and higher latency. Audio interfaces, on the other hand, are specifically engineered to handle the demands of professional audio recording and playback.
Audio interfaces come in a variety of shapes and sizes, from small portable devices with a few inputs and outputs to larger units with multiple channels and additional features like built-in preamps and MIDI connectivity. The right audio interface for you will depend on your specific needs and budget.
When selecting an audio interface, it’s important to consider factors such as the number and type of inputs and outputs you require, the sample rate and bit depth supported, and the overall sound quality. It’s also worth considering whether you need features like phantom power for condenser microphones or MIDI connectivity for controlling external synthesizers.
To make the most out of your audio interface, it’s crucial to have a basic understanding of the connectors commonly used. The most common types include XLR, TRS, and USB. XLR connectors are typically used for microphones and provide a balanced signal, reducing interference and ensuring better audio quality. TRS connectors, also known as “jacks” or “phone plugs,” are used for line-level signals, such as connecting instruments or studio monitors. USB connectors are used to connect the audio interface to your computer, enabling data transfer and power supply.
Now that we have a solid foundation in understanding audio interfaces, let’s move on to the different types available and how to choose the right one for your specific needs.
Types of Audio Interfaces
When it comes to audio interfaces, there are several different types available, each catering to specific needs and preferences. Let’s explore the most common types of audio interfaces:
- USB Audio Interfaces: USB audio interfaces are the most popular and widely used type among musicians and home studio owners. They are relatively affordable, compact, and easy to connect to your computer via a USB cable. These interfaces typically offer a range of inputs and outputs, including microphone preamps, instrument inputs, and headphone outputs.
- Thunderbolt Audio Interfaces: Thunderbolt interfaces are known for their blazing fast data transfer speeds, making them ideal for professional audio production. They provide ultra-low latency and offer high-quality audio conversion. However, it’s important to note that Thunderbolt interfaces require a computer with Thunderbolt connectivity.
- PCIe Audio Interfaces: PCIe interfaces are designed to be installed directly into your computer’s PCIe slot. They offer extremely low latency and high channel counts, making them suitable for professional studios and demanding audio tasks. However, they require an available PCIe slot on your computer’s motherboard.
- FireWire Audio Interfaces: FireWire interfaces were once popular but have since become less common due to the rise of USB and Thunderbolt. They provide fast data transfer speeds and offer low latency. However, like Thunderbolt interfaces, FireWire interfaces require a computer with FireWire connectivity.
- Ethernet Audio Interfaces: Ethernet interfaces are designed for professional audio-over-IP (AoIP) applications. They allow for multiple audio channels to be streamed over an Ethernet network, providing flexibility and scalability for large-scale audio production environments.
When choosing the right audio interface for your needs, consider factors such as the number and type of inputs and outputs required, the desired audio quality, budget constraints, and the compatibility with your computer’s connectivity options. Additionally, it’s important to consider the specific requirements of your audio projects and future expansion possibilities.
Now that you have an understanding of the different types of audio interfaces available, let’s move on to the step-by-step process of connecting an audio interface to your computer.
Steps to Connect an Audio Interface to a Computer
Connecting an audio interface to your computer may seem daunting, but it’s actually a straightforward process. Below are the step-by-step instructions to get you up and running:
- Step 1: Install the Drivers: Before connecting your audio interface, you will need to install the necessary drivers. These drivers allow your computer to communicate properly with the interface. Most audio interfaces come with a driver installation CD or provide a downloadable driver from their website. Follow the manufacturer’s instructions to install the drivers on your computer.
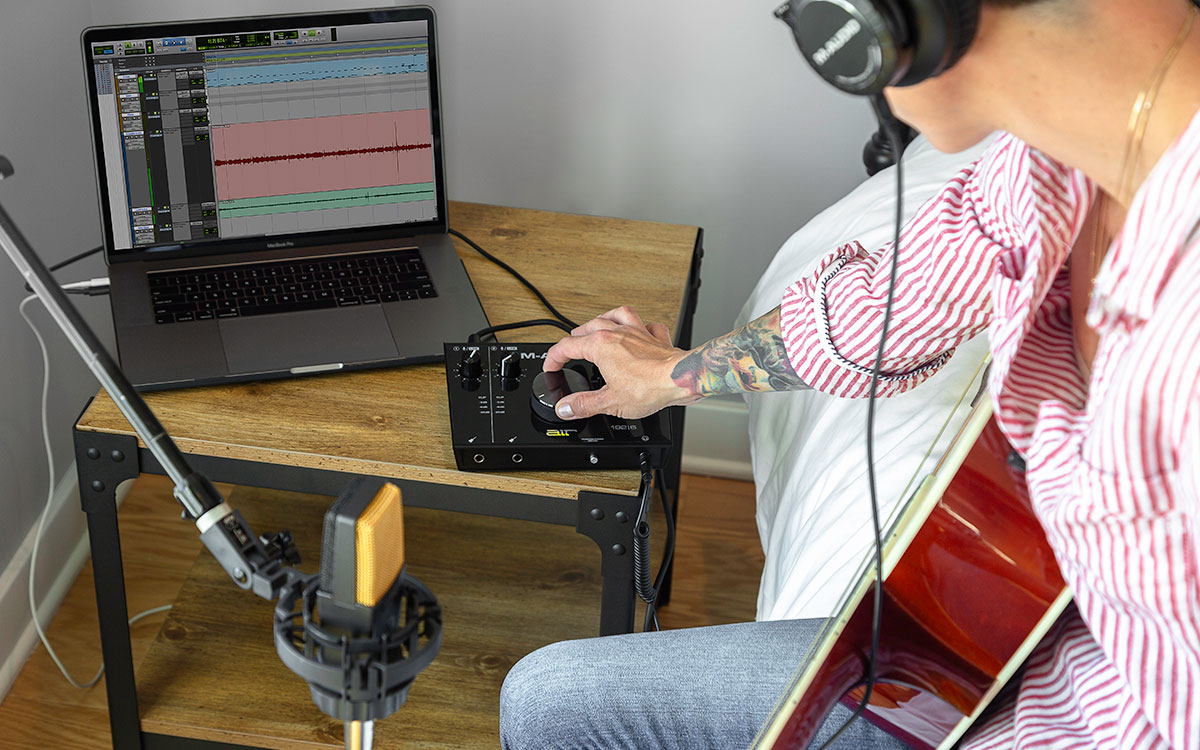
- Step 2: Connect the Audio Interface to the Computer: Once the drivers are installed, it’s time to connect your audio interface to your computer. Use the appropriate cables and connectors based on the interface and computer’s connectivity options. For USB interfaces, simply connect the USB cable from the interface to an available USB port on your computer.
- Step 3: Configure Audio Settings: Now that your audio interface is connected, you’ll need to configure the audio settings on your computer. Open your computer’s audio settings or audio control panel and select the audio interface as the default input and output device. Adjust the sample rate and buffer size if needed, depending on your specific requirements and the capabilities of your interface.
- Step 4: Test the Audio Interface: It’s crucial to test your audio interface to ensure everything is working correctly. Connect a microphone or instrument to the appropriate input on the interface, open your preferred recording software, and check if you’re receiving audio input. Play back a recorded track and listen through the interface’s headphone output or connected studio monitors to confirm audio output.
Remember to consult your audio interface’s user manual for specific instructions on connecting and configuring the device. Each interface may have slight variations in the setup process.
By following these steps, you should now have your audio interface successfully connected to your computer and ready to capture and produce high-quality audio. However, it’s worth noting that troubleshooting may be required in case you encounter any issues along the way.
In the next section, we’ll discuss some common issues you may face when connecting an audio interface and provide troubleshooting tips to help you overcome them.
Step 1: Install the Drivers
Before you can connect your audio interface to your computer, you need to install the necessary drivers. These drivers enable your computer to recognize and communicate with the interface effectively. Here’s how to install the drivers:
- Check the Manufacturer’s Website: Start by visiting the manufacturer’s website for your specific audio interface model. Look for the “Support” or “Downloads” section, where you will usually find the latest drivers available for download.
- Download the Drivers: Locate the appropriate driver for your operating system (e.g., Windows, macOS) and download it to your computer. Make sure to select the correct version that matches your operating system version (32-bit or 64-bit).
- Install the Drivers: Once the driver file is downloaded, locate it in your computer’s file explorer and double-click on it to start the installation process. Follow the on-screen prompts to complete the installation. In some cases, you may need to restart your computer after the installation is complete.
- Connect the Audio Interface: After installing the drivers, connect your audio interface to your computer using the appropriate cables and connectors. For USB interfaces, use a USB cable to connect the interface to an available USB port on your computer.
- Confirm Driver Installation: Once your audio interface is connected, your computer should automatically detect it and recognize the installed drivers. You can confirm this by checking the device manager on your computer. If your audio interface is listed without any errors, it means the drivers have been successfully installed.
It’s important to note that some audio interfaces may require you to install the drivers before connecting the device to your computer. Always consult the manufacturer’s instructions or user manual for specific guidance on driver installation.
Installing the correct drivers ensures that your audio interface functions properly and optimizes performance. If you encounter any issues during the driver installation process, refer to the troubleshooting section in the user manual or contact the manufacturer’s customer support for assistance.
With the drivers successfully installed, you’re now ready to move on to the next step – connecting your audio interface to your computer. Stay tuned!
Step 2: Connect the Audio Interface to the Computer
Once you have installed the necessary drivers for your audio interface, it’s time to connect it to your computer. Follow these steps to ensure a proper and secure connection:
- Gather the Required Cables: Determine the cables you need to connect your audio interface to your computer based on the interface’s connectivity options and your computer’s available ports. The most common cable used is a USB cable for USB audio interfaces.
- Power off Your Audio Interface: Before connecting any cables, it’s recommended to turn off your audio interface to avoid any potential damage or interference.
- Connect the Cables: Depending on your audio interface and computer, connect the appropriate cables to the respective ports. For USB audio interfaces, plug one end of the USB cable into the USB port on the interface and the other end into an available USB port on your computer. Ensure a snug and secure connection.
- Power on Your Audio Interface: Once the cables are connected, power on your audio interface. Most interfaces have a power switch or a power button that needs to be turned on. Refer to your interface’s user manual for specific instructions.
- Computer Recognition: After connecting and powering on your audio interface, your computer should recognize the device. It may take a few moments for the computer to detect and configure the interface.
- Check Device Status: Verify that your audio interface is detected and is functioning properly. You can do this by checking the device manager on your computer. If your audio interface is listed without any errors, it means the connection was successful.
It’s important to note that some audio interfaces may require additional power sources, such as an external power adapter or batteries. Refer to your audio interface’s user manual for specific instructions on powering the device.
By following these steps, you should have successfully connected your audio interface to your computer. In the next section, we will discuss how to configure the audio settings to ensure proper functionality and optimal audio performance.
Step 3: Configure Audio Settings
After successfully connecting your audio interface to your computer, the next step is to configure the audio settings to ensure proper functionality and optimal audio performance. Follow these steps to set up your audio settings:
- Select the Audio Interface: Open your computer’s audio settings or audio control panel. Depending on your operating system, this may be found in the system preferences or control panel. Look for the audio device settings or playback/recording options. Select your audio interface as the default input and output device. This tells your computer to use the audio interface for audio input and output instead of the default sound card.
- Adjust Sample Rate and Buffer Size: The sample rate and buffer size settings determine the quality and latency of audio playback and recording. Access the audio settings of your recording software or audio control panel and adjust these settings based on your specific needs. Higher sample rates offer better audio quality but may require more processing power, while lower buffer sizes reduce latency but may increase the strain on your computer’s CPU. Experiment with different settings to find the balance that works best for your setup.
- Enable Phantom Power (if needed): If you are using a condenser microphone that requires phantom power, make sure to enable it on your audio interface. Phantom power provides the necessary voltage for condenser microphones to function correctly. Check your audio interface’s user manual to determine how to enable phantom power.
- Test Input and Output: To ensure that your audio interface is properly configured and functioning, test the audio input and output. Connect a microphone or instrument to the appropriate input on your audio interface and open your recording software. Set up a track to record and speak or play your instrument to check if the audio is being captured. Additionally, play back a recorded track to verify if the audio is being successfully routed to your audio interface’s output.
It’s important to note that the exact steps to access the audio settings may vary depending on your operating system and recording software. Refer to the respective documentation or online resources for detailed instructions specific to your setup.
By configuring your audio settings correctly, you ensure that your audio interface is optimized for recording, playback, and manipulation of audio signals. In the next step, we will discuss how to test your audio interface to ensure everything is working as expected.
Step 4: Test the Audio Interface
After configuring the audio settings, it’s crucial to test your audio interface to ensure that it is functioning correctly. Follow these steps to test the audio input and output of your audio interface:
- Connect an Audio Source: Plug in a microphone, instrument, or any other audio source to the appropriate input on your audio interface. Make sure the input levels on the interface are properly set to avoid clipping or distortion.
- Open your Recording Software: Launch your preferred recording software or digital audio workstation (DAW) on your computer.
- Create a New Track: Set up a new track within your recording software to record the audio input from your interface. Ensure that the input source is correctly set to match the input where you connected the audio source.
- Test the Audio Input: Speak into the microphone or play your instrument to check if the audio input is being captured by the recording software. Monitor the input levels on the software’s mixer or track meters to ensure that the audio is registering and within an appropriate range.
- Playback the Recorded Track: After testing the audio input, play back the recorded track to ensure that the audio is routed correctly and can be heard through the audio interface’s output. Monitor the output levels on the software’s mixer or track meters to ensure the audio is within a suitable range.
- Check for Latency: Pay attention to the latency, which is the delay between the audio input and output. If you notice a significant delay, you may need to adjust the buffer size or consider using a lower-latency audio driver for your interface.
- Listen Through Headphones or Studio Monitors: If your audio interface has a dedicated headphone output or if you have connected studio monitors, listen to the playback through these devices to ensure the audio quality and clarity.
By testing your audio interface, you can verify that the input and output signals are being properly captured and reproduced. If you encounter any issues during the testing process, refer to the troubleshooting section in your audio interface’s user manual or contact the manufacturer’s customer support for assistance.
Congratulations! You have successfully connected and tested your audio interface. Now you’re ready to embark on your audio recording, production, and mixing journey.
Troubleshooting Common Issues
While connecting and setting up an audio interface is usually a straightforward process, it’s not uncommon to encounter some issues along the way. Here are some common problems you may face and their troubleshooting solutions:
- No Sound or Audio Input: If you’re not getting any sound or audio input, first check if your audio interface is properly powered on and connected to your computer. Ensure that the drivers are installed correctly and the audio interface is selected as the default input and output device in your computer’s audio settings. Also, check the input and output levels on your audio interface and software to make sure they are not set too low or muted.
- Audio Interface Not Recognized: If your computer doesn’t recognize the audio interface, verify that the drivers are installed correctly. Restart your computer and ensure that the interface is connected securely. Try connecting the interface to a different USB port or use a different cable in case the issue lies with the port or cable.
- Audio Glitches or Dropouts: If you’re experiencing audio glitches, stutters, or dropouts during playback or recording, it may be due to inadequate buffer size or insufficient computer resources. Increase the buffer size in your audio settings to reduce the strain on your computer’s CPU. Close any unnecessary applications running in the background to free up system resources and try again.
- Latency Issues: Latency can be bothersome, causing a delayed response between playing an instrument or singing and hearing the sound in your headphones or monitors. To reduce latency, try decreasing the buffer size in your audio settings. Consider using an audio interface with low-latency drivers or invest in a dedicated low-latency audio driver for your interface.
- No Phantom Power: If you are using a condenser microphone that requires phantom power, but it’s not working, double-check if the phantom power switch is enabled on your audio interface. Ensure that the microphone is connected securely and that the XLR cable is functioning correctly. If the issue persists, test the microphone with a different audio interface or contact the manufacturer for further assistance.
If you encounter any other issues not mentioned here, refer to the troubleshooting section in your audio interface’s user manual. Additionally, online forums and communities dedicated to audio production can be valuable resources for finding solutions to specific problems.
Remember, troubleshooting may require some trial and error, and it’s important to approach the process with patience and persistence. By troubleshooting common issues, you can ensure a smooth and trouble-free recording experience with your audio interface.
Conclusion
Connecting an audio interface to your computer is an essential step for anyone involved in music production, podcasting, or sound recording. By understanding the different types of audio interfaces available and following the step-by-step process outlined in this guide, you can ensure a successful setup and enjoy high-quality audio recording and playback.
We started by understanding the concept of audio interfaces and why they are crucial for achieving professional-grade audio. We then explored the various types of interfaces, including USB, Thunderbolt, PCIe, FireWire, and Ethernet interfaces, each catering to different needs and preferences.
In the subsequent steps, we walked through the process of installing drivers, connecting the audio interface to your computer, configuring the audio settings, and testing the interface’s functionality. Armed with this knowledge, you can troubleshoot common issues such as no sound, unrecognized devices, audio glitches, latency, and phantom power problems.
Remember to consult your audio interface’s user manual and the manufacturer’s support resources for specific instructions and troubleshooting tips unique to your interface model.
Now that you have successfully connected your audio interface to your computer and tested its functionality, you’re ready to embark on your audio production journey. Whether you’re recording vocals, playing instruments, podcasting, or producing electronic music, your audio interface will be your faithful companion in capturing and manipulating high-quality audio.
Enjoy the benefits of your audio interface and unleash your creativity to create incredible audio productions. Happy recording!