Home>Devices & Equipment>Turntable>How To Check Azimuth Turntable
Turntable
How To Check Azimuth Turntable
Modified: January 22, 2024
Learn how to check the azimuth of your turntable and ensure optimal performance. Discover the key steps and tools needed to maintain your turntable's accuracy.
(Many of the links in this article redirect to a specific reviewed product. Your purchase of these products through affiliate links helps to generate commission for AudioLover.com, at no extra cost. Learn more)
Table of Contents
Introduction
When it comes to audio quality, turntables have an undeniable charm. The warm sound, the tactile experience of placing a vinyl record on the platter, and the mesmerizing rotation of the turntable create a truly immersive listening experience. However, to ensure optimal sound reproduction, it is essential to maintain and calibrate your turntable correctly. One crucial aspect of turntable calibration is checking the azimuth.
The azimuth refers to the angle at which the stylus of the turntable’s cartridge makes contact with the grooves of the record. It is a critical parameter that directly affects the accuracy and quality of the audio playback. If the azimuth is misaligned, it can result in channel imbalance, distortion, and even premature wear on your precious vinyl records.
In this article, we will delve into the process of checking the azimuth on a turntable. We’ll explore the importance of this calibration, the tools required, and provide a step-by-step guide on how to perform the process accurately. So, whether you’re an avid vinyl enthusiast or just getting started on your turntable journey, this article will equip you with the knowledge to optimize your audio experience.
Understanding Azimuth in Turntables
Azimuth is a term commonly used in the world of turntables to describe the angle at which the stylus is aligned with the grooves of a vinyl record. It is crucial to have the proper azimuth adjustment for optimal sound quality and accurate stereo imaging.
When a vinyl record is cut, the grooves represent the stereo audio signals – the left channel on one side of the groove and the right channel on the other side. The stylus of a turntable’s cartridge reads these grooves, translating the physical movements into electrical signals that are then amplified and sent to the speakers.
If the azimuth is set incorrectly, it means that the stylus is not hitting the grooves perpendicularly, resulting in misalignment between the left and right channels. This misalignment can cause sound imbalances, distortion, and an overall degradation of audio quality.
Moreover, a misaligned azimuth can also lead to excessive stylus wear and premature damage to your vinyl records. The stylus relies on the proper alignment to correctly track the grooves without excessive force or skipping. If the azimuth is off, the stylus may not track the grooves optimally, leading to an increased risk of damage to the record surface.
By understanding the importance of azimuth, you can ensure that your turntable is properly calibrated and delivering the best possible sound reproduction. In the next section, we will discuss why checking the azimuth on your turntable is essential.
Importance of Checking Azimuth
Checking the azimuth on your turntable is crucial for several reasons. Let’s explore why this calibration is so important:
- Optimal Sound Quality: A properly aligned azimuth ensures accurate stereo imaging and balanced sound reproduction. It allows for the faithful reproduction of the original recording, delivering a more immersive and enjoyable listening experience.
- Channel Balance: When the azimuth is correctly set, the left and right channels of your audio signal will be aligned, resulting in a balanced and centered soundstage. This means that instruments and vocals will be accurately positioned, providing a more realistic and engaging audio experience.
- Reduced Distortion: Incorrect azimuth calibration can introduce distortion to your audio playback. This distortion can manifest as a loss of clarity, muddiness, or even audible artifacts. By checking and adjusting the azimuth, you can minimize these distortions and achieve cleaner and more faithful sound reproduction.
- Extended Stylus and Record Life: A misaligned azimuth can lead to excessive stylus wear and damage to your vinyl records. By ensuring proper alignment, you can minimize the risk of premature wear and maintain the longevity of both your stylus and your cherished vinyl collection.
Overall, checking the azimuth on your turntable is essential for achieving optimal sound quality, preserving the condition of your records, and enhancing your overall listening experience. In the next section, we will explore the tools required to perform this calibration.
Tools Required for Checking Azimuth
Checking the azimuth on a turntable requires a few specific tools to ensure accurate calibration. These tools are readily available and relatively affordable. Let’s take a look at the essential tools needed:
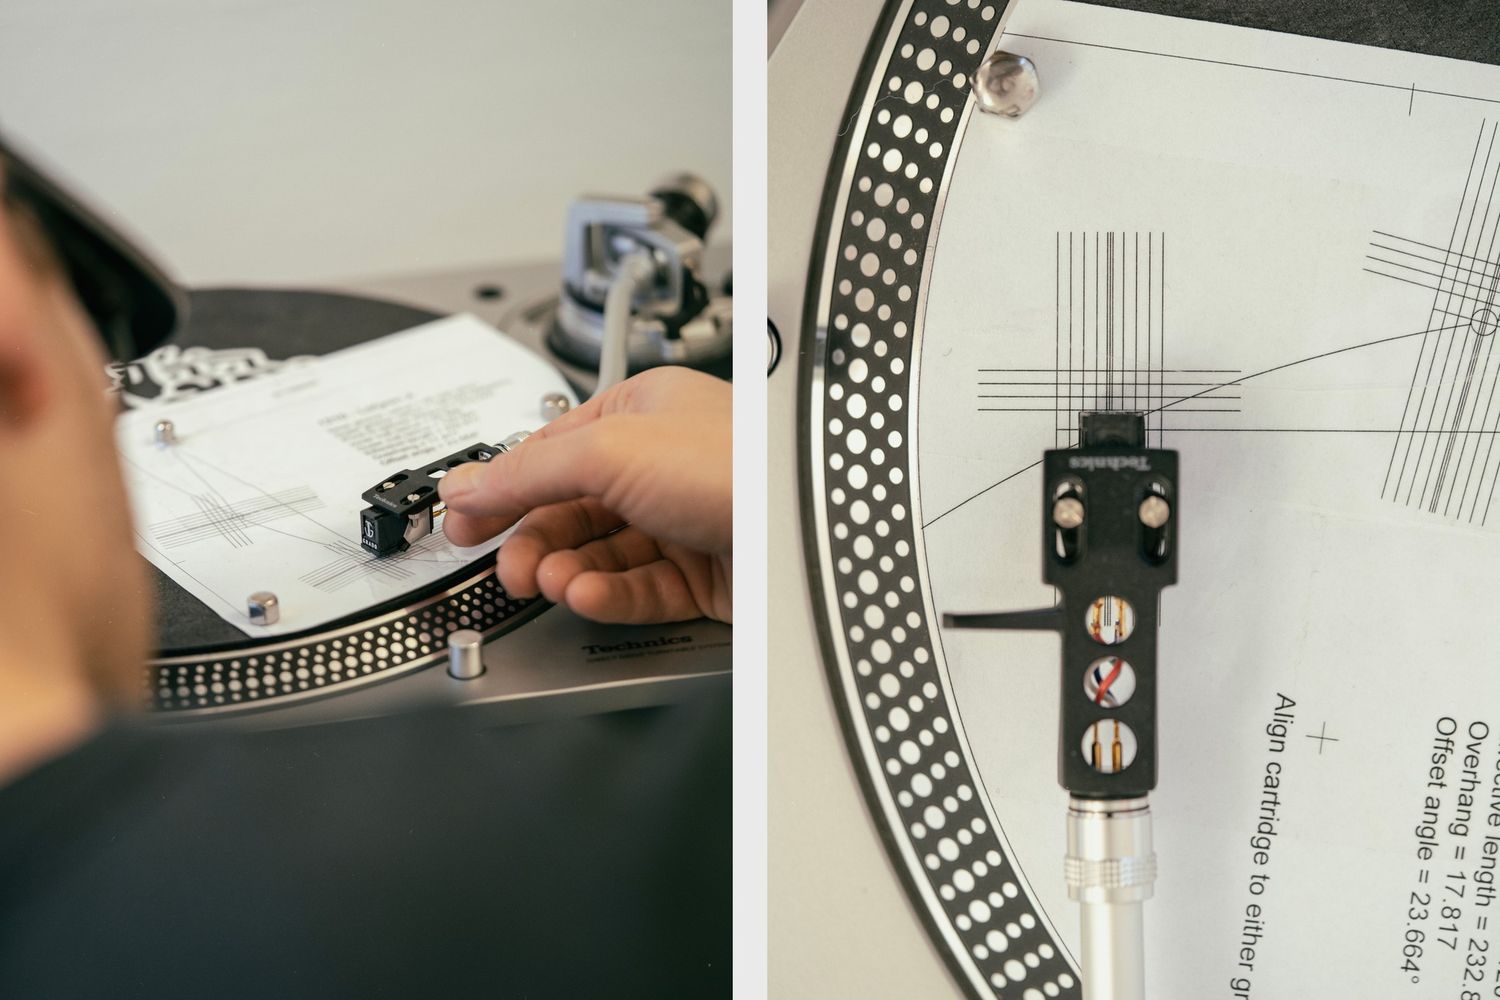
- Alignment Protractor: An alignment protractor is a measurement tool used to align the cartridge on the turntable’s tonearm. It consists of a printed template with grid lines and alignment points. The protractor helps you position the cartridge properly to achieve the correct azimuth angle.
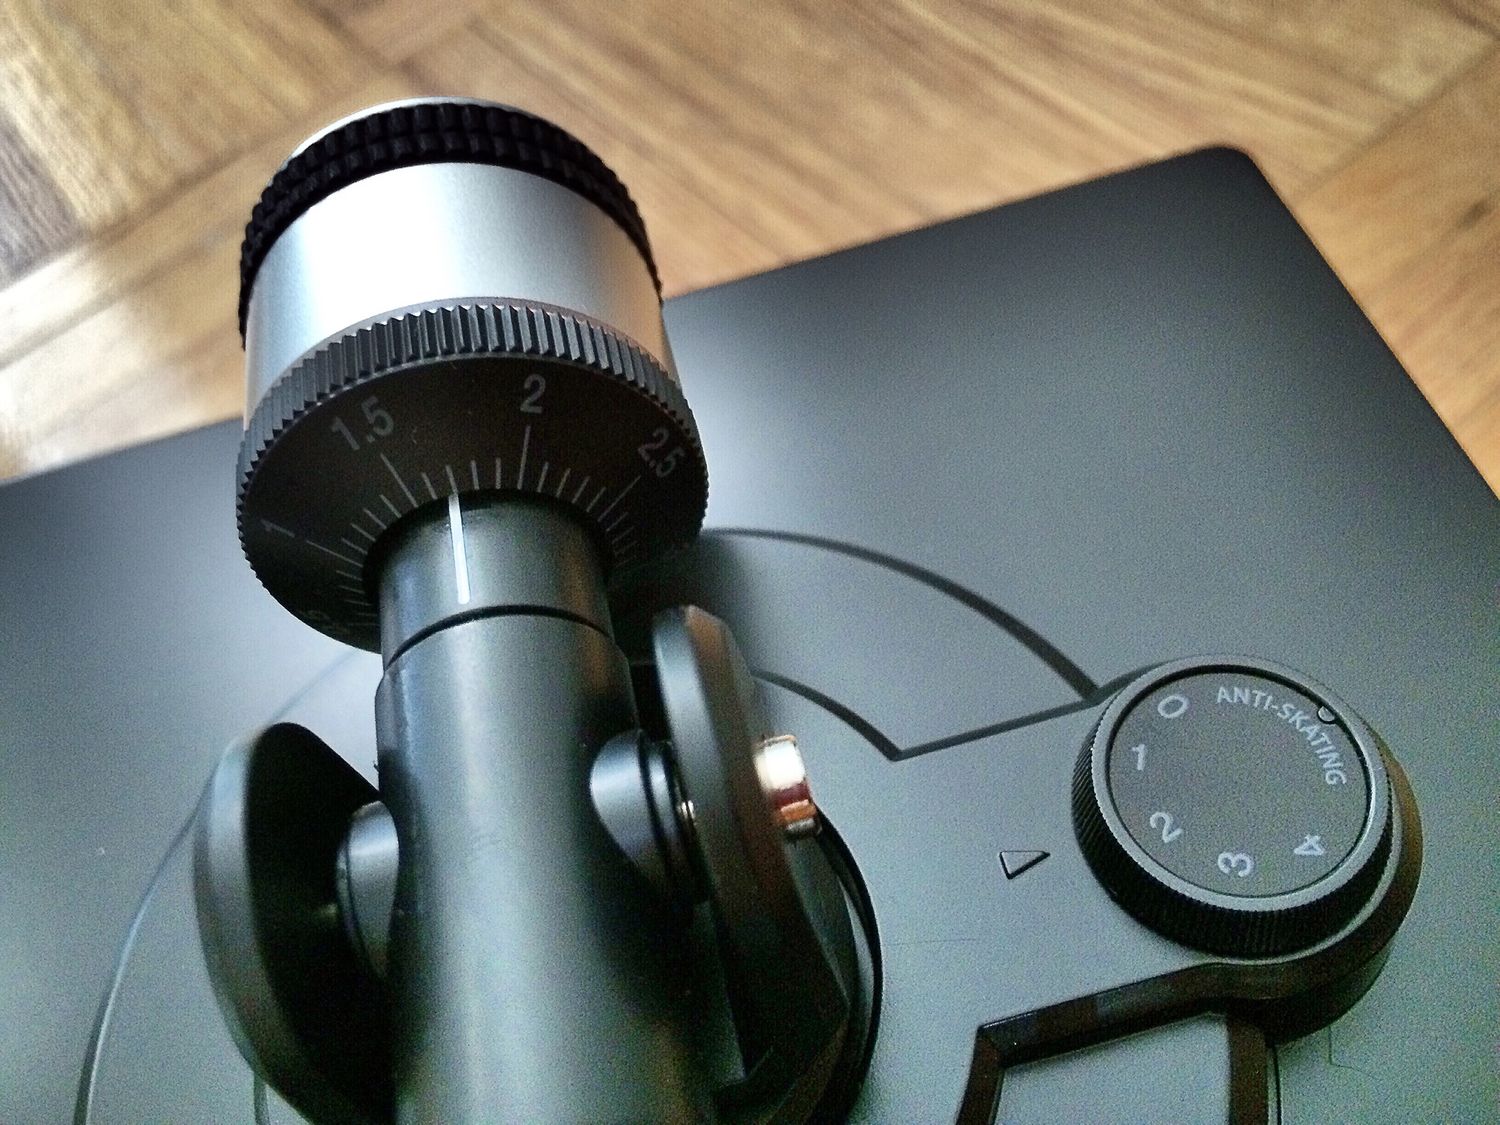
- Stylus Force Gauge: A stylus force gauge is used to measure the tracking force applied by the stylus on the record. While it is not directly related to azimuth calibration, it is important to ensure the proper tracking force for accurate playback and to prevent excessive wear on your records.
- Leveling Device: A leveling device, such as a bubble level or electronic level, is essential to ensure that your turntable’s platter and tonearm are perfectly horizontal. This is important for accurate azimuth measurement, as any tilt or slant can affect the alignment.
- Headshell Alignment Tool: Some turntables may require a special alignment tool for adjusting the position of the cartridge within the headshell. This tool allows you to achieve precise alignment of the cartridge for optimal sonics.
- Test Record: A test record with specific azimuth tracks can be useful for fine-tuning the azimuth calibration. These tracks contain various test signals that can help you evaluate and adjust the azimuth angle accurately.
These tools provide you with the necessary means to check and adjust the azimuth on your turntable effectively. With the appropriate equipment in hand, you are ready to proceed with the calibration process. In the next section, we will guide you through a step-by-step procedure to check the azimuth on your turntable.
Step-by-Step Guide to Check Azimuth on a Turntable
Properly checking the azimuth on your turntable involves a systematic process to ensure accurate calibration. Follow these step-by-step instructions to check the azimuth on your turntable:
- Prepare Your Turntable: Start by ensuring that your turntable is set up correctly and in good working condition. Ensure that the turntable is level and that the cartridge is properly mounted on the tonearm.
- Set Up the Alignment Protractor: Place the alignment protractor on the turntable platter and align it with the center spindle. Make sure it is fixed in place and accurately positioned.
- Select the Proper Alignment Point: Look for the null point or alignment point on the alignment protractor specific to your cartridge model. This point is where you will align the cartridge for optimal azimuth calibration.
- Lower the Stylus: Gently lower the stylus onto the alignment point of the protractor while keeping the tonearm parallel to the protractor’s grid lines.
- Observe the Stylus Angle: Carefully observe the angle at which the stylus aligns with the printed lines on the protractor. The goal is to achieve a parallel alignment between the stylus and the grid lines.
- Adjust the Azimuth: Use the adjustable tool (if available) on your turntable to modify the azimuth angle. Make slight adjustments while observing the stylus angle and aiming for parallel alignment with the grid lines.
- Check Alignment from Both Channels: Repeat the process for both the left and right channels, ensuring that the azimuth is properly adjusted for each channel.
- Verify with a Test Record (Optional): Consider using a test record with dedicated azimuth tracks to fine-tune and verify the calibration. These tracks can provide additional reference points to ensure precise azimuth alignment.
- Finalize and Enjoy: Once you are satisfied with the azimuth calibration, lock the adjustments in place (if applicable) and enjoy your accurately calibrated turntable for optimal sound reproduction.
Following these step-by-step instructions will help you accurately check and adjust the azimuth on your turntable. Remember to take your time, be patient, and make small adjustments for the best results. In the next section, we will discuss some common issues related to azimuth calibration and offer troubleshooting tips.
Common Issues and Troubleshooting
While checking azimuth on a turntable, you may encounter some common issues. Here are a few of them and some troubleshooting tips:
- Inaccurate Alignment: If you notice that the stylus is not aligning parallel to the grid lines on the alignment protractor, double-check the setup of your turntable. Ensure that the turntable is level and that the cartridge is properly mounted. Make adjustments as necessary and try again.
- Uneven Channel Balance: If you find that there is an imbalance between the left and right channels after aligning the azimuth, it may indicate a cartridge or tonearm issue. Check the cartridge alignment within the headshell, as misalignment can affect channel balance. You may need to consult the manufacturer’s instructions or seek professional assistance for proper alignment.
- Tracking Issues: If you experience tracking problems or excessive stylus wear even after aligning the azimuth, it might be due to other factors such as improper tracking force, worn stylus, or damaged records. Verify that you have set the proper tracking force as recommended by the cartridge manufacturer. If issues persist, consider replacing the stylus or inspecting your records for visible damage or excessive debris.
- Inconsistent Results: If you consistently encounter inconsistent or unreliable results when checking the azimuth, it may be due to external factors such as background noise, vibrations, or suboptimal signal sources. Ensure that you are performing the calibration in a quiet environment and using high-quality test records or reference tracks for accurate measurement.
- Headshell Mounting Issues: If you find it challenging to achieve proper azimuth alignment due to limitations in headshell adjustments, consider alternative headshells or tonearms that provide more flexibility in cartridge alignment. Consult the turntable manufacturer or seek expert advice for compatible options.
Remember, calibrating the azimuth of your turntable can be a meticulous process that requires patience and attention to detail. If you encounter persistent issues or are unsure about any step in the process, it is always advisable to consult the turntable manufacturer’s instructions or seek professional assistance to ensure accurate calibration.
With proper troubleshooting and adjustments, you can overcome these common issues and achieve optimal azimuth calibration on your turntable. In the next section, we will conclude our discussion on checking azimuth on turntables.
Conclusion
Checking the azimuth on your turntable is a vital step in ensuring optimal sound quality and accurate stereo imaging. By aligning the stylus properly with the grooves of your vinyl records, you can experience a balanced and immersive audio experience. Additionally, proper azimuth calibration helps reduce distortion, extend stylus and record life, and preserve the integrity of your cherished vinyl collection.
In this article, we have explored the significance of azimuth in turntables and the importance of checking and adjusting it. We have discussed the tools required for this calibration process, including alignment protractors, stylus force gauges, leveling devices, headshell alignment tools, and test records. We have also provided a step-by-step guide to help you perform the azimuth check accurately.
Furthermore, we have addressed common issues that may arise during the calibration process and offered troubleshooting tips. It is important to be mindful of accurate alignment, channel balance, tracking force, and external factors that can affect the calibration results.
By following these guidelines and troubleshooting suggestions, you can ensure that your turntable is properly calibrated and ready to deliver the best possible sound reproduction. Remember to take your time, be patient, and make precise adjustments for optimal results.
Now, armed with the knowledge and understanding of azimuth, you can confidently check and adjust the azimuth on your turntable. Enjoy the enhanced audio performance and immerse yourself in the captivating world of vinyl music.