Home>Devices & Equipment>Turntable>How To Upgrade Turntable Cartridge
Turntable
How To Upgrade Turntable Cartridge
Modified: January 22, 2024
Upgrade your turntable cartridge with these easy steps. Improve the sound quality and performance of your turntable. Find out how to upgrade your turntable cartridge today!
(Many of the links in this article redirect to a specific reviewed product. Your purchase of these products through affiliate links helps to generate commission for AudioLover.com, at no extra cost. Learn more)
Table of Contents
Introduction
Welcome to the world of turntables, where the warm and rich sound of vinyl records fills your space with nostalgia and soul. Whether you’re an audiophile or a casual listener, upgrading your turntable cartridge can greatly enhance your listening experience. The cartridge is a vital component of the turntable, responsible for reading the grooves on a record and translating them into audio signals.
In this article, we will guide you through the process of upgrading your turntable cartridge. We will discuss the tools and materials you’ll need, as well as provide step-by-step instructions on removing the old cartridge, preparing the new cartridge, and installing it correctly. Additionally, we will cover the importance of aligning the cartridge to ensure optimal playback performance.
Before we delve into the nitty-gritty details, it’s essential to note that upgrading your turntable cartridge can have a significant impact on the sound quality of your vinyl collection. A high-quality cartridge can deliver improved clarity, detail, and accuracy, allowing you to fully appreciate the nuances of your favorite albums.
So, whether you’re looking to replace a worn-out cartridge or seeking an upgrade to take your listening experience to the next level, let’s dive in and explore the world of turntable cartridge upgrades!
Step 1: Gather necessary tools and materials
Before you begin the process of upgrading your turntable cartridge, it’s essential to gather all the necessary tools and materials. Having everything ready beforehand will streamline the process and ensure that you have everything you need at your fingertips. Here’s a list of what you’ll need:
- New turntable cartridge: Research and choose a cartridge that suits your needs and budget. There are various options available, ranging from entry-level to high-end cartridges. Consider factors like tracking performance, stylus type, and compatibility with your turntable.
- Screwdriver set: The specific type of screwdrivers required will depend on your turntable model. Check the user manual or do some research to determine which screwdrivers are needed for cartridge installation.
- Antistatic gloves: These gloves will help protect the delicate components of the cartridge from any static electricity that may be present.
- Alignment protractor: An alignment protractor is a handy tool that ensures proper alignment of the cartridge. It helps optimize tracking performance and avoid excessive wear on your records.
- Force gauge: A force gauge is used to measure the tracking force applied by the cartridge. It ensures that the tracking force is set correctly, preventing potential damage to your records and stylus.
- Tweezers: Tweezers are useful for handling small parts and making precise adjustments.
- Clean cloth: A clean, lint-free cloth will come in handy for wiping down the turntable and removing any debris.
Make sure to gather all these tools and materials ahead of time, ensuring a smooth and hassle-free cartridge replacement process. Once you have everything ready, you’re all set to move on to the next step: removing the old cartridge.
Step 2: Remove the old cartridge
Now that you have gathered all the necessary tools and materials, it’s time to remove the old cartridge from your turntable. Follow these steps:
- Power off and unplug the turntable: This is an important safety precaution. Make sure the turntable is completely powered off and unplugged from the electrical outlet before proceeding with the cartridge removal.
- Locate the cartridge: The cartridge is usually located at the end of the tonearm, where the stylus makes contact with the record.
- Remove the headshell screws: Using the appropriate screwdriver, carefully remove the screws that secure the cartridge to the headshell. Keep the screws in a safe place as you will need them later.
- Disconnect the cartridge wires: Gently detach the cartridge wires from the corresponding pins or terminals on the headshell. Take note of how the wires are connected as you will need to replicate this when installing the new cartridge.
- Remove the old cartridge: Once the screws and wires are disconnected, carefully lift the old cartridge from the headshell. Be gentle and avoid touching the delicate stylus or cantilever.
- Inspect and clean: Take a moment to inspect the turntable’s tonearm and headshell for any debris or dust. Use a clean cloth to wipe away any dirt or residue, ensuring a clean and clear surface for the new cartridge.
With the old cartridge now removed, you’re ready to move on to the next step: preparing the new cartridge for installation. Pro-tip: If you plan to reinstall the old cartridge or store it for later use, be sure to protect the stylus with a stylus guard or cover.
Step 3: Prepare the new cartridge
With the old cartridge removed, it’s time to prepare the new cartridge for installation. This step is crucial to ensure optimal performance and longevity of the cartridge. Follow these steps:
- Remove the stylus guard: If your new cartridge comes with a stylus guard, carefully remove it to expose the stylus. Be cautious not to touch the stylus itself, as it is fragile and sensitive.
- Inspect the stylus: Take a close look at the stylus for any visible defects, such as bends or damage. If you notice any issues, contact the manufacturer or seller for assistance.
- Check the stylus pressure: It’s essential to confirm that the tracking force specified by the cartridge manufacturer is set correctly. Refer to the cartridge’s documentation for the recommended tracking force range.
- Attach the wires: Take note of how the previous cartridge’s wires were connected, and replicate the same connections on the new cartridge. Ensure a secure and proper connection to avoid any audio issues.
- Secure the cartridge to the headshell: Carefully position the new cartridge on the headshell, aligning the mounting holes with the screws. Use the screws removed earlier to secure the cartridge in place. Be careful not to overtighten the screws, as this may damage the cartridge or headshell.
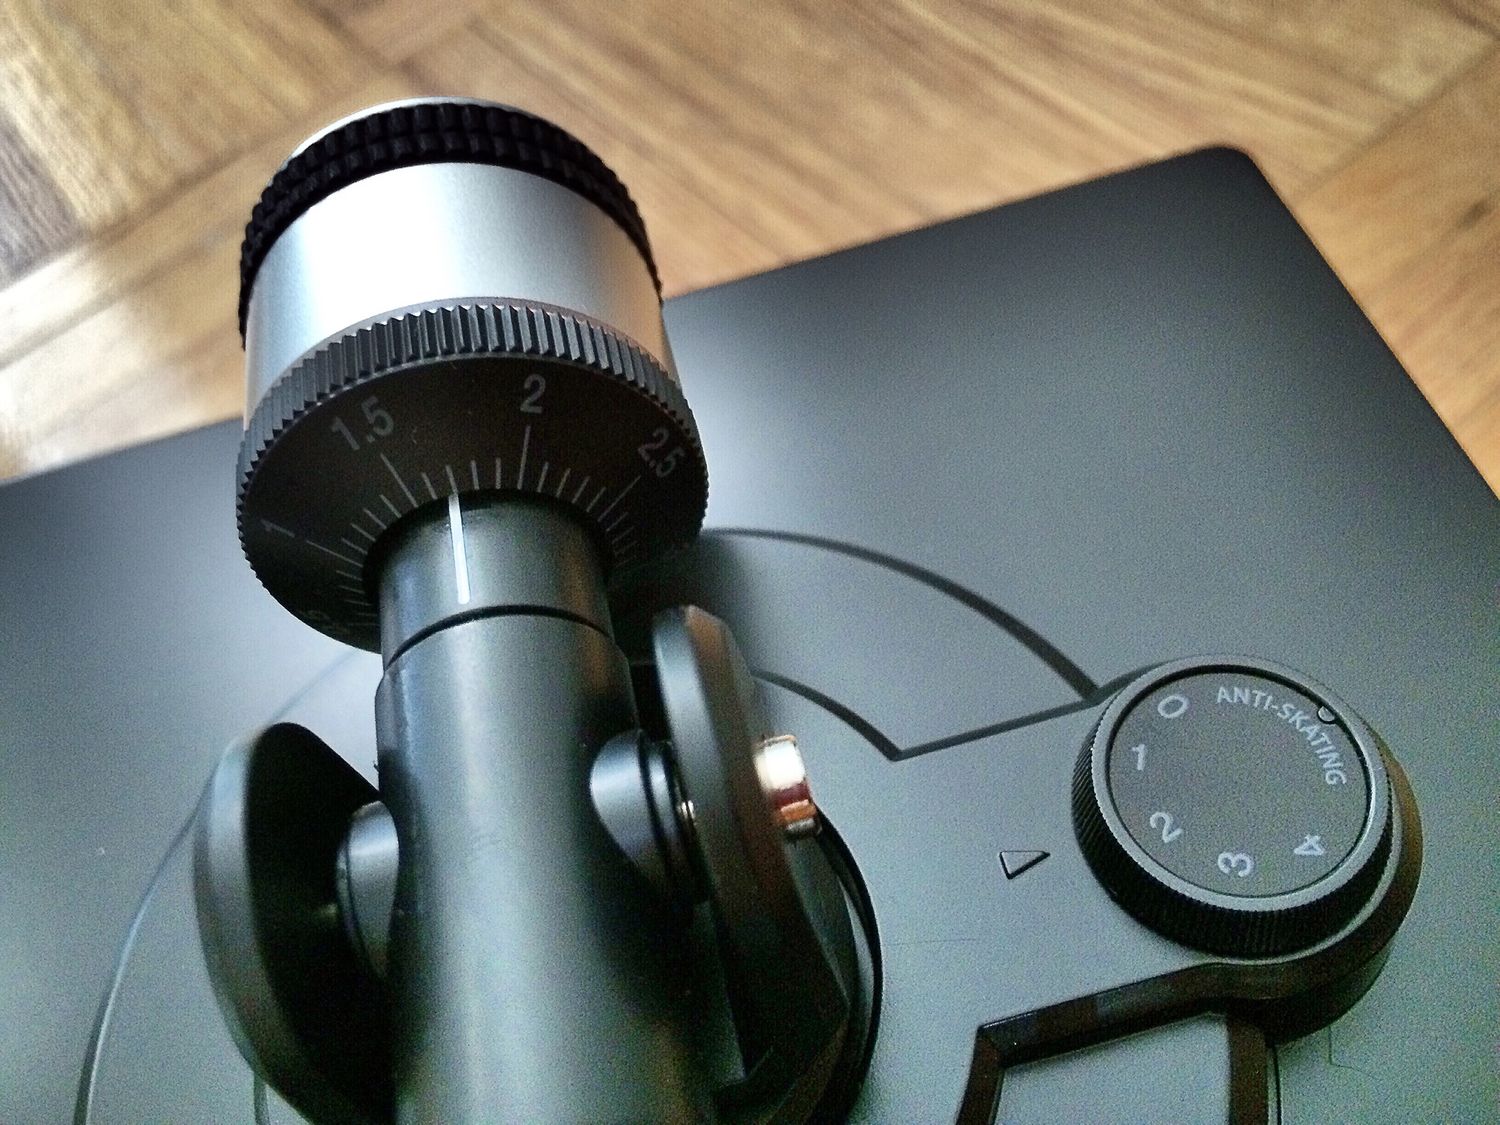
- Set the tracking force: Use a force gauge to set the tracking force according to the manufacturer’s specifications. Adjust the counterweight or other tracking force adjustment mechanism on the turntable’s tonearm until the desired tracking force is achieved.
Once you have completed these steps, congratulations! You have successfully prepared the new cartridge for installation. The next step involves installing the cartridge onto the turntable, so let’s move on.
Step 4: Install the new cartridge
Now that you have prepared the new cartridge, it’s time to install it onto your turntable. Follow these steps to ensure a proper installation:
- Power off and unplug the turntable: As a safety precaution, make sure the turntable is powered off and unplugged from the electrical outlet.
- Position the tonearm: Lift the tonearm and position it over the cartridge mounting area. Make sure it is aligned with the correct position for the cartridge installation.
- Lower the tonearm: Carefully lower the tonearm, ensuring that the cartridge’s mounting holes align with the tonearm’s finger-lift or any alignment markers.
- Secure the cartridge: Use the screws provided with the new cartridge to securely fasten it to the tonearm. Use the appropriate screwdriver to tighten the screws, being careful not to overtighten them.
- Check the alignment: Use an alignment protractor to verify that the cartridge is properly aligned. Follow the instructions provided with the protractor to ensure accurate alignment.
- Double-check the connections: Confirm that the cartridge wires are securely connected to the corresponding pins or terminals on the turntable’s headshell. Ensure there are no loose connections that could affect audio playback.
- Inspect for clearance: With the cartridge installed, ensure that there is sufficient clearance between the stylus and the turntable platter. A general rule of thumb is to have a gap of about 1.5 to 2mm.
Once you have completed these steps, you have successfully installed the new cartridge onto your turntable. The next step involves aligning the cartridge for optimal performance, so let’s move on to the next section.
Step 5: Align the cartridge
Proper cartridge alignment is crucial for achieving accurate tracking and optimal sound quality. Follow these steps to align your new cartridge:
- Choose an alignment protractor: There are various alignment protractors available, such as Baerwald, Stevenson, and Löfgren. Select the protractor that is compatible with your turntable’s tonearm and cartridge.
- Print or download the protractor: Find a printable protractor template online or download a digital version. Ensure that you print the template at the correct scale without any resizing.
- Place the protractor on the turntable: Carefully place the protractor on the turntable platter, ensuring it is centered and aligned with the spindle. Some protractors have a centering hole to assist with this step.
- Align the cartridge: Position the tonearm stylus at the null point or alignment point specified on the protractor. Adjust the cartridge’s alignment using the provided screws or other adjustment mechanisms until the stylus aligns with the recommended tracking points on the protractor.
- Check azimuth alignment: Azimuth refers to the horizontal alignment of the cartridge. Use the azimuth adjustment feature on your tonearm, if available, to ensure that the cartridge is perfectly level. This will further optimize playback performance.
- Repeat the process: Double-check the alignment by moving the tonearm across the protractor’s lines and ensuring that the stylus continues to align with the tracking points. Make any necessary adjustments as needed.
- Confirm alignment with test records: You can further confirm the alignment by playing test records specifically designed to assess cartridge alignment. These records often include test tracks with various types of grooves to check tracking accuracy.
By following these steps, you will have successfully aligned your new cartridge, which is essential for optimal sound quality and minimizing wear on your records. Now, it’s time to move on to the final step: testing the turntable with the newly installed cartridge.
Step 6: Test the turntable
After installing and aligning the new cartridge, it’s crucial to test the turntable to ensure everything is functioning properly. Follow these steps to test the turntable with the newly installed cartridge:
- Power on the turntable: Plug in the turntable and power it on according to the manufacturer’s instructions.
- Select a test record or a familiar album: Choose a test record specifically designed to evaluate turntable and cartridge performance, or select a familiar album with a range of musical genres and dynamics to assess the overall sound quality.
- Place the record on the platter: Carefully place the record onto the turntable platter, ensuring it sits properly and is centered.
- Lower the tonearm: Gently lower the tonearm onto the record, allowing the stylus to make contact with the grooves. Be cautious and avoid any sudden movements.
- Listen for accurate playback: Pay close attention to the playback quality. Listen for clarity, detail, and accuracy in the sound reproduction. Ensure that there are no skips or distortions during playback.
- Monitor tracking force: While the record is playing, monitor the tracking force on the force gauge. Ensure that the tracking force remains within the recommended range specified by the cartridge manufacturer.
- Check for any issues: During playback, observe for any issues such as excessive background noise, mis-tracking, or imbalanced channel output. If you notice any issues, consult the cartridge’s documentation or seek professional assistance.
- Make minor adjustments if needed: If necessary, you can make minor adjustments to the tracking force or alignment as per the manufacturer’s recommendations or your personal preference. However, exercise caution and make small changes at a time while carefully monitoring the impact on playback performance.
By testing the turntable and carefully evaluating the playback performance, you can ensure that the new cartridge is providing optimal sound quality and tracking accuracy. If everything sounds great and functions properly, you’ve successfully completed the process of upgrading your turntable cartridge!
Congratulations on your successful cartridge upgrade! Enjoy rediscovering your vinyl collection with improved sound quality and a more engaging listening experience.
Conclusion
Upgrading your turntable cartridge is a great way to enhance your vinyl listening experience. By following the steps outlined in this guide, you can successfully replace and align your cartridge to achieve optimal sound quality and performance. Here’s a recap of the steps involved:
- Gather the necessary tools and materials.
- Remove the old cartridge.
- Prepare the new cartridge for installation.
- Install the new cartridge onto the turntable.
- Align the cartridge for precise tracking.
- Test the turntable with the newly installed cartridge.
By taking the time to carefully follow each step, you ensure that the cartridge is installed correctly and aligned to provide accurate playback and minimize wear on your records. Remember to consult the manufacturer’s instructions for specific details regarding your cartridge and turntable model.
Upgrading your turntable cartridge opens up a new world of audio fidelity, allowing you to immerse yourself in the richness and warmth of vinyl recordings. It’s an investment in preserving the authenticity and nostalgia of this analog format.
Don’t be afraid to experiment and explore different cartridge options to find the one that suits your preferences and budget. Keep in mind that proper maintenance and care, such as regular cleaning and stylus replacement, are crucial for maintaining the longevity and performance of your cartridge.
So, go ahead and embark on the journey of upgrading your turntable cartridge. Experience the joy of rediscovering your vinyl collection with enhanced sound quality and a renewed appreciation for the intricate details hidden within the grooves.
Happy listening!