Home>Production & Technology>Audio Interface>Where To Plug In Headphones On Audio Interface
Audio Interface
Where To Plug In Headphones On Audio Interface
Published: February 5, 2024
Find out where to plug in your headphones on an audio interface and enhance your audio experience. Explore the options on how to connect your headphones to your audio interface.
(Many of the links in this article redirect to a specific reviewed product. Your purchase of these products through affiliate links helps to generate commission for AudioLover.com, at no extra cost. Learn more)
Table of Contents
Introduction
When it comes to audio production and recording, having a high-quality audio interface is crucial. An audio interface is a device that connects your computer or recording equipment to your musical instruments, microphones, and other sound sources. It serves as the bridge between the analog and digital worlds, converting the audio signals into a format that can be processed and recorded digitally.
One essential feature of an audio interface is the headphone output, which allows you to monitor your audio while recording or mixing. Having a dedicated headphone output with sufficient power and clarity is vital for accurate monitoring and ensuring the quality of your recordings.
In this article, we will explore the different types of headphone outputs found on audio interfaces, their locations on the front and rear panels, and their purpose in the audio production workflow. We will also discuss the importance of monitoring and mixing with headphones and provide some tips for maximizing headphone performance.
Whether you’re a musician, podcaster, or audio engineer, understanding the different headphone output options on your audio interface will help you make informed decisions and optimize your workflow. So, let’s dive in and discover where to plug in your headphones on an audio interface.
Understanding Audio Interfaces
Before we delve into the specifics of headphone outputs on audio interfaces, let’s first gain a basic understanding of what an audio interface is and its role in audio production.
An audio interface is an external hardware device that connects your computer to various audio devices, such as microphones, instruments, and speakers. It serves as both an analog-to-digital converter (ADC) and a digital-to-analog converter (DAC), ensuring accurate conversion of audio signals in both directions.
Audio interfaces come in various shapes and sizes, with different input and output options. These include XLR and TRS inputs for microphones and instruments, line-level inputs and outputs for connecting with mixers or other sound sources, MIDI connections, and, of course, headphone outputs.
Audio interfaces are essential for professional audio recording and production as they provide high-quality audio conversion with low latency. They offer better sound quality and more robust features compared to the built-in audio interfaces found in computers.
Moreover, audio interfaces offer flexibility, allowing you to connect multiple devices simultaneously and providing control over input levels, monitor mixes, and more. They also typically come with software drivers and control panels for adjusting settings, routing audio signals, and managing the overall audio workflow.
Whether you’re a home studio enthusiast, a professional musician, or a content creator, having a reliable audio interface is crucial for achieving professional-grade sound recordings and productions.
Headphone Output on an Audio Interface
The headphone output on an audio interface is a dedicated jack that allows you to monitor your audio directly through headphones. It provides a convenient way to listen to your recordings, perform live monitoring, and make critical judgments about the sound quality and mix.
The headphone output on an audio interface is designed to deliver a clean and powerful signal to your headphones. It typically includes a headphone amplifier that can drive different types of headphones, providing ample volume and ensuring accurate representation of the audio.
Most audio interfaces feature both front panel and rear panel headphone jacks, each serving a specific purpose and offering distinct advantages.
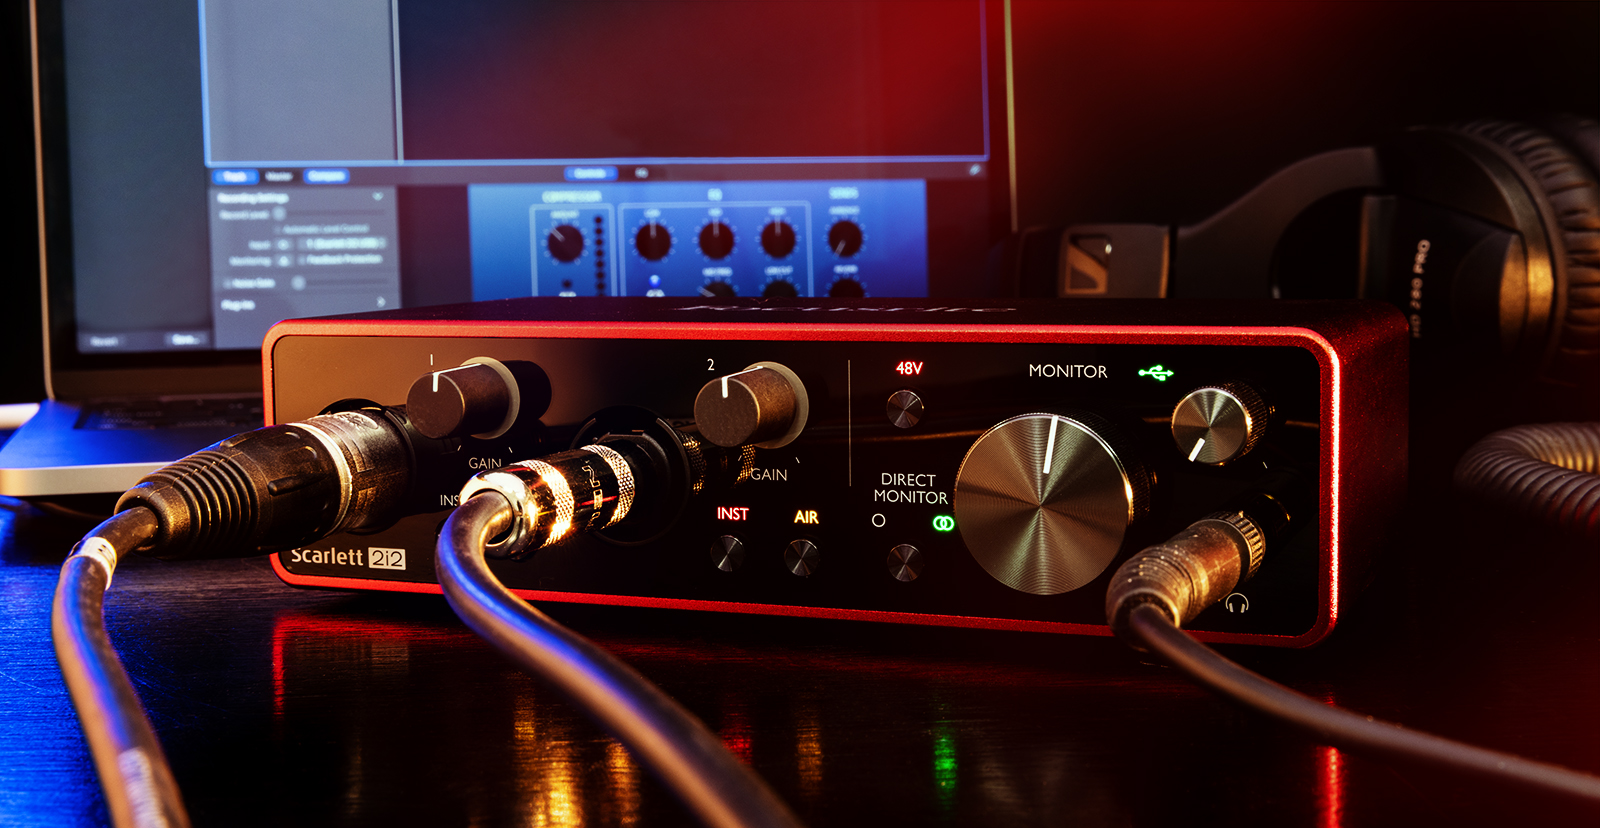
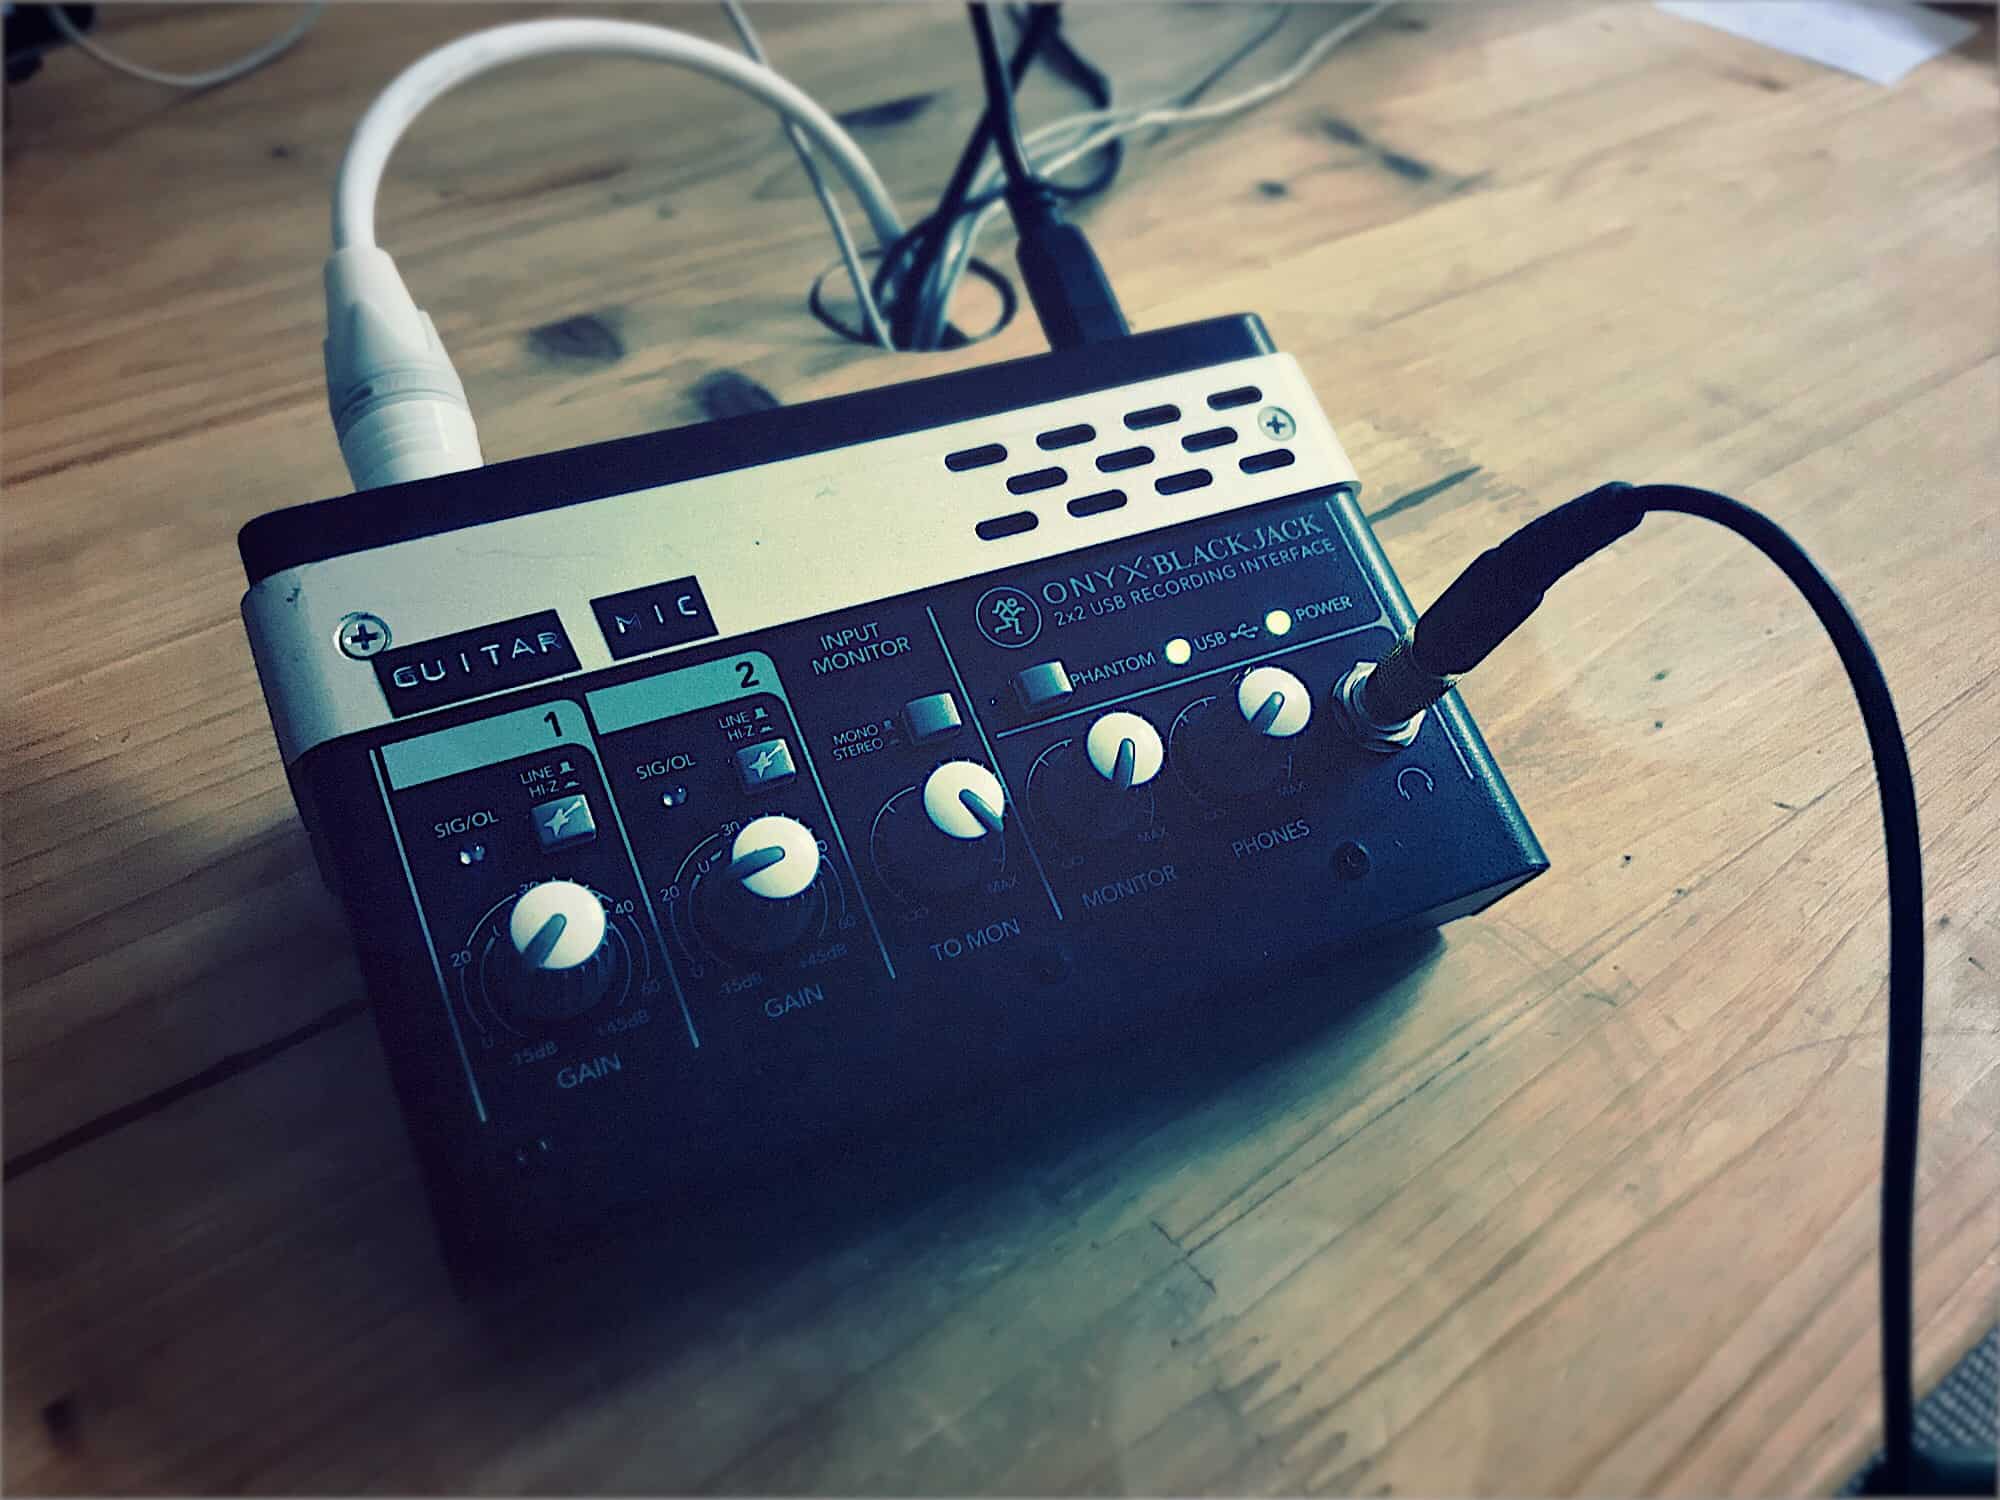
Front Panel Headphone Jacks:
The front panel headphone jacks are usually located on the front face of the audio interface for easy access. These jacks are convenient for quick monitoring and plugging in and unplugging your headphones without having to reach the back of the device.
Front panel headphone jacks often come with a dedicated volume knob, allowing you to control the headphone level independently of the main output volume. This feature is useful when you want to adjust the relative volume between your headphones and the main speakers.
Rear Panel Headphone Jacks:
In addition to the front panel headphone jacks, many audio interfaces also have headphone outputs on the rear panel. These jacks are typically designed for more permanent connections and are ideal for applications where you want to keep your cables neatly organized.
Rear panel headphone outputs often offer additional routing options, allowing you to assign different headphone mixes, connect multiple pairs of headphones for monitoring purposes, or integrate with external headphone distribution amplifiers.
Having both front and rear panel headphone jacks gives you flexibility in connecting your headphones and tailors to your specific workflow preferences.
Next, we will explore how to effectively use headphones for monitoring and mixing with an audio interface.
Front Panel Headphone Jacks
The front panel of an audio interface features convenient headphone jacks that allow for quick and easy access to monitoring your audio. These headphone jacks are typically located on the front face of the device, making them readily accessible without needing to reach around to the back of the interface.
Front panel headphone jacks offer several advantages for monitoring and mixing. One of the key advantages is the presence of a dedicated volume knob specifically for the headphone output. This allows you to control the headphone volume independently from the main output volume, providing precise control over your monitoring levels.
With a dedicated volume knob, you can easily adjust the level of your headphones to match your desired listening volume, without affecting the volume of your main speakers or other outputs. This is particularly useful when you need to fine-tune the relative volume between your headphones and the rest of your audio setup.
An important consideration when using front panel headphone jacks is the impedance compatibility between your headphones and the interface’s headphone output. Impedance is essentially the resistance that the headphones present to the audio signal. Different headphones have different impedance ratings, and it’s essential to ensure that the interface’s headphone output can adequately drive your headphones.
Many audio interfaces provide different headphone impedance options, allowing you to match the impedance setting with your headphones for optimal performance. Higher impedance headphones generally require more power to drive, so having the flexibility to adjust the impedance setting can ensure that your headphones sound their best.
In addition to the dedicated volume control and impedance options, front panel headphone jacks often offer other features such as headphone mix control, which allows you to blend the audio signal from different sources or adjust the balance between the playback and input signals. This feature can be especially helpful for musicians and podcasters who want to monitor their own performance while listening to pre-recorded tracks or other inputs.
Front panel headphone jacks provide convenience, control, and flexibility in monitoring your audio. They are a valuable feature on any audio interface and make it easy to connect and monitor your headphones without hassle.
Now that we’ve explored front panel headphone jacks, let’s move on to discussing the rear panel headphone jacks found on many audio interfaces.
Rear Panel Headphone Jacks
In addition to the front panel headphone jacks, many audio interfaces also feature headphone outputs on the rear panel. While not as easily accessible as the front panel jacks, rear panel headphone jacks offer distinct advantages and are often designed for more permanent connections.
Rear panel headphone jacks are typically located on the back of the audio interface, alongside other input and output connections. These jacks provide a neater and more organized setup, especially if you have limited space or want to keep your cables hidden.
One primary advantage of rear panel headphone jacks is the additional routing options they provide. Some audio interfaces allow you to assign different headphone mixes to the rear panel jacks, allowing multiple users to listen to different audio sources simultaneously. This is particularly useful in recording studios or collaborative settings where it’s essential to provide independent monitoring options for each performer or engineer.
Rear panel headphone jacks also offer the flexibility to connect multiple pairs of headphones for monitoring purposes. You can use a headphone distribution amplifier or splitter to distribute the audio signal from the interface to multiple headphones, allowing everyone in the recording or mixing session to monitor the audio. This feature is particularly beneficial in situations where multiple people need to listen to the same audio source without compromising audio quality.
Furthermore, some audio interfaces may have additional control options or settings on the rear panel for headphone outputs. These can include additional gain controls or switches for adjusting the headphone level or impedance, further tailoring the audio experience to your specific headphones or monitoring preferences.
While rear panel headphone jacks may not offer the immediate accessibility of front panel jacks, they provide a more organized setup and added flexibility for routing and monitoring purposes. If you have multiple headphones or require independent monitoring options, using the rear panel headphone jacks can greatly enhance your audio production workflow.
Now that we’ve explored both front and rear panel headphone jacks, let’s move on to the importance of monitoring and mixing with headphones in the audio production process.
Monitoring and Mixing with Headphones
Monitoring and mixing with headphones play a crucial role in the audio production process. Whether you’re recording, editing, or mixing, headphones provide a unique perspective on the audio that can help you make critical decisions and ensure the accuracy and quality of your work.
One of the main advantages of using headphones for monitoring is the isolation they offer. When wearing headphones, you can focus solely on the details of the audio without any external interference or distractions. This allows you to catch subtle nuances, detect background noise, and make precise adjustments to your recordings or mix.
Using headphones also provides a controlled and consistent listening environment. Unlike speakers, which can be affected by room acoustics and external factors, headphones deliver the audio signal directly to your ears. This ensures that you hear the audio as it was intended, without any interference from the surrounding environment.
When it comes to mixing, headphones can help you achieve a more precise and detailed balance between different elements of the audio. They allow you to focus on individual tracks, identify any issues with the mix, and make precise adjustments to achieve the desired sonic balance. Headphones can reveal subtle panning, frequency imbalances, and spatial effects that may be harder to discern with speakers alone.
However, it’s important to note that relying solely on headphones for monitoring can have its limitations. While they provide excellent detail and isolation, they may not accurately reproduce the spatial qualities and stereo imaging of speakers in a room. It’s essential to periodically reference your mix on different playback systems, such as speakers or car stereo, to ensure that it translates well across various listening environments.
To maximize the performance of monitoring and mixing with headphones, it’s crucial to consider a few tips:
- Choose high-quality headphones that are well-suited for audio production, ensuring accurate frequency response and a comfortable fit.
- Calibrate your headphone volume to a comfortable level that allows for extended periods of use without causing fatigue or damage to your ears.
- Take regular breaks and alternate between headphone and speaker monitoring to maintain a fresh perspective on your audio.
- Use reference tracks that you are familiar with to compare the sound of your mix with professional recordings, ensuring that it aligns with industry standards.
- Consider using virtual surround sound plugins or 3D audio technologies to simulate a more spatial listening experience when mixing with headphones.
Monitoring and mixing with headphones provide an essential tool for audio production, offering isolation, detail, and control. By incorporating headphones into your workflow and following these tips, you can enhance the accuracy and quality of your recordings and mixes.
Now, let’s wrap up our discussion with a few concluding thoughts.
Tips for Maximizing Headphone Performance
To ensure that you get the most out of your headphones and maximize their performance, consider the following tips:
- Invest in high-quality headphones: Choose headphones that are specifically designed for audio production and have a reputation for accurate sound reproduction. Look for models that provide a wide frequency response and a balanced sound signature.
- Consider impedance compatibility: Check the impedance rating of your headphones and ensure that it matches the output impedance of your audio interface. Mismatched impedance can lead to distortion or inadequate volume levels.
- Properly calibrate headphone volume: Set the volume level of your headphones to a comfortable and safe level. Listening at excessively high volumes can cause ear fatigue and damage your hearing over time. Use the volume control on your audio interface to regulate the output level.
- Utilize equalization settings: Experiment with equalization settings to fine-tune the frequency response of your headphones. This can help compensate for any inherent frequency imbalances and achieve a more accurate representation of the audio.
- Take regular breaks: Listening to audio through headphones for extended periods can cause ear fatigue. Take regular breaks to give your ears a rest and prevent long-term damage. It’s also a good opportunity to gain a fresh perspective on your audio when you come back.
- Reference your mix on different playback systems: While headphones provide excellent detail and isolation, it’s essential to check your mix on various playback systems. This ensures that your audio translates well across different devices and listening environments.
- Use reference tracks: Select a few tracks that you are familiar with and often listen to across different systems. These reference tracks can serve as a benchmark for comparing the sonic qualities and balance of your mix.
- Consider using room simulation plugins: To overcome the lack of spatial representation in headphones, utilize room simulation plugins or 3D audio technologies. These tools can help create a more immersive and realistic listening experience when mixing.
By following these tips, you can enhance the performance of your headphones and ensure that you are getting the most accurate representation of your audio. Remember that every headphone model is unique, so take the time to understand the specific characteristics of your headphones and tailor your listening experience accordingly.
Now, let’s wrap up our discussion.
Conclusion
In conclusion, understanding the headphone output options on an audio interface is essential for achieving high-quality audio recordings and mixes. Both front panel and rear panel headphone jacks offer unique advantages and cater to specific workflow preferences.
The front panel headphone jacks provide convenience and quick access, often with dedicated volume controls and impedance options. They are ideal for adjusting the relative volume between headphones and main speakers, offering a more personalized listening experience.
Rear panel headphone jacks, on the other hand, provide additional routing options and allow for more permanent connections. They offer flexibility in assigning different headphone mixes and connecting multiple pairs of headphones, making them valuable in collaborative or professional recording environments.
Monitoring and mixing with headphones provide a controlled and isolated listening experience, allowing you to focus on the details of your audio without external disturbances. While headphones excel at delivering accuracy and detail, it’s important to periodically reference your mix on different playback systems to ensure its translation across various listening environments.
By following tips such as investing in high-quality headphones, calibrating the volume properly, taking breaks, and using reference tracks, you can maximize the performance of your headphones and achieve accurate audio representation.
Whether you’re a musician, podcast producer, or audio engineer, understanding where to plug in your headphones on an audio interface is crucial for achieving professional-grade sound recordings and mixes. Take advantage of the headphone outputs on your audio interface, select the right headphones for your needs, and make informed decisions that will elevate your audio production workflow.
Now that you are armed with the knowledge of headphone outputs on audio interfaces, it’s time to dive in, create, and enjoy the world of precise and immersive audio production.