Home>Production & Technology>Metronome>How To Replace Light On Franz Electric Metronome Model LM-FB-4
Metronome
How To Replace Light On Franz Electric Metronome Model LM-FB-4
Published: January 15, 2024
Looking to replace the light on your Franz Electric Metronome Model LM-FB-4? Find out how to do it easily and quickly in this comprehensive guide.
(Many of the links in this article redirect to a specific reviewed product. Your purchase of these products through affiliate links helps to generate commission for AudioLover.com, at no extra cost. Learn more)
Table of Contents
- Introduction
- Important Notes before Replacing the Light
- Tools and Materials Needed
- Step 1: Disconnecting the Power
- Step 2: Opening the Metronome Model LM-FB-4
- Step 3: Locating the Light Bulb
- Step 4: Removing the Old Light Bulb
- Step 5: Installing the New Light Bulb
- Step 6: Closing the Metronome Model LM-FB-4
- Step 7: Testing the New Light bulb
- Conclusion
Introduction
Welcome to the guide on how to replace the light on the Franz Electric Metronome Model LM-FB-4. The metronome is a classic and essential tool for musicians, helping them keep time and maintain a steady rhythm. However, over time, the light on the metronome may dim or burn out completely, making it difficult to use in low-light conditions. Fortunately, replacing the light bulb is a relatively simple task that you can easily do on your own.
In this guide, we will walk you through the step-by-step process of replacing the light bulb on your Franz Electric Metronome Model LM-FB-4. Before we get started, it’s important to note that while this guide is specifically for the Franz Electric Metronome Model LM-FB-4, the general process of replacing the light bulb may be applicable to other metronome models as well. However, it’s always advisable to consult your metronome’s user manual or contact the manufacturer for model-specific instructions.
Before you begin the replacement process, there are a few important notes to keep in mind. First, ensure that the metronome is powered off and disconnected from any power source before attempting any repairs or modifications. This will help prevent any electrical accidents or damage to the metronome.
Additionally, make sure you have the necessary tools and materials for the replacement. These will typically include a small screwdriver, a replacement light bulb suitable for your metronome model, and a clean cloth or tissue for handling the bulb. It’s always a good idea to wear a pair of gloves to protect your hands from any shards of glass that may break during the replacement process.
Now that you have the necessary information and precautions, let’s proceed to the step-by-step process of replacing the light bulb on your Franz Electric Metronome Model LM-FB-4.
Important Notes before Replacing the Light
Before you begin the process of replacing the light on your Franz Electric Metronome Model LM-FB-4, there are a few important notes that you should keep in mind:
- Ensure that the metronome is powered off and disconnected from any power source before attempting any repairs or modifications. This will help prevent any electrical accidents or damage to the metronome. Safety should always be your top priority.
- Consult your metronome’s user manual or contact the manufacturer for model-specific instructions. While this guide is tailored for the Franz Electric Metronome Model LM-FB-4, it’s always advisable to follow the manufacturer’s guidelines to ensure proper replacement and avoid any potential damage to your metronome.
- Make sure you have the necessary tools and materials before starting the replacement process. The tools typically required for the job include a small screwdriver to open the metronome, a replacement light bulb suitable for your metronome model, and a clean cloth or tissue for handling the bulb. Wearing gloves during the process is also suggested to protect your hands from any glass shards that may break during the replacement.
- Take your time and work in a well-lit and comfortable area. This will allow you to focus on the task at hand and ensure proper replacement without any unnecessary hurry or distraction.
- If you encounter any difficulties or are unsure about any step in the process, it’s always best to seek assistance from a professional or contact the manufacturer for guidance. It’s better to have an expert’s opinion to avoid any potential damage or mistakes.
By keeping these important notes in mind, you can proceed with confidence in replacing the light on your Franz Electric Metronome Model LM-FB-4. Now that you are prepared, let’s move on to the step-by-step process of opening the metronome and locating the light bulb.
Tools and Materials Needed
Before you begin replacing the light on your Franz Electric Metronome Model LM-FB-4, gather the following tools and materials:
- Small screwdriver: You will need a small screwdriver to open the metronome and access the light bulb. Ensure that the screwdriver is the appropriate size for the screws on your specific metronome model.
- Replacement light bulb: Purchase a replacement light bulb suitable for the Franz Electric Metronome Model LM-FB-4. Check the specifications of your metronome or consult the user manual to ensure you choose the correct bulb.
- Clean cloth or tissue: It’s always a good idea to have a clean cloth or tissue on hand to handle the light bulb during the replacement process. This will help prevent any fingerprints or debris from affecting the bulb’s performance.
- Gloves: Wearing gloves is recommended to protect your hands from any glass shards that may break during the replacement. Opt for a pair of gloves that allow for dexterity, making it easier to handle the delicate components of the metronome.
Having these tools and materials ready before you start the replacement process will ensure a smooth and efficient experience. It’s always better to be properly equipped to avoid any delays or complications along the way.
Now that you have all the necessary tools and materials, let’s move on to the step-by-step process of replacing the light on your Franz Electric Metronome Model LM-FB-4.
Step 1: Disconnecting the Power
Before you begin replacing the light on your Franz Electric Metronome Model LM-FB-4, it’s important to disconnect the power to ensure your safety. Follow these steps:
- Turn off the metronome: If your metronome has an on/off switch, flip it to the “off” position. If it doesn’t have an on/off switch, unplug it from the power source.
- Remove batteries (if applicable): If your metronome operates on batteries, remove them to ensure there is no power source connected to the device. This step is crucial to prevent any accidental electrical shock or damage during the replacement process.
By disconnecting the power and removing any batteries, you’ll eliminate the risk of electrical accidents and have peace of mind while working on the metronome.
Now that you’ve disconnected the power, you can proceed to the next step of opening the metronome and accessing the light bulb.
Step 2: Opening the Metronome Model LM-FB-4
Now that you have safely disconnected the power, the next step is to open the Franz Electric Metronome Model LM-FB-4. Follow these steps:
- Inspect the metronome: Take a close look at the metronome and locate the screws or fasteners securing the casing. These screws are usually located on the back or bottom of the metronome.
- Use the appropriate screwdriver: Depending on the type of screws used, select the correct size and type of screwdriver. It’s important to use a screwdriver that fits snugly into the screw head to prevent any potential damage.
- Remove the screws: Carefully unscrew and remove the screws, setting them aside in a safe place. Be sure to keep track of the exact order and location of each screw to make reassembling easier later.
- Gently open the metronome: Once all the screws are removed, gently separate the casing of the metronome. Take care not to force it open or apply excessive pressure, as it may damage the internal components.
As you open the metronome, you will gain access to the internal components, including the light bulb that needs to be replaced. Take a moment to familiarize yourself with the interior layout and locate the light bulb.
Now that you have successfully opened the Franz Electric Metronome Model LM-FB-4, it’s time to move on to the next step of locating the light bulb.
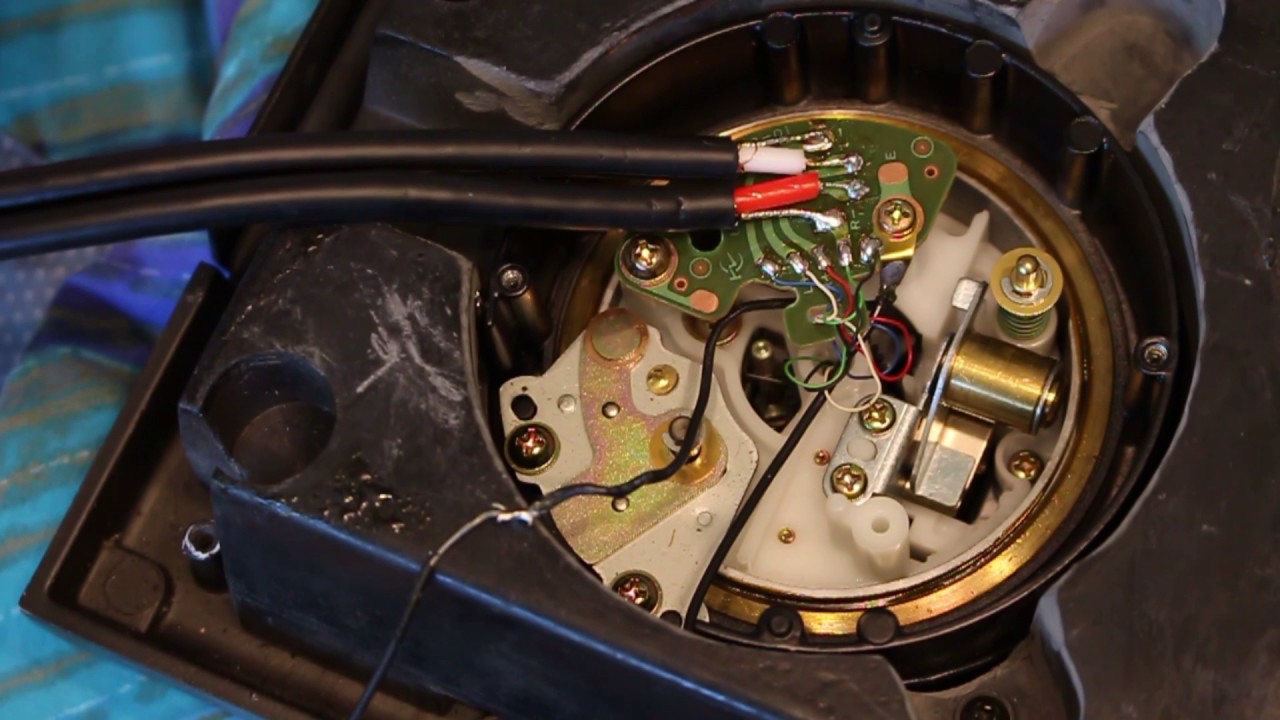
Step 3: Locating the Light Bulb
Now that you have opened the Franz Electric Metronome Model LM-FB-4, the next step is to locate the light bulb that needs to be replaced. Follow these steps:
- Observe the internal components: Take a moment to examine the interior of the metronome and familiarize yourself with the different parts. Look for the light bulb, which is usually located near the display or on the circuit board.
- Refer to the user manual: If you are unsure about the exact location of the light bulb, consult the metronome’s user manual. The manual will provide detailed instructions and diagrams specific to your metronome model.
- Inspect the bulb compartment: Once you have identified the general area where the light bulb is located, inspect the compartment or socket that holds the bulb. Identify any clips, connectors, or wires that are connected to the bulb.
It’s worth noting that different metronome models may have slight variations in the placement and design of the light bulb. Taking the time to familiarize yourself with the specific layout of your Franz Electric Metronome Model LM-FB-4 will ensure a smoother replacement process.
Now that you have located the light bulb, it’s time to move on to the next step of removing the old bulb.
Step 4: Removing the Old Light Bulb
With the location of the light bulb identified, you can now proceed to remove the old bulb from your Franz Electric Metronome Model LM-FB-4. Follow these steps:
- Ensure the metronome is powered off and disconnected from any power sources, as mentioned earlier.
- If there are any clips or connectors holding the bulb in place, carefully detach them. You may need to use a small screwdriver or gentle pressure to release any locking mechanisms.
- Gently twist or pull the old light bulb out of its socket. Be cautious not to use excessive force to avoid damaging the bulb or the surrounding components.
- Once the old bulb is removed, set it aside for proper disposal. It is important to handle and dispose of old bulbs safely and in accordance with local regulations.
During the process of removing the old bulb, it’s a good idea to be cautious and delicate with your movements. Take your time and ensure that you have a firm but gentle grip on the bulb to prevent any accidental drops or breakage.
Now that the old light bulb has been successfully removed, you are ready to move on to the next step: installing the new light bulb.
Step 5: Installing the New Light Bulb
With the old light bulb removed, it is time to install a new light bulb in your Franz Electric Metronome Model LM-FB-4. Follow these steps to complete the installation:
- Take out the new light bulb from its packaging. Ensure that the replacement bulb is the correct type and size for your metronome model. Consult the user manual or the manufacturer’s instructions for the recommended specifications.
- Gently insert the new light bulb into the socket, aligning it properly with the connectors and making sure it fits snugly. Avoid using excessive force, as this can damage the bulb or the surrounding components.
- If there are any clips or connectors, reattach them to secure the new light bulb in place. Double-check that the connections are secure and that the bulb is properly seated in the socket.
During the installation process, avoid touching the glass portion of the new light bulb with your bare hands. Oils from your skin can cause hot spots on the bulb, potentially reducing its lifespan. If you accidentally touch the bulb, clean it with a cloth or tissue before proceeding.
Once the new light bulb is successfully installed and secured, you are ready to move on to the next step: closing the Franz Electric Metronome Model LM-FB-4.
Step 6: Closing the Metronome Model LM-FB-4
After successfully installing the new light bulb in your Franz Electric Metronome Model LM-FB-4, it’s time to close the metronome and secure the components in place. Follow these steps to complete the closing process:
- Position the metronome casing carefully to ensure it aligns properly with the internal components. Take note of any tabs or grooves that match up to ensure a proper fit.
- Gently press the casing together, applying even pressure to make sure all edges meet and no gaps remain. Take care not to force the casing shut, as this can damage the internal components.
- Secure the casing by reinserting and tightening the screws that were removed earlier. Start with the screws in opposite corners and gradually work your way around, tightening them evenly. Avoid overtightening the screws to prevent any damage to the casing.
As you close the metronome, listen for any snapping or clicking sounds that indicate the components are securely aligned. If you encounter any resistance or difficulty during the closing process, double-check that all the screws are properly aligned and that the casing is aligned correctly with the internal parts.
Once the metronome is fully closed and all the screws are tightened, you can move on to the final step: testing the new light bulb in your Franz Electric Metronome Model LM-FB-4.
Step 7: Testing the New Light bulb
Now that you have successfully closed your Franz Electric Metronome Model LM-FB-4, it’s time to test the new light bulb to ensure it is functioning properly. Follow these steps to perform a quick test:
- Plug in or turn on the power source for your metronome, depending on the model. Make sure the power is properly connected and that the metronome is turned on.
- Activate the light: If your metronome has a designated light switch, turn it on. Some models have an automatic light sensor that activates when the metronome is powered on. Check the user manual or manufacturer’s instructions to determine how to activate the light.
- Observe the new light bulb: Look for a bright, steady illumination from the new light bulb. Ensure that it reaches the whole display area and provides sufficient visibility in low-light conditions.
- Check for any flickering or abnormal behavior: Pay attention to the behavior of the light bulb. If you notice any flickering or inconsistent brightness, there may be a loose connection or a problem with the bulb. In that case, repeat the steps to open the metronome, check the connection, and reinstall the bulb if necessary.
If the new light bulb is functioning properly and providing adequate illumination for the metronome display, congratulations! You have successfully replaced the light bulb in your Franz Electric Metronome Model LM-FB-4. You can now use your metronome with confidence in any lighting conditions.
However, if you encounter any issues or the new light bulb does not work as expected, you may need to repeat the replacement process or seek assistance from a professional. It’s important to troubleshoot and address any problems to ensure the proper functioning of your metronome.
With the new light bulb tested and confirmed to be working correctly, you have completed the process of replacing the light on your Franz Electric Metronome Model LM-FB-4. Enjoy using your metronome with its refreshed light and improved visibility!
Conclusion
Congratulations on successfully replacing the light bulb on your Franz Electric Metronome Model LM-FB-4! By following the step-by-step guide in this article, you have gained the knowledge and confidence to handle this simple repair on your own.
Remember, before you begin any repairs or modifications, always ensure that the metronome is powered off and disconnected from any power sources. Your safety is of utmost importance.
Throughout the process, we discussed the importance of having the necessary tools and materials, such as a small screwdriver, a replacement light bulb, and a clean cloth or tissue. These items assist you in safely removing the old bulb, installing the new one, and maintaining the integrity of the metronome’s components.
By carefully following each step, from opening the metronome and locating the light bulb to completing the installation and testing the new bulb, you have successfully replaced the light source in your metronome. Now, you can enjoy using your Franz Electric Metronome Model LM-FB-4 in all lighting conditions, ensuring accurate synchronization and rhythm.
Remember to dispose of the old light bulb properly, following local regulations for the safe handling and disposal of electronic waste. Keep in mind that every metronome model may have slight variations, so always refer to your specific model’s user manual or contact the manufacturer for any model-specific instructions or concerns.
Thank you for using this guide to replace the light on your Franz Electric Metronome Model LM-FB-4. We hope it has been informative and helpful in extending the lifespan of your instrument. Happy metronome practicing!