Home>Devices & Equipment>Yamaha>How To Connect Yamaha Soundbar To TV

Yamaha
How To Connect Yamaha Soundbar To TV
Modified: February 17, 2024
Learn how to easily connect your Yamaha soundbar to your TV for an immersive audio experience. Follow our step-by-step guide and enhance your home entertainment setup with Yamaha.
(Many of the links in this article redirect to a specific reviewed product. Your purchase of these products through affiliate links helps to generate commission for AudioLover.com, at no extra cost. Learn more)
Table of Contents
- Introduction
- Step 1: Gather the necessary equipment
- Step 2: Check the available connectivity options
- Step 3: Connect the soundbar using HDMI ARC
- Step 4: Connect the soundbar using optical cable
- Step 5: Connect the soundbar using Bluetooth
- Step 6: Adjust the TV settings for optimal sound
- Step 7: Troubleshooting common issues
- Conclusion
Introduction
Welcome to our guide on how to connect a Yamaha soundbar to your TV. Yamaha is known for producing high-quality audio equipment, and their soundbars are no exception. Whether you’ve purchased a Yamaha soundbar or are considering getting one, connecting it to your TV is a straightforward process that can enhance your overall audiovisual experience.
A soundbar is a great addition to any home theater setup, as it provides a more immersive sound compared to your TV’s built-in speakers. With a Yamaha soundbar, you can enjoy clear and powerful audio while watching movies, gaming, or listening to music.
While the process of connecting a Yamaha soundbar to your TV may seem daunting, it’s actually quite simple. In this guide, we’ll walk you through the steps needed to set up your Yamaha soundbar and ensure that it works seamlessly with your TV.
Whether you have a smart TV, an older model, or a gaming console that you want to connect your soundbar to, we’ll cover the different connectivity options provided by Yamaha soundbars. From HDMI ARC and optical cables to Bluetooth connectivity, we’ll explore the various methods you can use to connect your Yamaha soundbar to your TV.
Not only will we guide you through the physical connections, but we’ll also cover adjusting the TV settings to ensure optimal sound output from your soundbar. Additionally, we’ll address common troubleshooting issues that you might encounter along the way.
So, if you’re ready to take your audio experience to the next level, let’s dive into the step-by-step process of connecting your Yamaha soundbar to your TV!
Step 1: Gather the necessary equipment
Before you start connecting your Yamaha soundbar to your TV, it’s important to gather all the necessary equipment. Having everything you need on hand will make the setup process much smoother and more efficient.
Here’s a list of the equipment you will need:
- A Yamaha soundbar (model may vary)
- Your TV
- An HDMI cable
- An optical cable (also known as TOSLINK or SPDIF)
- A Bluetooth-enabled device (optional)
The specific cables you need will depend on the available connectivity options on both your Yamaha soundbar and your TV. It’s always a good idea to check the user manuals for your devices to determine the appropriate cables for your setup.
If your TV and soundbar support HDMI ARC (Audio Return Channel), using an HDMI cable will provide the best audio quality and a simplified setup. If your TV doesn’t have HDMI ARC, an optical cable is the next best option. Bluetooth connectivity is another option if both devices have this feature.
Make sure to choose high-quality cables that are appropriate for the length you need. Cheap or damaged cables can affect the audio and video quality, so investing in good cables is recommended for the best performance.
Once you have all the necessary equipment ready, you can proceed to the next steps and connect your Yamaha soundbar to your TV.
Step 2: Check the available connectivity options
Before you start connecting your Yamaha soundbar to your TV, it’s important to check the available connectivity options on both devices. This will help you determine the most suitable method for your specific setup.
Here are the common connectivity options you might find on your Yamaha soundbar:
- HDMI ARC (Audio Return Channel): This allows you to connect your soundbar to your TV using a single HDMI cable, which carries both audio and video signals. HDMI ARC is the preferred method as it provides the best audio quality and allows you to control the soundbar using your TV remote.
- Optical input: This option allows you to connect your soundbar to your TV using an optical cable. While it doesn’t support lossless audio formats like Dolby TrueHD or DTS-HD Master Audio, it still provides a reliable and high-quality audio connection.
- Bluetooth: If both your soundbar and TV have Bluetooth capabilities, you can connect them wirelessly. This option is convenient if you want to stream audio from your TV or other devices without the need for cables.
When it comes to your TV, you might have different connectivity options available, depending on the model and age:
- HDMI ARC (Audio Return Channel): Look for an HDMI port on your TV labeled as ARC. This indicates that it supports audio return functionality.
- Optical output: If your TV doesn’t have HDMI ARC but has an optical output, you can use an optical cable to connect it to your soundbar.
- Bluetooth: Some newer TVs offer Bluetooth connectivity, allowing you to pair them with your soundbar wirelessly.
By understanding the available connectivity options on both your Yamaha soundbar and your TV, you can choose the best method that suits your setup. In the next steps, we’ll walk you through the process of connecting your soundbar using HDMI ARC, optical cable, and Bluetooth, depending on the available options.
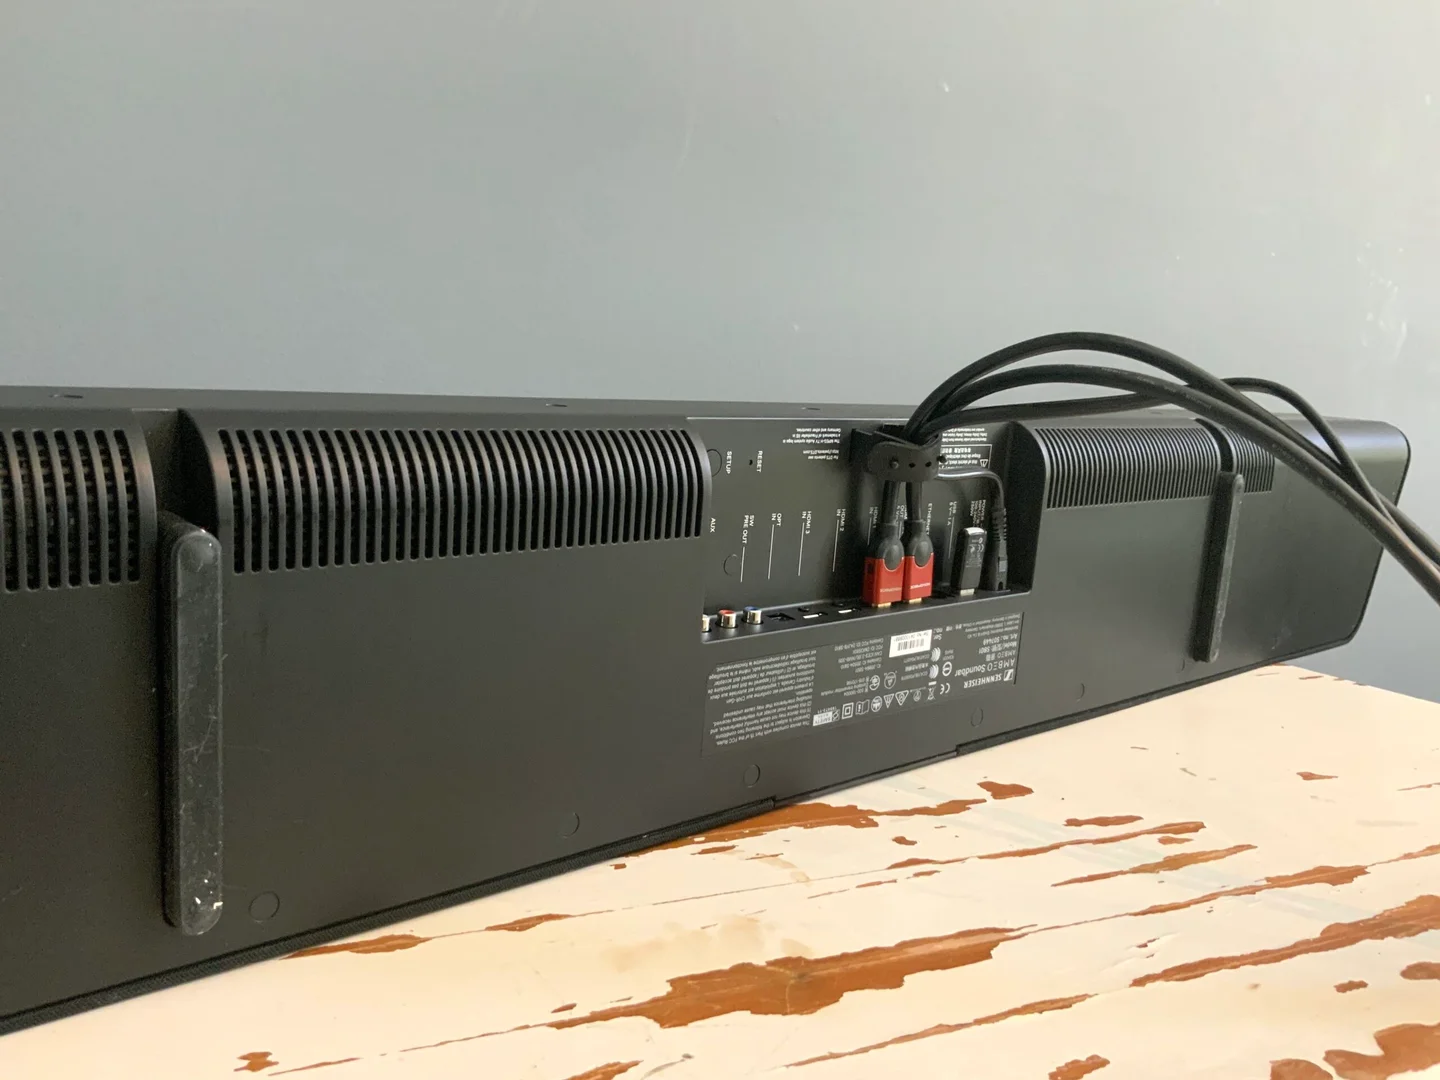
Step 3: Connect the soundbar using HDMI ARC
If your Yamaha soundbar and your TV both have HDMI ARC (Audio Return Channel) support, this is the recommended method for connecting them. HDMI ARC allows you to send audio signals from your TV to the soundbar using a single HDMI cable, eliminating the need for multiple cables and providing high-quality audio.
Follow these steps to connect your soundbar using HDMI ARC:
- Locate the HDMI ARC port on your TV. This port is usually labeled as “HDMI ARC” or “ARC”.
- Connect one end of the HDMI cable to the HDMI ARC port on your TV and the other end to the HDMI ARC port on your Yamaha soundbar. Ensure that the cable is securely plugged in.
- Turn on your TV and soundbar.
- On your TV, navigate to the audio settings menu. This may vary depending on the TV brand and model. Look for options related to audio output or HDMI settings.
- Select “HDMI ARC” as the audio output option.
- Test the connection by playing some audio or video content on your TV. The sound should be coming from the Yamaha soundbar.
- If the sound is still coming from your TV’s speakers, you may need to adjust the audio settings on your soundbar. Consult the user manual for your specific Yamaha soundbar to learn how to toggle between input sources.
Connecting your Yamaha soundbar to your TV using HDMI ARC provides several advantages. It allows you to control the soundbar volume using your TV remote, simplifies the connectivity with a single cable, and delivers the best audio quality with support for various audio formats.
If HDMI ARC is not available on your TV, don’t worry. You can still connect your soundbar using other methods, such as an optical cable or Bluetooth, which we will cover in the next steps.
Step 4: Connect the soundbar using optical cable
If your TV doesn’t have HDMI ARC or if you prefer an alternative connection method, you can connect your Yamaha soundbar to your TV using an optical cable. An optical cable, also known as a TOSLINK or SPDIF cable, carries high-quality digital audio signals from your TV to the soundbar.
Follow these steps to connect your soundbar using an optical cable:
- Locate the optical output port on your TV. It is usually labeled as “OPTICAL OUT” or “SPDIF.”
- Connect one end of the optical cable to the optical output port on your TV and the other end to the optical input port on your Yamaha soundbar. Ensure that the cable is securely plugged in.
- Turn on your TV and soundbar.
- On your TV, navigate to the audio settings menu. Look for options related to audio output or digital audio settings.
- Select “Optical” or “SPDIF” as the audio output option.
- Test the connection by playing some audio or video content on your TV. The sound should be coming from the Yamaha soundbar.
- If the sound is still coming from your TV’s speakers, you may need to adjust the audio settings on your soundbar. Consult the user manual for your specific Yamaha soundbar to learn how to toggle between input sources.
Using an optical cable provides a reliable and high-quality audio connection between your TV and Yamaha soundbar. It may not support lossless audio formats like Dolby TrueHD or DTS-HD Master Audio, but it is still capable of delivering excellent sound.
Keep in mind that using an optical cable requires an additional cable for video transmission if you want to connect external devices directly to your TV. In this case, you would need to use HDMI or other video cables separately.
If your TV and soundbar do not have HDMI ARC or optical input options, don’t worry. You can still connect your soundbar using Bluetooth, which we will cover in the next step.
Step 5: Connect the soundbar using Bluetooth
If both your Yamaha soundbar and your TV have Bluetooth capabilities, you can connect them wirelessly. Connecting your soundbar via Bluetooth allows you to stream audio from your TV or other compatible devices without the need for cables.
Follow these steps to connect your soundbar using Bluetooth:
- Turn on the Bluetooth function on your Yamaha soundbar. Consult the user manual for your specific model to learn how to enable Bluetooth mode.
- Go to the settings menu on your TV and locate the Bluetooth settings. Enable the Bluetooth function and set it to discoverable mode.
- On your Yamaha soundbar, select the option to scan or search for Bluetooth devices. It will display a list of available devices, including your TV.
- Select your TV from the list to initiate the pairing process.
- On your TV, you may be prompted to enter a PIN or confirm the pairing request. Follow the instructions on the screen to complete the pairing process.
- Once the pairing is successful, you will see a confirmation message on both your TV and soundbar.
- Test the connection by playing some audio or video content on your TV. The sound should now be coming from your Yamaha soundbar.
Keep in mind that the Bluetooth range is limited, typically up to 33 feet (10 meters). Make sure your TV and soundbar are within close proximity for a stable Bluetooth connection.
Connecting your soundbar to your TV via Bluetooth provides a convenient and clutter-free setup. However, it’s important to note that Bluetooth audio may introduce a slight delay, which can result in audio syncing issues with video content. If you experience any latency or audio sync problems, you may need to consider alternative connection methods like HDMI ARC or optical cable.
If you encounter any issues during the pairing process or need further assistance, refer to the user manuals for your Yamaha soundbar and TV for troubleshooting steps specific to your devices.
Step 6: Adjust the TV settings for optimal sound
After connecting your Yamaha soundbar to your TV, it’s essential to optimize the TV settings to ensure the best audio performance. Fine-tuning these settings can help you achieve optimal sound quality and make the most out of your soundbar.
Here are some key settings to consider:
- Audio output settings: Access your TV’s audio menu and select the appropriate audio output settings. Set it to “External Speakers,” “Soundbar,” or “Audio System” to ensure that the audio is directed to your Yamaha soundbar instead of the TV’s built-in speakers.
- Sound mode: Experiment with different sound modes available on your TV to find the one that suits your preferences. Options like “Movie,” “Music,” or “Cinema” are designed to enhance specific types of content and may provide a more immersive audio experience.
- Volume control: Check if your TV’s remote control can adjust both the TV volume and the soundbar volume. If it doesn’t, you may need to rely on the soundbar’s remote control or program a universal remote to control both devices simultaneously.
- Audio synchronization: If you notice any audio delay or syncing issues, your TV may have an option to adjust the audio delay. This feature allows you to align the audio with the video to avoid any audio lag. Consult your TV’s user manual to learn how to access this setting.
Additionally, many Yamaha soundbars offer their own set of audio settings that can further enhance the sound quality. Explore the soundbar’s user manual to learn about the available options, such as EQ settings, surround sound modes, or virtual sound enhancements.
To truly optimize the audio experience, consider calibrating the soundbar using a built-in calibration feature or external tools like an audio calibration microphone. This can help fine-tune the sound output based on your room’s acoustics.
Remember that the optimal TV settings may vary depending on your personal preferences, the content you’re watching, and the specific capabilities of your Yamaha soundbar. Take the time to experiment and find the settings that deliver the best audio performance for your setup.
Step 7: Troubleshooting common issues
During the process of connecting your Yamaha soundbar to your TV, you may encounter some common issues. Understanding how to troubleshoot these problems can help you resolve them quickly and ensure a smooth audio setup.
Here are some common issues you may come across, along with potential solutions:
- No sound from the soundbar: If you’re not hearing any audio from your soundbar, first ensure that it’s powered on and properly connected to your TV. Check the input settings on the soundbar to ensure it’s set to the correct input source. Additionally, check your TV settings to ensure the audio output is correctly configured for the soundbar. If using HDMI ARC, make sure the HDMI cable is connected to the ARC-enabled HDMI port on your TV.
- Poor audio quality: If you notice low volume, distorted sound, or poor audio quality, check the volume settings on both your TV and soundbar. Ensure that neither device is set to a low volume level. Also, make sure that your soundbar is not placed too close to walls or corners, as this can affect sound reflection and quality.
- Audio and video out of sync: If you experience audio and video syncing issues, your TV may have an audio delay setting. Access the TV settings and adjust the audio delay to synchronize the sound with the video. Consult your TV’s user manual for specific instructions on accessing this setting.
- Bluetooth connection issues: If you’re having trouble pairing your soundbar with your TV using Bluetooth, make sure both devices are in pairing mode. Reset the Bluetooth settings on both devices, and try the pairing process again. Also, ensure that your TV and soundbar are within the Bluetooth range, and there are no obstructions interfering with the signal.
- Remote control compatibility: If you find that your TV remote control does not adjust the volume or control other functions of the soundbar, you may need to program a universal remote control that is compatible with both your TV and soundbar. Alternatively, use the dedicated remote control provided with the soundbar.
If you encounter any other issues or difficulties during the setup process, refer to the user manuals for your Yamaha soundbar and TV. These manuals often include troubleshooting guides specific to your devices, providing additional steps and solutions.
Remember, it’s always a good idea to restart or power cycle both your TV and soundbar if you’re experiencing persistent issues. Sometimes, a simple reboot can resolve minor connectivity problems.
By troubleshooting common issues, you can ensure that your Yamaha soundbar and TV are working seamlessly together, providing you with an enhanced audio experience for your home entertainment setup.
Conclusion
Connecting your Yamaha soundbar to your TV can greatly enhance your audio experience when enjoying movies, music, and games. Whether you choose to connect via HDMI ARC, optical cable, or Bluetooth, the process is relatively straightforward, and the benefits are well worth it.
In this guide, we have walked you through the step-by-step process of connecting your Yamaha soundbar to your TV. We discussed gathering the necessary equipment, checking the available connectivity options, and connecting via HDMI ARC, optical cable, and Bluetooth.
Furthermore, we provided instructions on adjusting the TV settings to optimize the sound output and troubleshooting common issues that may arise during the setup process.
Remember to always consult the user manuals for your specific Yamaha soundbar and TV as they may contain device-specific instructions and troubleshooting tips.
By following the steps outlined in this guide, you can enjoy powerful and immersive sound quality from your Yamaha soundbar, elevating your home entertainment experience to the next level.
So go ahead, connect your Yamaha soundbar to your TV, sit back, and immerse yourself in the rich and captivating audio that will bring your favorite movies, music, and games to life.