Home>Devices & Equipment>Yamaha>How To Connect Yamaha Rx V673 To Network
Yamaha
How To Connect Yamaha Rx V673 To Network
Published: February 6, 2024
Learn how to easily connect your Yamaha RX V673 receiver to your network. Enhance your audio experience and take advantage of network streaming capabilities.
(Many of the links in this article redirect to a specific reviewed product. Your purchase of these products through affiliate links helps to generate commission for AudioLover.com, at no extra cost. Learn more)
Table of Contents
Introduction
Welcome to our guide on how to connect your Yamaha RX V673 receiver to a network. Yamaha is renowned for producing high-quality audio equipment, and the RX V673 is no exception. By connecting it to your network, you can enjoy a multitude of benefits such as streaming music, accessing online radio stations, and firmware updates.
Connecting your Yamaha RX V673 to a network may seem daunting at first, but fear not. In this article, we will provide you with a step-by-step guide to make the process as seamless as possible. We will cover everything from ensuring a proper network connection to configuring network settings and troubleshooting common issues that may arise.
Before we proceed, it’s important to note that your Yamaha RX V673 receiver can be connected to a network either through an Ethernet cable or wirelessly via Wi-Fi. The Ethernet connection provides a more stable and reliable connection, while Wi-Fi offers convenience and flexibility. Choose the method that suits your needs and available resources.
So, if you’re ready to unlock the full capabilities of your Yamaha RX V673 receiver, let’s dive into the steps required to connect it to your network!
Step 1: Ensure Proper Network Connection
Before you can connect your Yamaha RX V673 receiver to your network, it is important to ensure that you have a proper network connection in place. Here are a few steps to follow:
- Check your internet service: Make sure that your internet service is active and working properly. Test the connection on other devices such as a computer or smartphone to ensure that you can access the internet without any issues.
- Position your router: If you are using a wireless connection, make sure that your Yamaha RX V673 receiver is within range of your router. Position the router in a central location to maximize the wireless signal coverage.
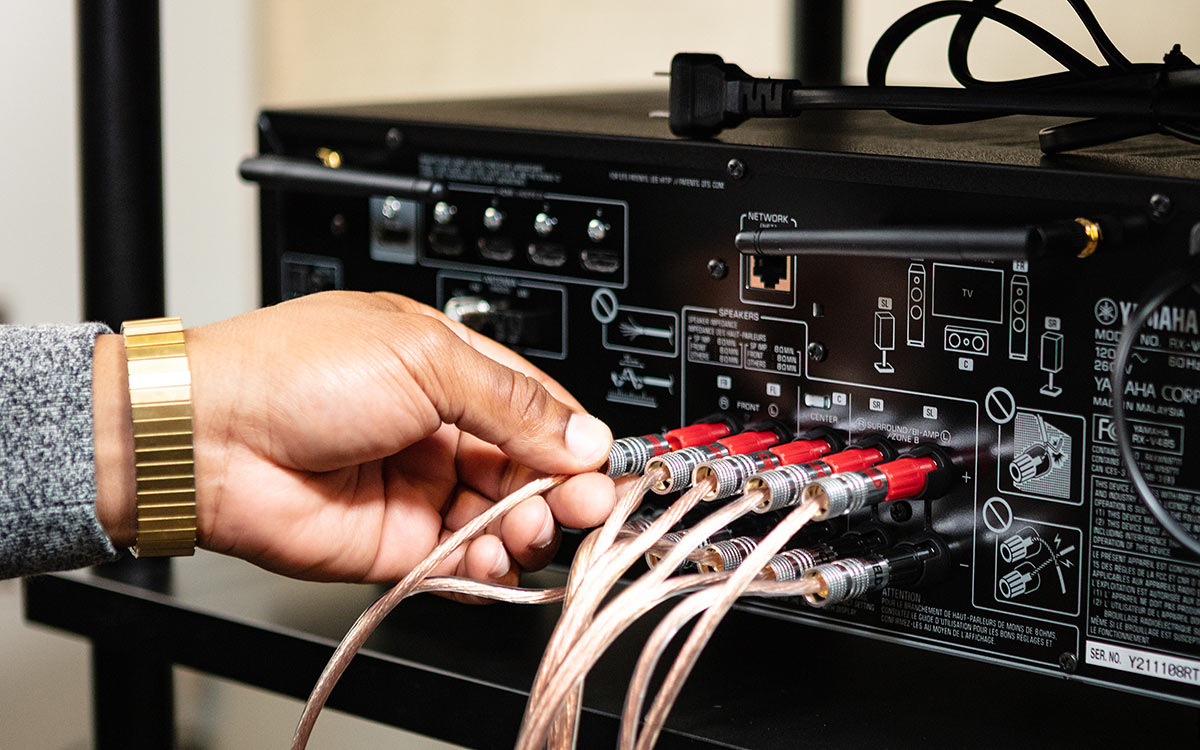
- Check your Ethernet cable: If you plan to connect your receiver using an Ethernet cable, ensure that the cable is in good condition and properly connected to both the receiver and the router or modem.
- Reset your modem and router: If you are experiencing any network connectivity issues, try resetting your modem and router by unplugging them from the power source for a few seconds, then plugging them back in. This can often resolve temporary network glitches.
- Update your firmware: If there are firmware updates available for your router or modem, it is recommended to update them to ensure optimal performance and compatibility with your Yamaha RX V673 receiver.
Once you have confirmed that you have a stable and functional network connection, you can proceed to the next steps to connect your Yamaha RX V673 receiver to the network. Whether you choose a wired Ethernet connection or a wireless Wi-Fi connection, the following steps will guide you through the process.
Step 2: Access Network Settings on Yamaha Rx V673
Now that you have ensured a proper network connection, the next step is to access the network settings on your Yamaha RX V673 receiver. Here’s how to do it:
- Power on your Yamaha RX V673 receiver and ensure that it is connected to your TV or display.
- Using the remote control, press the “Setup” button to access the receiver’s setup menu.
- Use the arrow keys on the remote control to navigate to the “Network” or “Setup Network” option. Press the “Enter” button to select it.
- If prompted, select the network connection type you wish to use – either wired Ethernet or wireless Wi-Fi.
- If you are using a wired Ethernet connection, proceed to Step 4. If you are using a wireless Wi-Fi connection, continue to Step 6.
- If you selected wireless Wi-Fi, the receiver will start searching for available networks. A list of networks will appear on your TV screen or display. Select your Wi-Fi network from the list using the arrow keys and press the “Enter” button.
- If your Wi-Fi network is password-protected, enter your network password using the on-screen keyboard. Once done, press the “Enter” button.
- Wait for the receiver to establish a connection to your network. Once connected, you will see a confirmation message on your TV screen or display.
If you encounter any issues or errors during this step, make sure to double-check your network settings, including the Wi-Fi network name and password. It is also helpful to restart your Yamaha RX V673 receiver and try the process again.
Once you have successfully accessed the network settings and established a connection, it’s time to proceed to the next step and configure the network settings on your Yamaha RX V673 receiver.
Step 3: Connect Yamaha Rx V673 to Wi-Fi Network
If you have chosen to connect your Yamaha RX V673 receiver to your network using a wireless Wi-Fi connection, this step will guide you through the process:
- After accessing the network settings on your receiver (as explained in Step 2), select the “Wireless” option.
- Your receiver will display a list of available Wi-Fi networks. Use the arrow keys on your remote control to navigate the list and select your desired Wi-Fi network.
- If your Wi-Fi network is password-protected, you will be prompted to enter the network password. Use the on-screen keyboard to enter the password, and then press the “Enter” button.
- The receiver will then attempt to connect to the selected Wi-Fi network. Wait for the connection to be established.
- Once connected, you will see a confirmation message on your TV screen or display, indicating that your Yamaha RX V673 receiver is now connected to the Wi-Fi network.
It is important to ensure that you are within range of your Wi-Fi network and that the network name and password are entered correctly. This will help to ensure a successful connection.
If you encounter any issues during this step, try restarting your receiver and repeating the process, ensuring that you have selected the correct Wi-Fi network and entered the password correctly.
With your Yamaha RX V673 receiver successfully connected to your Wi-Fi network, you can now proceed to the next step and configure the network settings to optimize your audio experience.
Step 4: Configure Network Settings on Yamaha Rx V673
Now that your Yamaha RX V673 receiver is connected to your network, it’s time to configure the network settings to optimize your audio experience. Follow these steps to configure the network settings:
- Access the network settings menu on your Yamaha RX V673 receiver, as described in Step 2.
- Navigate to the “Network Setup” or “Network Configuration” option, and select it.
- Within the network settings menu, you will find various options to customize your network setup. Some common settings you may want to configure include:
- IP settings: Choose the appropriate IP settings for your network. If you are uncertain, it is recommended to select the default DHCP (Dynamic Host Configuration Protocol) setting, which automatically assigns IP addresses.
- DNS settings: Enter the DNS (Domain Name System) server addresses provided by your internet service provider. Alternatively, you can use the default automatic DNS setting.
- Proxy settings: If your network requires a proxy server to connect to the internet, configure the proxy settings accordingly. Otherwise, leave this option disabled or set it to “Off.”
- Other advanced settings: Depending on your network setup and requirements, you may find additional advanced settings related to network security, firewall settings, or QoS (Quality of Service) settings. Customize these options as needed.
- Once you have made the necessary configurations, save your settings and exit the network setup menu.
Configuring the network settings on your Yamaha RX V673 receiver allows you to optimize network performance, ensure smooth audio streaming, and maintain a secure connection. Take the time to explore and adjust these settings based on your network setup and preferences.
Now that your network settings are configured, it’s time to move on to the next step and test the network connection on your Yamaha RX V673 receiver.
Step 5: Test Network Connection
After connecting and configuring your Yamaha RX V673 receiver to your network, it’s important to test the network connection to ensure it is working properly. Here’s how you can test the network connection:
- Access the network settings menu on your Yamaha RX V673 receiver (as explained in Step 2).
- Navigate to the “Test Network” or “Network Connection” option and select it.
- The receiver will perform a network connectivity test, checking for a successful connection to the internet.
- If the network test is successful, you will see a confirmation message on your TV screen or display. This indicates that your Yamaha RX V673 receiver is properly connected to the network and can now take advantage of network-enabled features such as music streaming and firmware updates.
- If the network test fails, double-check your network settings, including the IP settings, DNS settings, and proxy settings. Ensure that they are configured correctly and aligned with your network setup.
- If you are still experiencing connectivity issues, try power cycling your Yamaha RX V673 receiver, as well as your modem and router. This can often resolve temporary network glitches.
Testing the network connection ensures that your Yamaha RX V673 receiver can seamlessly access the internet and all network services. If the test is successful, you can confidently enjoy all the network-enabled features of your receiver.
If you encounter any persistent network issues, it may be helpful to consult the user manual of your receiver or reach out to Yamaha customer support for further assistance.
With the network connection successfully tested, you can now proceed to enjoy the immersive audio experience that your Yamaha RX V673 receiver has to offer!
Troubleshooting Common Network Connection Issues
While connecting your Yamaha RX V673 receiver to a network is usually a straightforward process, it’s not uncommon to encounter some common network connection issues. Here are a few troubleshooting tips to help you overcome these issues:
- Verify network settings: Double-check that the network settings on your receiver are correct. Ensure that the Wi-Fi network name and password are entered accurately, or that the Ethernet cable is properly connected.
- Restart your devices: Sometimes, a simple restart can resolve network connectivity issues. Try restarting your Yamaha RX V673 receiver, as well as your modem and router, by unplugging them from the power source for a few seconds and then plugging them back in.
- Move closer to the router: If you are using Wi-Fi, ensure that your receiver is within range of your router. Physical obstructions and distance can weaken the Wi-Fi signal. Moving your receiver closer to the router can improve the connection.
- Check for firmware updates: Ensure that your Yamaha RX V673 receiver is running the latest firmware. Firmware updates often include bug fixes and improvements that can enhance network connectivity. Check the Yamaha website for any available updates.
- Update router firmware: Similarly, make sure that your modem and router are running the latest firmware updates. This can help resolve compatibility issues and improve overall network performance.
- Disable firewall or security settings: If your receiver’s network connection is being blocked by a firewall or other security settings, try temporarily disabling them. Consult your router’s manual for instructions on how to adjust these settings.
- Contact your internet service provider: If you have exhausted all troubleshooting steps and are still experiencing network issues, it may be worth reaching out to your internet service provider. They can offer further assistance and check if there are any specific issues with your network connection.
By following these troubleshooting tips, you should be able to address common network connection issues and enjoy uninterrupted network connectivity on your Yamaha RX V673 receiver.
If you require additional assistance, refer to the user manual for your receiver or contact Yamaha customer support for further guidance.
Conclusion
Congratulations! You have successfully connected your Yamaha RX V673 receiver to your network. By following the steps outlined in this guide, you can now enjoy the full range of features and benefits that a network-connected receiver has to offer.
Throughout this article, we covered everything from ensuring a proper network connection to accessing and configuring the network settings on your Yamaha RX V673 receiver. We also provided troubleshooting tips to help you overcome common network connectivity issues.
With your receiver connected to the network, you can now stream music from your favorite music services, access online radio stations, and receive firmware updates to keep your receiver up to date with the latest features and improvements. Take advantage of the network-enabled capabilities of your Yamaha RX V673 and elevate your audio experience to new heights.
Remember, if you encounter any difficulties during the setup process or experience ongoing network issues, consult the user manual of your receiver or reach out to Yamaha customer support for assistance.
Thank you for choosing Yamaha and for taking the time to read this guide. We hope it has been helpful in connecting your Yamaha RX V673 receiver to your network. Enjoy your enhanced audio experience!