Home>Instruments>Guitar>How To Adjust A Guitar Truss Rod
Guitar
How To Adjust A Guitar Truss Rod
Modified: February 14, 2024
Learn how to adjust the truss rod on your guitar to fine-tune its neck and improve playability. Follow our step-by-step guide for a smooth adjustment process.
(Many of the links in this article redirect to a specific reviewed product. Your purchase of these products through affiliate links helps to generate commission for AudioLover.com, at no extra cost. Learn more)
Table of Contents
Introduction
Welcome to the fascinating world of guitar maintenance! As a guitar enthusiast, it's essential to understand the inner workings of this beloved instrument. One crucial aspect of guitar care is knowing how to adjust the truss rod. The truss rod plays a pivotal role in maintaining the optimal playability and stability of your guitar. Whether you're a seasoned musician or a novice player, mastering the art of truss rod adjustment is a valuable skill that can enhance your playing experience and prolong the life of your instrument.
In this comprehensive guide, we'll delve into the intricacies of the truss rod, explore the tools necessary for the adjustment process, and provide a step-by-step walkthrough to help you confidently adjust the truss rod of your guitar. By the end of this article, you'll have a deeper understanding of this essential maintenance task and the confidence to perform it with precision.
So, grab your guitar, roll up your sleeves, and let's embark on this enlightening journey into the world of truss rod adjustment. Whether you're seeking to remedy an annoying buzz, optimize your guitar's action, or simply maintain its overall health, understanding how to adjust the truss rod is a skill every guitarist should possess. Let's dive in and demystify this crucial aspect of guitar care.
Understanding the Truss Rod
Before delving into the process of adjusting a guitar’s truss rod, it’s essential to grasp the fundamental role it plays in the instrument’s construction and maintenance. The truss rod is a metal rod that runs along the length of the guitar’s neck, beneath the fingerboard. Its primary function is to counteract the tension exerted by the strings, thereby providing stability and preventing the neck from bowing or warping due to the string tension. This crucial component ensures that the neck remains straight, facilitating comfortable playability and optimal intonation.
Truss rods are typically adjustable, allowing for minor alterations to the neck’s curvature to accommodate different playing styles, string gauges, and environmental conditions. Understanding the truss rod’s purpose empowers guitarists to maintain the ideal neck relief, which refers to the slight curvature of the neck that influences the guitar’s playability and overall feel.
It’s important to note that while the truss rod contributes to the neck’s stability, it does not directly affect the guitar’s action or string height at the nut or bridge. These aspects are typically adjusted through different mechanisms, such as the nut or bridge saddles. By comprehending the truss rod’s function and limitations, guitarists can effectively troubleshoot issues related to neck relief and make informed decisions when adjusting their instrument.
Now that we’ve established the truss rod’s significance in maintaining the neck’s structural integrity, let’s explore the essential tools required for adjusting this critical component of your guitar.
Tools Needed
Before embarking on the journey of adjusting your guitar’s truss rod, it’s essential to gather the necessary tools to ensure a smooth and precise adjustment process. Having the right tools at your disposal will not only streamline the task but also minimize the risk of causing damage to your instrument. Here are the essential tools you’ll need:
- Truss Rod Wrench: This specialized wrench is designed to fit the truss rod nut located inside the guitar’s neck. It’s crucial to use the correct truss rod wrench size to avoid stripping the nut, which can lead to costly repairs.
- Capo: A capo is useful for temporarily fretting the strings near the first fret, allowing easier access to the truss rod adjustment nut located at the headstock.
- Measuring Tool: A precision straightedge or a specialized notched straightedge is invaluable for assessing the neck’s curvature and determining the required adjustments accurately.
- Light Source: Adequate lighting is essential for inspecting the neck’s curvature and observing any changes during the adjustment process.
- Patience and Caution: While not physical tools, patience and caution are indispensable during the truss rod adjustment. Proceeding with patience and attentiveness can prevent mishaps and ensure a successful outcome.
By assembling these tools, you’ll be well-equipped to tackle the truss rod adjustment process with confidence and precision. Now that you have the necessary tools at your disposal, let’s proceed to the step-by-step process of adjusting the truss rod of your guitar.
Steps to Adjust the Truss Rod
Now that you have gathered the essential tools, it’s time to walk through the step-by-step process of adjusting the truss rod of your guitar. It’s important to approach this task with care and attention to detail, as the truss rod plays a pivotal role in maintaining the structural integrity of the instrument. Here’s a comprehensive guide to adjusting the truss rod:
- Prepare the Guitar: Begin by detuning the strings to relieve the tension on the neck. This step is crucial to prevent potential damage to the truss rod or the neck itself during the adjustment process.
- Assess the Neck’s Curvature: Using a straightedge or notched straightedge, evaluate the neck’s curvature by laying the straightedge along the frets. This assessment will help determine whether the truss rod needs adjustment to achieve the optimal neck relief.
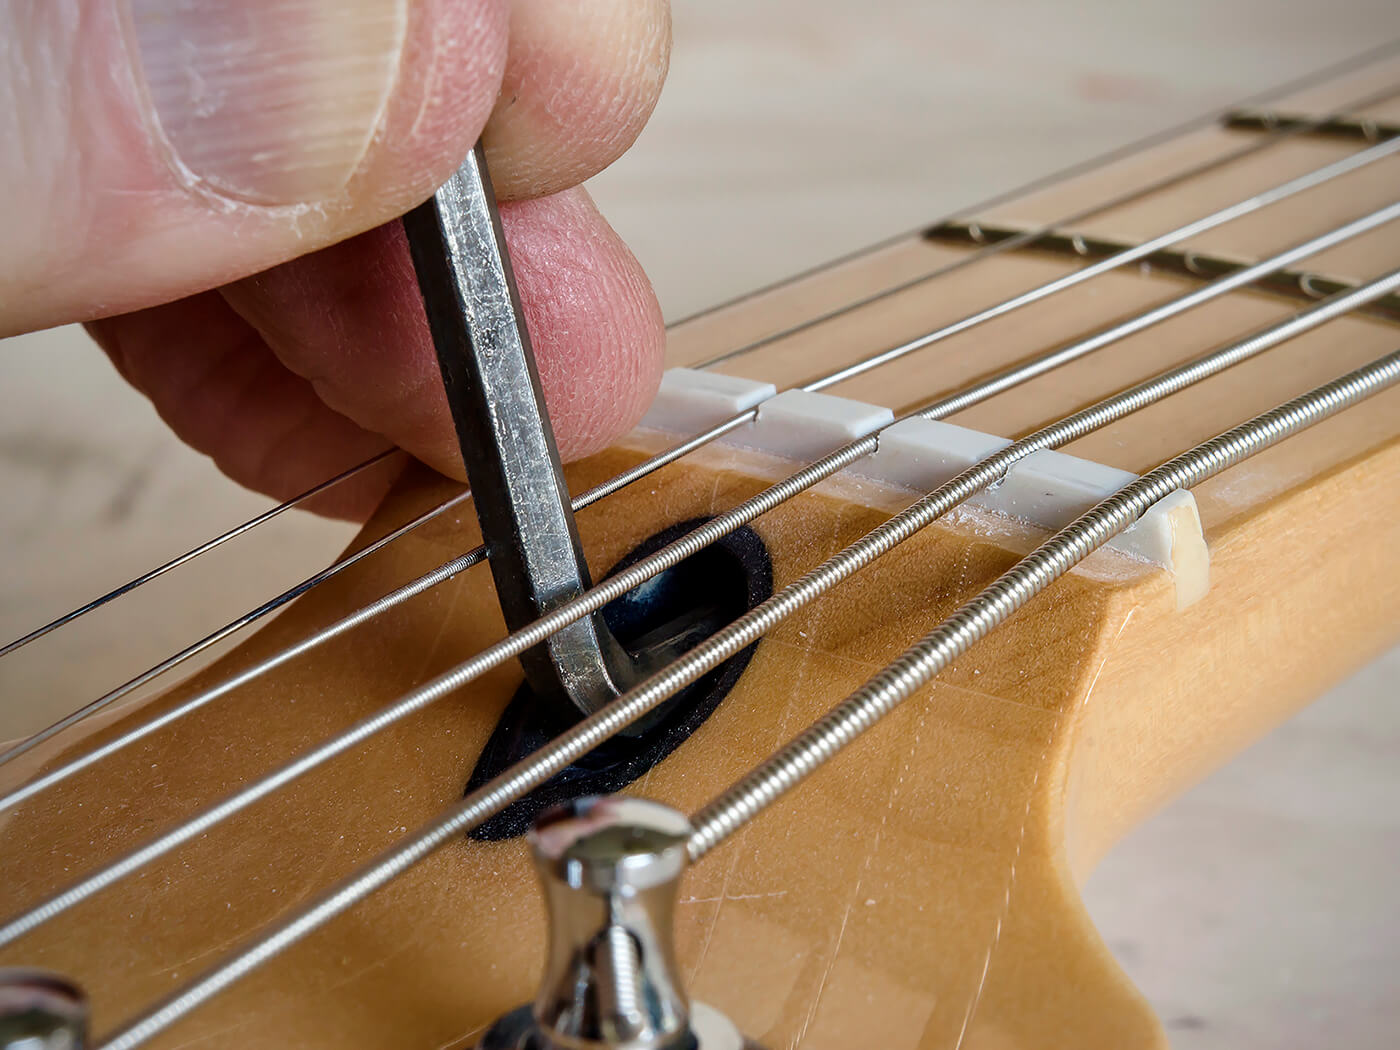
- Access the Truss Rod Nut: Depending on your guitar’s design, locate the truss rod adjustment nut, which is typically situated at the headstock end of the neck. Use the appropriate truss rod wrench to fit the nut securely.
- Make Incremental Adjustments: With the truss rod wrench in place, carefully make incremental adjustments to the truss rod. Turn the wrench in small increments, typically a quarter or eighth of a turn at a time, to avoid over-tightening or loosening the truss rod excessively.
- Reassess the Neck’s Curvature: After each adjustment, reassess the neck’s curvature using the straightedge. This iterative process allows you to monitor the changes and ensure that the neck relief aligns with your preferences and playing style.
- Restore String Tension: Once you’ve achieved the desired neck relief, tune the strings back to pitch. Restoring the string tension allows the neck to settle into its adjusted position, providing a more accurate assessment of the truss rod’s impact.
It’s crucial to approach the truss rod adjustment process with patience and caution, as small, incremental adjustments yield the best results while minimizing the risk of overcorrection. By following these steps meticulously, you can effectively adjust the truss rod to maintain the optimal neck relief and enhance your guitar’s playability.
With the truss rod adjustment complete, the next crucial step is to check the adjustment and ensure that the neck’s curvature aligns with your preferences and playing requirements. Let’s explore this essential validation process in the next section.
Checking the Adjustment
After completing the truss rod adjustment process, it’s vital to assess the impact of the changes made to the neck’s curvature. This validation step is essential for ensuring that the truss rod adjustment aligns with your playing preferences and the guitar’s specific requirements. Here’s a comprehensive guide to checking the truss rod adjustment:
- Playability Assessment: With the truss rod adjustment completed and the strings tuned to pitch, evaluate the guitar’s playability. Pay attention to the fretting action, string buzz, and overall comfort while playing various chords and scales across the fretboard.
- Neck Relief Verification: Using a precision straightedge, verify the neck’s curvature to confirm that the desired relief has been achieved. The neck should exhibit a subtle, uniform curvature that complements your playing style and provides optimal playability across the fretboard.
- String Height Inspection: Assess the string height at various positions along the fretboard to ensure that the adjustments have not adversely affected the guitar’s action. The strings should maintain a consistent height relative to the frets, facilitating comfortable playability and clear intonation.
- Intonation Check: Verify the guitar’s intonation by playing notes and chords at different positions on the fretboard. Ensure that the instrument maintains accurate intonation and that the adjustments to the truss rod have not introduced any intonation issues.
- Final Playtest: Play the guitar across different musical styles and techniques to gauge its overall responsiveness and tonal characteristics. This comprehensive playtest allows you to confirm that the truss rod adjustment has positively contributed to the instrument’s playability and tonal quality.
By meticulously evaluating the truss rod adjustment’s impact on playability, neck relief, string height, and intonation, you can ensure that the guitar’s structural integrity and performance have been optimized. If any issues are identified during the validation process, consider revisiting the truss rod adjustment or seeking assistance from a qualified guitar technician to address any persistent concerns.
With the truss rod adjustment successfully validated and the guitar’s playability optimized, you’ve effectively navigated the intricate process of adjusting the truss rod. Let’s conclude our journey with some final thoughts on the significance of truss rod maintenance and its impact on your guitar’s performance.
Final Thoughts
Congratulations on mastering the art of adjusting your guitar’s truss rod! By gaining a deeper understanding of this essential maintenance task and following the step-by-step process outlined in this guide, you’ve taken a significant step towards enhancing your instrument’s playability and longevity. As you reflect on this enlightening journey into the world of truss rod adjustment, it’s important to appreciate the profound impact that this seemingly minor adjustment can have on your guitar’s performance and your playing experience.
Understanding the truss rod’s role in maintaining the neck’s structural integrity empowers you to address issues related to neck relief, string action, and overall playability with confidence and precision. The careful assessment and validation of the truss rod adjustment ensure that your guitar remains in optimal playing condition, allowing you to explore its sonic capabilities across various musical genres and playing styles.
As you continue your musical endeavors, remember that regular maintenance, including periodic truss rod assessments and adjustments, is essential for preserving your instrument’s health and performance. By integrating truss rod maintenance into your guitar care routine, you demonstrate a commitment to nurturing your instrument’s potential and safeguarding its longevity.
Whether you’re a seasoned guitarist or an aspiring musician, the knowledge and skills acquired through truss rod adjustment serve as a testament to your dedication to the craft. Embrace the rewarding journey of guitar maintenance and continue exploring the myriad possibilities that your instrument offers.
With your newfound expertise in truss rod adjustment, you’re well-equipped to embark on future maintenance endeavors and inspire fellow guitar enthusiasts to engage in the art of caring for their instruments. The harmonious synergy between musician and instrument is enriched through attentive maintenance, and your commitment to this practice amplifies the resonance of every note you play.
As you savor the fruits of your labor, may your guitar serve as a steadfast companion on your musical odyssey, resonating with the melodies of your journey and bearing witness to the evolution of your artistry. Embrace the transformative power of truss rod maintenance, and let your guitar’s voice reverberate with clarity, precision, and boundless creativity.