Home>Production & Technology>Acoustic>How To Adjust Acoustic Truss Rod
Acoustic
How To Adjust Acoustic Truss Rod
Published: March 12, 2024
Learn how to adjust the truss rod on your acoustic guitar to maintain optimal neck relief and playability. Follow these step-by-step instructions for a smooth adjustment process.
(Many of the links in this article redirect to a specific reviewed product. Your purchase of these products through affiliate links helps to generate commission for AudioLover.com, at no extra cost. Learn more)
Table of Contents
Introduction
The truss rod is a vital component of an acoustic guitar, playing a crucial role in maintaining its structural integrity and ensuring optimal playability. Understanding how to adjust the truss rod is a valuable skill for any guitarist, as it allows for the fine-tuning of the instrument's neck relief, which directly impacts the playability and sound quality.
A well-adjusted truss rod ensures that the guitar neck maintains the ideal amount of curvature, preventing issues such as fret buzz or high action. Whether you're a seasoned musician or a novice player, knowing how to properly adjust the truss rod can help you maintain your instrument in top condition and tailor its performance to your preferences.
In this comprehensive guide, we will delve into the intricacies of adjusting the truss rod on an acoustic guitar. From understanding the purpose of the truss rod to the tools required for adjustment and the step-by-step process, this article will equip you with the knowledge and confidence to perform this essential maintenance task. So, grab your guitar and let's embark on this journey to unlock the secrets of truss rod adjustment!
Understanding the Truss Rod
The truss rod is a crucial component of an acoustic guitar's neck structure, serving as a reinforcement mechanism to counteract the tension exerted by the strings. Essentially, it is a metal rod that runs through the length of the neck, embedded just beneath the fingerboard. Its primary function is to provide structural support and enable adjustments to the neck's curvature, also known as neck relief.
The neck relief, or the slight curvature of the neck, is essential for maintaining the playability and overall performance of the guitar. When the strings are under tension, they exert a force that can cause the neck to bend forward, resulting in a concave shape. Conversely, changes in temperature and humidity can cause the neck to bend backward, creating a convex shape. Both scenarios can lead to playability issues and affect the instrument's intonation and action.
The truss rod allows for the precise adjustment of the neck relief, ensuring that the neck remains in the optimal position to accommodate the string tension and environmental factors. By turning the truss rod, the curvature of the neck can be increased or decreased, aligning it with the player's preferences and playing style.
It's important to note that truss rod adjustments should be approached with caution, as over-tightening or loosening the truss rod excessively can lead to irreversible damage to the guitar. Therefore, understanding the purpose and function of the truss rod is essential before attempting any adjustments.
In summary, the truss rod is a fundamental element of an acoustic guitar, providing the means to maintain the neck's curvature and ensure optimal playability. Its role in counteracting string tension and environmental factors underscores its significance in preserving the structural integrity and performance of the instrument. With a clear understanding of the truss rod's function, we can proceed to explore the tools required for its adjustment.
Tools Needed for Adjustment
When it comes to adjusting the truss rod of an acoustic guitar, having the right tools at your disposal is essential to ensure a safe and effective process. Here are the key tools you will need for this task:
-
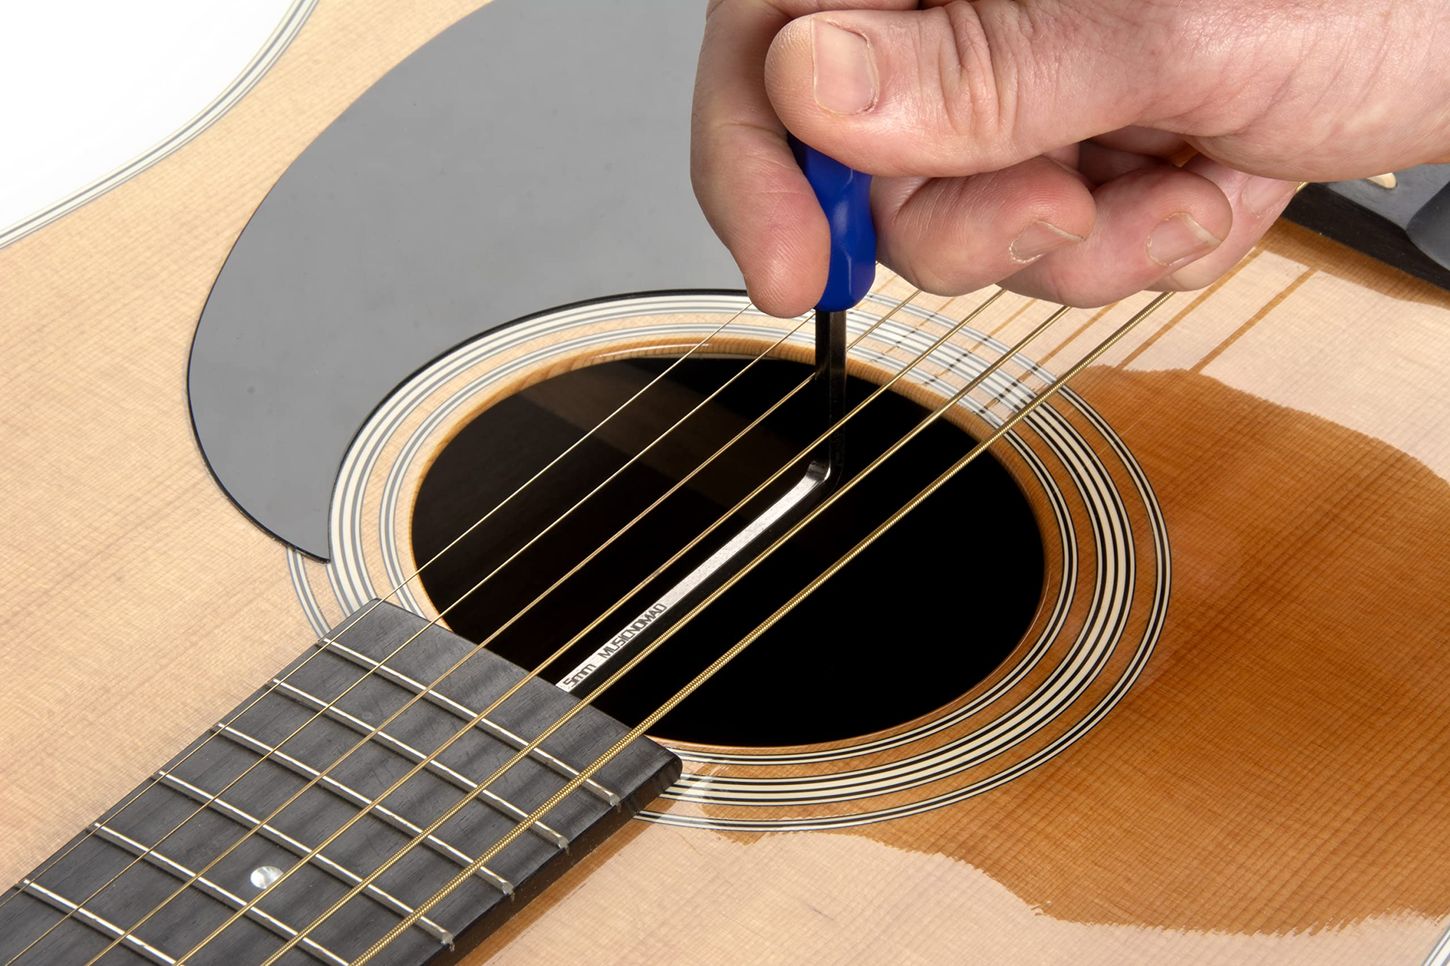
Truss Rod Wrench: This specialized wrench is designed to fit the truss rod nut located inside the guitar's soundhole or at the headstock. It comes in various sizes to accommodate different guitar models, so it's crucial to have the correct wrench that matches your guitar's truss rod nut.
-
Capo: Using a capo to fret the strings at the first fret can help create a temporary straight edge, allowing for a more accurate assessment of the neck relief during the adjustment process.
-
Straight Edge: A straight edge, typically a long ruler or specialized guitar tool, is used to gauge the curvature of the neck. This tool provides a visual and tactile reference for assessing the amount of relief present in the neck before and after adjustments.
-
Feeler Gauge: A feeler gauge is employed to measure the gap between the top of the frets and the bottom of the straight edge. This measurement helps determine the amount of neck relief and ensures precise adjustments to achieve the desired curvature.
-
Guitar Tuner: A reliable guitar tuner is indispensable for checking the instrument's tuning before and after the truss rod adjustment. This ensures that the guitar remains in tune throughout the process and after the adjustments are made.
-
Lint-Free Cloth: Keeping a lint-free cloth handy is useful for cleaning the truss rod access point and the surrounding area, ensuring that no debris interferes with the adjustment process.
-
Workbench or Stable Surface: Performing the truss rod adjustment on a stable surface, such as a workbench or table, provides a secure and level platform for the guitar, facilitating a more controlled and precise adjustment process.
By ensuring that you have these essential tools on hand, you can approach the truss rod adjustment with confidence, knowing that you are well-equipped to carry out the process safely and effectively. With the tools in place, we can now proceed to the next section, where we will delve into the step-by-step process of adjusting the truss rod of an acoustic guitar.
Steps to Adjust the Truss Rod
-
Prepare the Guitar: Before initiating the truss rod adjustment, ensure that the guitar is placed on a stable surface, such as a workbench or table, to provide a secure platform for the process. Additionally, use a lint-free cloth to clean the truss rod access point and the surrounding area, removing any debris that could interfere with the adjustment.
-
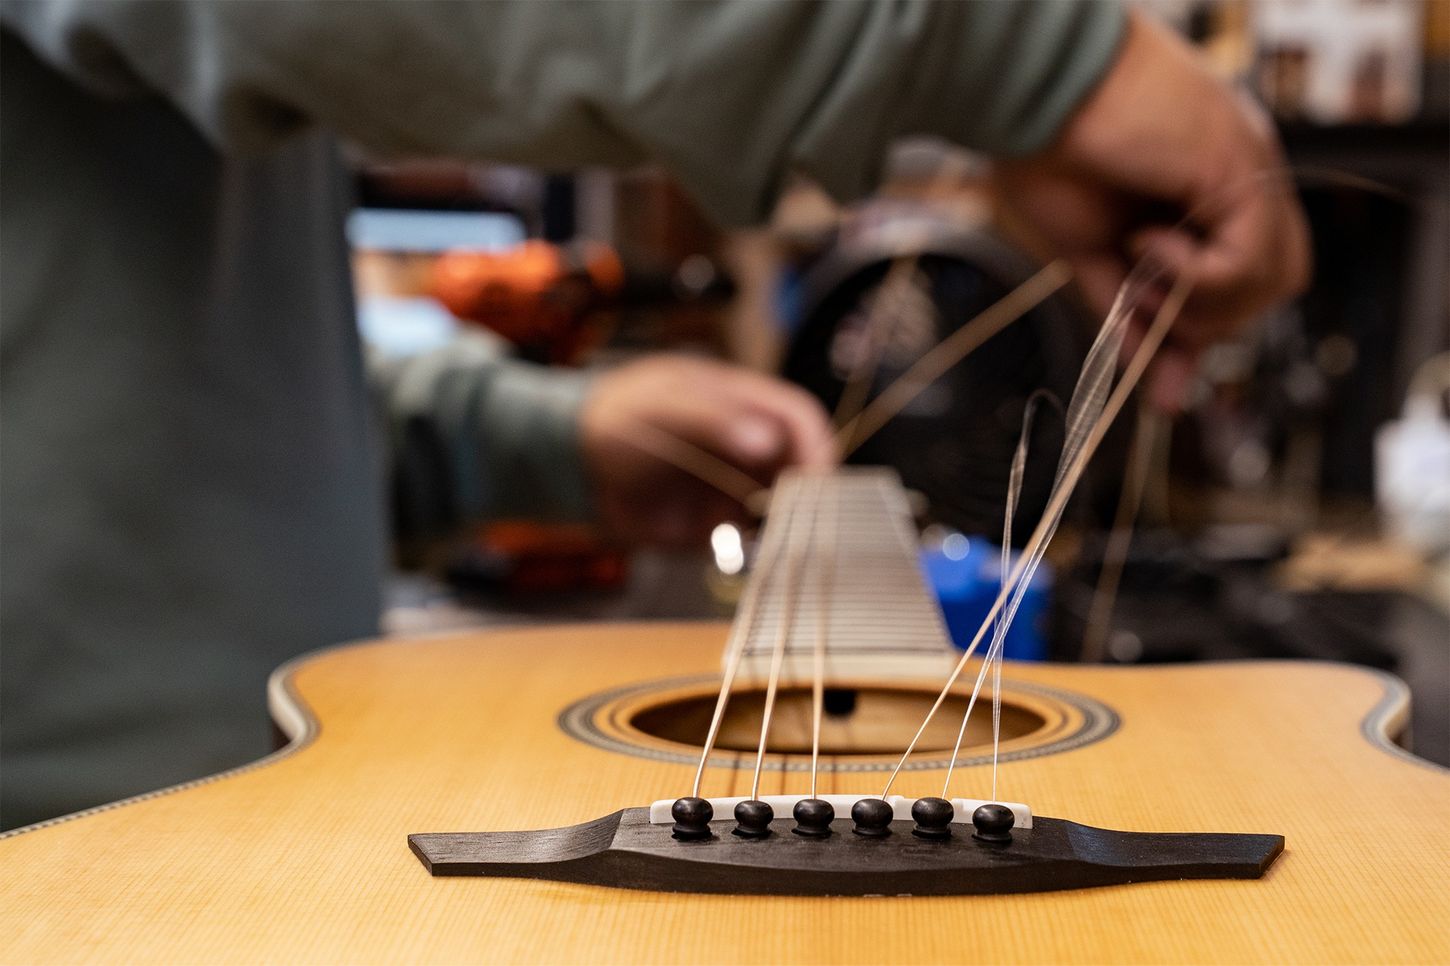
Loosen the Strings: To access the truss rod and prevent potential damage to the neck or headstock, it is advisable to loosen the guitar strings. This can be achieved by turning the tuning pegs to reduce the tension on the strings, making it easier to perform the truss rod adjustment.
-
Assess the Neck Relief: Using a straight edge and a feeler gauge, evaluate the current neck relief by placing the straight edge along the length of the fretboard and measuring the gap between the bottom of the straight edge and the top of the frets. This assessment provides a baseline for determining the required adjustments to the truss rod.
-
Locate the Truss Rod Access Point: Depending on the guitar model, the truss rod access point may be located inside the soundhole or at the headstock. Use the appropriate truss rod wrench to access the truss rod nut, ensuring a secure fit to prevent slippage and potential damage to the nut.
-
Make Incremental Adjustments: With the truss rod wrench in place, carefully turn the nut in small increments, either clockwise or counterclockwise, depending on the required adjustment. Clockwise turns typically tighten the truss rod, reducing the neck relief, while counterclockwise turns loosen the truss rod, increasing the neck relief.
-
Check the Neck Relief Periodically: After each adjustment, reevaluate the neck relief using the straight edge and feeler gauge to gauge the impact of the truss rod adjustments. This iterative process allows for precise and controlled modifications to the neck relief, ensuring that the desired curvature is achieved.
-
Tune the Guitar: Once the truss rod adjustments have been made and the desired neck relief is attained, tune the guitar using a reliable tuner to ensure that the instrument remains in proper pitch. This step is crucial in maintaining the guitar's playability and intonation after the truss rod adjustment.
-
Recheck and Fine-Tune if Necessary: After tuning the guitar, reassess the neck relief to confirm that it aligns with the desired specifications. If further adjustments are needed, repeat the process by making incremental turns to the truss rod and rechecking the neck relief until the optimal curvature is achieved.
By following these step-by-step instructions, you can confidently navigate the process of adjusting the truss rod on your acoustic guitar, empowering you to maintain the instrument's playability and structural integrity. Remember to approach truss rod adjustments with caution and patience, as precision and attentiveness are key to achieving the desired neck relief without compromising the guitar's functionality.
Testing the Adjustment
Once the truss rod adjustment process is completed, it is crucial to thoroughly test the impact of the adjustments on the guitar's playability and overall performance. Testing the adjustment involves a series of assessments to ensure that the neck relief aligns with the desired specifications and that the instrument remains in optimal condition for playing. Here are the key steps involved in testing the truss rod adjustment:
-
Assess Neck Relief: After completing the truss rod adjustments, it is essential to reevaluate the neck relief using a straight edge and feeler gauge. Placing the straight edge along the length of the fretboard and measuring the gap between the bottom of the straight edge and the top of the frets allows for a precise assessment of the neck curvature. The goal is to ensure that the neck relief corresponds to the desired specifications, providing the optimal balance between string tension and playability.
-
Check Fret Buzz and Action: Playing each string individually and across different frets helps identify any instances of fret buzz, which may indicate an inadequate neck relief. Additionally, assessing the string action, or the distance between the strings and the frets, ensures that the adjustments have not inadvertently affected the playability of the instrument. Ideally, the guitar should exhibit consistent and clear tones across the fretboard without any disruptive buzzing or excessively high action.
-
Evaluate Intonation: Testing the guitar's intonation by playing notes and chords across the fretboard allows for the assessment of the instrument's tuning accuracy. Proper truss rod adjustments contribute to improved intonation, ensuring that the guitar maintains accurate pitch and harmonious sound quality across different fret positions. Any signs of intonation discrepancies may indicate the need for further adjustments or setup modifications.
-
Re-Tune the Guitar: Following the truss rod adjustments and testing process, it is essential to re-tune the guitar using a reliable tuner. This step ensures that the instrument remains in proper pitch and that the adjustments have not compromised its tuning stability. Re-tuning the guitar allows for the confirmation of its playability and intonation, providing a comprehensive assessment of the truss rod adjustments' impact.
By meticulously testing the truss rod adjustments through these assessments, guitarists can ascertain the effectiveness of the adjustments and their impact on the instrument's playability and sound quality. It is important to approach the testing process with attentiveness and patience, as it allows for the identification of any potential issues or the need for further adjustments to achieve the desired neck relief and overall performance.
Conclusion
In conclusion, mastering the art of adjusting the truss rod of an acoustic guitar is a valuable skill that empowers musicians to maintain their instruments in optimal condition and tailor their playability to individual preferences. The truss rod, a fundamental component of the guitar's neck structure, plays a pivotal role in counteracting string tension and environmental factors, ensuring the instrument's structural integrity and performance.
By understanding the purpose and function of the truss rod, guitarists can appreciate its significance in maintaining the ideal neck relief, which directly influences playability and sound quality. The step-by-step process of adjusting the truss rod, accompanied by the essential tools and testing procedures, equips musicians with the knowledge and confidence to undertake this essential maintenance task.
Through meticulous assessment of the neck relief, testing for fret buzz, action, and intonation, and re-tuning the guitar, musicians can ensure that the truss rod adjustments have achieved the desired curvature and enhanced the instrument's overall performance. This comprehensive approach to truss rod adjustment underscores the importance of precision and attentiveness in preserving the guitar's playability and tonal characteristics.
Ultimately, the ability to adjust the truss rod empowers guitarists to maintain their instruments in top condition, mitigate playability issues, and customize the neck relief to suit their playing style and preferences. It exemplifies the symbiotic relationship between musicians and their instruments, allowing for a harmonious and tailored playing experience.
As musicians embark on the journey of truss rod adjustment, they embrace not only the technical aspects of instrument maintenance but also a deeper connection with their guitars. The process becomes an expression of care and dedication to the craft, fostering a profound appreciation for the intricacies of the instrument and the art of fine-tuning its performance.
In essence, the knowledge and proficiency in adjusting the truss rod serve as a testament to the commitment and artistry of musicians, enriching their musical journey and elevating the bond between player and instrument. With this newfound expertise, guitarists can confidently navigate the realm of truss rod adjustments, ensuring that their acoustic guitars resonate with precision, playability, and personalized character.