Home>Production & Technology>Audio Interface>How To Setup And Configure Focusrite Scarlett 18I20 (2Nd Gen) USB Audio Interface With Pro Tools
Audio Interface
How To Setup And Configure Focusrite Scarlett 18I20 (2Nd Gen) USB Audio Interface With Pro Tools
Modified: February 17, 2024
Learn how to easily setup and configure the Focusrite Scarlett 18i20 (2nd Gen) USB Audio Interface with Pro Tools. Enhance your audio production with this top-notch audio interface.
(Many of the links in this article redirect to a specific reviewed product. Your purchase of these products through affiliate links helps to generate commission for AudioLover.com, at no extra cost. Learn more)
Table of Contents
- Introduction
- Required Equipment
- Installing the Focusrite Scarlett 18i20 Drivers
- Connecting the Focusrite Scarlett 18i20 to your Computer
- Configuring the Focusrite Scarlett 18i20 in Pro Tools
- Setting up Inputs and Outputs in Pro Tools
- Adjusting Sample Rate and Buffer Size
- Configuring Playback Engine in Pro Tools
- Troubleshooting Common Issues
- Conclusion
Introduction
Welcome to the world of professional audio recording! If you’re serious about recording music or producing high-quality audio, an audio interface is an essential piece of equipment you’ll need. One of the most popular choices among musicians and producers is the Focusrite Scarlett 18i20 (2nd Gen) USB audio interface. This powerful and versatile device allows you to connect multiple instruments and microphones to your computer, providing you with pristine audio quality and robust functionality.
In this article, we will guide you through the process of setting up and configuring the Focusrite Scarlett 18i20 with Pro Tools, one of the leading digital audio workstation (DAW) software used in professional recording studios. Whether you’re a seasoned musician or a beginner, this step-by-step guide will help you get up and running with your audio interface and take your recordings to the next level.
Before we dive into the setup process, let’s take a moment to understand the important role that an audio interface plays in your recording setup. An audio interface serves as the bridge between your instrument or microphone and your computer, converting analog audio signals into digital data that can be processed and recorded.
The Focusrite Scarlett 18i20 offers a variety of inputs and outputs, allowing you to connect multiple instruments, microphones, and other audio devices simultaneously. With its high-quality preamps and low-latency performance, it’s a favorite among professional musicians and producers who demand the best sound quality for their recordings.
Now that you have an overview of what the Focusrite Scarlett 18i20 can do, let’s dive into the setup process. Before we proceed, make sure you have all the necessary equipment and software ready. This includes the Focusrite Scarlett 18i20 audio interface, a USB cable, and the latest drivers and firmware from the Focusrite website. You’ll also need a computer with a compatible operating system and Pro Tools installed.
Required Equipment
Before you begin setting up your Focusrite Scarlett 18i20 (2nd Gen) USB audio interface with Pro Tools, it’s important to gather all the necessary equipment to ensure a smooth and successful setup. Here’s a list of what you’ll need:
- Focusrite Scarlett 18i20 audio interface: This is the heart of your recording setup. Make sure you have the 2nd Generation model, as it offers improved functionality and performance.
- USB cable: You’ll need a standard USB cable to connect the audio interface to your computer. Ensure that it’s a USB 2.0 or higher cable to support faster data transfer.
- Computer: You’ll need a computer or laptop with a compatible operating system. Check the Focusrite website or product documentation for a list of supported operating systems.
- Pro Tools: This is the digital audio workstation (DAW) software that you’ll be using for recording, editing, and mixing your audio. Make sure you have the latest version of Pro Tools installed on your computer.
- Microphones and instruments: Depending on your recording needs, you’ll need microphones and instruments to connect to the audio interface. Ensure that they are compatible with the Focusrite Scarlett 18i20.
- Headphones or studio monitors: To listen to your recordings, you’ll need headphones or studio monitors. These will allow you to monitor your audio accurately during the recording and mixing process.
It’s important to note that the Focusrite Scarlett 18i20 comes with all the necessary cables and power supply. However, if you have specific requirements or want to upgrade your cables for better sound quality, you may consider purchasing additional cables.
Once you have gathered all the required equipment, you’ll be ready to set up and configure your Focusrite Scarlett 18i20 with Pro Tools. In the next sections, we’ll guide you through the installation, connection, and configuration process step by step, ensuring that you’re ready to start recording in no time.
Installing the Focusrite Scarlett 18i20 Drivers
Before connecting your Focusrite Scarlett 18i20 audio interface to your computer, you’ll need to install the necessary drivers. These drivers allow your computer to recognize and communicate with the audio interface, ensuring smooth operation and optimal performance.
To install the Focusrite Scarlett 18i20 drivers, follow these steps:
- Visit the official Focusrite website and navigate to the Support section.
- Search for the drivers and software downloads specific to the Scarlett 18i20 (2nd Gen) model.
- Download the latest version of the drivers compatible with your operating system. Make sure to select the correct version for your computer (Windows or macOS).
- Once the download is complete, locate the driver file in your Downloads folder or the specified location.
- Double-click on the driver file to start the installation process. Follow the on-screen instructions to proceed with the installation.
- During the installation process, you may be prompted to restart your computer. If so, save any ongoing work and restart your computer to complete the driver installation.
- After restarting your computer, connect your Focusrite Scarlett 18i20 audio interface to an available USB port using the provided USB cable.
- Wait for your computer to recognize the audio interface and install any additional drivers or software components if prompted.
- Once the installation is complete, you can verify that the drivers are installed correctly by checking the Device Manager on Windows or the System Preferences on macOS.
It’s worth noting that the Focusrite Scarlett 18i20 drivers are regularly updated to fix bugs, improve stability, and add new features. To ensure you have the latest drivers installed, periodically check the Focusrite website for updates and install them accordingly.
With the Focusrite Scarlett 18i20 drivers successfully installed on your computer, you’re one step closer to accessing the full potential of your audio interface. In the next section, we’ll guide you through the process of connecting the Scarlett 18i20 to your computer and configuring it with Pro Tools.
Connecting the Focusrite Scarlett 18i20 to your Computer
Now that you have installed the Focusrite Scarlett 18i20 drivers, it’s time to connect the audio interface to your computer. Follow these steps to ensure a proper connection:
- Locate an available USB port on your computer.
- Take the USB cable that came with your Scarlett 18i20 and connect one end to the USB port on the back of the audio interface.
- Connect the other end of the USB cable to the USB port on your computer. Ensure a secure connection.
- If your Scarlett 18i20 is powered by an external power supply, plug it into a power outlet and connect it to the audio interface.
- Turn on your Scarlett 18i20 by pressing the power button located on the front panel.
- Your computer should now recognize the Scarlett 18i20 as an available audio device.
- You can verify the connection by checking the Device Manager on Windows or the System Preferences on macOS to ensure that the audio interface is listed and recognized.
Once the Scarlett 18i20 is connected and recognized by your computer, you’re ready to configure it with Pro Tools. In the next section, we will guide you through the configuration process, enabling you to utilize the full capabilities of your audio interface with the Pro Tools software.
Note: If you encounter any issues with the connection, check the USB cable, ensure that you have installed the correct drivers, and try connecting to a different USB port. If the problem persists, consult the Focusrite support resources or reach out to their customer service for further assistance.
Configuring the Focusrite Scarlett 18i20 in Pro Tools
Once you have successfully connected your Focusrite Scarlett 18i20 audio interface to your computer, it’s time to configure it with Pro Tools. Follow these steps to ensure proper configuration:
- Launch Pro Tools on your computer.
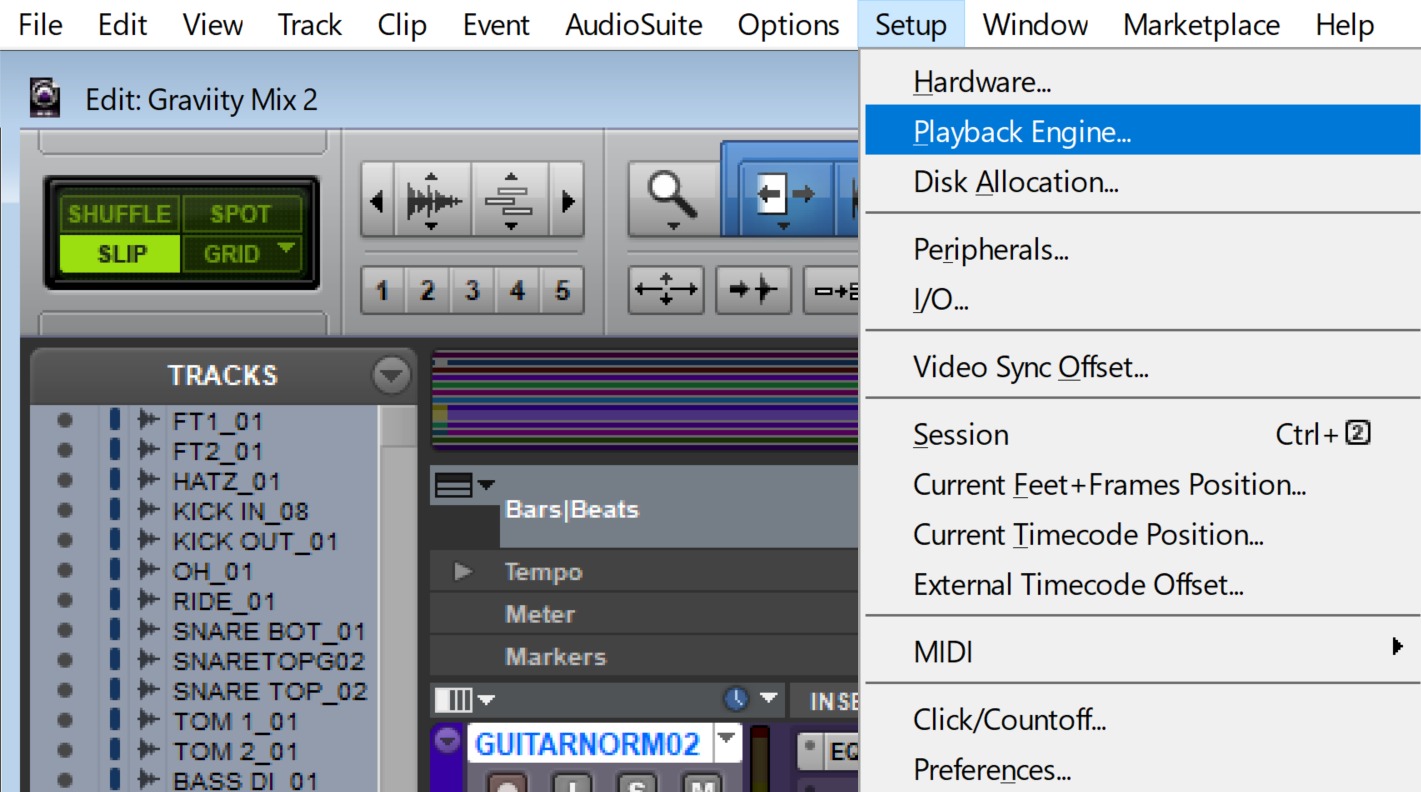
- Go to the “Setup” menu and select “Playback Engine.”
- In the Playback Engine settings, select the Focusrite Scarlett 18i20 as the audio interface.
- Set the sample rate and buffer size according to your recording needs. Higher sample rates offer better audio quality but may require more processing power, while larger buffer sizes provide more stability but introduce more latency.
- Click “OK” to apply the changes.
- Next, go to the “Setup” menu again and select “I/O Setup.”
- In the I/O Setup window, you can configure the inputs and outputs of your Scarlett 18i20. Assign the desired inputs and outputs for recording and playback.
- Make sure to enable phantom power if you’re using condenser microphones that require it.
- Click “OK” to save the I/O settings.
Now, your Focusrite Scarlett 18i20 is properly configured with Pro Tools. You can start recording and monitoring your audio using the inputs and outputs you have assigned. Remember to connect your microphones or instruments to the appropriate inputs on the Scarlett 18i20 for recording.
You can also access the additional features and settings offered by the Scarlett 18i20. The audio interface provides control over the preamp gain, headphone output levels, and other advanced settings through the included Focusrite Control software. Install the software from the Focusrite website, and follow the instructions to explore and adjust these settings according to your needs.
By configuring your Focusrite Scarlett 18i20 with Pro Tools, you have unlocked the full potential of your audio interface and the powerful recording capabilities of Pro Tools. Experiment with different settings and options to achieve the best results for your audio projects.
In the next section, we’ll cover important settings like sample rate and buffer size, which can greatly impact the performance of your audio interface and the recording experience in Pro Tools.
Setting up Inputs and Outputs in Pro Tools
Configuring the inputs and outputs in Pro Tools is crucial to ensure that you can record and playback audio using your Focusrite Scarlett 18i20 audio interface. Follow these steps to set up your inputs and outputs:
- Open Pro Tools on your computer.
- Go to the “Setup” menu and select “I/O Setup.”
- In the I/O Setup window, you’ll see different tabs for inputs, outputs, inserts, and buses. For now, focus on the “Input” and “Output” tabs.
- In the “Input” tab, you will see a list of available inputs on the left and corresponding input paths on the right. Assign the desired inputs from your Scarlett 18i20 to the appropriate input paths. For example, if you want to use a microphone connected to Input 1 on the Scarlett 18i20, assign it to Input 1 in Pro Tools. Repeat this process for all the inputs you want to use.
- In the “Output” tab, you will see a list of available outputs on the left and corresponding output paths on the right. Assign the desired outputs from your Scarlett 18i20 to the appropriate output paths. For example, if you want to monitor through Output 1-2 on the Scarlett 18i20, assign it to Output 1-2 in Pro Tools. Repeat this process for all the outputs you want to use.
- If you have connected external hardware processors or effects units, you can also set up send and return paths in the “Inserts” tab.
- Once you have assigned the inputs and outputs, click “OK” to apply the changes and close the I/O Setup window.
With the inputs and outputs set up correctly, you can now start recording audio using Pro Tools and your Focusrite Scarlett 18i20. When creating a new audio track, make sure to select the appropriate input assigned to the microphone or instrument you want to record. Likewise, set the output of the track to the desired output for monitoring or playback.
Remember to check the levels of your inputs and outputs in Pro Tools. You can adjust the gain on your Scarlett 18i20 to ensure optimal signal levels for recording and avoid clipping. Use the volume controls in Pro Tools for monitoring to set a comfortable listening level through your headphones or studio monitors.
Setting up inputs and outputs correctly in Pro Tools is essential for efficient and seamless audio recording and playback. It allows you to take full advantage of the capabilities of your Focusrite Scarlett 18i20 audio interface. In the next section, we’ll explore the importance of adjusting sample rate and buffer size settings in Pro Tools.
Adjusting Sample Rate and Buffer Size
The sample rate and buffer size are important settings in Pro Tools that can significantly impact the performance and latency of your Focusrite Scarlett 18i20 audio interface. It’s crucial to adjust these settings appropriately for your specific recording needs. Here’s how you can do it:
- Launch Pro Tools on your computer.
- Go to the “Setup” menu and select “Playback Engine.”
- In the Playback Engine settings, you’ll find options for sample rate and buffer size.
- Sample Rate: The sample rate determines the number of samples per second that Pro Tools will record and playback. Higher sample rates provide better audio quality, but they also require more processing power and storage. Choose a sample rate that matches the quality you desire for your recordings. Common sample rates are 44.1 kHz (CD quality), 48 kHz, 96 kHz, and 192 kHz.
- Buffer Size: The buffer size determines the amount of audio data that Pro Tools processes at once. A smaller buffer size reduces the latency between when you play or record audio and when you hear it, but it also increases the strain on your computer’s CPU. A larger buffer size reduces the strain on your CPU, but it introduces more latency. Find a balance between lower latency and optimal performance by testing different buffer sizes. Common buffer sizes range from 64 samples to 1024 samples.
- Adjust the sample rate and buffer size according to your recording needs.
- Click “OK” to apply the changes.
It’s important to note that selecting higher sample rates and smaller buffer sizes may require a more powerful computer to handle the increased processing demands. If you experience audio dropouts or glitches during recording or playback, consider increasing the buffer size or reducing the sample rate to alleviate the strain on the system.
Experiment with different sample rates and buffer sizes to find the settings that best balance audio quality, performance, and latency for your specific projects. Keep in mind that the optimal settings may vary depending on the complexity of your sessions and the capabilities of your computer.
With proper adjustment of the sample rate and buffer size, you can ensure a smoother recording and monitoring experience with your Focusrite Scarlett 18i20 and Pro Tools. In the next section, we’ll delve into configuring the Playback Engine settings in Pro Tools to enhance the overall performance of your audio interface.
Configuring Playback Engine in Pro Tools
Configuring the Playback Engine settings in Pro Tools is crucial to optimize the performance of your Focusrite Scarlett 18i20 audio interface. By adjusting these settings, you can ensure smooth playback, minimize latency, and maximize the efficiency of your recording sessions. Here’s how you can configure the Playback Engine in Pro Tools:
- Launch Pro Tools on your computer.
- Go to the “Setup” menu and select “Playback Engine.”
- In the Playback Engine settings, you’ll see options that allow you to adjust the hardware buffer size, CPU usage limit, and other performance-related parameters.
- Hardware Buffer Size: The hardware buffer size determines the size of the buffer used by your audio interface. Increasing the buffer size can help reduce system strain and minimize audio dropouts, but it also introduces more latency. Decreasing the buffer size reduces latency but increases the processing demands on your computer. Find a balance that suits your needs by adjusting the buffer size accordingly.
- CPU Usage Limit: This setting allows you to control the CPU usage during playback. Adjusting this limit can help ensure that your computer’s CPU is not overwhelmed by processing demands. You can experiment with different limits to achieve the best balance between performance and stability.
- Configure other options such as disk playback, disk cache, and sample rate conversion according to your preferences and system capabilities.
- Click “OK” to apply the changes.
It’s important to note that the optimal Playback Engine settings may vary depending on the complexity of your sessions and the capabilities of your computer. If you experience audio dropouts, glitches, or excessive latency, consider increasing the buffer size or adjusting the CPU usage limit to alleviate the strain on the system.
Additionally, make sure to close any unnecessary background applications or processes that may be consuming system resources while you are working with Pro Tools. This can help improve the overall performance and stability of your recording sessions.
By configuring the Playback Engine settings in Pro Tools to match the capabilities of your Focusrite Scarlett 18i20 and your computer, you can ensure smooth and efficient operation during recording, playback, and mixing. In the next section, we’ll explore some common troubleshooting tips to help you address any issues you might encounter along the way.
Troubleshooting Common Issues
While setting up and configuring your Focusrite Scarlett 18i20 audio interface with Pro Tools, you may encounter certain issues. Don’t worry; many of these issues can be easily resolved with some troubleshooting. Here are some common issues and their possible solutions:
- No audio signal: If you’re not getting any audio signal, check the following:
- Make sure the audio cables are properly connected to the appropriate inputs and outputs.
- Ensure that the input gains on the Scarlett 18i20 are set appropriately.
- Verify that the correct input channels are selected in Pro Tools.
- Check that the track’s input and output routing is properly configured.
- Audio dropouts/glitches: If you experience audio dropouts or glitches during playback or recording, consider the following:
- Increase the buffer size in the Pro Tools’ Playback Engine settings to reduce system strain.
- Close any unnecessary background applications or processes that may be consuming system resources.
- Ensure that your computer meets the minimum system requirements for Pro Tools and the Scarlett 18i20.
- Unresponsive audio interface: If your Scarlett 18i20 becomes unresponsive, try the following:
- Restart your computer and power cycle the audio interface.
- Make sure you have installed the latest drivers and firmware for the Scarlett 18i20.
- Check for any hardware conflicts in your computer’s device manager.
- Contact Focusrite support or consult their online resources for further troubleshooting steps.
- Latency issues: If you’re experiencing noticeable latency (delay) between playing an instrument and hearing the sound, consider these solutions:
- Reduce the buffer size in the Pro Tools’ Playback Engine settings.
- Optimize your computer’s performance by closing unnecessary background applications and processes.
- Disable any software or plugin effects that may introduce additional latency.
Remember to consult the user manual or support resources provided by Focusrite for specific troubleshooting steps or any known issues with the Scarlett 18i20. Additionally, ensure that you have the latest software updates for both Pro Tools and the Scarlett 18i20 to access any bug fixes or performance improvements.
If you’re still experiencing issues, don’t hesitate to reach out to the Focusrite support team or community forums for further assistance. They are knowledgeable and experienced in resolving audio interface and Pro Tools-related issues.
By troubleshooting common issues and seeking assistance when needed, you can overcome any hurdles and fully enjoy the benefits of your Focusrite Scarlett 18i20 audio interface and Pro Tools in your recording journey.
Conclusion
Setting up and configuring the Focusrite Scarlett 18i20 (2nd Gen) USB audio interface with Pro Tools allows you to unlock the full potential of your recording setup. By following the steps outlined in this guide, you can ensure a seamless and optimized workflow, resulting in high-quality audio recordings and mixing.
Throughout this article, we covered essential aspects of the setup process, including installing the necessary drivers, connecting the audio interface to your computer, configuring inputs and outputs, adjusting sample rate and buffer size, and optimizing the Playback Engine settings in Pro Tools.
Remember to gather all the required equipment, including the Focusrite Scarlett 18i20, USB cable, computer, Pro Tools software, instruments, and headphones or studio monitors. By ensuring you have the right gear, you can start your recording journey on the right foot.
Should you encounter any issues, refer to the troubleshooting section for common solutions. Don’t hesitate to reach out to Focusrite support or consult their online resources for further assistance.
With your Focusrite Scarlett 18i20 and Pro Tools properly set up and optimized, you have a powerful tool at your disposal for capturing and shaping your musical creations or audio projects. Take the time to explore the features and capabilities of your audio interface and software, experiment with different settings, and let your creativity soar.
So, set up your recording space, plug in your instruments and microphones, and embark on a journey of sound – the Focusrite Scarlett 18i20 and Pro Tools will be your guide along the way.