Home>Production & Technology>Audio Interface>How To Use The Scarlett Audio Interface
Audio Interface
How To Use The Scarlett Audio Interface
Published: February 4, 2024
Learn how to use the Scarlett Audio Interface to enhance your audio recording and production. Get professional-quality sound with this audio interface.
(Many of the links in this article redirect to a specific reviewed product. Your purchase of these products through affiliate links helps to generate commission for AudioLover.com, at no extra cost. Learn more)
Table of Contents
- Introduction
- What is the Scarlett Audio Interface?
- Setting up the Scarlett Audio Interface
- Connecting Microphones and Instruments
- Adjusting Input Levels and Gain
- Understanding the Control Panel
- Using the Scarlett Audio Interface with DAWs
- Recording and Monitoring with the Scarlett Audio Interface
- Troubleshooting Common Issues
- Conclusion
Introduction
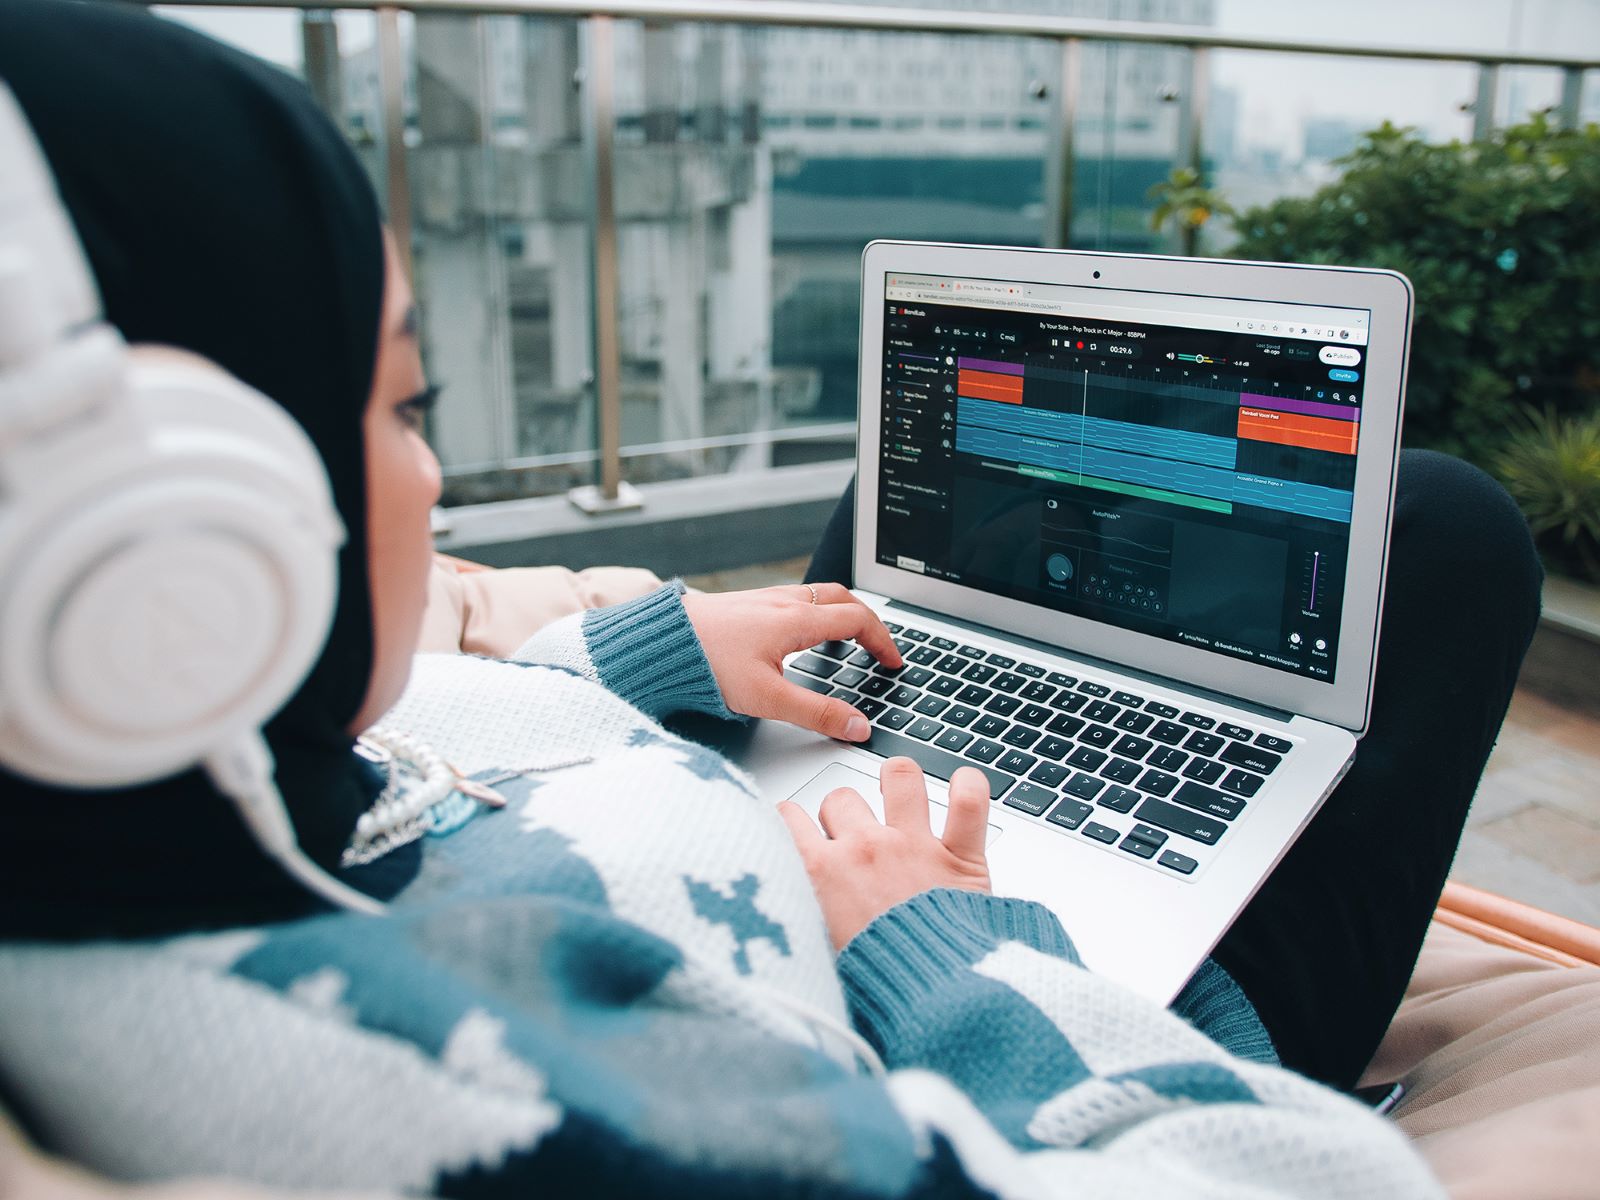
Welcome to the world of professional audio recording and production! If you’re a musician, podcaster, or content creator looking to elevate the quality of your recordings, you’ve come to the right place. In this article, we will delve into the fascinating world of audio interfaces, with a specific focus on the renowned Scarlett Audio Interface.
Whether you’re a beginner or an experienced audio enthusiast, the Scarlett Audio Interface is a powerful tool that can greatly enhance the sound quality of your recordings. With its advanced features, intuitive controls, and high-quality preamps, the Scarlett Audio Interface has become a go-to choice for professionals and home studio enthusiasts alike.
In this comprehensive guide, we will walk you through all the essential aspects of the Scarlett Audio Interface, from setting it up and connecting your microphones and instruments, to adjusting input levels and using it with popular Digital Audio Workstations (DAWs). Additionally, we will provide troubleshooting tips to help you overcome common issues you may encounter during your recording sessions.
So, whether you’re a vocalist looking to capture every nuance of your voice, a guitarist aiming to capture the perfect tone, or a podcaster seeking professional-grade audio for your shows, the Scarlett Audio Interface is an essential tool that can take your recordings to the next level.
Throughout this article, we’ll break down the technical jargon, provide practical tips and techniques, and equip you with the knowledge you need to make the most out of your Scarlett Audio Interface. So, let’s dive in and unlock the full potential of this incredible device!
What is the Scarlett Audio Interface?
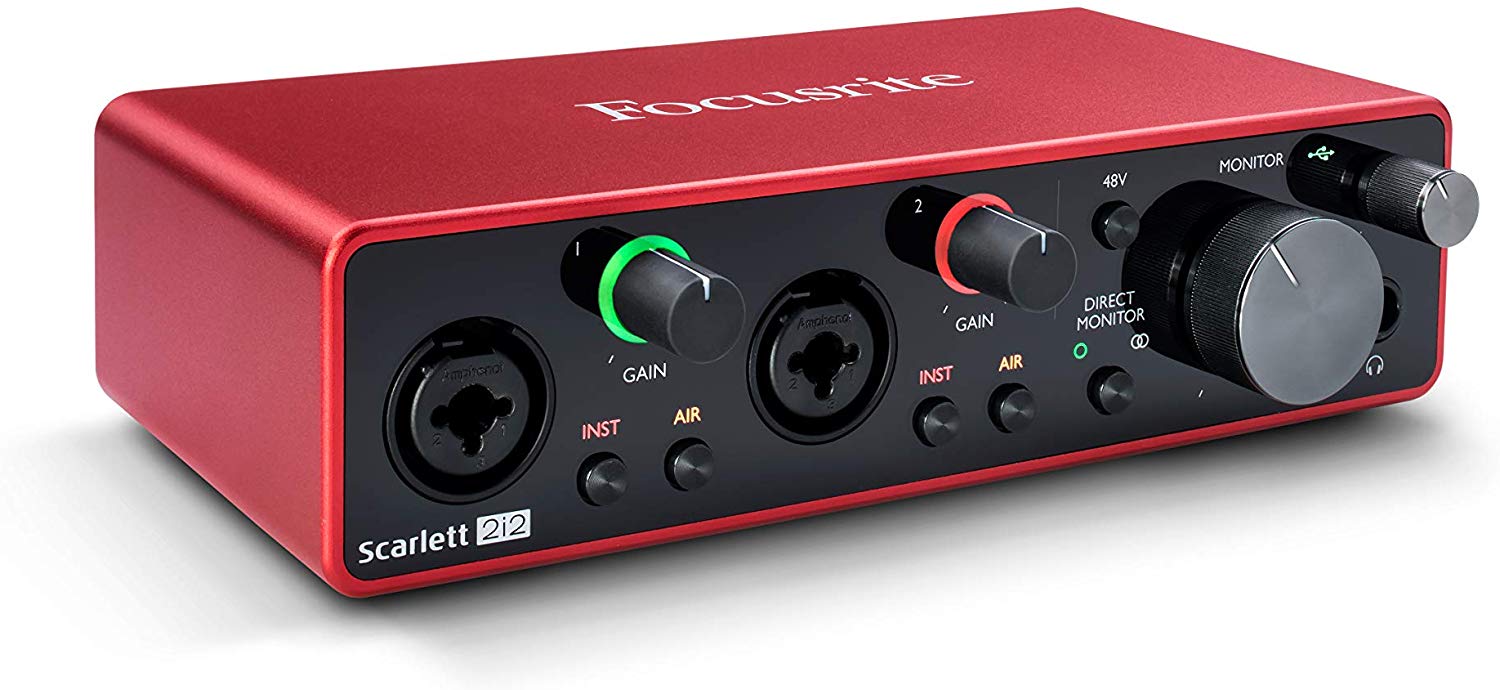
The Scarlett Audio Interface is a line of audio interfaces developed by Focusrite, a renowned name in the audio industry. Designed with musicians, producers, and content creators in mind, the Scarlett Audio Interface serves as the bridge between your instruments or microphones and your computer, allowing you to record and monitor high-quality audio.
One of the standout features of the Scarlett Audio Interface is its exceptional audio quality. Equipped with high-performance preamps, it ensures pristine and accurate sound capture, allowing you to faithfully reproduce the nuances of your music or voice. Whether you’re recording vocals, guitars, drums, or any other instrument, the Scarlett Audio Interface delivers studio-grade audio right in the comfort of your home or studio.
Another key advantage of the Scarlett Audio Interface is its versatility. It offers a range of input and output options, allowing you to connect a variety of microphones, instruments, headphones, and studio monitors. With XLR, TRS, and MIDI connectivity, you can easily integrate your favorite gear and expand your creative possibilities.
The Scarlett Audio Interface also excels in providing low latency performance, which is crucial for real-time monitoring while recording. It enables you to monitor your recorded tracks with near-zero delay, ensuring accurate timing and effortless performance. This feature is particularly important for musicians who rely on direct monitoring while laying down their tracks.
In addition, the Scarlett series comes bundled with a comprehensive software package that includes industry-standard digital audio workstations (DAWs) and a suite of plugins. Whether you’re a beginner or a seasoned pro, the software bundle provides you with the necessary tools to record, mix, and master your audio projects.
The Scarlett Audio Interface is available in different models, each offering a unique configuration to suit your specific needs. From the compact and portable Scarlett Solo, ideal for solo musicians and podcasters, to the feature-rich Scarlett 18i20, perfect for professional studios and advanced multi-instrument recording setups, there’s a Scarlett Audio Interface that fits every requirement and budget.
Ultimately, the Scarlett Audio Interface stands as a reliable, user-friendly, and high-quality solution for anyone seeking to elevate their audio production game. Whether you’re a musician, content creator, or podcaster, the Scarlett Audio Interface empowers you to capture, create, and share your passion with the world.
Setting up the Scarlett Audio Interface
Setting up your Scarlett Audio Interface is a straightforward process that ensures you are ready to start recording in no time. Follow these steps to get your Scarlett Interface up and running:
- Install the Drivers: Before connecting the Scarlett Audio Interface to your computer, it’s important to install the necessary drivers. These drivers allow your computer to recognize and communicate with the interface. Simply visit the Focusrite website and download the latest drivers for your specific Scarlett model, then follow the installation instructions provided.
- Connect the Interface: Once the drivers are installed, connect your Scarlett Audio Interface to your computer using the included USB cable. Plug one end of the USB cable into the USB port on the interface and the other end into an available USB port on your computer.
- Power the Interface: Some Scarlett models are powered via USB, while others require an external power supply. Make sure to connect the power supply to the Scarlett Audio Interface if necessary.
- Gain Accessory Setup: If you are connecting microphones or instruments to your Scarlett Audio Interface, ensure that the necessary gain accessories are properly connected. This may include XLR cables for microphones, instrument cables for guitars or keyboards, or MIDI cables for MIDI controllers.
- Adjust Sample Rate and Buffer Size: Open your Digital Audio Workstation (DAW) software and adjust the sample rate and buffer size settings to match the settings of your Scarlett Audio Interface. This ensures optimal performance and minimal latency during recording and playback.
- Test the Interface: After completing the setup, it’s a good idea to test the Scarlett Audio Interface to ensure everything is functioning correctly. Open your DAW and create a new project. Select the Scarlett Audio Interface as the input and output device within your DAW’s audio settings. Connect a microphone or instrument to the appropriate input on the interface, and check for signal input in your DAW’s metering display.
With these simple steps, you will have your Scarlett Audio Interface set up and ready to capture high-quality audio. Now that your interface is connected and functioning properly, it’s time to explore the various features and functionalities it offers.
Connecting Microphones and Instruments
The Scarlett Audio Interface provides versatile connectivity options, allowing you to connect a wide range of microphones and instruments. Here’s how you can connect your microphones and instruments to the Scarlett Audio Interface:
- For Microphones: If you’re using a microphone with an XLR connector, simply connect one end of an XLR cable to the microphone and the other end to the XLR input on the Scarlett Audio Interface. Make sure to securely tighten the connectors to ensure a proper and noise-free connection.
- For Instruments: If you’re connecting an instrument such as a guitar or keyboard, you have a couple of options. For instruments with a line-level output, you can use a TRS cable to connect the instrument’s output to one of the line inputs on the Scarlett Audio Interface. For guitars or basses with passive pickups, you may need a DI box to balance the signal before connecting it to the line input. Alternatively, if your instrument has an instrument-level output, you can directly connect it to the dedicated instrument input on the front of the Scarlett Audio Interface using an instrument cable.
- Phantom Power: Some microphones, such as condenser microphones, require phantom power to operate. The Scarlett Audio Interface provides phantom power, which can be enabled or disabled using the corresponding switch or control in the interface’s control panel. Make sure to turn on phantom power if you’re using a microphone that requires it.
- Monitoring: The Scarlett Audio Interface allows for direct monitoring, meaning you can listen to the input signal in real-time without any noticeable latency. By connecting a pair of headphones to the dedicated headphone output on the interface, you can monitor your recordings and adjust the headphone volume using the corresponding control on the interface.
By following these simple steps, you can connect your microphones and instruments to the Scarlett Audio Interface and start capturing high-quality audio with ease. Remember to experiment with microphone placement and instrument settings to achieve the desired sound. The Scarlett Audio Interface provides a solid foundation for your recording setup, ensuring accurate and professional results.
Adjusting Input Levels and Gain
Setting the appropriate input levels and gain for your Scarlett Audio Interface is crucial to ensure optimal recording quality and prevent distortion. Here’s a step-by-step guide on how to adjust the input levels and gain:
- Access the Control Panel: Open the Focusrite Control software on your computer. This software allows you to control various settings and parameters of your Scarlett Audio Interface.
- Set the Input Level: Identify the input channel you wish to adjust and use the input level knob or slider in the Focusrite Control software to set the appropriate input level. It’s important to ensure that the input level is neither too low, resulting in a weak signal, nor too high, causing distortion.
- Monitor the Metering: Keep an eye on the input level metering in the software or on the interface itself. Adjust the input level until the signal reaches an optimal level, usually indicated by a green or yellow range on the meter. Avoid letting the signal reach the red zone, as this indicates clipping and distortion.
- Use the Gain Control: The gain control, located on the Scarlett Audio Interface, allows you to adjust the overall gain of the input signals. Use the gain control to fine-tune the input level and achieve the desired volume while maintaining a clean and distortion-free signal.
- Consider Dynamic Range: When adjusting the input levels and gain, it’s essential to consider the dynamic range of your audio source. Vocal performances, for example, may have a wide dynamic range that requires careful gain staging to capture both the soft and loud parts effectively.
- Apply Phantom Power: If you’re using a microphone that requires phantom power, ensure that the corresponding switch or control in the Focusrite Control software or on the Scarlett Audio Interface is enabled. This will provide the necessary voltage to power the microphone.
It’s important to note that while setting the input levels and gain, you should aim for a healthy signal level without excessive noise or distortion. Adjusting the gain appropriately allows your Scarlett Audio Interface to capture the nuances of your performance accurately, resulting in professional-quality recordings.
Remember, every audio source is unique, and the optimal input levels and gain settings may vary depending on the specific microphone or instrument you’re using. Take the time to experiment and fine-tune the settings to achieve the best results for your recordings.
Understanding the Control Panel
The Scarlett Audio Interface features a control panel that allows you to access and adjust various settings to customize your recording experience. Understanding the different controls and features on the control panel will help you harness the full potential of your Scarlett Audio Interface. Let’s explore the key components:
- Input Gain Knobs: The input gain knobs are located on the front of the Scarlett Audio Interface and are used to adjust the gain level for each input channel. Turning the knob clockwise increases the gain, while turning it counterclockwise decreases it. Properly adjusting the input gain is crucial for achieving optimal signal levels and preventing distortion.
- Headphone Output and Volume Control: The Scarlett Audio Interface provides a dedicated headphone output that allows you to monitor your audio in real-time. The headphone volume control adjusts the level of the headphone output signal, enabling you to set the desired listening volume without affecting the recording levels.
- Direct Monitor Switch: The direct monitor switch, sometimes labeled as “DIM” or “MON,” allows you to toggle between monitoring the direct input signal or the playback signal from your computer. When the switch is engaged for direct monitoring, you will hear the input signal directly without any processing or latency, while disabling it will allow you to monitor what is being played back from your recording software.
- Phantom Power Switch: Some microphones, such as condenser microphones, require phantom power to operate. The phantom power switch allows you to activate or deactivate the +48V phantom power supply for the appropriate inputs on the Scarlett Audio Interface. Ensure that the phantom power switch is turned off when using dynamic microphones or other devices that do not require phantom power.
- Monitor Mix Control: The monitor mix control on the Scarlett Audio Interface allows you to adjust the balance between the input signal and the playback signal from your recording software. This feature is especially useful when recording vocals or instruments while simultaneously monitoring previously recorded tracks.
- Sample Rate and Clock Source: The control panel also provides options to adjust the sample rate and clock source for your interface. The sample rate determines the quality and resolution of your recordings, while the clock source determines the master timing reference for synchronization with other audio devices.
By familiarizing yourself with the control panel of your Scarlett Audio Interface, you can easily access and customize the essential settings that directly impact your recording experience. Experimenting with the controls will help you find the optimal settings for your specific needs and workflows, ensuring a seamless and efficient recording process.
Using the Scarlett Audio Interface with DAWs
The Scarlett Audio Interface seamlessly integrates with various Digital Audio Workstations (DAWs), providing a reliable and efficient recording platform. Whether you’re using popular DAWs like Ableton Live, Pro Tools, Logic Pro, or any other software, the Scarlett Audio Interface offers a versatile and straightforward setup. Here’s how to use it with your preferred DAW:
- Connect the Interface: Ensure that your Scarlett Audio Interface is properly connected to your computer via the USB cable. The DAW should recognize the interface as an available audio input and output device.
- Select the Interface in your DAW: Access the audio settings or preferences of your DAW and choose the Scarlett Audio Interface as the input and output device. This allows your DAW to receive and send audio signals through the interface.
- Configure Input and Output Routing: Within your DAW, configure the input routing to match the input channels on your Scarlett Audio Interface. Assign the appropriate inputs to each track or channel you want to record from. Similarly, configure the output routing to send the audio signal to the desired output channels on the interface.
- Set Sample Rate and Buffer Size: Adjust the sample rate and buffer size settings within your DAW to match the settings of your Scarlett Audio Interface. This ensures synchronicity and optimal performance during recording and playback.
- Apply Input Monitoring: Enable the input monitoring feature in your DAW to listen to the incoming audio signal in real-time. This allows you to hear your recorded tracks without any noticeable latency, ensuring accurate timing and performance.
- Utilize Software Bundled with Scarlett: Take advantage of the software bundled with the Scarlett Audio Interface. This often includes a digital audio workstation (DAW), plugins, and other music production tools. Explore these software options to enhance your recording, editing, and mixing capabilities.
- Record and Mix: With your Scarlett Audio Interface properly set up and integrated into your DAW, you’re ready to start recording and producing music. Use the interface’s controls to adjust input levels, gain, and monitor mix as needed. Experiment with various recording techniques and make use of the DAW’s features to achieve the desired sound.
By utilizing the Scarlett Audio Interface with your preferred DAW, you unlock a world of possibilities for recording, editing, and producing music. The seamless integration between the interface and the software enables a smooth and efficient workflow, allowing you to focus on your creativity and achieve professional-quality audio results.
Recording and Monitoring with the Scarlett Audio Interface
The Scarlett Audio Interface provides comprehensive recording and monitoring capabilities that enable you to capture and monitor high-quality audio with ease. Whether you’re recording vocals, instruments, podcasts, or any other audio source, the Scarlett Audio Interface offers the essential tools for a smooth and efficient recording process. Here’s a breakdown of the key steps involved in recording and monitoring with the Scarlett Audio Interface:
- Setting Input Levels: Adjust the input gain knobs on the Scarlett Audio Interface to set the appropriate input levels for your microphones or instruments. Take care to avoid clipping, which can result in distorted recordings. Use the input level meters in your Digital Audio Workstation (DAW) to help monitor and optimize the input levels.
- Monitor Mix Control: The Scarlett Audio Interface features a monitor mix control that allows you to blend the direct input signal with the playback signal from your DAW. This enables you to monitor your performance in real-time while still hearing previously recorded tracks for reference.
- Direct Monitoring: Activate direct monitoring if you want to listen to the raw, unprocessed input signal without any latency. This is especially useful for recording vocals or instruments where real-time monitoring is crucial for performance.
- Headphone Monitoring: Connect your headphones to the dedicated headphone output on the Scarlett Audio Interface to monitor your recordings. Adjust the headphone volume control to achieve a comfortable listening level.
- Latency: Latency refers to the delay between the input signal and its playback through your computer’s audio system. Adjust the buffer size in your DAW’s settings to minimize latency and ensure real-time monitoring.
- Record and Playback: Arm the desired track(s) in your DAW for recording and press the record button to start capturing your performance. The Scarlett Audio Interface will faithfully capture the audio signal with its high-quality preamps and converters. After recording, use the Scarlett Audio Interface to monitor and listen to your recorded tracks during playback.
- Mixing and Monitoring: After recording, you can use the Scarlett Audio Interface to monitor and mix your recorded tracks. Connect your studio monitors or speakers to the line outputs of the interface and adjust the output levels to achieve the desired playback volume.
By following these steps, you can ensure a smooth and efficient recording process with the Scarlett Audio Interface. The interface’s user-friendly controls, low-latency monitoring capabilities, and high-quality audio conversion make it an ideal tool for capturing and monitoring your recordings with precision and clarity.
Troubleshooting Common Issues
While the Scarlett Audio Interface is a reliable and efficient tool, you may encounter some common issues during your recording sessions. Here are some troubleshooting tips to help you address these issues:
- No Sound or Signal: If you’re not getting any sound or signal from the Scarlett Audio Interface, check the following:
– Ensure that the interface is properly connected to your computer and powered on.
– Make sure the input levels are set appropriately on the interface and in your DAW.
– Confirm that the correct input and output devices are selected in your DAW’s audio settings.
– Verify that the cables and connections are secure and not faulty. - Low or Weak Signal: If you’re experiencing a weak or low signal, try the following:
– Check the input gain settings on the Scarlett Audio Interface and increase the gain if necessary.
– Ensure that the microphone or instrument is properly connected and the cables are functioning correctly.
– Adjust the input levels in your DAW to increase the signal strength. - Latency Issues: Latency can be a common issue during recording and monitoring. Here’s how to minimize it:
– Adjust the buffer size in your DAW’s audio settings to reduce latency. However, be cautious as lower buffer sizes can increase the strain on your computer’s CPU.
– Use direct monitoring on the Scarlett Audio Interface to monitor the input signal without any latency. - Crackling or Distorted Sound: If you hear crackling or distorted sound, try the following:
– Ensure that the input signal is not clipping. Reduce the input gain if the signal is too strong and causing distortion.
– Check the cables and connections for any issues or loose connections.
– Update the drivers and firmware of your Scarlett Audio Interface to the latest version. - Driver Issues: If you’re encountering driver-related problems, follow these steps:
– Update the drivers of your Scarlett Audio Interface to the latest version from the Focusrite website.
– Uninstall any conflicting or outdated drivers on your computer.
– Restart your computer after installing or updating the drivers to ensure proper functionality.
If you’re still experiencing issues with your Scarlett Audio Interface, consulting the user manual or contacting Focusrite’s customer support can provide further assistance. They can offer specific guidance based on your interface model and the nature of the problem. Remember, troubleshooting may require some trial and error, so be patient and persistent in finding a solution.
Conclusion
The Scarlett Audio Interface is a powerful tool that empowers musicians, producers, and content creators to achieve professional-grade audio recordings. With its high-quality preamps, versatile connectivity options, and user-friendly controls, the Scarlett Audio Interface delivers excellent sound quality and a seamless recording experience.
In this comprehensive guide, we explored the various aspects of the Scarlett Audio Interface, from setting it up and connecting microphones and instruments to adjusting input levels and understanding the control panel. We also discussed how to use the Scarlett Audio Interface with popular DAWs, provided troubleshooting tips for common issues, and covered the recording and monitoring process.
By following the steps outlined in this guide, you can unleash the full potential of your Scarlett Audio Interface and unlock new possibilities in your audio production journey. Whether you’re recording vocals, instruments, podcasts, or any other audio source, the Scarlett Audio Interface offers the tools and features you need to capture, monitor, and fine-tune your recordings with precision and clarity.
Remember to experiment, explore different recording techniques, and make use of the bundled software and plugins to enhance your creative process. The Scarlett Audio Interface is more than just a piece of equipment – it’s a gateway to unlock your creative expression and bring your musical vision to life.
As you continue your audio recording and production journey with the Scarlett Audio Interface, keep learning, experimenting, and refining your skills. The Scarlett Audio Interface is a reliable and versatile companion that will grow with you as you progress in your audio production aspirations.
So, embrace the power of the Scarlett Audio Interface, capture your best performances, and let your creativity soar to new heights. Get ready to make your mark in the world of professional audio with the unmatched capabilities of the Scarlett Audio Interface.