Home>Production & Technology>Background Music>How To Add Background Music To A Video In Windows Movie Maker
Background Music
How To Add Background Music To A Video In Windows Movie Maker
Published: October 29, 2023
Learn how to easily add background music to your videos in Windows Movie Maker. Enhance your video projects with the perfect soundtrack.
(Many of the links in this article redirect to a specific reviewed product. Your purchase of these products through affiliate links helps to generate commission for AudioLover.com, at no extra cost. Learn more)
Table of Contents
Introduction
Adding background music to a video can greatly enhance its impact and make it more engaging to viewers. Whether you’re creating a personal video montage, a marketing video, or a presentation, the right background music can set the mood and create a powerful emotional connection.
Windows Movie Maker, a popular video editing software for Windows, offers a user-friendly interface and a range of tools to help you add background music to your videos. In this article, we will guide you through the process of adding background music to a video using Windows Movie Maker.
Before we dive into the steps, it’s important to note that you should only use background music that you have the rights to use. Using copyrighted music without permission can lead to legal issues. There are several websites where you can find royalty-free music, such as YouTube Audio Library, Epidemic Sound, or PremiumBeat.
Now, let’s get started on adding background music to your video with Windows Movie Maker!
Step 1: Importing the video and audio files
The first step in adding background music to your video in Windows Movie Maker is to import both the video file and the audio file into the software.
To import the video file, open Windows Movie Maker and click on “Add videos and photos” in the Home tab. Browse your computer for the video file you want to edit and click on “Open” to import it into the software.
Next, to import the audio file, click on “Add music” in the Home tab. Again, browse your computer for the audio file you want to use as background music and click on “Open” to import it into Windows Movie Maker.
Once both the video and audio files are imported, they will appear in the “Storyboard” or “Timeline” section of Windows Movie Maker.
It’s important to ensure that the length of the audio file matches or is longer than the duration of the video. If the audio file is shorter, it will stop before the video ends. If it’s longer, you can easily trim or adjust the length later in the editing process.
Now that you have imported both the video and audio files, let’s move on to the next step: arranging the video and audio tracks.
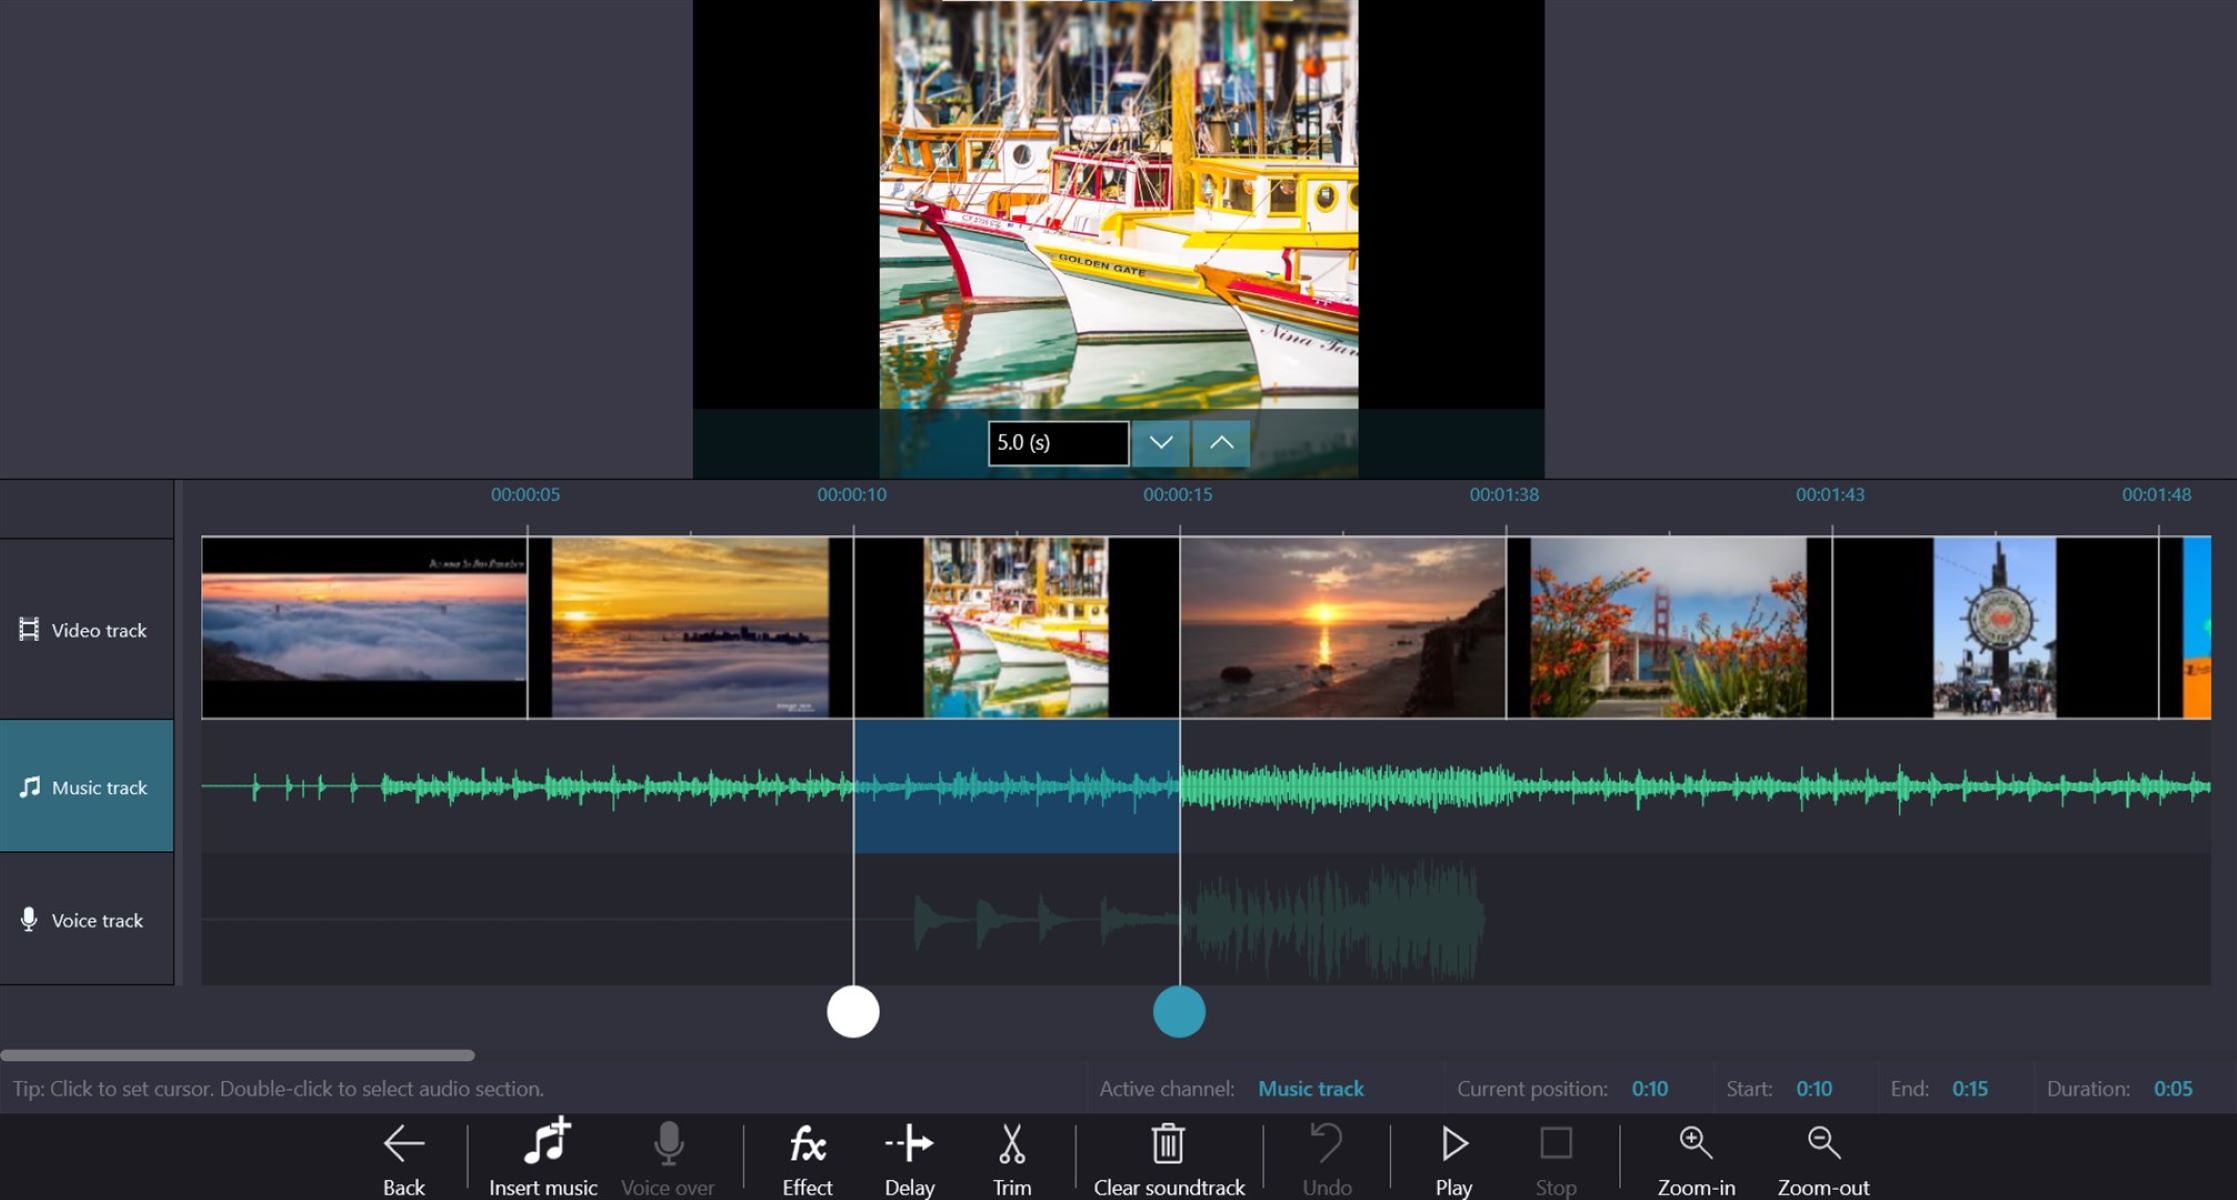
Step 2: Arranging the video and audio tracks
Once you have imported the video and audio files into Windows Movie Maker, the next step is to arrange their tracks to sync the background music with the visuals.
In the “Storyboard” or “Timeline” section, you will see separate tracks for the video and audio. Click and drag the video track to align it with the desired position in the timeline. Similarly, click and drag the audio track to align it with the corresponding section of the video.
You can adjust the position and length of the tracks by splitting, trimming, or extending them as needed. To split a track, move the playback indicator to the desired position, and then click on the “Split” button in the Edit tab. This allows you to separate a particular section of the track for editing.
To trim a track, click on the edge of the track you want to trim, and then drag it inward to shorten its length. Conversely, drag it outward to extend the length. This helps you match the background music with specific segments of the video.
Windows Movie Maker also allows you to apply transitions between different sections of the video or audio tracks. Transitions help create a smooth flow between scenes or audio clips. To add a transition, click on the “Animations” tab, select the desired transition style, and drag it between two clips on the timeline.
By arranging the video and audio tracks, splitting and trimming them, and adding transitions, you can create a cohesive and visually appealing video with synchronized background music. Now let’s move on to the next step: adjusting the audio levels.
Step 3: Adjusting the audio levels
After arranging the video and audio tracks in Windows Movie Maker, it’s important to adjust the audio levels to ensure that the background music is properly balanced with the video’s original audio.
In the “Audio” section of the software, you will find various tools to help you adjust the audio levels. First, select the audio track by clicking on it in the timeline. Then, navigate to the “Audio tools” tab and click on “Volume.”
A volume slider will appear, allowing you to increase or decrease the overall volume of the audio track. You can drag the slider to the left to decrease the volume or to the right to increase it. Adjust the volume until the background music is audible without overpowering the original video’s audio.
In addition to adjusting the overall volume, you can also control the audio levels at specific points within the video. To do this, click on the “Edit volume” button in the “Audio tools” tab.
A volume graph will appear, representing the audio levels over time. You can click on points on the graph to add control points and drag them up or down to adjust the volume at those specific points. This is useful if you want to fade the background music in or out at particular moments in the video.
Experiment with different control point placements to achieve the desired audio level variations. You can also add multiple control points to create gradual fades or sudden changes in audio volume.
By carefully adjusting the audio levels, you can ensure that the background music complements the video without overshadowing any dialogue or other important sounds. Now, let’s move on to the next step: applying fade in and fade out effects.
Step 4: Applying fade in and fade out effects
Adding fade in and fade out effects to the background music can create a smooth transition and enhance the overall listening experience. Windows Movie Maker provides easy-to-use tools to apply these effects.
To apply a fade in effect to the background music, select the audio track and navigate to the “Audio tools” tab. Click on the “Fade in” button to gradually increase the volume of the audio at the beginning of the track. You can adjust the duration of the fade in effect by dragging the slider.
Similarly, to apply a fade out effect at the end of the background music, click on the “Fade out” button in the “Audio tools” tab. This will gradually decrease the volume of the audio towards the end of the track. Again, you can adjust the duration of the fade out effect by sliding the duration slider.
By adding fade in and fade out effects, you can smoothly introduce and conclude the background music, seamlessly blending it with the video’s audio. These effects help avoid any sudden or jarring transitions that can distract the viewer.
Remember, you can also adjust the duration and intensity of the fade in and fade out effects by simply dragging the audio track’s edges in the timeline. This gives you greater control over how quickly or slowly the music fades in and out.
Now that you have applied fade in and fade out effects to the background music, let’s move on to the final step: previewing and saving the video with background music.
Step 5: Previewing and saving the video with background music
After making all the necessary adjustments and adding background music to your video in Windows Movie Maker, it’s time to preview and save your final creation.
To preview your video with the background music, click on the “Play” button located in the preview pane of Windows Movie Maker. This will allow you to watch your video in real-time and ensure that the background music is synchronized with the visuals.
While previewing, pay attention to the overall audio balance, the timing of fade in and fade out effects, and how well the background music complements the content of the video. If you notice any issues, you can always go back and make adjustments until you are satisfied with the result.
Once you are happy with the preview, it’s time to save your video with the background music. Click on the “File” tab and select “Save movie.” Windows Movie Maker offers various options for saving your video, including different file formats and resolutions.
Choose the appropriate settings based on your needs and preferences. You can save the video in a standard format, such as MP4 or WMV, or select high-definition options if you want to maintain the best possible video quality.
After selecting the save options, Windows Movie Maker will process and save your video with the background music. The time it takes to save the video will depend on the length of the video and the processing power of your computer.
Once the process is complete, you can locate the saved video file in the specified output folder. You can now share your video with family and friends, upload it to social media platforms, or use it for any other purpose you intended.
Congratulations! You have successfully added background music to your video using Windows Movie Maker. By following these steps, you can create captivating videos that evoke emotions, engage viewers, and leave a lasting impact.
With a little creativity and experimentation, you can explore different music choices, adjust audio levels, and apply various effects to further enhance your videos. Use this newfound knowledge and unleash your creativity with the power of background music.
Enjoy your video editing journey and happy storytelling!
Conclusion
Adding background music to your videos can significantly elevate the overall quality and impact of your content. Whether you’re creating personal vlogs, marketing videos, or presentations, Windows Movie Maker provides a user-friendly platform to seamlessly incorporate background music into your videos.
In this article, we explored a step-by-step guide on how to add background music to a video using Windows Movie Maker. We covered importing video and audio files, arranging and adjusting tracks, applying fade in and fade out effects, and finally previewing and saving your video with background music.
Remember to always use background music that you have the rights to use, ensuring compliance with copyright laws. There are several websites where you can find royalty-free music, making it easy to find the perfect soundtrack for your videos.
Once you have mastered the art of adding background music to your videos, don’t hesitate to experiment with different music choices, audio levels, and effects to enhance the overall viewer experience. Music has the power to evoke emotions, set the right mood, and create a powerful connection with your audience.
So, unleash your creativity and let background music take your videos to the next level. Whether it’s a nostalgic melody, an upbeat rhythm, or a soothing instrumental, the right background music can truly transform your videos into captivating storytelling experiences.
Now it’s time for you to grab Windows Movie Maker, import your video and audio files, and start adding that perfect background music to create videos that leave a lasting impression. Happy editing!