Home>Devices & Equipment>Music Box>How To Make An Electronic Music Box
Music Box
How To Make An Electronic Music Box
Published: January 11, 2024
Learn how to create your own electronic music box and explore the world of music with our step-by-step guide. Enjoy the enchanting melodies of a customized music box.
(Many of the links in this article redirect to a specific reviewed product. Your purchase of these products through affiliate links helps to generate commission for AudioLover.com, at no extra cost. Learn more)
Table of Contents
Introduction
Welcome to the fascinating world of electronic music boxes! These charming devices have been captivating people for decades with their whimsical melodies and the nostalgia they evoke. If you’re a fan of music boxes and have a passion for electronics, why not combine the two and create your very own electronic music box?
In this article, we will guide you through the step-by-step process of making an electronic music box from scratch. Whether you’re a seasoned DIY enthusiast or a beginner in the world of electronics, this project is a great way to explore your creativity and create a unique piece of musical art.
Creating an electronic music box involves a combination of electronics, programming, and craftsmanship. You will need to gather materials, design the circuit, solder components, assemble the music box, program the music sequence, test and troubleshoot, and finally, customize the exterior to make it truly unique.
Not only will this project allow you to exercise your technical skills, but it will also give you the opportunity to choose the melodies and sounds you want your music box to play. Imagine the joy of creating personalized tunes or playing your favorite songs on your handmade creation!
So, if you’re ready to embark on this musical journey, let’s dive in and learn how to make your very own electronic music box. Get ready to enjoy the enchanting melodies and experience the satisfaction of bringing your creation to life.
Step 1: Gather Materials
The first step in creating an electronic music box is to gather all the necessary materials. Here’s a list of the items you’ll need:
- Arduino Uno or similar microcontroller board
- Breadboard
- Jumper wires
- Speaker or buzzer
- Resistors
- Capacitors
- Pushbuttons
- LEDs
- Potentiometer
- Battery or power supply
- Wood or acrylic box for the exterior
- Screws and screwdriver
- Wire cutters and strippers
- Soldering iron and solder
- Computer with Arduino IDE software
The microcontroller board, such as Arduino Uno, will be the brain of your electronic music box. It will control the music playback and other functions. The breadboard will act as a temporary platform for prototyping and connecting the components.
The speaker or buzzer will produce the sound of the music. Make sure it’s compatible with your microcontroller board and can generate the desired range of frequencies. Resistors and capacitors will be needed to stabilize the circuit and prevent damage to the components.
Pushbuttons and LEDs will allow you to interact with the music box, such as selecting different melodies or adjusting the volume. The potentiometer can be used to control the volume level. Make sure to choose buttons and LEDs that fit your design preferences.
In terms of power, you can either use a battery to make your music box portable or connect it to a power supply. Depending on your chosen power source, ensure you have the necessary connectors, adapters, or cables.
Lastly, you’ll need a suitable box for the exterior of your music box. You can either purchase a pre-made wooden or acrylic box, or if you’re feeling adventurous, you can build one from scratch. Either way, make sure it has enough space to accommodate all the components.
Gather all these materials and make sure you have everything you need before moving on to the next step. Once you’ve gathered all the materials, it’s time to design the circuit for your electronic music box.
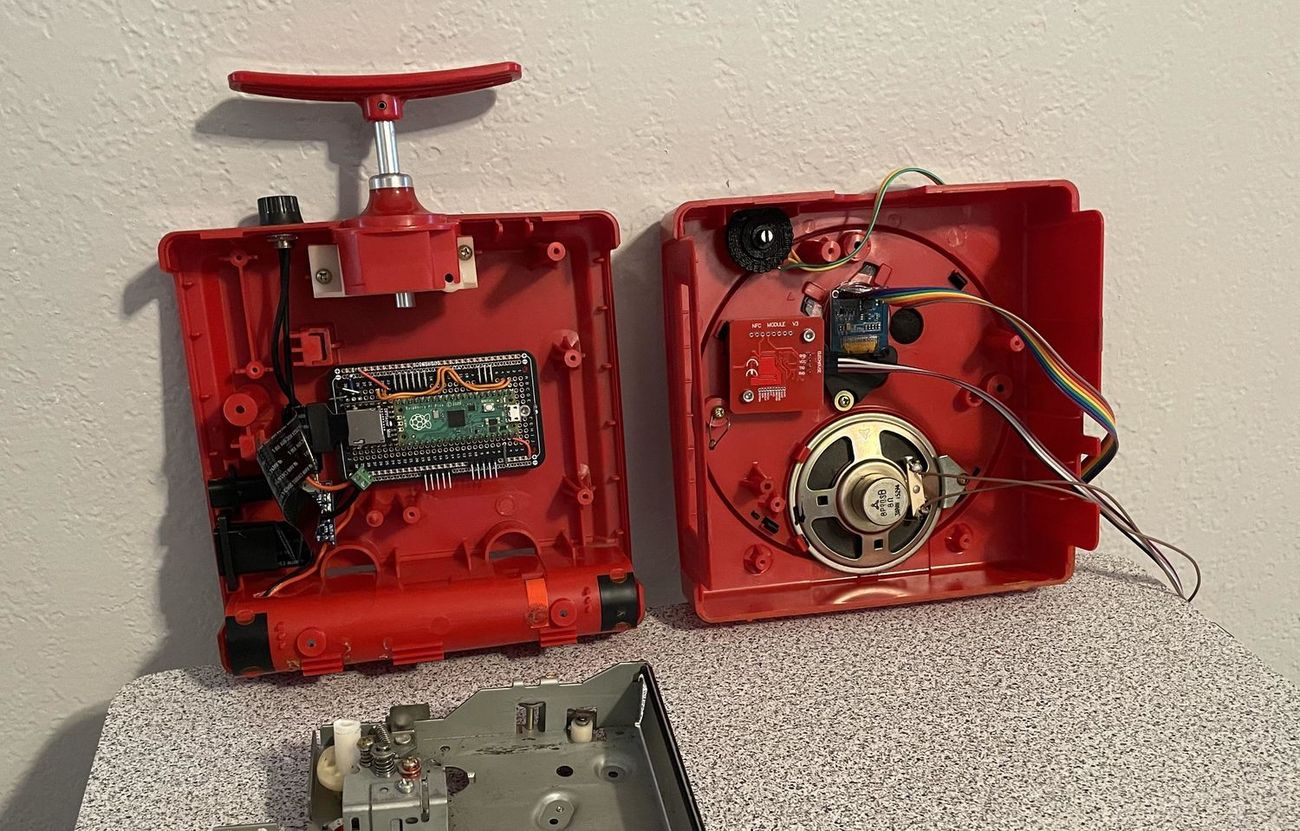
Step 2: Design the Circuit
Now that you have all the materials ready, it’s time to design the circuit for your electronic music box. The circuit will determine how the different components are connected and how they interact with each other.
Start by planning the layout of the components on the breadboard. Identify the connections needed between the microcontroller board, the speaker, buttons, LEDs, and other components. Consider the placement of the components to ensure a clean and organized circuit.
Next, refer to the datasheets of the components to determine the necessary resistors, capacitors, and other passive components needed for proper operation. These components help regulate the current and voltage levels to protect the sensitive electronic components and prevent circuit damage.
Take note of the pin assignments for the microcontroller board and match them with the connections required for the components. This will help ensure that everything is properly connected and avoid any potential issues when programming and testing the music box.
While designing the circuit, keep in mind any specific features or functionalities you want to implement in your music box. For example, if you want to add volume control, make sure to include a potentiometer and establish the necessary connections. Similarly, if you want to include multiple melodies, plan the buttons or switches accordingly.
Remember to pay attention to the power requirements of the components and ensure that the power supply can handle the load. You may need to use voltage regulators or adjust the circuit accordingly to maintain stable power throughout the circuit.
Once you have a clear design in mind, use the jumper wires to connect the components as per your circuit diagram. Take care to connect the positive (+) and negative (-) terminals correctly, as incorrect connections may result in unexpected behavior or damage to the components.
Before moving to the next step, double-check your circuit connections and make sure everything is in order. This will help prevent any issues during the assembly and programming stages of the project.
With the circuit design complete and the components connected, you’re one step closer to creating your electronic music box. In the next step, we’ll move on to soldering the components to ensure a secure and permanent connection.
Step 3: Solder Components
Now that you have designed the circuit and made the necessary connections on the breadboard, it’s time to solder the components. Soldering provides a permanent and secure connection, ensuring the stability and durability of your electronic music box.
Start by preparing the components for soldering. Trim any excess leads on the components using wire cutters, leaving a clean and manageable length. This will make it easier to solder and prevent any unwanted short circuits.
Next, heat up your soldering iron and allow it to reach the appropriate operating temperature. While it’s heating, make sure to clean the soldering iron tip with a damp sponge or brass wire sponge. A clean tip will help the solder flow smoothly and create a strong bond.
Place the component on the circuit board and hold it in place with a pair of tweezers or a helping hand tool. Apply a small amount of solder to the tip of the iron and place it on the joint where the component lead meets the pad on the circuit board. Allow the solder to melt and flow onto the joint, creating a solid connection.
Be careful not to apply too much heat or keep the iron in contact with the joint for too long, as this can damage the component or the circuit board. Aim for a quick and efficient soldering process, ensuring a reliable connection without causing any harm.
Continue soldering all the components according to the circuit design. Take your time and pay attention to each joint, ensuring they are clean, shiny, and free of any solder bridges or cold solder joints. Double-check the polarity of the components and make sure they are oriented correctly.
Once you have soldered all the components, inspect the entire circuit for any potential issues. Look for solder joints that may need touch-up or any accidental solder bridges that need to be removed. Use a magnifying glass if needed to ensure the quality and integrity of your soldering work.
After completing the soldering process, allow the circuit to cool down before moving on to the next step. This will ensure that the solder joints have solidified properly and are ready for assembly.
With all the components securely soldered to the circuit board, you’re now ready to move on to the exciting step of assembling your electronic music box in the next section.
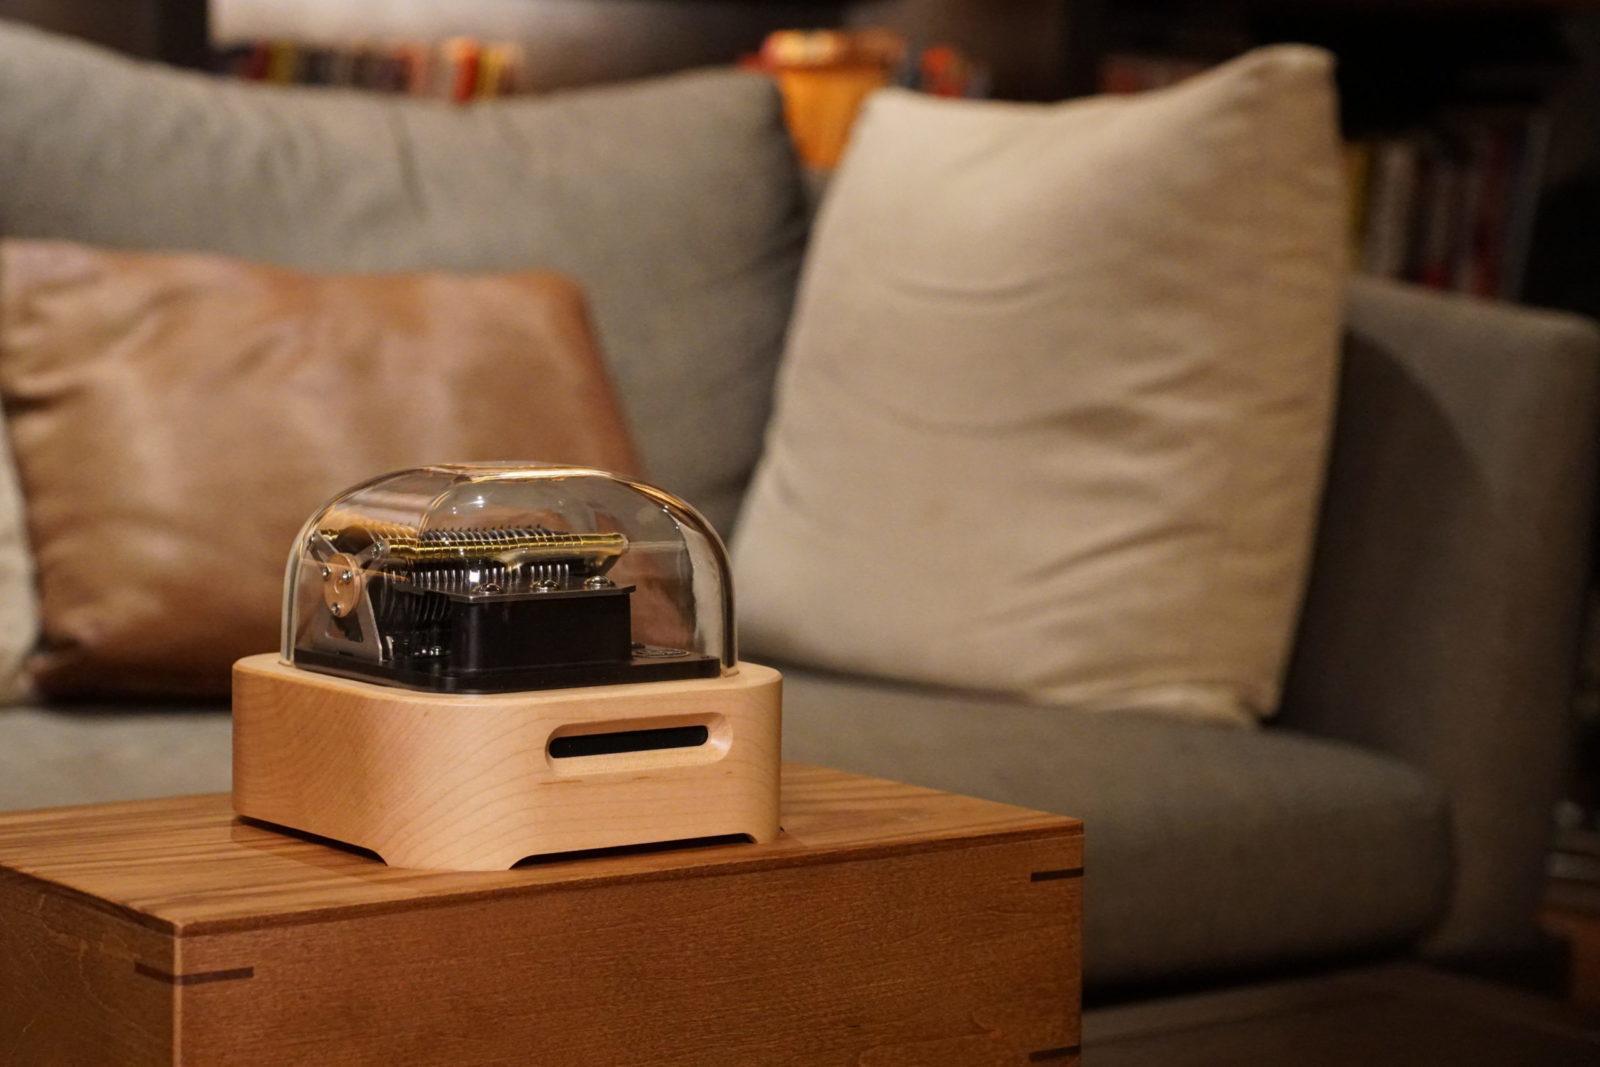
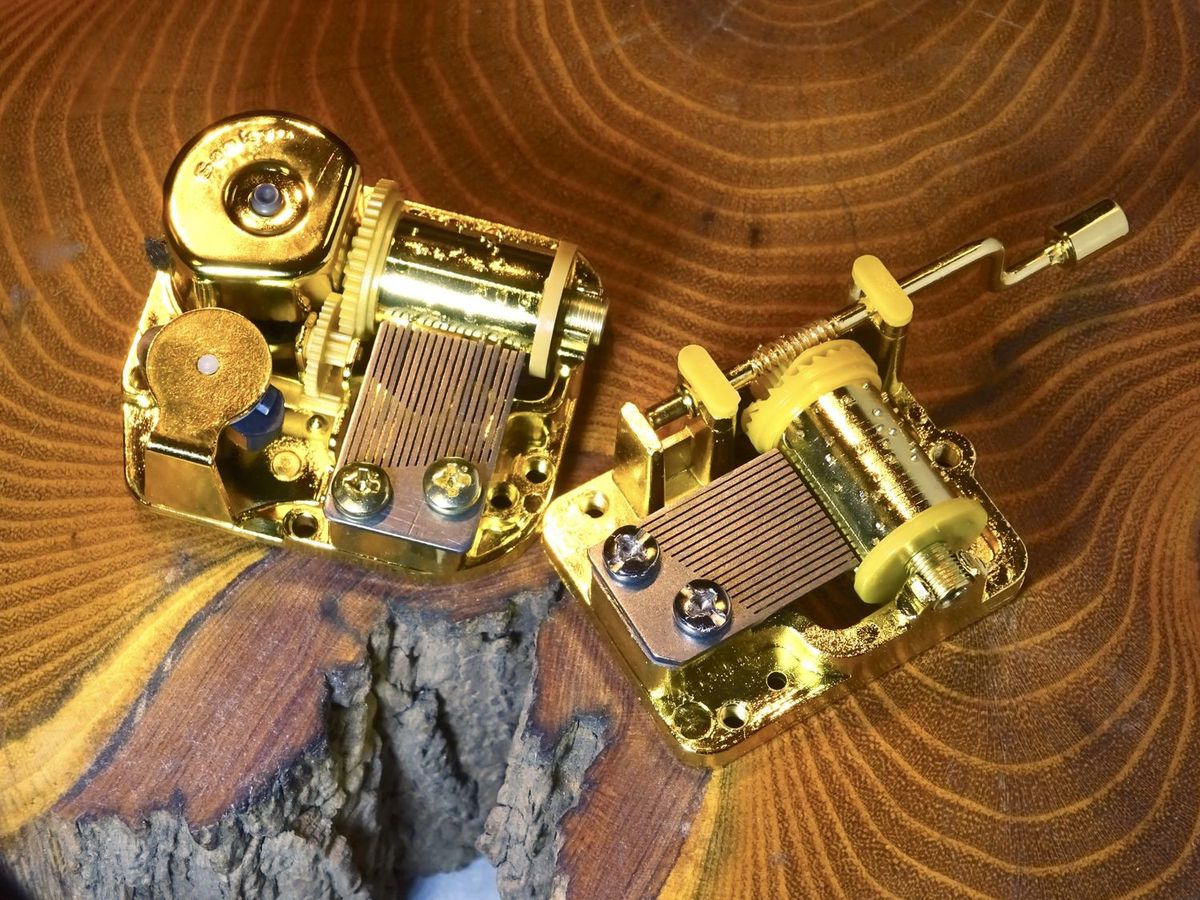
Step 4: Assemble the Music Box
With the components soldered onto the circuit board, it’s time to assemble your electronic music box. This step involves arranging the components within the chosen box and creating a cohesive and visually appealing design.
Start by choosing a suitable box for your music box. This can be a pre-made wooden or acrylic box, or you can even build your own if you have the necessary tools and skills. Make sure the box is large enough to hold the circuit board and all the components comfortably.
Before placing the circuit board inside the box, drill any necessary holes for the buttons, potentiometer, and other external components. Ensure that the holes are aligned with the circuit board and provide easy access to the buttons and controls.
Once the holes are drilled, carefully place the circuit board inside the box. Make sure it fits securely, with enough clearance for the components and any wiring that may need to be connected.
Next, position the speaker or buzzer in a location that allows the sound to be heard clearly. You may need to create a mounting bracket or use adhesive to attach the speaker to the box.
If you have additional components such as LEDs or switches, place them in their designated locations within the box. Consider the aesthetics of the design and ensure that the components are easily accessible and visually pleasing.
Depending on the complexity of your music box, you may also need to consider the placement of the power supply and any additional modules or sensors you plan to incorporate.
Once all the components are in place, secure them using screws, cable ties, or adhesive as needed. Ensure that everything is firmly held in place and that there are no loose connections or components that could cause issues.
Finally, tidy up any excess wiring by organizing and routing the cables neatly. This will help maintain a clean and professional appearance for your music box.
With the assembly complete, take a moment to admire your creation. You’re now ready to move on to the next step, which involves programming the music sequence for your electronic music box.
Step 5: Program the Music Sequence
Now that your electronic music box is assembled, it’s time to program the music sequence that it will play. Programming allows you to control the melody, rhythm, and other musical elements of your music box.
First, you’ll need to connect your microcontroller board, such as Arduino Uno, to your computer. Install the necessary software, such as the Arduino IDE, if you haven’t already done so. This software will allow you to write and upload the program to the microcontroller.
Next, open the Arduino IDE and create a new sketch. Begin by defining the necessary variables, such as the pin assignments for the buttons, LEDs, and speaker. These variables will be used to control the various components of the music box.
Now, it’s time to write the code for playing the music. You can either create your own melodies using the programming language or look for pre-existing music libraries that you can use. These libraries often include a variety of musical notes and functions to help you create intricate melodies.
Once you have the code for playing the music, you can start programming the sequence. This can involve playing different melodies based on button presses, adjusting the tempo or volume with a potentiometer, or even adding special effects such as fading or looping.
Take your time to experiment and fine-tune the music sequence until you are happy with the results. You can test the program as you go along by uploading it to the microcontroller and listening to the music produced by your electronic music box.
Remember to add comments to the code to provide descriptions and notes on the different sections. This will make it easier for you or others to understand and modify the code in the future.
Once you are satisfied with the music sequence, upload the final version of your code to the microcontroller. Verify that the program runs smoothly and that the music plays correctly. Make any necessary adjustments to the code if needed.
Congratulations! You have successfully programmed the music sequence for your electronic music box. In the next step, we will move on to testing and troubleshooting to ensure everything is functioning as expected.
Step 6: Test and Troubleshoot
After programming the music sequence for your electronic music box, it’s time to put it to the test and make sure everything is working as expected. Testing and troubleshooting will help identify any issues or bugs in your system and allow you to make necessary adjustments.
Start by connecting your music box to a power source and turning it on. Press the buttons or interact with the controls to test the different functionalities of your music box. Pay attention to any unexpected behavior or errors that may occur.
Listen to the music being played and ensure that the melodies, rhythm, and volume are as desired. If there are any issues with the sound, check the connections between the microcontroller, speaker, and other audio components. Make sure they are properly wired and securely connected.
If you encounter any issues, refer back to your circuit diagram and code to identify potential causes. Double-check the wiring connections and ensure that the components are correctly connected to the microcontroller board.
One common troubleshooting technique is to use debugging tools available in the Arduino IDE. These tools allow you to monitor variables, print debug statements, and observe the flow of the program. Utilize these tools to identify any logic errors or unexpected behavior in your code.
If necessary, consult online forums, documentation, or seek help from experienced individuals who have dealt with similar projects. They may be able to provide insights and solutions to any specific issues you may encounter.
Throughout the testing and troubleshooting process, keep a record of any problems encountered, solutions implemented, and changes made to the circuit or code. This will be helpful for future reference and can save you time if you encounter similar issues in the future.
Continue iterating and testing your music box until you are satisfied with its performance. It’s important to be patient and persistent in troubleshooting, as it may require multiple rounds of testing to achieve the desired results.
Once you have successfully tested and addressed any issues, you can move on to the final step, which involves adding a personal touch by customizing the exterior of your electronic music box.
Step 7: Customize the Exterior
The final step in creating your electronic music box is to give it a personalized touch by customizing its exterior. This will not only enhance the aesthetics of your music box but also make it uniquely yours.
Consider the overall theme or design you want to achieve. Decide whether you want a rustic, vintage look or a modern and sleek appearance. This will help guide you in choosing the materials and techniques for customization.
If you opted for a pre-made box, you can start by sanding and painting it in your desired color. Use acrylic or wood paint and apply multiple coats for a smooth and even finish. You can also experiment with different painting techniques like distressing or stenciling to add texture or patterns.
If you built your own box, you have even more freedom to customize the shape, size, and design. Consider adding decorative elements like carvings, engravings, or inlays to make it truly unique. You can also use veneers or other materials to give it a different texture or contrasting colors.
Additionally, think about incorporating other materials such as fabric, stickers, or decoupage to add visual interest and personality to your music box. You can cover the box with patterned fabric, apply stickers or decals related to music or your personal interests, or even create a collage using magazine cutouts or printed images.
Don’t forget to label the buttons and controls if necessary. You can use adhesive labels or create custom labels with a label maker, vinyl cutter, or hand-lettering. Clear labeling will make it easier for users to understand the functions and navigate the different controls.
Finally, consider adding a protective finish to seal and protect the exterior of your music box. Depending on the materials used, you can use varnish, polyurethane, or a clear coat of spray paint. This will help preserve the customized design and ensure durability over time.
Remember that customization is a personal expression of your creativity, so have fun and let your imagination guide you. Don’t be afraid to try new techniques or experiment with different materials until you achieve the desired look.
By customizing the exterior, you are adding your own personal touch to the project, making it a true reflection of your style and creativity. Once complete, sit back, admire your creation, and enjoy the delightful melodies produced by your unique electronic music box.
Congratulations! You have successfully completed all the steps to create your own electronic music box. Whether you keep it as a treasured keepsake or give it as a thoughtful gift, your personalized music box is sure to bring joy and enchantment to all who hear its melodies.
Conclusion
Creating your very own electronic music box is not only a rewarding and fulfilling DIY project but also a way to blend the charm of traditional music boxes with the wonders of modern technology. Through the steps of gathering materials, designing the circuit, soldering components, assembling the music box, programming the music sequence, testing and troubleshooting, and customizing the exterior, you have embarked on a creative journey.
By using your technical skills, creativity, and passion for music, you’ve transformed a collection of components into a personalized musical masterpiece. The process of designing the circuit, programming the music sequence, and troubleshooting any issues along the way has allowed you to develop problem-solving skills and gain a deeper understanding of electronics and programming.
Customizing the exterior of your electronic music box has given it a unique and personal touch, making it a one-of-a-kind creation. The choice of materials, painting, and decorative elements have transformed a simple box into a work of art that reflects your own style and personality.
Now, as you listen to the enchanting melodies emitted by your electronic music box, you can take pride in the fact that it was crafted with your own hands and imagination. Whether you keep it as a cherished memento or gift it to someone special, your electronic music box is sure to bring joy and evoke nostalgic memories for years to come.
Remember, the journey doesn’t end here. Feel free to continue exploring and experimenting with different melodies, sounds, and customization techniques. Share your creation with others and inspire them to unleash their creativity in their own electronic music box projects.
So, congratulations on completing this remarkable project! Embrace the joy of music and the satisfaction of creating something truly unique. Keep exploring, dreaming, and making beautiful melodies with your very own electronic music box.