Home>Devices & Equipment>Subwoofer>How To Hook Up A Subwoofer In A Car
Subwoofer
How To Hook Up A Subwoofer In A Car
Modified: February 18, 2024
Learn how to properly hook up a subwoofer in your car for enhanced audio performance. Step-by-step guide to connecting a subwoofer with ease.
(Many of the links in this article redirect to a specific reviewed product. Your purchase of these products through affiliate links helps to generate commission for AudioLover.com, at no extra cost. Learn more)
Table of Contents
- Introduction
- Step 1: Gather the necessary materials
- Step 2: Choose a suitable location for the subwoofer
- Step 3: Remove the necessary panels in the car
- Step 4: Mount the subwoofer enclosure
- Step 5: Connect the power wire to the battery
- Step 6: Run the RCA cables from the head unit to the subwoofer
- Step 7: Connect the remote turn-on wire
- Step 8: Connect the subwoofer to the amplifier
- Step 9: Adjust the audio settings
- Step 10: Test the subwoofer
- Conclusion
Introduction
Welcome to the world of deep bass and immersive sound – the world of subwoofers! Whether you’re a car enthusiast looking to upgrade your audio system or a music lover wanting to experience the full spectrum of low-frequency sounds, a subwoofer is an essential component to achieve that thumping and powerful bass.
A subwoofer is a specialized speaker designed specifically to reproduce low-frequency audio signals, typically below 100Hz. It adds depth and impact to your music, movies, and even gaming experiences, bringing your audio to life like never before. With a subwoofer, you can feel the rumble of explosions, the thumping beats of your favorite songs, and the deep notes of a double bass in a symphony.
Installing a subwoofer in your car is a popular choice for those seeking a premium audio experience on the go. However, setting up a subwoofer can be intimidating for beginners. Where do you start? How do you connect it to your existing car sound system? Not to worry – we’ve got you covered.
In this comprehensive guide, we will walk you through the process of hooking up a subwoofer in your car. From gathering the necessary materials to adjusting the audio settings, we’ll cover everything you need to know to get that heart-pounding bass pumping through your car’s speakers.
So, if you’re ready to take your car audio system to the next level, grab your toolbox, buckle up, and let’s dive into the wonderful world of subwoofers!
Step 1: Gather the necessary materials
Before you can start installing a subwoofer in your car, it’s important to make sure you have all the necessary materials and tools at hand. Here’s a list of items you’ll need:
- Subwoofer: Choose a subwoofer that fits your needs and preferences. Consider factors like power handling, size, and enclosure type.
- Amplifier: You’ll need an amplifier to power the subwoofer. Make sure it’s compatible with your subwoofer and car audio system.
- Subwoofer enclosure: Depending on your preference, you can choose a pre-made enclosure or build one yourself. The enclosure is responsible for housing the subwoofer and optimizing its performance.
- Wiring kit: A good wiring kit is essential for connecting the subwoofer to the amplifier and power source. It should include power cables, ground cables, RCA cables, and remote turn-on wire.
- Tools: You’ll need basic tools such as wire cutters, a socket wrench set, electrical tape, and a screwdriver for removing panels.
- Line output converter (LOC): If your car stereo doesn’t have preamp outputs, you’ll need an LOC to convert the speaker-level outputs to RCA line-level outputs.
- Fuse holder and fuse: A fuse holder and fuse are crucial for protecting your car’s electrical system from any potential short circuits or power surges.
Make sure to gather all these materials before starting the installation process. It’s advisable to invest in high-quality components to ensure optimal performance and durability.
Once you have all the necessary materials, you’ll be fully prepared to move on to the next step of installing your subwoofer. Let’s get started!
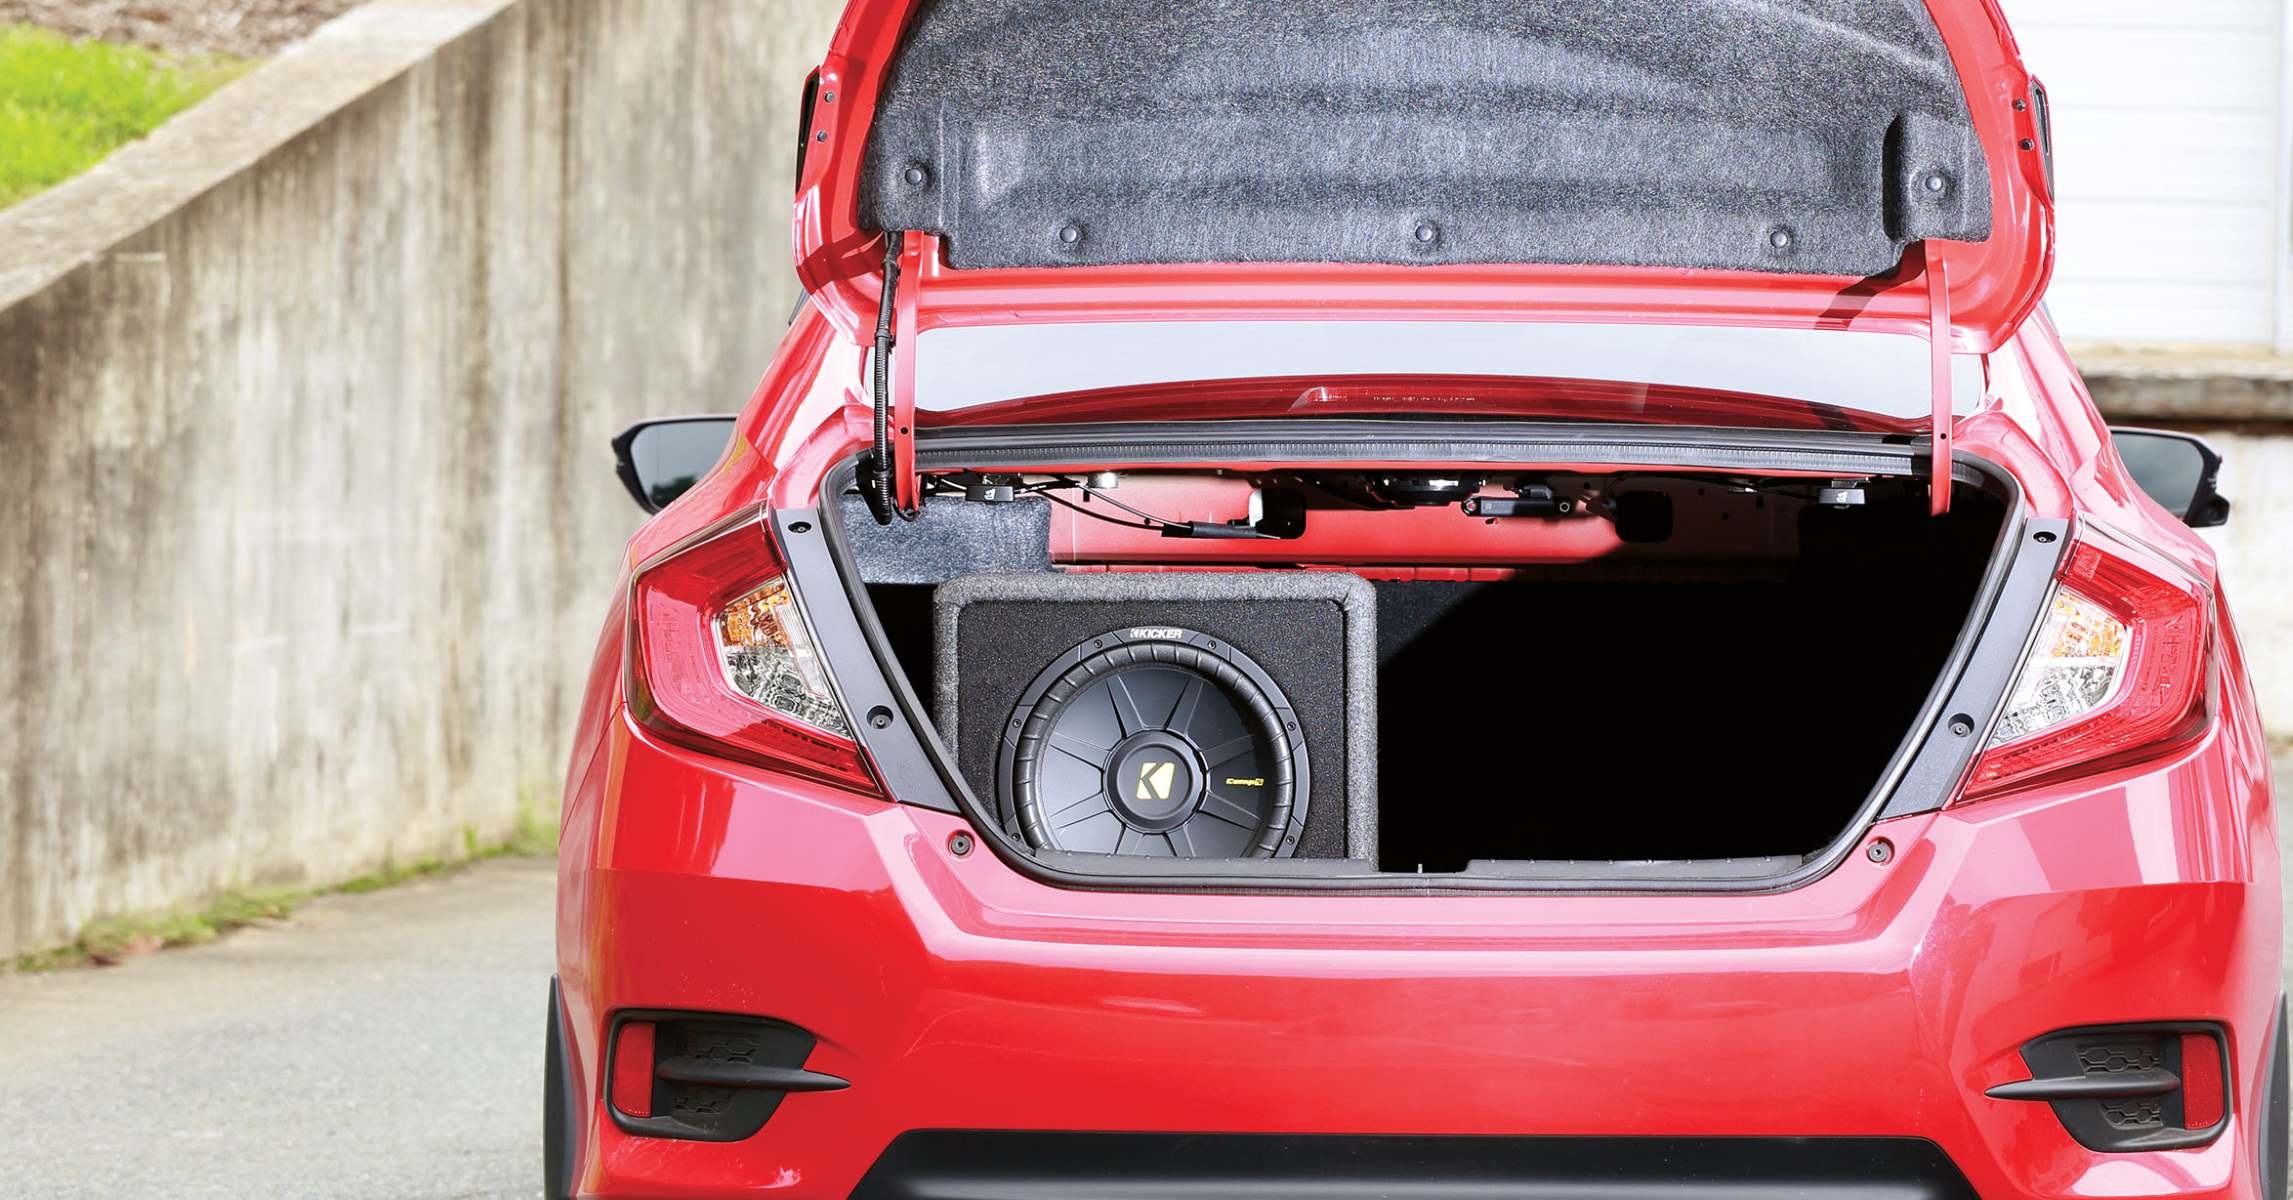
Step 2: Choose a suitable location for the subwoofer
Choosing the right location for your subwoofer is crucial for achieving optimal sound quality and integration with your car’s interior. Here are a few factors to consider when selecting a suitable location:
- Available space: Take a look at your car’s interior and identify areas where there is ample space to accommodate the subwoofer and its enclosure. Common locations include the trunk, rear cargo area, or under a seat.
- Enclosure type: Different subwoofer enclosures have specific space requirements. For example, a sealed enclosure requires less space compared to a ported or bandpass enclosure. Make sure you choose an enclosure that fits within your available space.
- Accessibility: Consider how easily you’ll be able to access the subwoofer for adjustments or maintenance. It’s important to choose a location that allows for convenient access without obstructing other components or storage areas.
- Aesthetic appeal: While sound quality should be the primary consideration, it’s also important to choose a location that aesthetically complements your car’s interior. Opt for a spot that doesn’t hinder the overall visual appeal of your vehicle.
Once you’ve taken these factors into account, you can determine the best location for your subwoofer. In many cases, the trunk or cargo area is a popular choice as it provides sufficient space and easy accessibility. However, if space is limited, you can explore options such as mounting the subwoofer under a seat or in a custom-built enclosure.
Remember to consider the specific requirements of your subwoofer and enclosure before finalizing the location. This will ensure that you achieve the best possible sound performance and an installation that seamlessly integrates with your car’s interior.
With the location selected, you’re one step closer to experiencing the exhilarating bass that a subwoofer brings to your car audio system. Let’s move on to the next step!
Step 3: Remove the necessary panels in the car
Before you can start installing the subwoofer, you’ll need to remove certain panels in your car to gain access to the necessary wiring and mounting areas. Here’s a general guide on how to remove the panels:
- Refer to your car’s manual: Every car has a slightly different interior design, so it’s important to consult your car’s manual to locate the specific panels that need to be removed. The manual will provide detailed instructions and diagrams to help you identify the panels.
- Use appropriate tools: Depending on the type of panels, you may need a variety of tools such as a screwdriver, trim removal tool, or panel removal tool. Make sure you have the necessary tools on hand before you begin.
- Start with the trim pieces: Begin by removing any trim pieces or decorative covers that may be concealing screws or attachment points for the panels. Use a trim removal tool to carefully pry off the trim pieces without causing damage to the surrounding surfaces.
- Remove screws or clips: Once the trim pieces are removed, you may encounter screws or clips that are securing the panels in place. Unscrew or unclip these fasteners using the appropriate tools. Keep track of the screws and clips as you’ll need them when reassembling the panels later.
- Detach electrical connectors: Some panels may have electrical connectors attached to them, such as those for power windows or door locks. Before fully removing the panels, disconnect these connectors by gently pressing the release tab and pulling them apart.
- Remove the panels: With all the screws, clips, and connectors removed, you can now carefully pull the panels away from their attachment points. Take your time and avoid using excessive force to prevent any damage to the panels or surrounding components.
Be sure to follow these steps for each panel that needs to be removed. Take note of the specific locations and orientation of the panels to make the reinstallation process easier later on.
Remember, each car model may have slight variations in panel removal procedures, so it’s always recommended to consult your car’s manual for the most accurate and detailed instructions. Once the necessary panels are removed, you’re ready to progress to the next step of installing the subwoofer.
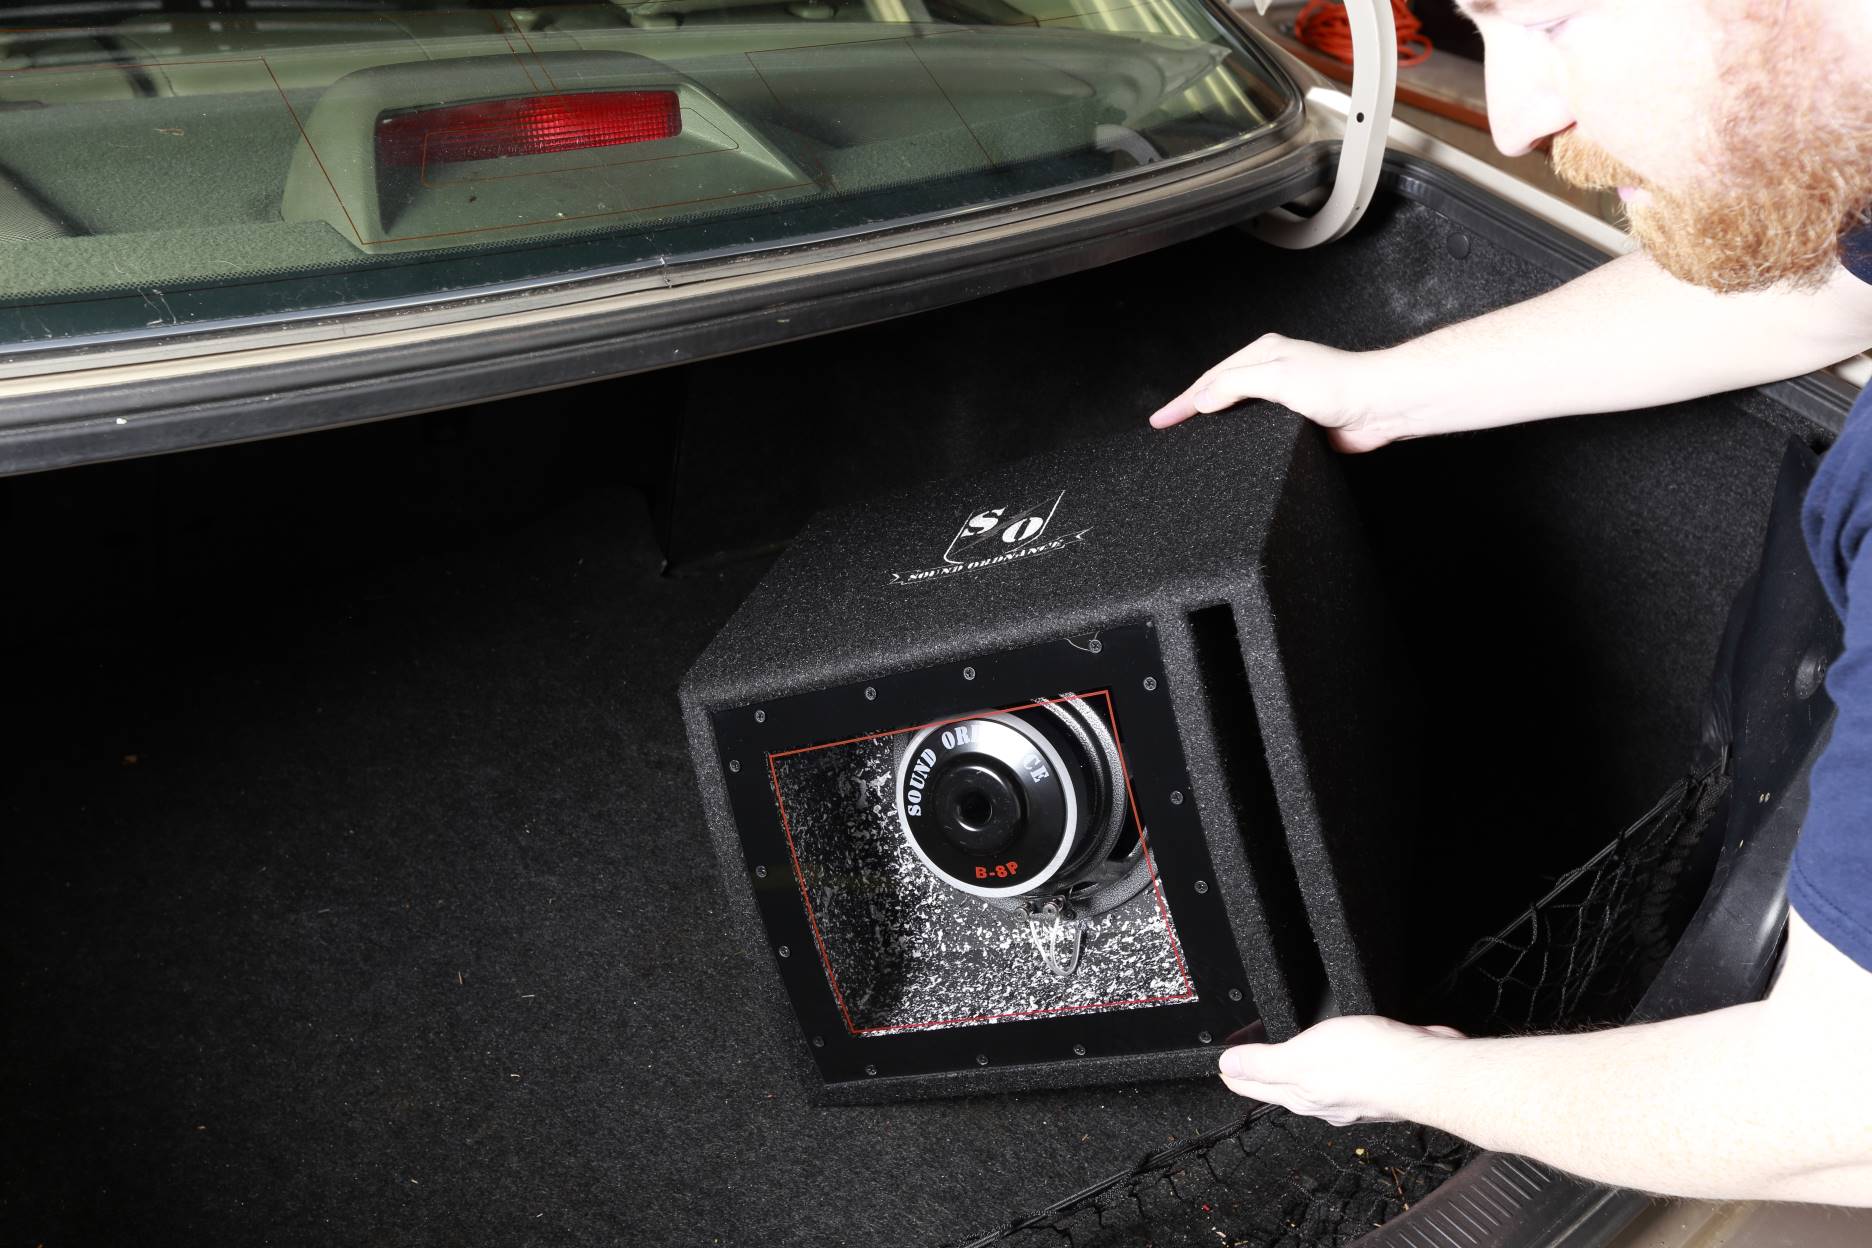
Step 4: Mount the subwoofer enclosure
Now that you have removed the necessary panels and have chosen the location for your subwoofer, it’s time to mount the subwoofer enclosure. Mounting the enclosure securely ensures that the subwoofer stays in place and delivers the best possible sound performance. Follow these steps to mount the subwoofer enclosure:
- Prepare the mounting surface: Clean the mounting surface in your car to remove any dirt, debris, or residue. This will help provide a solid and secure attachment for the subwoofer enclosure.
- Position the enclosure: Place the enclosure in the chosen location and check that it fits properly without obstructing any other components or interfering with the movement of seats or cargo.
- Secure the enclosure: Depending on the type of enclosure, you may need to use mounting brackets, screws, or adhesive strips to secure it in place. Follow the manufacturer’s instructions for your specific subwoofer enclosure to ensure a secure attachment.
- Test the stability: Gently shake the enclosure to ensure it is securely mounted and doesn’t move or rattle. If you notice any instability, readjust the mounting or consider using additional securing methods such as straps or braces.
Remember, the goal is to achieve a sturdy and vibration-free mount for the subwoofer enclosure. This will ensure that the subwoofer can deliver consistent and accurate bass response without any unwanted distortion or movement.
Once the subwoofer enclosure is securely mounted, take a moment to admire your progress. You’re now ready to move on to the next step of connecting the wiring and power source for your subwoofer.
Step 5: Connect the power wire to the battery
Connecting the power wire to the battery is a critical step in ensuring your subwoofer receives the necessary power to operate efficiently. Properly routing and connecting the power wire is essential for optimal performance and to avoid any electrical issues. Follow these steps to connect the power wire to the battery:
- Choose the correct gauge wire: The gauge of the power wire depends on the power requirements of your subwoofer and amplifier. Consult the manufacturer’s recommendations to determine the appropriate gauge for your setup.
- Disconnect the negative terminal of the battery: Before working with any electrical connections, you must disconnect the negative terminal of the car battery to prevent any accidental short circuits or electrical shocks.
- Route the power wire: Plan the route for the power wire from the battery to the subwoofer amplifier. It is important to follow existing wire harnesses or channels and avoid areas with excessive heat or moving parts.
It is important to note that working with electrical connections can be potentially dangerous. If you are unsure or uncomfortable with this step, it is advisable to seek assistance from a professional car audio installer.
With the power wire successfully connected to the battery, you are now ready to move on to the next step of running the RCA cables from the head unit to the subwoofer.
Step 6: Run the RCA cables from the head unit to the subwoofer
The RCA cables are essential for transmitting the audio signal from your car’s head unit to the subwoofer amplifier. Running these cables properly ensures a clean and interference-free signal, resulting in optimal sound quality. Follow these steps to run the RCA cables:
- Determine the route: Plan the route for the RCA cables from the head unit to the subwoofer amplifier. It is recommended to avoid running them near power cables or sources of interference to minimize any potential noise or buzzing.
It is important to handle the RCA cables with care and avoid bending them excessively or causing any damage to the connectors. Any interference or signal loss can negatively impact the audio quality.
With the RCA cables successfully run from the head unit to the subwoofer amplifier, you’re now ready to move on to the next step of connecting the remote turn-on wire.
Step 7: Connect the remote turn-on wire
The remote turn-on wire is responsible for activating the subwoofer amplifier when you power on your car’s audio system. This ensures that the amplifier turns on and off with the rest of the audio components, preventing any possible battery drain. Follow these steps to connect the remote turn-on wire:
Ensuring a solid and secure connection of the remote turn-on wire is essential for proper operation of the subwoofer amplifier. It allows the amplifier to turn on and off with the audio system, providing a seamless audio experience.
With the remote turn-on wire successfully connected, you’re making great progress in the installation process. The next step involves connecting the subwoofer to the amplifier. Let’s move on!
Step 8: Connect the subwoofer to the amplifier
Now that you have the power and signal connections in place, it’s time to connect the subwoofer to the amplifier. This step ensures that the audio signal is properly delivered to the subwoofer for optimal bass output. Follow these steps to connect the subwoofer to the amplifier:
- Determine the type of connection: Depending on the subwoofer and amplifier setup, there are different ways to connect them. The most common methods include using speaker wire, RCA cables, or a specialized subwoofer cable.
By correctly connecting the subwoofer to the amplifier, you are enabling the subwoofer to receive the audio signal and reproduce the low-frequency sounds with precision. This step is crucial in achieving the desired bass impact and enhancing your overall audio experience.
With the subwoofer successfully connected to the amplifier, you’re almost there. All that’s left is to adjust the audio settings and fine-tune the subwoofer. Let’s proceed to the next step!
Step 9: Adjust the audio settings
With the subwoofer and amplifier connected, it’s time to fine-tune the audio settings to achieve the best possible sound quality. Adjusting the audio settings will ensure that the subwoofer seamlessly integrates with the rest of your car’s audio system. Follow these steps to adjust the audio settings:
- Access the audio control options: Depending on your car’s head unit, you can access the audio control options through a dedicated audio settings menu or by pressing a specific button combination.
- Select the equalizer (EQ): Locate the equalizer settings and select the appropriate EQ preset or manually adjust the frequency bands. This will allow you to customize the sound to your preference and optimize the bass response.
Take your time during this step to experiment with different settings and find the sound that suits your preferences. Remember that everyone’s sonic preferences may vary, so trust your ears and make adjustments accordingly.
By properly adjusting the audio settings, you can ensure that the subwoofer seamlessly blends with the rest of your car’s audio system, providing a rich and immersive sound experience.
Now that you’ve fine-tuned the audio settings, you’re ready to put the subwoofer to the test. Let’s move on to the final step!
Step 10: Test the subwoofer
With everything properly connected and the audio settings adjusted, it’s time to put your newly installed subwoofer to the test. This step allows you to ensure that the subwoofer is working correctly and delivering the desired bass performance. Follow these steps to test the subwoofer:
- Choose a test track: Select a test track that features a wide range of frequencies, including deep bass notes. Look for tracks that have clear and distinct low-frequency elements to fully assess the subwoofer’s capability.
Performing a thorough test allows you to identify any potential issues and make the necessary adjustments. Remember that it may take some trial and error to achieve the optimal sound quality for your specific car audio setup.
Congratulations! By completing this final step, you have successfully installed and tested your subwoofer. Sit back, relax, and enjoy the enhanced audio experience with deep, powerful bass!
Should you encounter any ongoing issues or have further questions about your subwoofer installation, consult with a professional car audio installer for assistance.
Conclusion
Congratulations on successfully installing a subwoofer in your car! You’ve now unlocked the world of deep bass and enhanced audio experiences on the go. By following the steps outlined in this guide, you’ve achieved a seamless integration of the subwoofer into your car’s audio system, allowing you to enjoy immersive sound quality.
We started by gathering the necessary materials, ensuring you had everything you needed for the installation process. Then, we guided you through choosing a suitable location for the subwoofer and removing the necessary panels in your car to access the wiring and mounting areas.
Next, we covered how to mount the subwoofer enclosure securely, ensuring optimal sound performance. We then moved on to connecting the power wire to the battery, followed by running the RCA cables from the head unit to the subwoofer, and connecting the remote turn-on wire.
After that, we discussed connecting the subwoofer to the amplifier, adjusting the audio settings, and testing the subwoofer to ensure optimal performance. Each step was designed to help you achieve the best sound quality and bass output from your subwoofer.
Remember, the installation process may vary depending on your specific car model and audio system. It’s always recommended to consult your car’s manual and seek guidance from professionals if needed.
Now that you have successfully installed and tested your subwoofer, it’s time to enjoy the immersive audio experience it brings. Whether you’re cruising down the highway, rocking out to your favorite tunes, or getting fully immersed in a movie soundtrack, your subwoofer will add that extra punch and depth to your audio.
Don’t forget to regularly check and maintain your subwoofer and audio system to ensure optimal performance and longevity. With proper care, your subwoofer will continue to deliver the rich and powerful bass you love for years to come.
Thank you for choosing to enhance your car audio system with a subwoofer. We hope this guide has been informative and helpful throughout your installation journey. Enjoy the immersive audio experience and happy listening!