Home>Production & Technology>Sound Bar>How To Connect Sound Bar To Hisense TV
Sound Bar
How To Connect Sound Bar To Hisense TV
Published: December 24, 2023
Learn how to easily connect a sound bar to your Hisense TV and enhance your audio experience. Follow our step-by-step guide for seamless setup and enjoy immersive sound.
(Many of the links in this article redirect to a specific reviewed product. Your purchase of these products through affiliate links helps to generate commission for AudioLover.com, at no extra cost. Learn more)
Table of Contents
- Introduction
- Step 1: Gather the necessary equipment
- Step 2: Locate the audio output ports on your Hisense TV
- Step 3: Connect the sound bar to your TV using an HDMI cable
- Step 4: Set the sound bar to the correct input mode
- Step 5: Adjust the audio settings on your TV
- Step 6: Test the sound bar connection
- Conclusion
Introduction
Sound bars have become increasingly popular in recent years for their ability to enhance the audio experience of TVs, providing a cinematic sound quality without the need for multiple speakers and complex wiring. If you have a Hisense TV and are looking to connect a sound bar to it, you’re in the right place.
In this article, we will guide you through the process of connecting a sound bar to your Hisense TV, ensuring you can enjoy superior audio quality for your favorite movies, TV shows, and music. Whether you have a basic understanding of audio equipment or are a complete novice, we will break down the steps in a simple and concise manner.
Before we dive into the technical aspects, it’s important to note that Hisense TVs typically offer multiple options for connecting a sound bar, including HDMI, optical, and RCA connections. The method you choose will depend on the specific model and available ports on your TV. However, for the purpose of this article, we will focus on the most common and recommended method: connecting the sound bar using an HDMI cable.
So, if you’re ready to take your audio experience to the next level, let’s get started with the step-by-step process to connect your sound bar to your Hisense TV.
Step 1: Gather the necessary equipment
Before you begin the process of connecting your sound bar to your Hisense TV, it’s essential to ensure you have all the necessary equipment on hand. Here’s a list of items you’ll need:
- Hisense TV: Of course, you’ll need a Hisense TV as the main device for connecting the sound bar. Make sure your TV is powered off during the setup process to avoid any electrical issues.
- Sound bar: Choose a sound bar that suits your audio preferences and budget. There are various options available, ranging from basic models to high-end sound bars with advanced features.
- HDMI cable: Look for a high-quality HDMI cable that is long enough to connect your sound bar to your TV comfortably. Ensure the cable has HDMI 1.4 or later version to support ARC (Audio Return Channel) functionality.
- Remote control: Keep the remote control for both your Hisense TV and sound bar handy. You’ll need them to adjust settings and control the audio output.
- Power cables: Make sure you have the appropriate power cables for both your TV and sound bar. Check the power requirements for each device and ensure a stable power supply.
By gathering all the necessary equipment beforehand, you’ll save time and ensure a smoother setup process. Once you have everything ready, you can move on to the next step: locating the audio output ports on your Hisense TV.
Step 2: Locate the audio output ports on your Hisense TV
After gathering the necessary equipment, the next step is to locate the audio output ports on your Hisense TV. Identifying the correct ports will ensure a proper connection with your sound bar. Here’s how you can find them:
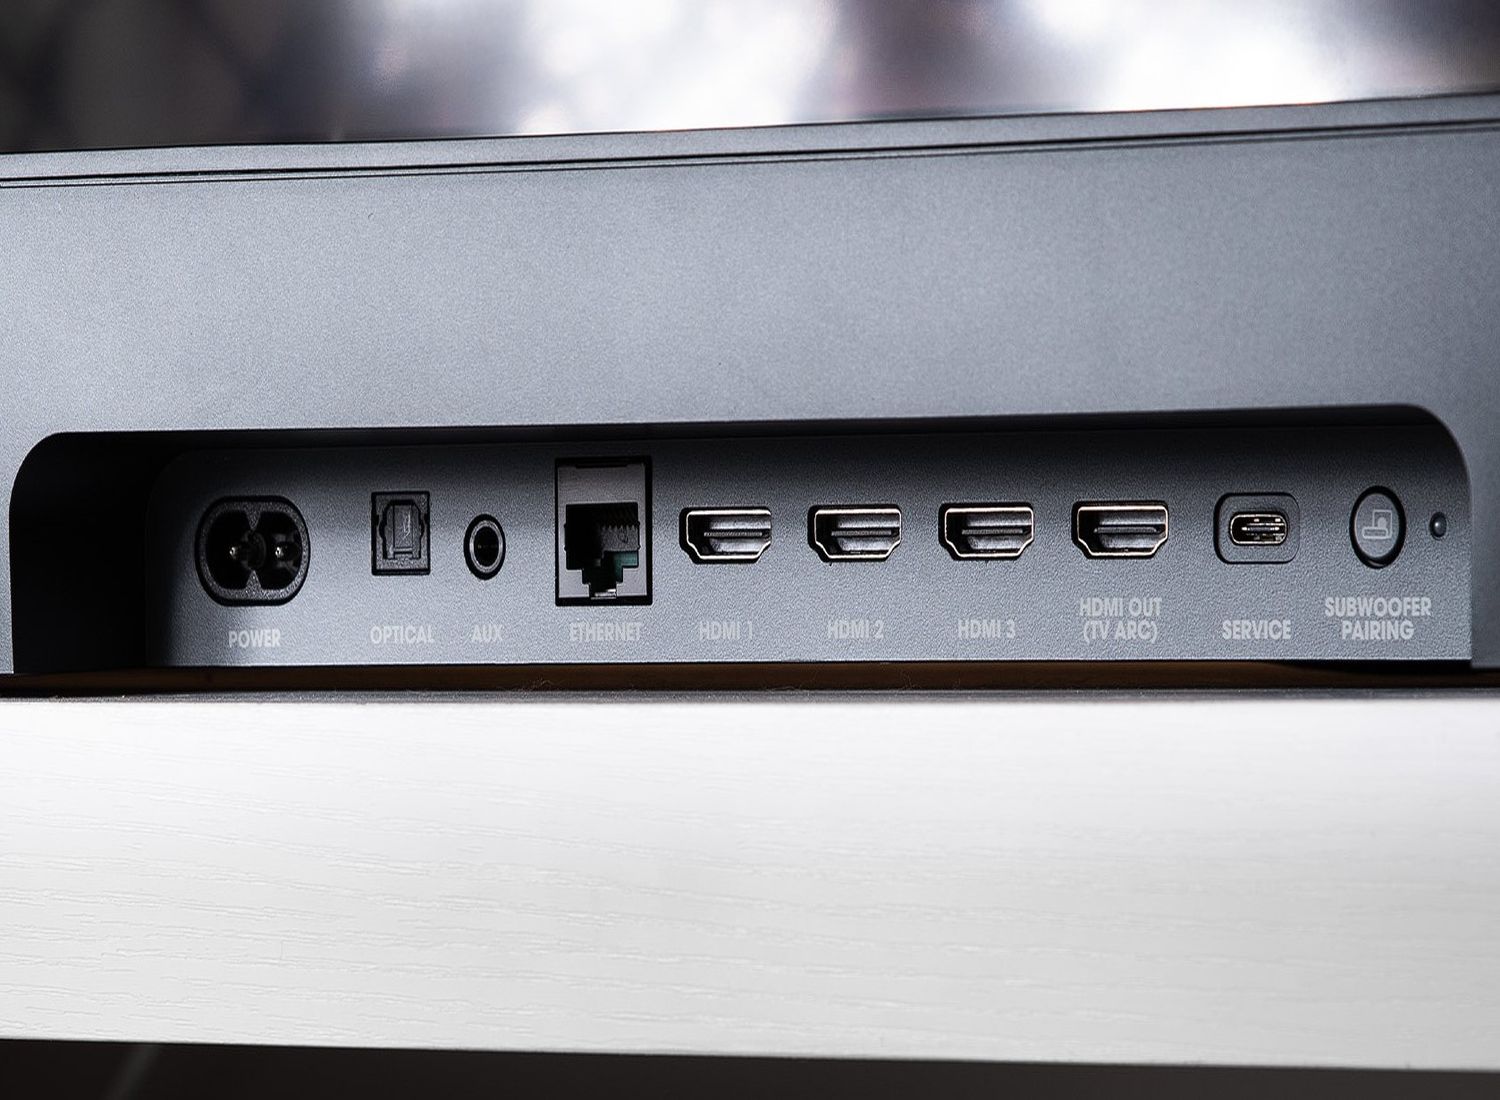
- Inspect the back or side panel of your Hisense TV. Look for a section specifically labeled “Audio Out” or “Audio Output.” This is where you’ll find the ports for connecting external audio devices.
- Common audio output ports on Hisense TVs include HDMI ARC (Audio Return Channel), optical (TOSLINK), and 3.5mm AUX. The HDMI ARC port is the most recommended option for connecting a sound bar, as it provides both audio playback and control functions through a single cable.
- If your Hisense TV has an HDMI ARC port, it will be labeled as such. It might also be labeled as “ARC” or “HDMI-ARC.” Look for a specific HDMI port labeled with one of these terms.
- If your Hisense TV lacks an HDMI ARC port, you can use the optical or 3.5mm AUX ports. The optical port uses a special optical cable that transmits audio signals via light, while the 3.5mm AUX port utilizes a standard audio cable. However, keep in mind that using these ports may require additional cables and adapters.
Once you have identified and located the audio output ports on your Hisense TV, you’re ready to move on to the next step: connecting the sound bar using an HDMI cable.
Step 3: Connect the sound bar to your TV using an HDMI cable
Now that you’ve located the audio output ports on your Hisense TV, it’s time to connect the sound bar using an HDMI cable. Here’s a step-by-step guide:
- Locate the HDMI ARC port on your Hisense TV. Remember, this port is specifically labeled as “ARC” or “HDMI-ARC.”
- Connect one end of the HDMI cable to the HDMI ARC port on your TV.
- Connect the other end of the HDMI cable to the HDMI ARC input on your sound bar. This port is usually labeled as “ARC” or “HDMI-ARC” as well.
- Ensure both the TV and sound bar are powered off.
- Once the HDMI cable is properly connected, power on your Hisense TV and sound bar.
When you power on your devices, they should automatically detect the HDMI connection. The sound from your TV will now be channeled through the sound bar, providing a superior audio experience.
Note that some sound bars may require additional steps for HDMI ARC setup, such as enabling the ARC function in the TV’s settings or adjusting audio output settings. Consult the user manual of your sound bar for specific instructions.
If your Hisense TV does not have an HDMI ARC port, don’t worry! You can still connect your sound bar using the optical or 3.5mm AUX ports. Simply connect one end of the respective cable to the TV’s audio output port and the other end to the corresponding input port on the sound bar. However, keep in mind that the audio control functionality may be limited in these setups.
With the HDMI cable properly connected between your Hisense TV and sound bar, you’re ready to move on to the next step: setting the sound bar to the correct input mode.
Step 4: Set the sound bar to the correct input mode
After connecting the sound bar to your Hisense TV, you need to ensure that the sound bar is set to the correct input mode. This will allow it to receive audio signals from the TV. Here’s how you can do it:
- Locate the remote control of your sound bar. This is typically included with the sound bar itself.
- Using the remote control, locate the input or source button. It is usually labeled as “Input,” “Source,” or represented by an icon of a TV.
- Press the input or source button on the remote control to cycle through the available input options. Select the input corresponding to the HDMI or audio cable that you used to connect your Hisense TV.
- Once you’ve selected the correct input mode, the sound bar should be ready to receive audio signals from your TV.
Some sound bars may automatically detect the input mode when you power them on, while others may require manual selection. Refer to the user manual of your sound bar for specific instructions on how to set the input mode.
It’s important to note that if you connected your sound bar to the HDMI ARC port, it should automatically switch to the ARC input when you power on your TV. In this case, you may not need to manually select the input mode on the sound bar.
With the sound bar set to the correct input mode, you can now proceed to the next step: adjusting the audio settings on your TV.
Step 5: Adjust the audio settings on your TV
Now that you have connected the sound bar to your Hisense TV and set the correct input mode on the sound bar, it’s time to optimize the audio settings on your TV. By adjusting these settings, you can ensure that the audio output is balanced and provides the best sound quality. Here’s how you can do it:
- Using your Hisense TV remote control, navigate to the settings menu. The location of the settings menu may vary depending on the model of your TV.
- Look for the audio or sound settings option in the settings menu.
- Once you’ve accessed the audio settings, you can make adjustments such as volume levels, equalizer settings, and audio presets. Experiment with these settings to find the optimal audio configuration that suits your preferences.
- Some Hisense TVs may have specific audio settings for external audio devices, including sound bars. Look for options like “Audio Out,” “Audio Output,” or “Speaker Output” and ensure they are set to the correct output mode.
While adjusting the audio settings, it’s important to take note of any additional audio features your Hisense TV may offer, such as virtual surround sound or dialog enhancement. These features can further enhance your audio experience when paired with a sound bar.
For more detailed instructions on adjusting audio settings, refer to the user manual of your Hisense TV or explore the online support resources provided by Hisense.
By fine-tuning the audio settings on your Hisense TV, you can maximize the potential of your sound bar and enjoy a rich and immersive sound experience. Once you are satisfied with the settings, you’re ready to move on to the final step: testing the sound bar connection.
Step 6: Test the sound bar connection
After setting up and adjusting the audio settings on your Hisense TV, it’s essential to test the sound bar connection to ensure everything is working correctly. Follow these steps to confirm the successful connection:
- Choose a source on your TV that produces sound, such as a TV show, movie, or music.
- Play the selected source on your TV and listen carefully.
- If the sound is coming through the sound bar, congratulations! Your sound bar is connected and functioning properly. Enjoy the enhanced audio experience!
- If you’re not hearing any sound or the sound is still coming from the TV speakers, double-check the connections between your TV and sound bar. Make sure the HDMI cable is securely plugged into the HDMI ARC ports and that the sound bar is set to the correct input mode.
- If the issue persists, try unplugging the HDMI cable and plugging it back in. You can also try restarting both your TV and sound bar.
- If you’re using the optical or 3.5mm AUX connection, check the cable connections and ensure they are properly inserted into the respective ports.
If you’ve followed all the previous steps carefully and are still experiencing issues with the sound bar connection, consult the user manual of your Hisense TV and sound bar for troubleshooting tips. Additionally, you can reach out to customer support for further assistance.
It’s worth noting that different TV models and sound bars may have unique settings and configurations. Therefore, it’s essential to refer to the user manuals and support resources specific to your devices for accurate troubleshooting information.
Once you have confirmed that the sound bar is working properly, sit back, relax, and enjoy the immersive sound quality that it brings to your Hisense TV.
Conclusion
Connecting a sound bar to your Hisense TV can greatly enhance your audio experience, immersing you in a world of superior sound quality. By following the step-by-step process outlined in this article, you can easily set up and connect a sound bar to your Hisense TV, bringing your favorite movies, TV shows, and music to life.
Remember to gather all the necessary equipment, including your Hisense TV, sound bar, HDMI cable, and remote control. Locate the audio output ports on your Hisense TV and connect the sound bar using an HDMI cable. Make sure you set the sound bar to the correct input mode and adjust the audio settings on your TV to optimize the sound output. Finally, test the sound bar connection by playing a source on your TV and verifying that the sound is coming through the sound bar.
If you encounter any difficulties during the setup or face issues with the sound bar connection, consult the user manuals and support resources specific to your devices or reach out to customer support for assistance.
With the sound bar successfully connected to your Hisense TV, you can now enjoy a cinematic sound experience from the comfort of your own home. Sit back, relax, and immerse yourself in the incredible audio quality that your sound bar brings to your entertainment setup.
Upgrade your audio and elevate your viewing experience with a sound bar connected to your Hisense TV today!