Home>Production & Technology>Audio Interface>How To Use H4N As Audio Interface For Cubase
Audio Interface
How To Use H4N As Audio Interface For Cubase
Published: February 4, 2024
Learn how to use H4N as an audio interface for Cubase to enhance your recording and editing experience. Easily connect and optimize your audio inputs with this comprehensive guide.
(Many of the links in this article redirect to a specific reviewed product. Your purchase of these products through affiliate links helps to generate commission for AudioLover.com, at no extra cost. Learn more)
Table of Contents
Introduction
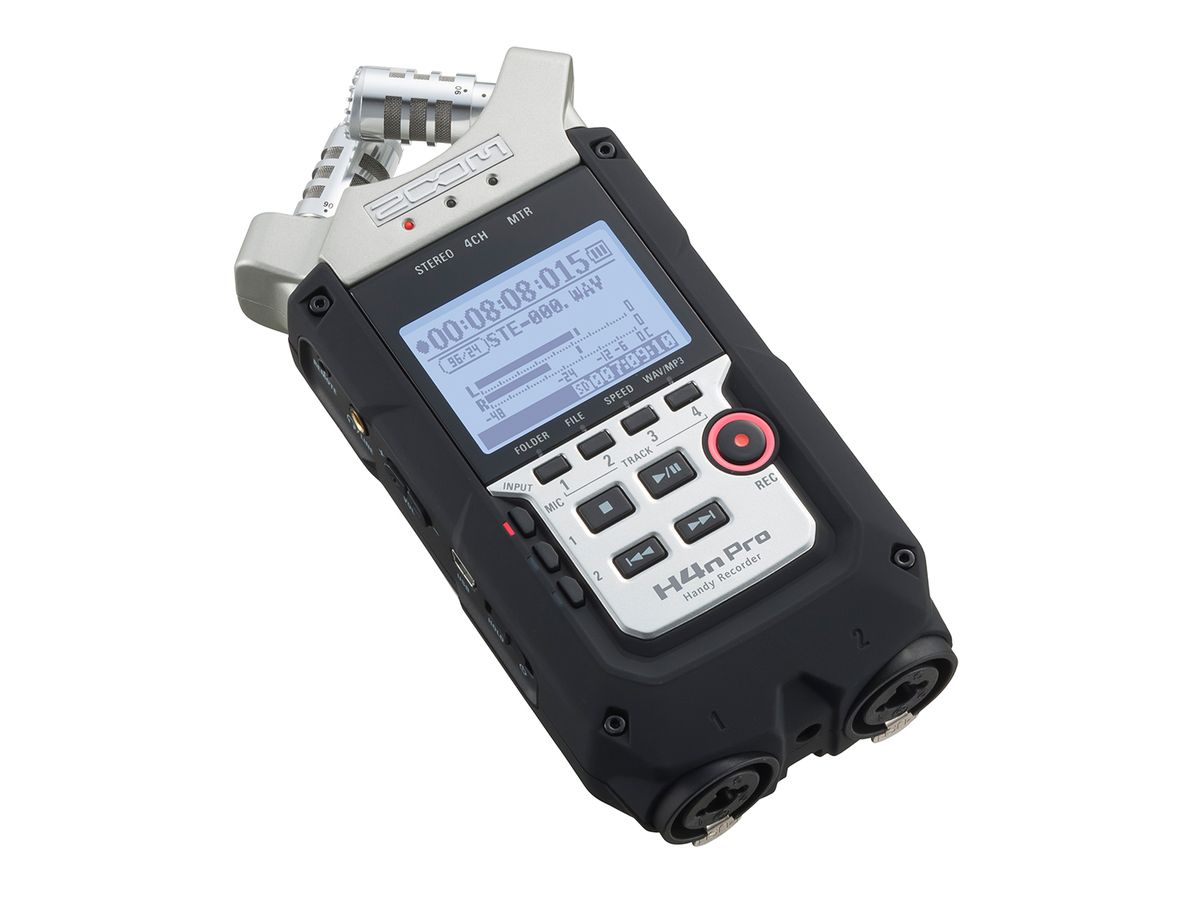
Welcome to the world of audio recording and production! If you’re a musician, podcaster, or content creator, having a reliable audio interface is essential to capture high-quality sound. One popular choice among professionals and amateurs alike is the H4N audio interface. The H4N is a portable and feature-packed device that allows you to record and monitor audio with ease.
In this article, we will guide you through the process of using the H4N as an audio interface for Cubase, one of the most popular digital audio workstations (DAWs) in the industry. Whether you’re a beginner or an experienced user, we will provide step-by-step instructions to help you get up and running in no time. So, let’s dive in and harness the power of the H4N and Cubase to create stunning audio recordings.
This article assumes that you have basic knowledge of audio interfaces and Cubase. If you are new to these concepts, don’t worry! We will provide explanations along the way to ensure that you are fully equipped to utilize the H4N as an audio interface for Cubase.
Requirements
Before getting started, it’s essential to ensure you have the necessary equipment and software to use the H4N as an audio interface for Cubase. Here are the requirements:
- H4N Audio Interface: Of course, you’ll need the H4N audio interface itself. Make sure it is in good working condition and has the latest firmware installed. If you don’t have one yet, you can easily find it online or at your local music equipment store.
- Computer: You’ll need a computer with sufficient processing power and memory to run Cubase. Check the system requirements for your specific version of Cubase to ensure compatibility with your computer.
- Cubase Software: You’ll need a licensed copy of Cubase installed on your computer. Make sure it is updated to the latest version to ensure compatibility with the H4N.
- USB Cable: You’ll need a USB cable to connect the H4N to your computer. Ensure that the cable is in good condition and capable of data transfer.
- Microphone and Cables (Optional): While the H4N has built-in microphones, you can also connect external microphones to improve sound quality. If you plan to use external microphones, make sure you have the necessary cables and accessories.
- Headphones or Studio Monitors: To monitor your audio, you’ll need a pair of headphones or studio monitors. Ensure that they are properly connected and functioning.
Once you have these requirements in place, you’ll be ready to set up the H4N as an audio interface and start recording in Cubase. It’s also a good idea to familiarize yourself with the user manuals for both the H4N and Cubase so you can make the most of their features.
Setting up H4N as Audio Interface
Now that you have all the necessary equipment and software, let’s move on to setting up the H4N as an audio interface. Follow these steps:
- Connect the H4N to your computer using a USB cable. The USB port is located on the bottom of the H4N. Ensure that it is securely connected on both ends.
- Power on the H4N by pressing and holding the power button until the display lights up.
- On your computer, open the audio settings or sound preferences. This can typically be found in the control panel or system settings.
- Select the H4N as the default audio input and output device. This will route the audio signals through the H4N for recording and playback.
- Adjust the input and output levels on the H4N. Use the physical knobs or buttons on the device to adjust the input gain and headphone volume to your desired levels. It’s important to find the right balance to avoid distortion or clipping.
Once you have completed these steps, the H4N should be recognized as the audio interface by your computer. You can now move on to configuring the H4N in Cubase.
Note: If you encounter any issues during the setup process, refer to the user manual of the H4N or visit the manufacturer’s website for troubleshooting tips. It’s also a good idea to ensure that you have the latest drivers and firmware installed for the H4N, as this can resolve any compatibility issues.
Configuring H4N in Cubase
Now that you have successfully set up the H4N as an audio interface, it’s time to configure it in Cubase. Follow these steps to ensure that Cubase recognizes and utilizes the H4N:
- Launch Cubase on your computer.
- Go to the “Devices” menu and select “Device Setup” or press “F4” on your keyboard. This will open the Device Setup window.
- In the Device Setup window, click on the “VST Audio System” tab.
- In the ASIO Driver drop-down menu, select the H4N audio interface. This will configure Cubase to use the H4N as the audio input and output device.
- Click on the “Inputs” tab to configure your inputs.
- In the Audio Inputs section, you’ll see a list of available inputs on the H4N. Check the boxes next to the inputs that you want to use in Cubase. You can select the built-in microphones, external microphones, or other audio sources connected to the H4N.
- Click on the “Outputs” tab to configure your outputs.
- In the Audio Outputs section, you’ll see a list of available outputs on the H4N. Check the boxes next to the outputs that you want to use in Cubase. This can be your headphones or studio monitors connected to the H4N.
- Click “OK” to save the changes and close the Device Setup window.
Once you have completed these steps, Cubase should now be configured to use the H4N as the audio interface. You can now proceed to record your audio using the H4N in Cubase.
Remember to consult the Cubase user manual or visit the Steinberg website for more detailed instructions on configuring audio devices in Cubase. Additionally, keep in mind that the specific steps may vary slightly depending on the version of Cubase you are using.
Recording with H4N in Cubase
Now that you have set up the H4N as an audio interface and configured it in Cubase, you are ready to start recording your audio. Follow these steps to begin recording with the H4N in Cubase:
- Create a new audio track in Cubase by going to the “Project” menu and selecting “Add Track” or by using the keyboard shortcut “Ctrl+T” (Windows) or “Cmd+T” (Mac).
- In the track settings, select the input source for the track. Choose the appropriate input channel that corresponds to the input on the H4N you want to use for recording.
- Set the desired recording levels. You can do this by adjusting the input gain on the H4N or using the input level meters in Cubase. Aim to keep the levels in the green range to avoid distortion or clipping.
- Arm the audio track for recording by clicking on the record enable button (typically a red circle) on the track. This will enable you to start recording on that track.
- Press the record button in Cubase to start recording. You can also use the keyboard shortcut “R” to initiate the recording process.
- Play your instrument, speak into the microphone, or generate the audio you want to record. Cubase will capture and save the audio on the track.
- When you are finished recording, press the stop button in Cubase or use the keyboard shortcut “Spacebar” to stop the recording.
Once you have recorded your audio, you can edit, mix, and apply various effects to enhance the sound in Cubase. Explore the various features and tools available in Cubase to take your recordings to the next level.
Remember to save your project regularly and refer to the Cubase user manual or online resources for more detailed instructions on recording and editing audio in Cubase.
Troubleshooting
While setting up and using the H4N as an audio interface in Cubase is generally a seamless process, you may encounter some common issues. Here are a few troubleshooting steps that can help resolve potential problems:
- No audio signal: If you’re not getting any audio signal in Cubase, first ensure that the H4N is properly connected to your computer and powered on. Check that the input and output settings in Cubase are correctly configured to use the H4N. Also, verify that the input and output levels are adjusted appropriately on the H4N.
- Distorted or clipping sound: If your recordings have distorted or clipped sound, try reducing the input gain on the H4N or lowering the input levels in Cubase. This helps prevent the audio signal from exceeding its maximum capacity and ensures a clean and clear recording.
- Driver issues: If you experience driver-related issues, such as audio dropouts or latency, make sure that you have the latest drivers and firmware installed for the H4N. Visit the manufacturer’s website to download and install any available updates.
- Compatibility issues: Ensure that your version of Cubase is compatible with the H4N audio interface. Check the system requirements for both Cubase and the H4N to ensure they are compatible with your operating system and hardware.
- Check cables and connections: Sometimes, faulty cables or loose connections can cause audio issues. Double-check all your cables and connections to ensure they are secure and functioning properly.
- Restart your computer and H4N: If you encounter any unexpected behavior, it can often be resolved by simply restarting your computer and the H4N audio interface. This can help refresh the system and resolve temporary issues.
- Seek professional help: If you’ve exhausted all troubleshooting options and are still experiencing problems, consider reaching out to technical support or consulting with audio professionals who are familiar with the H4N and Cubase. They may be able to provide further assistance.
Remember, troubleshooting can be a process of trial and error. Be patient, and don’t hesitate to seek help when needed. With a little perseverance, you’ll be able to overcome any obstacles and continue creating incredible recordings with the H4N and Cubase.
Conclusion
Congratulations! You’ve learned how to set up and use the H4N as an audio interface for Cubase. By following the steps outlined in this article, you can now take advantage of the H4N’s powerful features and record high-quality audio directly into Cubase.
Remember, the H4N offers incredible versatility, allowing you to use its built-in microphones or connect external microphones for even more professional results. With Cubase as your digital audio workstation, you have a powerful tool to edit, mix, and refine your recordings to perfection.
As you continue your journey in audio recording and production, don’t hesitate to experiment with different techniques, tools, and effects to further enhance your sound. The H4N and Cubase provide a solid foundation for your creative pursuits.
Should you encounter any difficulties along the way, refer back to this article or consult the user manuals for the H4N and Cubase. Additionally, online communities and forums dedicated to audio recording and production can be an excellent source of support and guidance.
Now, armed with the knowledge gained here, it’s time to unlock your creativity and see where the combination of the H4N and Cubase can take you. Whether you’re a musician, podcaster, or content creator, these tools will enable you to capture and produce exceptional audio that will impress your audience.
So, plug in your H4N, fire up Cubase, and start creating sonic masterpieces. The possibilities are endless!