Home>Production & Technology>Audio Interface>How To Connect Helix To Audio Interface

Audio Interface
How To Connect Helix To Audio Interface
Modified: March 11, 2024
Learn how to connect your Helix to an audio interface for seamless recording and high-quality sound. Maximize your music production with this essential audio gear.
(Many of the links in this article redirect to a specific reviewed product. Your purchase of these products through affiliate links helps to generate commission for AudioLover.com, at no extra cost. Learn more)
Table of Contents
Introduction
Welcome to our comprehensive guide on how to connect your Helix to an audio interface. If you’re an audio enthusiast, musician, or content creator, you know how important it is to have a reliable and efficient setup for recording and producing high-quality audio. The Helix, a powerful multi-effects processor, and the audio interface are two essential components that can significantly enhance your audio production journey.
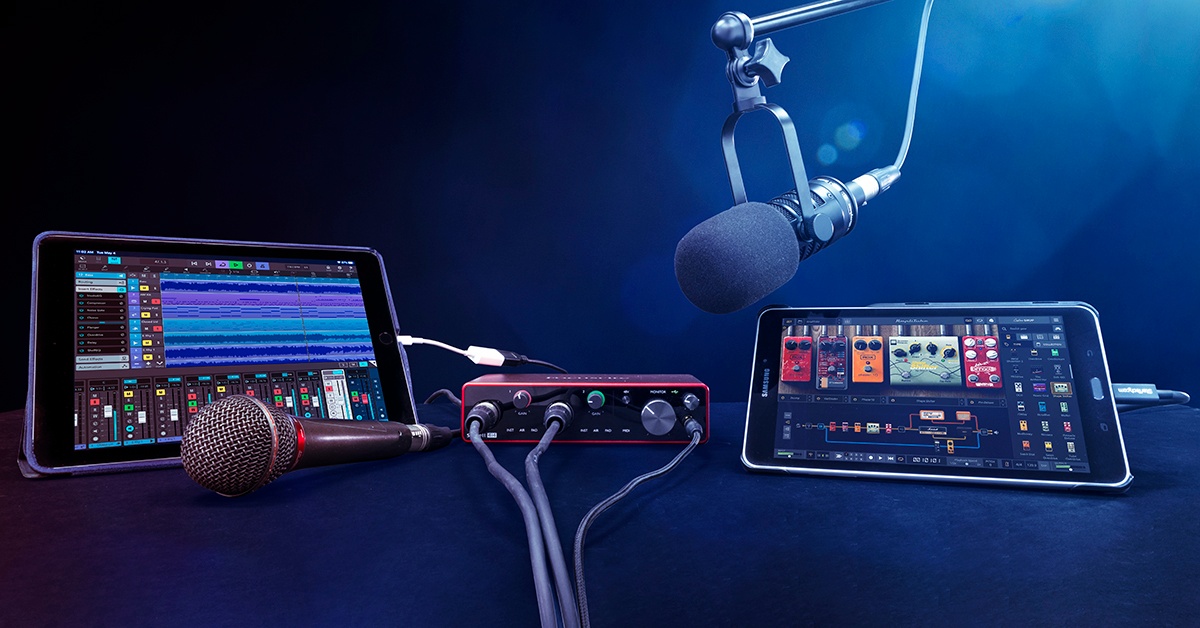
The Helix is a cutting-edge device that offers a wide range of amplifier models, virtual cabinets, effects, and routing options. It is a favorite among guitarists and bassists for its versatility and excellent sound quality. An audio interface, on the other hand, acts as the bridge between your musical instruments and your computer, allowing you to capture and process audio signals with precision and clarity.
By connecting your Helix to an audio interface, you can harness the processing power of the Helix while benefiting from the superior audio conversion and recording capabilities of the audio interface. Whether you’re playing live, recording in a studio, or creating content at home, this setup will ensure that you capture every nuance of your performance.
This guide will take you through the step-by-step process of connecting your Helix to an audio interface, ensuring that you have the knowledge and confidence to optimize your setup and produce professional-grade audio. So, let’s dive in!
Understanding Helix and Audio Interface
Before we jump into the process of connecting your Helix to an audio interface, let’s gain a deeper understanding of these two critical components.
The Helix is a powerful multi-effects processor designed for guitarists and bassists. It offers an extensive range of amplifier models, virtual cabinets, and a wide variety of effects, allowing you to craft your unique sound. With its intuitive interface and comprehensive control options, the Helix empowers musicians to explore endless creative possibilities and achieve professional-grade tones.
An audio interface, on the other hand, is a device that enables you to connect your musical instruments, microphones, and other audio sources to your computer. It acts as a digital bridge, converting the analog audio signals into a digital format that can be recorded, mixed, and processed using recording software. Audio interfaces typically offer high-quality preamps, multiple input and output options, and low-latency performance, ensuring pristine audio capture and playback.
When you connect your Helix to an audio interface, you are combining the best of both worlds. You can take advantage of the Helix’s extensive sonic capabilities while benefiting from the superior audio conversion and recording features of the audio interface. This combination allows for a seamless and professional recording and production workflow.
Understanding how the Helix and audio interface work together is crucial in achieving optimal audio quality and performance. With this knowledge, you can fully harness the capabilities of both devices and take your music production, recording, and live performances to the next level.
Step 1: Gathering your Equipment
Before you can connect your Helix to an audio interface, it’s essential to gather all the necessary equipment. Here’s a checklist of what you’ll need:
- Helix: Make sure you have your Helix multi-effects processor handy. Ensure that it is in good working condition and has the latest firmware updates.
- Audio Interface: You’ll need an audio interface that suits your needs. Consider factors like the number of inputs and outputs, preamp quality, and connectivity options. Research and choose a reliable audio interface that matches your requirements and budget.
- Instrument and Cables: Have your guitar or bass guitar, along with the appropriate instrument cable, ready for connection. Ensure that the cables are in good condition and free from any damage or loose connections.
- Computer: You’ll need a computer with the necessary software for recording and processing audio. Ensure that your computer meets the minimum system requirements and has the appropriate ports for connecting the audio interface.
- USB or Thunderbolt Cable: Check if your audio interface requires a USB or Thunderbolt cable for connection. Make sure you have the correct cable and ensure it is in good working condition.
- Monitor Speakers or Headphones: To monitor your audio output, you’ll need a pair of quality monitor speakers or headphones. Choose a pair that provides accurate and transparent sound reproduction.
- Microphone (optional): If you plan to record vocals or acoustic instruments, make sure you have a suitable microphone and cable available.
Once you have gathered all the necessary equipment, you’re ready to proceed with the connection process. Having everything prepared beforehand ensures a smooth and efficient setup, allowing you to focus on creating music or producing audio with ease.
Step 2: Connecting Helix to the Audio Interface
Now that you have all the required equipment, let’s move on to connecting your Helix to the audio interface. Follow these steps:
- First, locate the audio interface’s input and output ports. Commonly, audio interfaces have multiple inputs labeled as “Mic/Instrument” or “Line” inputs, and multiple outputs labeled as “Main Out” or “Line Out.”
- Connect one end of your instrument cable to the OUTPUT jack on your Helix. The OUTPUT jack is usually located on the rear panel of the unit.
- Take the other end of the instrument cable and connect it to one of the audio interface’s INPUT jacks. If you are using a guitar, connect it to a Hi-Z (high impedance) input. If you are using a bass or any other instrument with low frequencies, connect it to a regular line-level input.
- If you’re using a microphone, connect it to one of the audio interface’s microphone inputs using an XLR cable. Ensure that the microphone is compatible with the interface’s preamps, and Phantom Power (if required) is enabled on the interface.
- If your audio interface requires external power, make sure it is properly connected to a power source and turned on.
- Now, using a USB or Thunderbolt cable (depending on your interface’s connectivity options), connect the audio interface to your computer. Plug one end of the cable into the audio interface’s appropriate port and the other end into an available USB or Thunderbolt port on your computer.
- Power on your Helix by connecting it to a power source, or if it is bus-powered, ensure it is connected properly to your computer.
Once the connections are made, you have successfully connected your Helix to the audio interface. It’s important to ensure that all the cables are securely connected and that there are no loose connections. Taking care of these details will help eliminate any potential audio issues and ensure a stable and reliable connection between your Helix and the audio interface.
Step 3: Configuring the Audio Settings
After successfully connecting your Helix to the audio interface, the next step is to configure the audio settings on your computer. Follow these guidelines to ensure optimal audio performance:
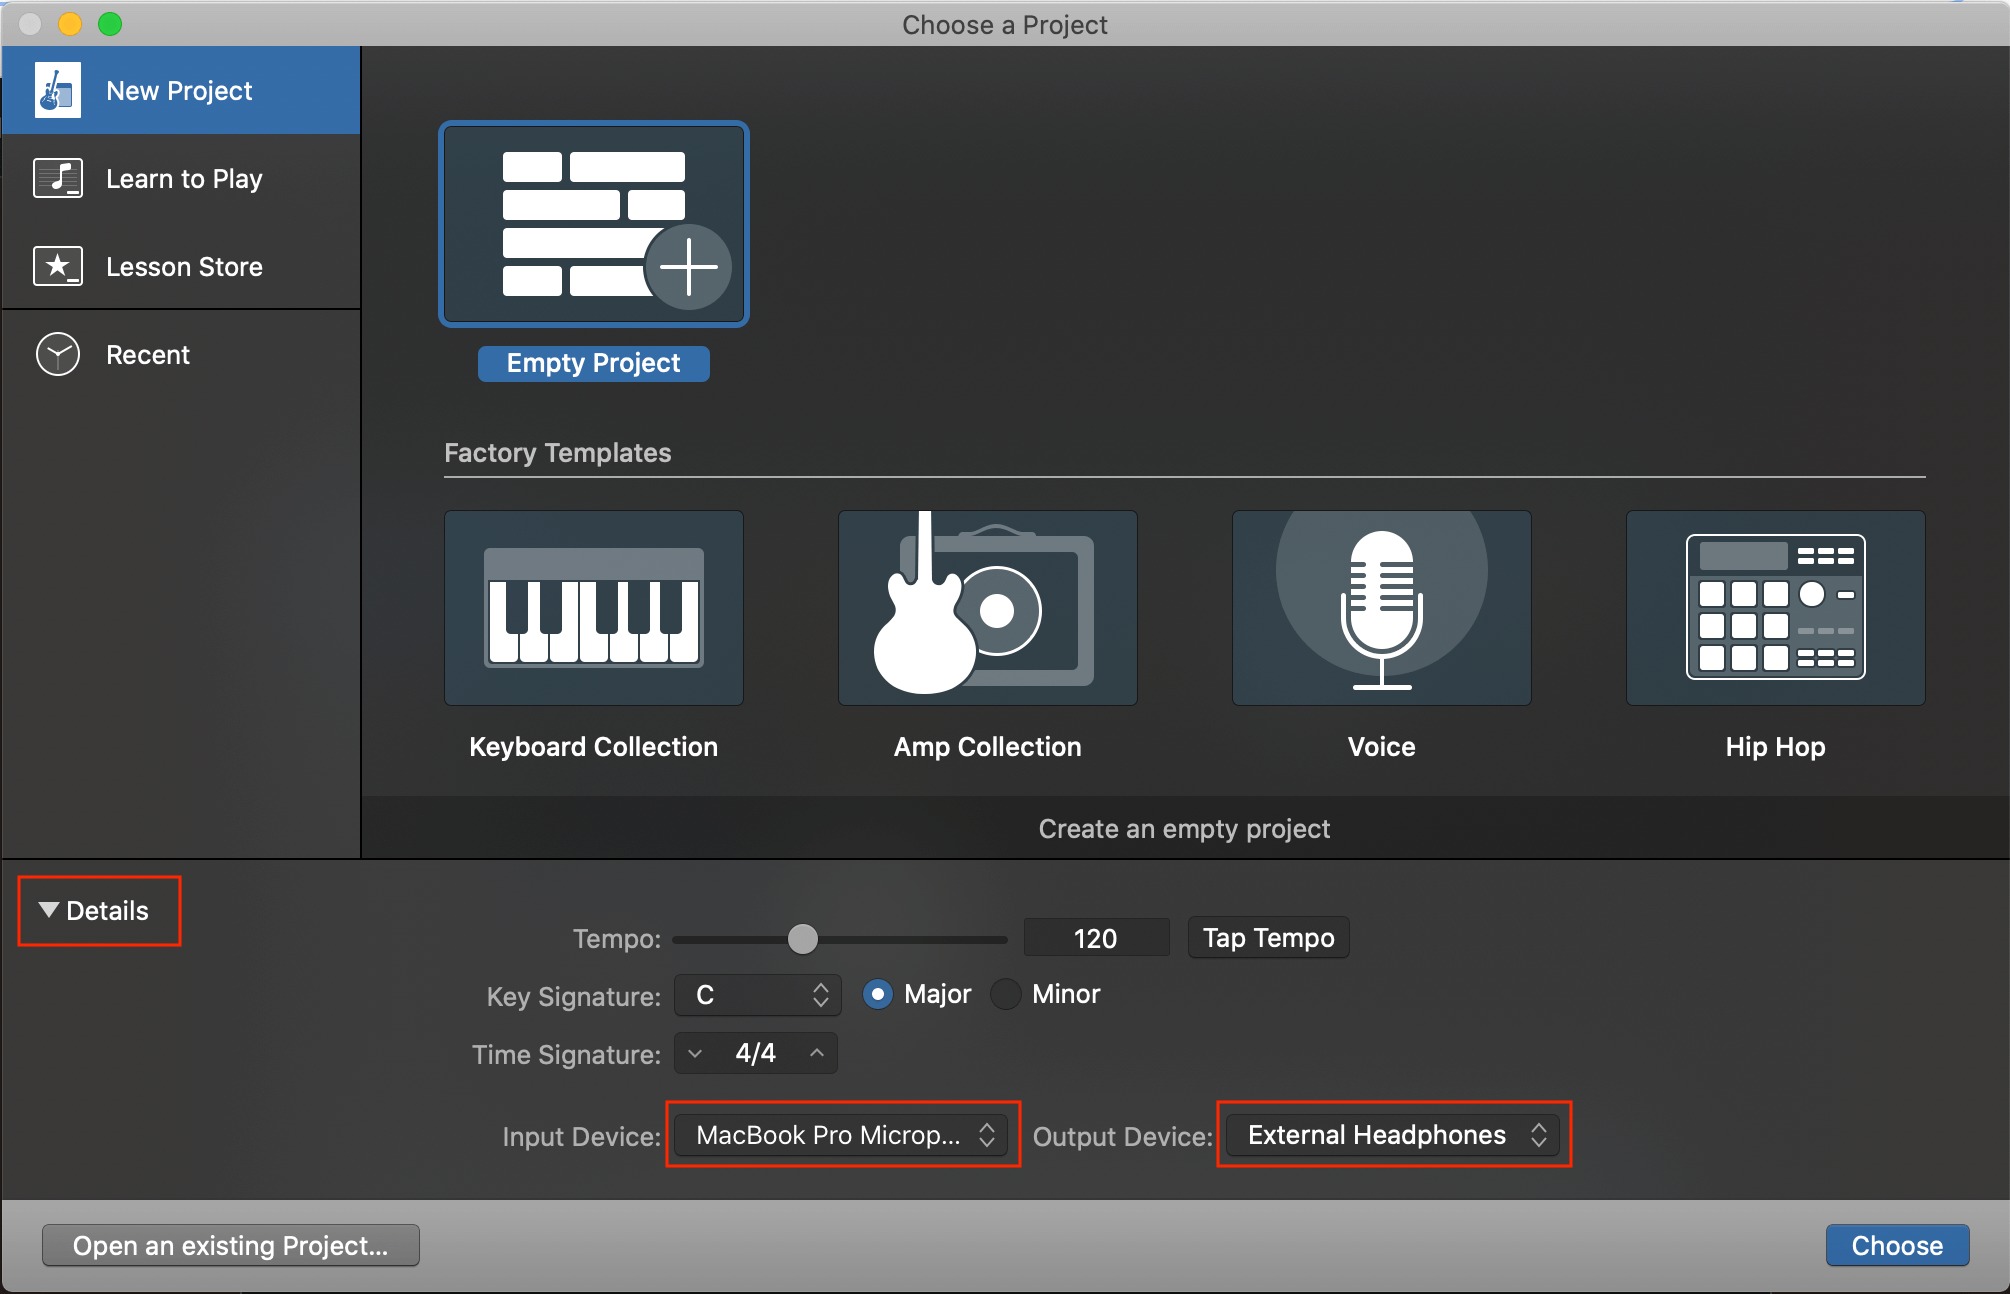
- Open your computer’s audio settings. On Windows, you can access these settings through the Control Panel or the sound icon in the taskbar. On a Mac, go to System Preferences and click on Sound.
- Under the playback tab, select the audio interface as the default playback device. This will ensure that the audio output from your computer is routed through the audio interface.
- Under the recording tab, select the audio interface as the default recording device. This will ensure that the audio input from your Helix or any connected microphone is properly recognized by your recording software.
- Adjust the input and output levels on your audio interface to achieve an optimal signal-to-noise ratio. Avoid setting the levels too low, as it may result in a weak signal, or too high, as it may introduce distortion or clipping.
- Configure the sample rate and buffer size in your recording software. A higher sample rate, such as 44.1kHz or 48kHz, is generally recommended for recording and producing high-quality audio. The buffer size determines the latency of your audio, so adjust it according to your preference and system capability.
- If you’re using an external microphone, make sure to enable Phantom Power on the audio interface only if your microphone requires it. Phantom Power is typically used for condenser microphones.
- Test the audio playback and recording by playing a sound or strumming your instrument through the Helix. Check if the audio is coming through the connected monitors or headphones and if the input signal from your Helix or microphone is registering on the recording software.
It’s crucial to familiarize yourself with the audio settings on your computer and recording software to optimize your audio workflow. Take some time to navigate through the settings and ensure everything is configured correctly for seamless recording and playback.
Step 4: Testing the Connection
Once you have connected your Helix to the audio interface and configured the audio settings, it’s important to test the connection to ensure everything is functioning properly. Follow these steps to test your setup:
- Launch your preferred recording software or Digital Audio Workstation (DAW) on your computer.
- Create a new audio track in your recording software and set the input source to the corresponding input where you have connected your Helix or microphone on the audio interface.
- Arm the audio track for recording and press the record button.
- Play your instrument through the Helix or speak into the microphone. Monitor the input levels on the recording software to ensure that it is receiving a strong and clear signal.
- Play back the recorded audio and listen for any distortions, clipping, or latency issues. Adjust the input and output levels and buffer size if necessary.
- Experiment with different Helix presets, amp models, and effects to ensure that the audio is processed correctly and is sounding the way you desire.
- Test the audio output by playing audio files or tracks from your recording software. Ensure that the audio is routed through the audio interface and is coming out of your connected monitors or headphones.
By thoroughly testing the connection, you can identify and address any potential issues early on. This will help you produce high-quality audio recordings and ensure a smooth and glitch-free performance experience.
Conclusion
Congratulations! You have successfully connected your Helix to an audio interface and configured the necessary audio settings. By following the steps outlined in this guide, you now have a powerful setup that combines the sonic capabilities of the Helix with the recording and processing capabilities of the audio interface.
With this setup, you can now take full advantage of the Helix’s expansive range of amplifier models, virtual cabinets, and effects, while achieving professional-grade audio quality for your recordings, live performances, or content creation endeavors.
Remember to regularly update your Helix’s firmware to access the latest features and optimizations, and stay informed about any specific software or driver updates for your audio interface. Keeping your equipment up to date will ensure optimal performance and compatibility with your recording software.
Explore the vast possibilities that this setup offers. Experiment with different amp models, effects, and microphone placements to craft your signature sound. Take advantage of the recording software’s features to fine-tune your recordings, apply audio effects, and create polished mixes.
As you familiarize yourself with your Helix and audio interface setup, continue to learn, practice, and experiment with different settings and techniques. Whether you’re a guitarist, bassist, or audio enthusiast, this setup opens doors to endless creativity and sonic exploration.
Now that you have a solid understanding of how to connect your Helix to an audio interface, you can confidently embark on your musical journey, capturing and producing professional-grade audio in the comfort of your home or studio.
So, plug in your instrument, fire up your recording software, and let the magic happen!