Home>Production & Technology>Sound Bar>How To Connect Sound Bar With USB Cable
Sound Bar
How To Connect Sound Bar With USB Cable
Published: December 26, 2023
Learn how to easily connect your sound bar to your device using a USB cable for enhanced audio experience. Discover step-by-step instructions for a seamless setup.
(Many of the links in this article redirect to a specific reviewed product. Your purchase of these products through affiliate links helps to generate commission for AudioLover.com, at no extra cost. Learn more)
Table of Contents
- Introduction
- Step 1: Check the compatibility of your sound bar and USB cable
- Step 2: Locate the USB input on your sound bar
- Step 3: Connect one end of the USB cable to your sound bar
- Step 4: Connect the other end of the USB cable to your audio source
- Step 5: Adjust the sound settings on your audio source and sound bar
- Step 6: Test the connection and enjoy your sound bar’s audio through USB
Introduction
Sound bars have become increasingly popular in recent years, thanks to their ability to enhance the audio experience of our favorite movies, music, and TV shows. These sleek and compact devices are a great addition to any home entertainment setup, providing powerful sound that brings your audio to life.
One of the key features of a sound bar is its connectivity options. While most people are familiar with connecting their sound bars to their TVs or other audio sources using HDMI or optical cables, another convenient option is to connect the sound bar using a USB cable.
USB (Universal Serial Bus) cables are not only used for charging and data transfer, but they can also transmit audio signals. This means that you can connect your sound bar directly to your audio source, such as a computer, smartphone, or tablet, using a USB cable.
In this article, we will guide you through the process of connecting your sound bar with a USB cable. We will provide step-by-step instructions to ensure a seamless and hassle-free setup. Whether you’re a tech-savvy individual or a beginner, you’ll find this guide helpful in getting your sound bar up and running in no time.
Step 1: Check the compatibility of your sound bar and USB cable
Before you begin connecting your sound bar with a USB cable, it’s essential to ensure that both your sound bar and USB cable are compatible with each other. Compatibility is crucial to establish a successful and stable connection.
Firstly, check the specifications of your sound bar to see if it supports USB connectivity. Consult the user manual or visit the manufacturer’s website for more information. Look for any specific USB requirements, such as USB 2.0 or USB 3.0 compatibility.
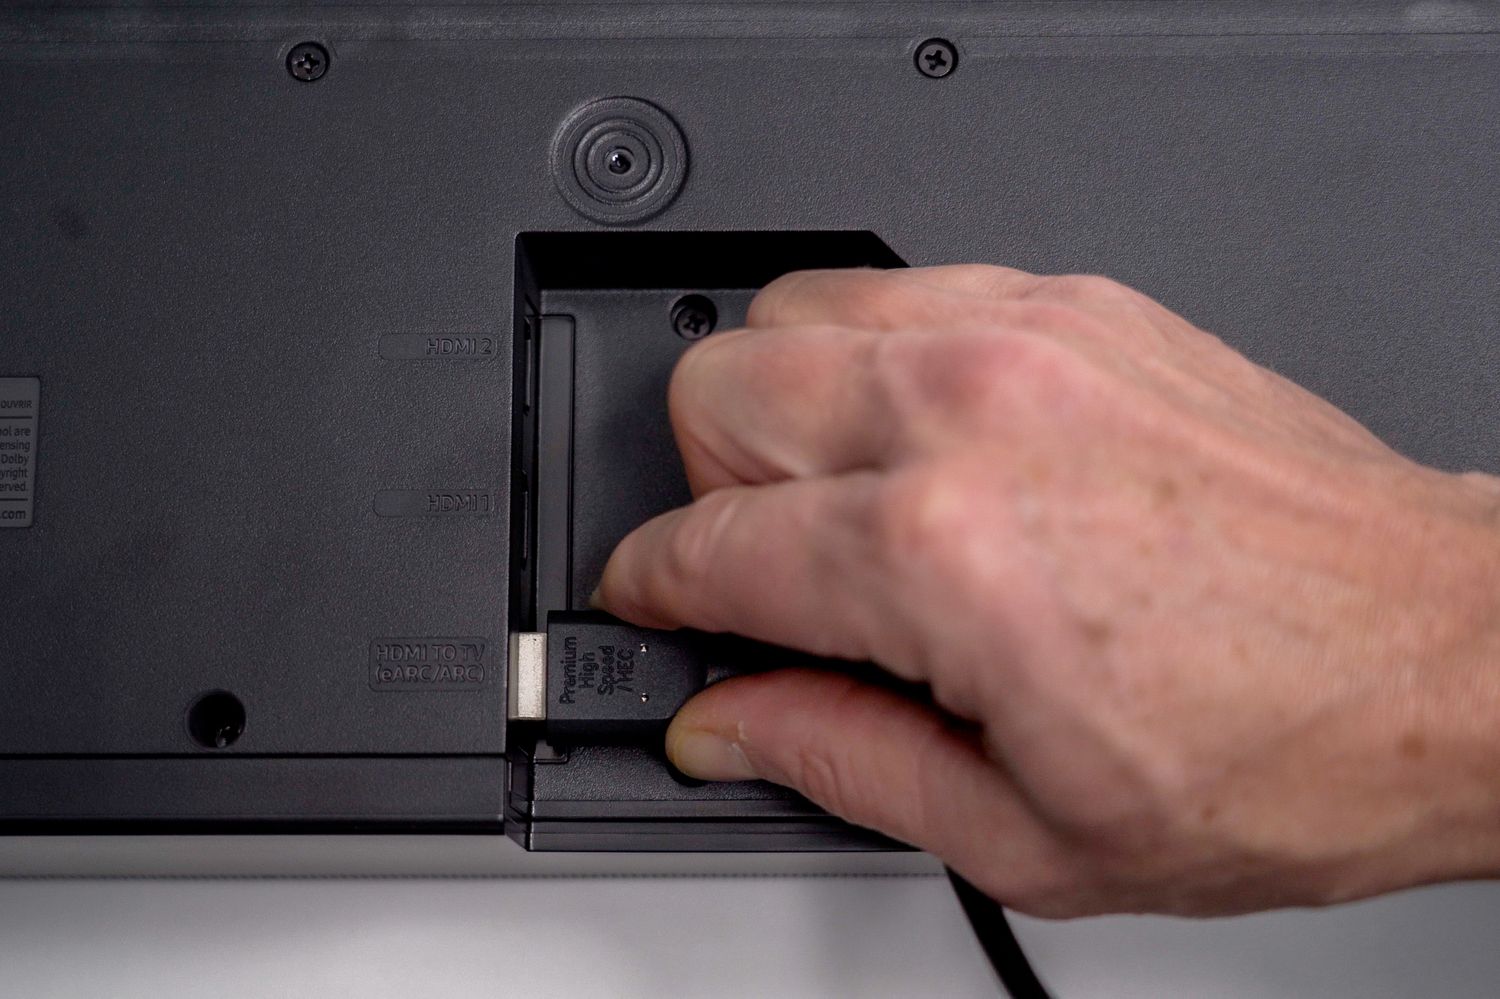
Additionally, check if your sound bar has a USB input. This is usually located at the back of the sound bar. Look for a USB symbol or a labeled USB port. If your sound bar doesn’t have a USB input, you may not be able to connect it using a USB cable.
Next, ensure that you have a USB cable that is compatible with your sound bar and audio source. USB cables come in different types, including USB-A, USB-B, and USB-C. Make sure you have the correct type of USB cable that matches the USB input of your sound bar.
If you’re unsure about the type of USB cable you need, consult the user manual of your sound bar or audio source. You can also refer to the manufacturer’s website or contact their customer support for clarification.
In addition to the compatibility of the USB cable, it’s essential to ensure that your audio source supports audio output through USB. Most modern devices, such as computers, smartphones, and tablets, are capable of transmitting audio through USB. However, it’s still worth checking the specifications of your audio source to be certain.
By verifying the compatibility of your sound bar and USB cable, you can proceed with confidence to the next step of the setup process. This ensures that you have the correct equipment and avoids any potential issues or limitations during the connection process.
Step 2: Locate the USB input on your sound bar
Once you have confirmed the compatibility of your sound bar and USB cable, the next step is to locate the USB input on your sound bar. This is where you will connect the USB cable to establish the audio connection.
The USB input on a sound bar can typically be found on the back panel or on the side panel, depending on the design of the sound bar. Take a close look at the exterior of your sound bar and look for a USB symbol or a labeled USB port.
If you’re having trouble finding the USB input, refer to the user manual of your sound bar. The manual usually includes a diagram or illustration that highlights the different ports and inputs available on the sound bar.
Once you have located the USB input, clear any obstructions around it to ensure easy access for connecting the USB cable. Remove any protective covers or caps from the USB input, if applicable.
It’s worth noting that some sound bars may have multiple USB inputs, especially if they offer advanced connectivity options. In such cases, refer to the user manual to identify the specific USB input dedicated for audio connections. Using the wrong USB input may result in the sound bar not recognizing the audio source.
By locating the USB input on your sound bar, you are now ready to proceed with the physical connection of the USB cable. Remember, proper placement and connection of the USB cable ensures a stable and uninterrupted audio signal between your audio source and sound bar.
Step 3: Connect one end of the USB cable to your sound bar
Now that you have identified the USB input on your sound bar, it’s time to make the physical connection. Connect one end of the USB cable to the USB input on your sound bar.
Take the USB cable and align the connector with the USB input on the sound bar. Ensure that both are oriented correctly to avoid forcing the cable into the port.
Gently insert the USB cable into the USB input until it fits securely. You may hear a clicking sound or feel a slight resistance when the cable is properly inserted. Avoid applying excessive force or wiggling the cable to prevent any damage to the port or cable.
If you’re using a USB cable with a reversible connector, such as USB-C, you can plug it in either way without worrying about the orientation. This makes the connection process even simpler and more convenient.
Once the USB cable is securely connected to the sound bar, take a moment to ensure that it is seated properly and there is no visible gap between the connector and the USB input. A snug and secure connection is crucial for a stable audio signal transmission.
It’s important to note that the USB cable should fit snugly into the USB input, but it should not require excessive force to be inserted. If you’re encountering significant resistance or the cable does not fit properly into the port, double-check that you have the correct USB cable type and orientation.
Now that you have successfully connected one end of the USB cable to your sound bar, you are ready to proceed to the next step of the setup process. The connection between your sound bar and audio source is gradually taking shape, making the audio experience just a step away.
Step 4: Connect the other end of the USB cable to your audio source
With one end of the USB cable securely connected to your sound bar, it’s time to connect the other end to your audio source. This could be a computer, smartphone, tablet, or any other device that supports audio output via USB.
Locate the USB port on your audio source where you’ll be connecting the USB cable. Depending on the device, this can be found on the side, back, or bottom panel. Look for a USB symbol or a labeled USB port.
Before making the connection, ensure that your audio source is powered on. This is necessary to establish the proper communication between the audio source and the sound bar.
Take the other end of the USB cable, align the connector with the USB port on your audio source, and gently insert it. Make sure the cable is inserted fully, and you may hear a click or feel a slight resistance when it is properly connected.
It’s important to note that some devices may require you to enable USB audio output in their settings menu. If you’re not hearing any sound from the sound bar after the connection, check the audio settings on your device and make sure the USB audio output is selected as the default option.
Once the USB cable is successfully connected to your audio source, take a moment to ensure that there is a secure connection and that the cable is not loosely inserted. A firm connection is essential for uninterrupted audio transmission.
If your audio source has multiple USB ports, ensure that you have connected the USB cable to the appropriate port designated for audio output. Connecting to a different port may result in the device not recognizing the sound bar as the audio output device.
By connecting the other end of the USB cable to your audio source, you have completed the physical connection process. The sound bar and audio source are now connected, and you’re one step closer to enjoying high-quality audio through your sound bar.
Step 5: Adjust the sound settings on your audio source and sound bar
After connecting the USB cable between your sound bar and audio source, it’s important to ensure that the sound settings are properly adjusted to optimize your audio experience. Fine-tuning the sound settings will help you achieve the desired sound quality and make the most out of your sound bar.
Start by adjusting the sound settings on your audio source. This can vary depending on the device you’re using. For example, if you’re connecting to a computer, you can access the sound settings by clicking on the volume icon in the taskbar or through the control panel. On a smartphone or tablet, you can usually find the sound settings in the settings menu.
In the sound settings, look for options related to audio output or sound devices. Select the sound bar as the default audio output device to ensure that the audio signal is directed to your sound bar through the USB connection.
Within the sound settings of your audio source, you may also have the ability to adjust specific audio attributes, such as equalizer settings or sound modes. Experiment with these settings to customize the sound according to your preferences. You can enhance the bass, adjust the treble, or choose from preset sound profiles for different types of content.
Next, access the sound settings on your sound bar itself. Most sound bars have built-in controls or a remote control that allows you to adjust various sound parameters.
Explore the sound bar’s settings menu to find options for adjusting the volume, bass, treble, and other sound-related settings. Some sound bars may offer additional features like surround sound emulation or virtual sound enhancement modes. Take the time to familiarize yourself with these settings and experiment to find the optimal sound balance.
It’s worth noting that the specific sound settings and adjustment options can vary between different sound bar models. Refer to the user manual of your sound bar for detailed instructions on accessing and adjusting the sound settings.
By adjusting the sound settings on both your audio source and sound bar, you can fine-tune the audio output to suit your preferences and create an immersive listening experience. Take the time to experiment with different settings and find the perfect combination that enhances your audio enjoyment.
Step 6: Test the connection and enjoy your sound bar’s audio through USB
Now that you have completed all the necessary steps to connect your sound bar with a USB cable, it’s time to test the connection and enjoy the enhanced audio experience.
Start by playing audio on your audio source, such as a song, movie, or YouTube video. Ensure that the volume is set at an audible level. As the audio plays, the sound should be transmitted through the connected USB cable to your sound bar.
Pay close attention to the sound output from your sound bar. The audio should be clear, balanced, and immersive, enhancing the overall audio quality compared to the built-in speakers of your audio source.
If you’re not hearing any sound or experiencing issues, double-check the connections between the sound bar, USB cable, and audio source. Ensure that the USB cable is firmly connected at both ends and that the sound settings on both the audio source and sound bar are correctly configured.
If you’re still experiencing difficulties, refer to the user manuals of both your sound bar and audio source for troubleshooting tips. You can also reach out to the manufacturer’s customer support for assistance.
Once the audio is playing through your sound bar, take a moment to immerse yourself in the enhanced sound quality. Notice the clarity of vocals, the depth of the bass, and the overall richness of the audio experience. Whether you’re watching a movie, listening to music, or playing games, your sound bar will elevate your audio enjoyment to a whole new level.
Remember, you can always fine-tune the sound settings on your sound bar to further enhance the audio output. Adjust the volume, bass, treble, and other settings to match your preferences and the specific content you’re enjoying.
With your sound bar successfully connected through the USB cable and the audio quality optimized, you’re now ready to sit back, relax, and enjoy the immersive sound experience delivered by your sound bar. So grab your popcorn, turn up the volume, and immerse yourself in the world of audio excellence!